14 Unique Minecraft Art Pixel Ideas
Minecraft has evolved far beyond its roots as a block-based survival game into a limitless digital canvas for visual design, complex iconography, and pixelated fine art. Within the constraints of a grid-based universe, players can transform flat voxel coordinates into stunning, complex portraits, sprawling landscapes, and retro-inspired gaming emblems. Creating high-impact Minecraft pixel art requires a deep understanding of block color palettes, subtle texture gradients, lighting dynamics, and scale rendering. When a player steps back to view a completed build, the individual voxels should merge seamlessly, reading as a clean, cohesive, and deeply impressive piece of digital artwork.

To convert a standard collection of blocks into a high-engagement, save-worthy masterpiece on Pinterest, you must design with a deep understanding of block physics and shading. Many beginner pixel artists make the mistake of using purely solid colored wool or concrete blocks, which results in a flat, synthetic look that fails to capture shadows or natural texture depth under the game’s engine. A truly viral pixel art layout balances clean geometric scaling with complex block blends, translucent glass overlays, and embedded glowing elements. By prioritizing clear structural contours and smart material choices, you create a timeless pixel showcase that stands out beautifully on visual discovery boards.
The Anatomy of High-Contrast Grid Blueprints
To elevate a basic flat grid layout into an incredible, three-dimensional pixel art showpiece, your foundational structural drafting must be completely flawless from the start. Visual appeal on visual discovery platforms is driven by intense contrast, accurate proportions, and distinct color transitions that make the image pop from a distance. This means utilizing explicit contrast outlining methods—such as framing your artwork with a sharp contour of dark obsidian, black concrete, or netherite blocks—to isolate the piece cleanly from the background sky or ground terrain. Incorporating a gradual block gradient across your main color fills ensures that your artwork possesses smooth shadows and an expensive, hand-drawn look.
The ideal premium pixel art layout balances aesthetic perfection with efficient survival-mode accessibility, ensuring the design can be realistically built across multiple worlds. Viewers want to know how to map out pixel coordinates, blend different block variants together to create custom skin or metal tones, and hide necessary lighting blocks to prevent mob spawning without ruining the artwork. By utilizing decorative blocks like colored glass panes for atmospheric translucent highlights, stairs for subtle anti-aliasing slopes, and sea lanterns hidden under carpets for uniform internal lighting, you can add immense depth without breaking the grid template. This perfect balance of extreme geometric alignment and creative material blending is the secret behind designs that get pinned thousands of times.
Optimizing Palettes for Depth and Color Gradients
Material selection and color gradient layering are the single most critical elements when it comes to capturing a smooth, high-fidelity look in voxel art. Standard concrete blocks are excellent for flat cartoon designs, but they can look cold and plain when trying to recreate detailed portraits or organic scenery. Replacing or supplementing solid concrete with textured variants like terracotta, wool, concrete powder, and colored glass completely transforms the richness and depth of your artwork. This strategic texture mixing catches the game’s directional lighting engines beautifully, adding realistic noise and painted qualities that make the build feel truly professional.
Furthermore, choosing the correct highlight and shadow blocks—such as pairing dark nether brick with bright red concrete powder, or soft calcite with flat white concrete—is a non-negotiable step toward achieving realistic light physics. Solid, single-color shapes look incredibly basic, which breaks the illusion of fine art and limits the build’s overall scale impact. Implementing a multi-block color palette allows you to simulate shadows, metallic glints, and translucent atmospheres smoothly across your flat grid. This advanced block integration not only enhances the detail of the artwork but also provides a premium baseline that elevates your entire creative portfolio.
Crafting Stunning and Beginner-Friendly Pixel Systems
One of the biggest misconceptions in the Minecraft creative building community is that creating a premium, museum-grade piece of pixel art requires elite mathematical scripts or advanced modding tools. The most successful aesthetic pixel art transformations are built on simple, highly practical design principles that any beginner can master with planning and patience. Whether you are mapping out a small retro gaming character, building a massive landscape portrait on a custom map canvas, or adding simple glowing outlines, focus on neat block placement.
By understanding the purpose behind every material choice, mapping out your x and y axis grid coordinates carefully, and prioritizing clean outlines, you can transform your builds safely. Taking the time to coordinate your color values, hide unsightly lighting blocks, and introduce subtle texture variables elevates the concept entirely. In the following sections, we will explore fourteen comprehensive, incredibly detailed Minecraft pixel art design concepts specifically tailored to maximize your digital building potential.
1. The Retro 8-Bit Arcade Heart with Glowstone Core
Embracing Classic Video Game Iconography with Radiant Internal Lighting
The Retro 8-Bit Arcade Heart concept delivers a classic, high-impact silhouette inspired by vintage arcade gaming user interfaces and pixelated life containers. This design pairs a sharp, black concrete contour outline with a vibrant red wool and red concrete powder gradient fill that creates instant warmth across the flat grid.

The centerpiece of the heart features a hidden, glowing core made of smooth glowstone blocks covered by translucent red stained glass panes. This layout acts as an incredible visual anchor that immediately delivers a high-energy, nostalgic retro-gaming feel to your world.
Understanding 8-Bit Voxel Geometry
Retro 8-bit game design relies heavily on absolute symmetry and strict staircase pixel scaling to ensure the icon looks immaculate from every viewing angle. Instead of using complex slopes, this look embraces simple, bold stepping blocks arranged in a perfect geometric pattern across the canvas.
The integration of glowing blocks within the core provides an exceptional glowing backlighting effect, ensuring that the artwork remains perfectly visible, bright, and structural during nighttime cycles without requiring messy external torch placements.
Step-by-Step Arcade Heart Styling Guide
- Trace the Black Concrete Perimeter Skeleton: Outline a fifteen-by-fifteen grid block heart silhouette using solid black concrete to establish sharp borders.
- Layer the Outer Crimson Shadow Gradients: Fill the lower edges of the heart with dark nether brick blocks to simulate realistic bottom shadows.
- Pack the Main Body with Red Concrete Powder: Fill the core areas with an alternating mix of red concrete, red wool, and red concrete powder for texture.
- Embed the Radiant Hidden Glowstone Core Light: Place a cross shape of glowstone in the direct center, overlaying it with red stained glass for a smooth glow.
Essential Material Kit for an Arcade Heart
To bring this retro look to life, you will want several stacks of solid black concrete to construct the clean, thick border outline. You will also need red concrete powder, red wool blocks, a handful of glowing glowstone blocks, and a stack of translucent red stained glass panes to create the radiant internal core.
2. The Luminous Steampunk Compass Grid
Infusing Metallic Copper Tones and Glowing Lines into Map Rooms
The Luminous Steampunk Compass Grid style focuses on creating intense geometric depth and industrial warmth using rich metallic pigments and luxurious glowing lines. This design showcases a stunning, large-scale compass rose layout positioned flat on the floor or mounted vertically on a massive gallery wall.

The industrial copper and bronze texture of the compass is broken up by sleek, inlaid paths of sea lanterns and orange concrete powder that catch ambient light beautifully. This setup looks incredibly high-end when paired with dark obsidian background panels.
Analyzing the Industrial Mechanical Aesthetic
This design layout thrives on the beautiful contrast between weathered, warm industrial metallic tones and clean, precise glowing energy lines. By choosing a mixed palette of cut copper, exposed copper, and packed mud bricks, you reference historic navigation gear and complex machinery in a modern way.
The styling features horizontal and vertical light axes embedded directly into the compass arrows, creating an architectural grid system that makes the artwork look functional and powered.
How to Build a Steampunk Compass Grid
- Lay a Solid Dark Obsidian Background Canvas: Build a large thirty-by-thirty block flat surface using solid obsidian to isolate your metallic compass.
- Carve the Primary North-South Arrow Outline: Draw long, tapering directional arrows using a combination of polished blackstone and cut copper blocks.
- Embed Sea Lanterns for Powered Energy Channels: Run a central line of sea lanterns down the core of each arrow, topping them with orange glass.
- Detail the Perimeter Ring with Packed Mud Bricks: Construct an outer geometric circle around the arrows using mud bricks and dark oak trapdoors.
Essential Material Kit for a Steampunk Compass
Achieving this industrial aesthetic requires a large quantity of solid obsidian blocks to construct your non-reflective background canvas. You will also want several stacks of cut copper blocks, a collection of sea lanterns, orange stained glass panes, and packed mud bricks to finish the outer mechanical details.
3. The Mythical Vaporwave Sunset Matrix
Adding Dreamy Neon Gradients and Retro Grid Lines to Creative Plots
The Mythical Vaporwave Sunset Matrix technique completely transforms a plain flat wall into a stunning, color-rich cultural masterpiece inspired by 1980s synthwave music and digital art. This style utilizes a massive, semi-circular sun emblem as its primary visual anchor, resting along a low geometric horizon line.

The canvas is brought to life by layering a beautiful, horizontal color gradient that transitions seamlessly from deep purple concrete at the top down to neon pink and bright orange blocks at the base.
The Mechanics of Vaporwave Color Blending
Modern synthwave voxel art focuses on creating smooth color transitions across long horizontal rows by pairing highly saturated concrete tones together. Because the individual rows blend into one another from a distance, the pixelated lines mimic the glowing horizon lines of vintage computer graphics.
The lower matrix is accented with a sharp, geometric grid path made of light blue concrete lines cutting through flat black wool panels, creating a stunning sense of retro digital depth.
Step-by-Step Vaporwave Sunset Blueprint
- Construct a Massive Black Wool Background Grid: Lay down a large vertical canvas using flat black wool blocks to absorb unwanted shadows.
- Map out the Giant Semi-Circular Sun Outline: Draw a wide dome shape across the center using a vibrant border of magenta concrete blocks.
- Layer the Horizontal Sunset Color Gradients Smoothly: Fill the sun from top to bottom using rows of purple, magenta, pink, orange, and yellow concrete.
- Etch the Neon Cyan Matrix Floor Grid Lines: Slice horizontal and perspective lines across the bottom using bright cyan concrete to finish the digital landscape.
Essential Material Kit for a Vaporwave Canvas
To capture this vibrant electronic aura, secure several stacks of flat black wool blocks to build your dark, non-reflective background canvas. You will also need purple concrete, magenta concrete, pink concrete, orange concrete, yellow concrete, and a stack of bright cyan concrete to draw the sharp matrix lines.
4. The Ethereal Stained Glass Ender Dragon Portrait
Creating a Translucent Medieval Mosaic Using Dimensional Light Shading
The Ethereal Stained Glass Ender Dragon Portrait transforms your gallery hall into a deeply atmospheric, serene sanctuary inspired by medieval cathedral windows. This aesthetic celebrates historic mosaic art by pairing a dark, powerful outline of the iconic ender dragon with vibrant, translucent background panels.

The color palette is beautifully balanced by placing sea lanterns directly behind rows of purple, magenta, and obsidian blocks, ensuring the portrait glows continuously from within.
Inside an Elegant Sub-Aquatic Mosaic Layout
This design concept balances dark boss-fight iconography with beautiful translucent light filtration, creating a soothing space that looks incredible when built inside a grand survival base hall. Instead of relying on flat solid walls, this style utilizes a double-layered layout where a glowing light wall sits behind an intricate stained glass matrix.
The look is framed with polished blackstone bricks and simple dark oak supports, keeping the overall environment feeling safe, historic, and premium.
How to Build a Stained Glass Dragon Portrait
- Erect a Solid Back Wall of Sea Lanterns: Build a large vertical rectangle using sea lanterns to serve as your master internal light engine.
- Map the Dragon Silhouette with Black Concrete: Place solid black concrete and obsidian blocks over the light wall to form the dragon’s body contour.
- Fill Background Panels with Translucent Stained Glass: Pack the open spaces around the dragon silhouette with purple, magenta, and violet stained glass blocks.
- Frame the Complete Mosaic with Blackstone Bricks: Enclose the glowing glass canvas inside a thick, three-dimensional border of polished blackstone bricks.
Essential Material Kit for a Glass Dragon Portrait
Transforming your wall into a cathedral-style showcase requires a massive quantity of sea lanterns to construct your internal light engine. You will also want solid black concrete blocks for the dragon silhouette, an assortment of purple and magenta stained glass blocks, and several stacks of polished blackstone bricks.
5. The Cybernetic Neon Glitch Wolf Profile
Slicing Futuristic High-Contrast Displacement Panels Across Animal Icons
The Cybernetic Neon Glitch Wolf Profile concept is built specifically for modern creative plots and tech-themed survival compounds where maximizing futuristic style is the goal. This design utilizes a fierce, side-profile portrait of a wolf head silhouette constructed from cold monochromatic tones.
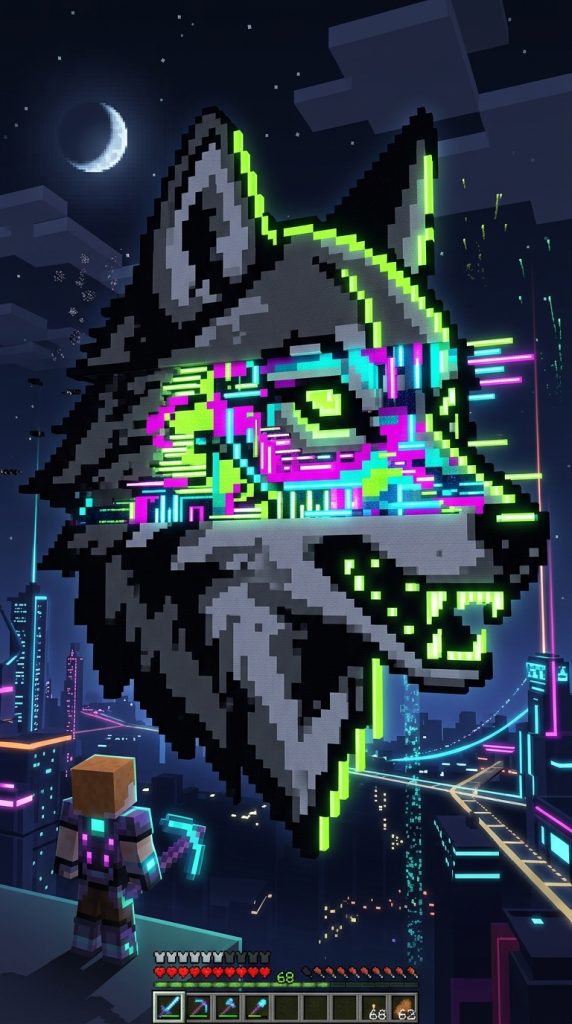
The organic lines of the animal profile are intentionally broken up and displaced by horizontal “glitch” bars finished in a vibrant mix of lime green, cyan, and magenta concrete.
The Architecture of Futuristic Digital Distortion
An elite glitch art design relies on architectural continuity, sharp geometric horizontal displacement, and intense color contrast to ensure the animal profile looks dynamically distorted. This style utilizes horizontal shifts where entire sections of the wolf’s face are stepped three blocks to the left or right along the grid.
The boundaries of these shifted panels are highlighted with glowing end rods and redstone torches, maintaining a powered, high-tech computer virus aesthetic across the artwork.
Step-by-Step Glitch Wolf Installation
- Draft the Baseline Wolf Profile in Grey Concrete: Outline a large wolf head silhouette using a mix of black, grey, and light grey concrete blocks.
- Mark the Horizontal Glitch Displacement Zones: Choose three horizontal rows across the face to cleanly slice and shift out past the natural border.
- Fill the Shifted Panels with Vibrant Neon Tones: Pack the displaced glitch channels with bright lime green, magenta, and cyan concrete blocks.
- Install End Rods Along the Kinetic Shift Edges: Place glowing end rods horizontally at the panel tips to simulate bright digital light leaks.
Essential Material Kit for a Glitch Wolf Profile
To create this clean computer-distorted environment, choose several stacks of black, grey, and light grey concrete blocks to form your base wolf portrait. You will also need bright lime green concrete, magenta concrete, cyan concrete blocks, and several glowing end rods to detail the displacement lines.
6. The Ancient Japanese Pixelated Bonsai Tree
Honoring Nature and Craftsmanship with Terracotta Bricks and Moss
The Ancient Japanese Pixelated Bonsai Tree is a beautiful, sophisticated tribute to traditional eastern gardens, completely redesigned for contemporary creative servers. This design replaces heavy chaotic leaf placement with an ultra-clean, pixelated geometric canopy frame made of rich green moss and lime terracotta blocks.
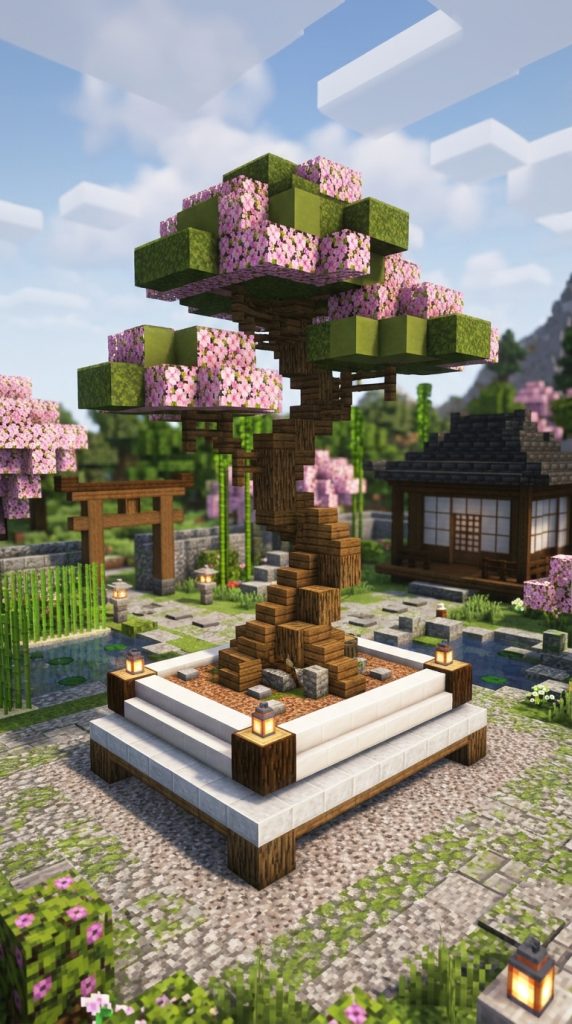
The tree trunk rises elegantly from a custom white quartz planter pot, creating a striking artistic statement piece that fits perfectly inside a zen garden.
The Structural Balance of Eastern Voxel Art
This design concept balances organic natural shapes with modern geometric simplicity, creating a peaceful artwork that feels balanced, clean, and deeply relaxing. The thin trunk lines are constructed from stripped dark oak logs and mud bricks, allowing the natural dark textures of the timber to stand out.
The canopy is styled with layers of pink cherry petals and moss blocks arranged in clean geometric steps, adding a soft, blooming element to the pixel canvas.
How to Style a Pixelated Bonsai Tree
- Construct a Large White Quartz Planter Box: Build a flat, symmetrical rectangular tray base using polished quartz slabs and quartz blocks.
- Weave the Curving Stripped Dark Oak Trunk Line: Draw a winding, elegant trunk line traveling upward and diagonally using stripped dark oak logs.
- Build Balanced Geometric Moss Canopy Clusters: Attach rectangular stepped clusters of moss blocks and green terracotta to the branches.
- Scatter Pink Cherry Petal Blocks Over the Canopy: Embed random cherry blossom leaf blocks along the tips to create a beautiful blooming highlight.
Essential Material Kit for a Pixelated Bonsai
To capture this peaceful eastern essence, secure several stacks of polished quartz blocks to construct your clean planter base. You will also want stripped dark oak logs to weave the elegant trunk line, moss blocks for the canopy structure, and cherry blossom leaf blocks for blooming accents.
7. The Retro 16-Bit Potion Brewing Stand Badge
Displaying Alchemical Emblems Inside Survival Potion Laboratory Hubs
The Retro 16-Bit Potion Brewing Stand Badge concept treats your survival potion laboratory room as an elite gallery curation space, utilizing an eye-catching retro gaming scale. This style features a massive, vertically oriented 16-bit replica icon depicting a traditional alchemical brewing stand holding three colorful glass vials.
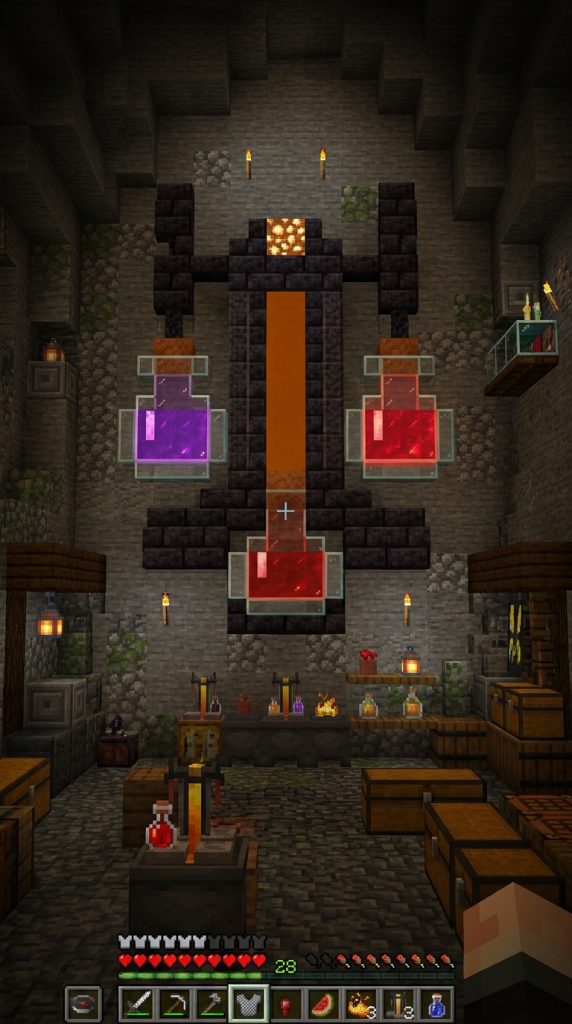
The artwork is constructed using a detailed combination of polished andesite, orange concrete, and glowing brewing fluid colors.
The Fine Detailing of Alchemical Item Recreation
Item icon recreation in a creative world focuses on scaling up tiny item textures accurately into large block matrices, creating an intense visual focal point that defines the purpose of a room. By using a large-scale 16-bit brewing badge on your laboratory wall, you instantly infuse your room with industrial magic and purpose.
The rich reds of the nether wart base, the glowing yellows of the blaze powder rod, and the translucent blues of the glass bottles are balanced with clean stone borders.
Step-by-Step Potion Badge Styling Blueprint
- Map out the Blackstone Base Support Pillar Grid: Outline the thick stone legs of the brewing stand icon using polished blackstone and andesite blocks.
- Construct the Central Blaze Rod Core Columns: Build the vertical golden heating element up the center using orange concrete and raw gold blocks.
- Detail the Three Hanging Glass Bottle Profiles: Draw three symmetrical bottle shapes at the base using light blue concrete and cyan stained glass.
- Fill the Bottles with Glowing Potion Fluid Blocks: Pack the inside of the bottle outlines with red, purple, or green concrete powder to represent liquid.
Essential Material Kit for an Alchemical Badge
Creating this functional laboratory room requires several stacks of polished blackstone and andesite blocks to construct the main brewing frame. You will also want orange concrete blocks for the blaze rod center, light blue concrete for the bottle outlines, and vibrant red and purple concrete powder.
8. The Geometric Mandala Base Floor Carpet
Grounding Sanctuary Rooms with Symmetrical Intricate Glazed Terracotta
The Geometric Mandala Base Floor Carpet design is tailored specifically for contemporary minimalist survival sanctuaries that want to add instant warmth, intricate patterns, and floor comfort. This look utilizes a massive, authentic circular or square mandala design layout built from glazed terracotta blocks.

The layout relies on absolute four-way mirror symmetry, where every single quadrant perfectly reflects the pattern of its opposite side across a center center block.
The Visual Power of Glazed Terracotta Geometry
An authentic glazed terracotta block arrangement provides exceptional pattern density, sharp geometric alignment, and a completely flat profile that fits perfectly beneath grand temple ceilings. Unlike plain wood planks or raw stone tiles that look empty over wide hall floors, a mandala carpet adds an immediate artistic texture.
The spinning lines of the purple, cyan, and magenta glazed blocks create an immediate visual swirl, transforming boring floors into high-end art installations.
How to Lay a Mandala Floor Carpet
- Locate the Exact Absolute Center of Your Room: Pinpoint the direct central block coordinate of your hall floor to serve as your master anchor point.
- Place the Central Cross of Matching Terracotta Blocks: Lay a two-by-two square of glazed terracotta, rotating the blocks outward to start the pattern.
- Radiate the Geometric Rings Outward Symmetrically: Add concentric rows of colored concrete, smooth quartz stairs, and alternating glazed terracotta blocks.
- Enclose the Mandala with a Polished Blackstone Ring: Frame your massive circular floor carpet inside a clean square border of polished blackstone tiles.
Essential Material Kit for a Mandala Floor
To build this intricate geometric floor layout, you will want several stacks of assorted glazed terracotta blocks, focusing on cyan, purple, and magenta colors. You will also need smooth quartz stairs to form decorative white boundary rings, and polished blackstone tiles to finish the outer frame borders.
9. The Golden Hour Pixelated Mountain Landscape
Recreating Scenic Nature Panoramas Using Organic Earth Gradients
The Golden Hour Pixelated Mountain Landscape captures the ultimate spirit of fine landscape painting inside a video game, transforming a massive vertical wall into a breathtaking panoramic view. This aesthetic utilizes a smooth, seamless background of warm sunset sky gradients that fade from rich orange down to pastel yellow.

The stone peaks are elevated by layering progressive steps of dark charcoal deepslate, weathered gray stone, and bright white snow caps across the mountain profiles.
The Fine Art of Voxel Scenery Painting
This design concept relies heavily on large-scale planning, subtle color blending, and realistic depth perception to cultivate an expansive, natural luxury environment. By scaling the artwork up to a large fifty-by-fifty block canvas, you allow individual square blocks to blend into a smooth impressionistic painting from a distance.
The glowing sun disk hidden behind the stone peaks casts a beautiful, warm glow across the landscape, mimicking a real survival sunset.
Step-by-Step Mountain Landscape Blueprint
- Build the Massive Vertical Sky Background Screen: Lay down horizontal rows of yellow, orange, and smooth red sandstone blocks to construct the sunset sky.
- Draft the Distant Mountain Peak Silhouettes: Draw the far mountain outlines using rows of light grey concrete and polished andesite blocks.
- Layer the Foreground Jagged Deepslate Ridges: Construct the closer, darker mountain faces using raw deepslate, cobblestone, and blackstone blocks.
- Apply the Crisp White Snow Cap Highlight Blocks: Blend pure white concrete and snow blocks along the mountain tips to simulate frozen glacier tops.
Essential Material Kit for a Landscape Painting
Achieving this fine-art nature wall requires several stacks of yellow concrete, orange concrete, and red sandstone to build the massive sunset background screen. You will also want polished andesite blocks for distant peaks, raw deepslate variants for the dark foreground ridges, and pure white concrete for snow highlights.
10. The Chibi Ender Pearl Enderman Icon
Softening Iconic Mob Designs with Playful Compact Proportions
The Chibi Ender Pearl Enderman Icon offers a bold, deeply inviting, and highly adorable character art concept that celebrates one of Minecraft’s most mysterious nocturnal mobs. This look features a highly stylized, compact version of an Enderman head and upper torso designed with large, expressive eyes.
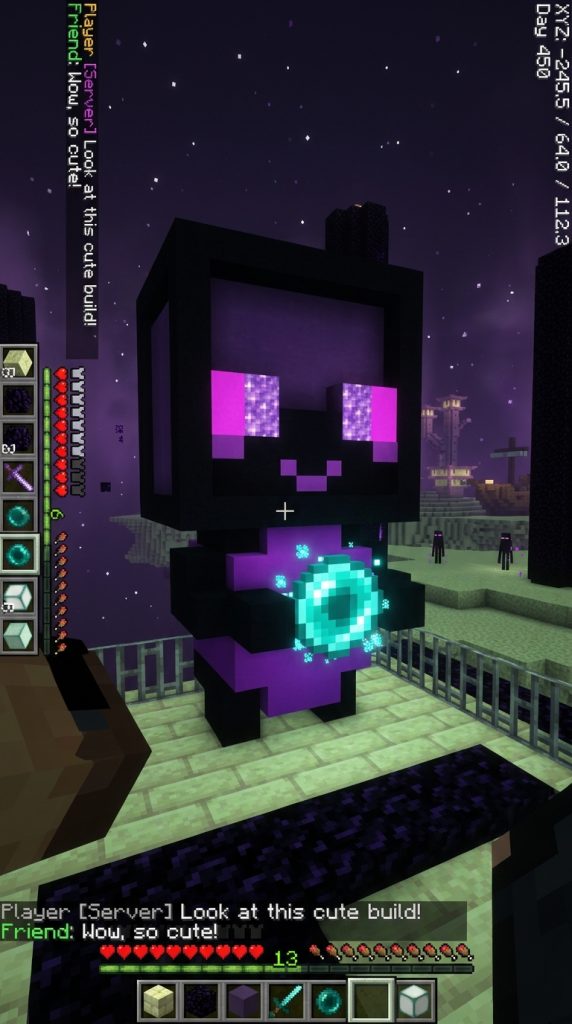
The character is depicted holding a vibrant, glowing turquoise ender pearl right against its chest, creating a beautiful focal point that contrasts with its dark skin.
The Visual Appeal of Cute Pixel Art Proportions
This design concept focuses on cute chibi proportions—large heads, compact bodies, and oversized expressive eyes—to transform scary survival enemies into friendly art pieces. The dark body is constructed from black concrete and dark purple terracotta, creating a deep texture that makes the glowing elements pop.
The oversized eyes are filled with bright magenta concrete and glowing amethyst blocks, giving the character a playful, high-energy gaze.
How to Style a Chibi Enderman Icon
- Outline the Compact Square Head Silhouette: Draw a wide square head frame using solid black concrete blocks across your grid canvas.
- Embed the Large Glowing Magenta Eyes Symmetrically: Build two oversized rectangular eyes using an alternating mix of magenta concrete and amethyst blocks.
- Construct the Cute Compact Torso and Hand Profiles: Draw a small body underneath the head, forming two small arm limbs that reach inward toward the center.
- Form the Radiant Turquoise Ender Pearl Centerpiece: Place a round circle of cyan concrete powder, sea lanterns, and green stained glass inside the hands.
Essential Material Kit for a Chibi Enderman
To build this cute character zone, source several stacks of solid black concrete and dark purple terracotta to construct the main body frame. You will also need bright magenta concrete blocks for the large eyes, a collection of sea lanterns, and cyan concrete powder to build the glowing ender pearl.
11. The Vaporwave Synthwave Grid Sports Car
Rolling Retro Futuristic Supercars Across Neon Digital Landscapes
The Vaporwave Synthwave Grid Sports Car is an incredibly bright, joyful, and deeply stylized design concept built around 1980s retro-futuristic automotive culture. This layout features a massive, side-profile pixel art model of an exotic wedge-shaped sports car driving across a glowing neon landscape.

The car body is finished in a deep crimson red and sharp magenta paint job, outlined by clean black concrete borders that keep the automotive lines crisp.
The Visual Balance of an Electronic Supercar Icon
This style utilizes sharp aerodynamic lines, low-profile wedge geometry, and high-contrast neon lighting to create a space that looks incredibly fast, active, and modern. The wheels are detailed using round configurations of coal blocks and polished netherite, giving the tires a heavy, realistic industrial weight.
A continuous glowing trail of yellow and orange stained glass panels extends behind the car to simulate high-speed kinetic motion blur.
Step-by-Step Synthwave Car Styling Routine
- Draw the Low-Profile Aerodynamic Car Outline: Plot the long, low wedge shape of the sports car chassis using solid black concrete blocks.
- Pack the Main Body Panels with Radiant Crimson: Fill the inner car panels with an alternating pattern of crimson wool, magenta concrete, and pink concrete powder.
- Construct the High-Contrast Industrial Wheel Profiles: Build two large wheels at the base using circles of black concrete, coal blocks, and central netherite.
- Extend the Glowing Stained Glass Motion Blur Trails: Run a long, tapering tail of yellow, orange, and red stained glass blocks out from the rear exhaust zone.
Essential Material Kit for a Synthwave Car
Transforming your grid into an electronic supercar requires several stacks of black concrete to trace the low aerodynamic chassis outline. You will also want crimson wool, magenta concrete blocks for body coloring, coal blocks to build the heavy wheels, and orange stained glass to draw the speed trails.
12. The Celestial Crescent Moon Fox Portrait
Balancing Whimsical Spirit Animals with Mystic Night Sky Backgrounds
The Celestial Crescent Moon Fox Portrait captures a beautifully peaceful, mystical, and highly artistic fairy-tale concept that looks spectacular on building server gallery plots. This design showcases a beautiful, sleeping orange forest fox curled up comfortably inside the glowing curve of a giant crescent moon.
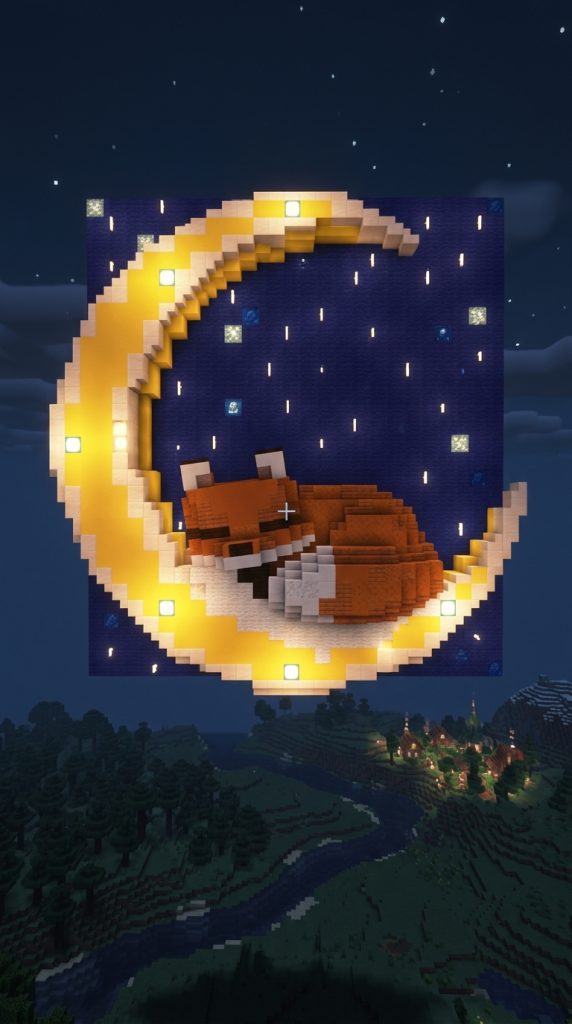
The background features a rich, dark midnight-blue wool sky decorated with small, shimmering stars made of end rods and sea lanterns.
The Harmonious Color Contrasts of Night Sky Art
This artwork relies heavily on the gorgeous complementary contrast between cool, deep night-sky tones and warm, vibrant animal fur pigments to capture the viewer’s attention. The crescent moon is built from smooth quartz blocks and yellow concrete powder, creating a bright, glowing golden frame around the sleeping animal.
The fox’s fur is textured using a warm gradient of orange concrete, terracotta, and soft white calcite, ensuring the sleeping form looks incredibly soft and touchable.
How to Style a Celestial Fox Portrait
- Build the Deep Midnight-Blue Sky Screen Canvas: Lay down a large vertical background using dark navy blue concrete and black wool blocks.
- Carve the Sweeping Golden Crescent Moon Outline: Draw a massive, elegant curved crescent moon shape across the canvas using yellow concrete and smooth quartz.
- Nestle the Sleeping Fox Profile Inside the Moon Curve: Plot the sleeping animal form right along the inner curve of the moon using orange terracotta blocks.
- Install Shimmering End Rod Stars Across the Sky: Place random glowing end rods and single sea lantern blocks across the dark background to simulate distant stars.
Essential Material Kit for a Celestial Fox
To build this mystical dream portrait, secure several stacks of dark navy blue concrete and black wool to construct your night sky background. You will also need yellow concrete blocks for the crescent moon, orange terracotta for the fox’s soft fur, and a collection of glowing end rods to serve as stars.
13. The Medieval Fantasy Royal Shield Crest
Curation of Noble Knight Banners Inside Castle Throne Rooms
The Medieval Fantasy Royal Shield Crest is a deeply sophisticated, historic design tailored for grand castle throne rooms, medieval armory halls, and noble clan gathering hubs. This aesthetic features a massive, vertically oriented heater-style knight shield banner emblazoned with a striking geometric lion or eagle emblem.
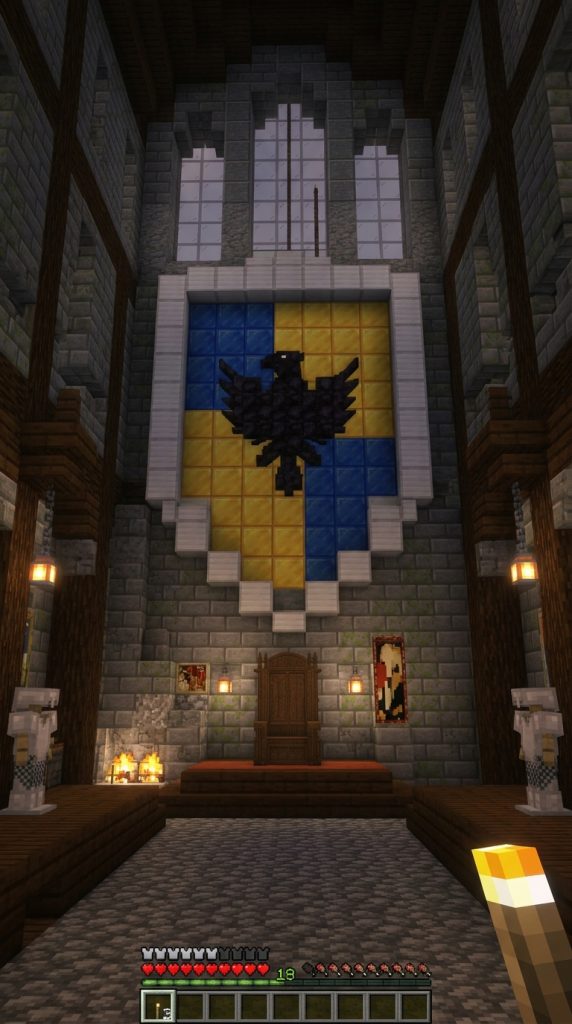
The shield is framed with a heavy, polished iron-block border, while the internal fields are split cleanly into high-contrast blue and gold heraldry quadrants.
The Imperial Symmetry of Castle Heraldry Art
This historic concept focuses on royal castle legacy, utilizing traditional military materials like polished iron, raw gold, and deep lapis lazuli blocks to build an aura of power and honor. The shield badge relies on perfect vertical mirror symmetry, ensuring that the heavy metal borders and geometric dividers align flawlessly down the center axis.
Hanging the massive shield crest directly behind a king’s throne adds an immediate storytelling layer that defines the history of your kingdom.
How to Construct a Royal Shield Crest
- Plot the Outer Curved Heater Shield Frame Lines: Outline a massive, pointed medieval shield shape using solid iron blocks and grey concrete.
- Divide the Internal Fields into Four Symmetrical Quadrants: Slice the inner canvas into four equal blocks using a central cross of black concrete.
- Fill Diagonal Fields with Lapis and Gold Blocks: Pack two diagonal quarters with blue lapis blocks, filling the remaining two with raw gold and yellow concrete.
- Center the Imperial Geometric Crest Emblem Cleanly: Draw a sharp, high-contrast blackstone lion or eagle profile right in the middle of the shield cross.
Essential Material Kit for a Shield Crest
To capture this historic castle essence, secure several stacks of solid iron blocks to construct your heavy metallic outer frame. You will also want blue lapis lazuli blocks for the heraldry fields, raw gold blocks to add royal wealth texturing, and polished blackstone to draw the central crest emblem.
14. The Nether Portal Tech-Frame Pixel Outline
Framing Dimensional Gateways with Intricate Circuit Board Patterns
The Nether Portal Tech-Frame Pixel Outline completely transforms a standard obsidian nether portal gateway into a stunning, high-tech piece of sci-fi machinery. This look utilizes a massive, oversized rectangular frame built completely around the purple portal blocks, extending out several rows past the frame.
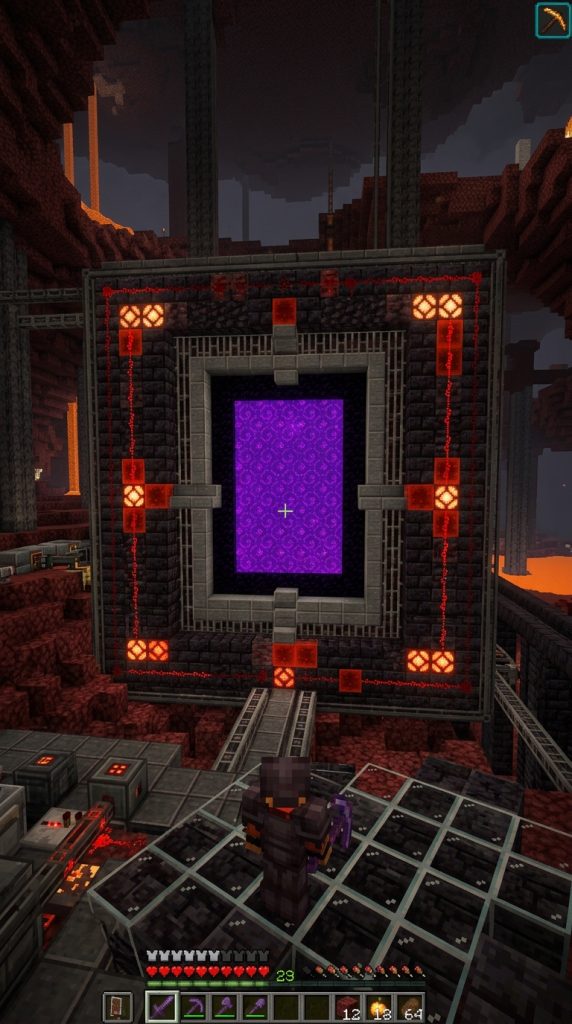
The outer shell is styled to look like an advanced circuit board or cybernetic engine core, featuring intricate lines of redstone blocks and iron bars.
The Engineering of Powered Portal Enclosures
Slick sci-fi framing concepts focus on disguising the organic, wavy texture of portal blocks inside sharp, mechanical geometric layers to create an industrial tech-lab atmosphere. By wrapping your nether portal inside an extensive pixel-art frame of dark netherite and glowing redstone lamps, you make the gateway feel controlled and powered.
The circuit lines are detailed using smooth stone slabs and vertical lightning rods, simulating a complex power generator stabilizing a wormhole.
Step-by-Step Tech-Portal Frame Assembly
- Erect a Large Oversized Blackstone Enclosure Box: Build a wide rectangular wall around your active nether portal, completely hiding the base obsidian blocks.
- Trace Mechanical Power Circuit Lines with Redstone: Embed continuous lines of redstone blocks and red concrete powder running toward the portal center.
- Install Redstone Lamps at Circuit Conjunction Points: Place functional redstone lamps at the corners of your circuit paths, backing them with levers to activate glow.
- Layer Smooth Stone Slabs for Industrial Surface Depth: Place stone slabs and iron bars over the circuitry to create a high-contrast mechanical frame.
Essential Material Kit for a Tech-Portal Frame
To master this industrial sci-fi gateway layout, you will want several stacks of polished blackstone blocks to construct your heavy outer frame enclosure. You will also need redstone blocks to draw the active power circuit lines, functional redstone lamps to provide high-tech lighting points, and smooth stone slabs to add surface depth.