11 Creative DIY Bedroom Decor Ideas
Injecting personalized charm, natural textures, and artistic layers into your bedroom does not require an immense bank loan or professional interior decorators. Most bedrooms suffer from blank drywall, uninspired lighting, or basic off-the-shelf retail accessories that lack distinct character. Modern 2026 home decorating trends, however, heavily favor organic warmth, biophilic elements, and thoughtful handmade craftsmanship that tells a story. You can easily elevate your personal space by tackling budget-friendly DIY projects over the weekend. Resourceful upgrades—like woven textiles, textured plaster, and upcycled natural materials—instantly turn plain sleeping quarters into relaxing, curated sanctuaries. Smart DIY bedroom decor combines intentional spatial layout, earthy neutral palettes, and practical crafting techniques to bring rich, designer-level dimension to every corner.

Infusing Natural Textures and Cozy Ambience into Bedroom Sanctuaries
Achieving high-end comfort relies primarily on layering tactile textures and soft, atmospheric lighting. Unfinished timber, natural linen, coarse rope, and botanicals naturally project calming, earthy sophistication. You can easily find these budget-friendly materials at hardware or craft retailers, or even forage them from the outdoors. Local thrift stores are also filled with sturdy, forgotten picture frames, mirrors, and outdated furniture waiting patiently for creative refreshes.
Simply adding a textured paint finish or wrapping a mirror in thick natural fibers instantly elevates inexpensive items into stylish statement pieces. Furthermore, incorporating vertical art, floating displays, and warm, layered task lighting frees up limited nightstand space while drawing the eye upward. These small, thoughtful additions establish a traveled, hand-put-together aesthetic that makes any compact bedroom feel both open and cozy.
1. Minimalist Raw Wood Bead and Tassel Garland

Flat bookshelves, dark dressers, and bedroom mantelpieces often feel rigid and boxy with solely rectangular items. Integrating a hand-strung wooden bead garland introduces organic flow, natural wood grains, and Scandi-inspired warmth to your surfaces. Draped gracefully over stacks of books or woven baskets, this tactile accent provides the perfect informal, grounding detail without requiring complex tools.
Bringing Soft Scandinavian Geometry to Flat Bedroom Surfaces
Natural, unfinished birch wood beads vary slightly in their organic grains, preventing your display from looking too sterile. Combining different bead diameters breaks up linear furniture lines with pleasing visual rhythm. Pair it with soft, handmade unbleached cotton tassels for a curated, boutique-quality look. It is an effortless, zero-glue project that instantly gives standard shelves a textured, professional touch.
Materials and Notions Needed
- Assorted raw, unfinished birch wood craft beads (in 15mm, 20mm, and 25mm diameters)
- Skein of natural unbleached cotton embroidery floss or thick cotton twine
- Large blunt tapestry needle with a wide threading eye
- Sharp craft scissors
- Sturdy piece of cardboard (about 6 inches) for wrapping tassels
Step-by-Step Garland Crafting Instructions
- Unroll a 2-yard length of strong cotton thread or twine, threading one end through your blunt needle.
- Wrap the unbleached cotton embroidery floss fifty times around your piece of cardboard to begin the tassel.
- Slide the wrapped loops off, tie a 6-inch scrap of twine tightly around the top to secure them, and cut the bottom loops open cleanly.
- Secure the tassel onto one end of your long piece of twine, knotting it tightly.
- Thread your tapestry needle with the opposite twine tail and begin stringing the raw wooden beads.
- Alternate the wooden spheres in a deliberate pattern, such as five small, one medium, and one large bead.
- Continue stringing the beads until your garland reaches about 4 to 5 feet in length.
- Tie your second handmade cotton tassel to the final end, pulling it tight against the last bead.
- Snip any excess twine neatly using your sharp craft scissors, tucking the tiny knots inside.
- Drape the finished garland loosely over books on your nightstand or wind it through an entryway display.
2. Textural Braided Jute Rope Circular Mirror Frame

Standard frameless wall mirrors and basic dresser glass often feel clinical, cold, and visually unfinished in bedrooms. Upcycling a plain round mirror with thick, natural braided jute rope adds rich coastal texture and rustic warmth to empty walls. The coarse, woven border softens shiny reflective glass while masking any minor, imperfect glass edges or cheap frames.
Elevating Bedside Visuals with Natural Woven Coasts
Mirrors are essential for bouncing natural morning daylight and making smaller bedroom footprints appear significantly bigger. Surrounding a reflective mirror with nautical jute rope adds breezy, organic dimension that beautifully contrasts with painted drywall. It perfectly captures relaxed, natural interior design aesthetics without the high price tags of professional framing.
Materials and Notions Needed
- Inexpensive round frameless wall mirror (12 to 18 inches in diameter)
- Spool of thick natural twisted jute rope (1/2-inch or 3/4-inch diameter)
- High-temperature electric hot glue gun with several glue sticks
- Sturdy corrugated cardboard or thin plywood backing panel (cut 2 inches larger than the mirror)
- Sharp utility knife and heavy-duty shears for trimming the rope
Step-by-Step Mirror Framing Technique
- Place the round mirror in the center of your sturdy cardboard or plywood backing, tracing around the circumference with a pencil.
- Draw a second circle 2 inches wider than the mirror’s border to provide a flat, secure surface for gluing the rope.
- Use a sharp utility knife to cut out this larger backing panel.
- Generously apply hot glue to the back of the mirror and press it firmly into the center of your backing, allowing it to dry.
- Apply a thick, continuous bead of hot glue along the outer edge where the mirror meets the cardboard.
- Press the natural twisted jute rope firmly into the hot glue, wrapping it tightly against the glass without gaps.
- Wrap the rope continuously around the mirror in concentric circles, gluing it to the backing as you go.
- Complete 3 to 4 rings of the coiled rope to create a substantial, textured natural frame.
- Trim the end of the rope at a sharp diagonal with heavy-duty shears to tuck and hide it neatly.
- Secure the loose fiber ends with extra hot glue and attach a sturdy hanger to the back.
3. Minimalist Raw Timber Hanging Plant Propagation Station
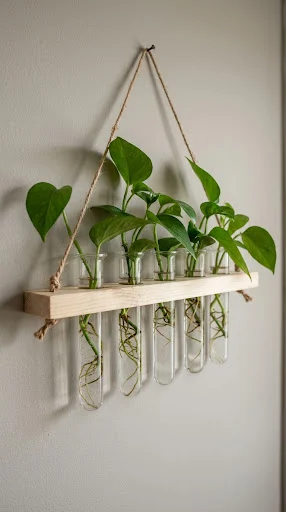
Integrating live green foliage into your bedroom instantly lifts the mood and improves the visual air quality. Propagating natural houseplant cuttings in water creates a living, dynamic gallery wall on otherwise blank bedroom drywall. This minimalist hanging station combines natural blonde wood with clear glass tubes to proudly display tender green root growth.
Cultivating Living Botanical Gallery Displays Above Beds
Empty bedroom walls can easily look uninspired, stark, and lacking in natural, lively artwork. Mounting a vertical propagation station utilizes vertical wall height, keeping your bedside table free of cluttered jars. Watching green cuttings of pothos or ivy develop delicate roots in water brings continuous natural beauty to the room. It’s a wonderful, low-profile biophilic project that brings life into bedroom corners.
Materials and Notions Needed
- Four to six clear glass test tubes with secure lip/rim tops (about 6 inches long)
- Sanded pine or birch craft wood board (about 2 inches wide, 12 to 18 inches long)
- Natural jute twine or soft twisted cotton cord for hanging
- Hand drill fitted with a 3/4-inch or 1-inch wood spade drill bit (matching the test tube diameter)
- Fine 120-grit sandpaper block and natural finishing wax or clear wood sealer
Step-by-Step Wood Station Assembly
- Measure and mark equal spaces across your timber board with a pencil to determine where the test tubes will sit.
- Mark your drilling locations, ensuring each hole has at least 2 inches of space in between.
- Clamp the timber firmly to a sturdy workbench.
- Drill straight through each marked location using your wood spade bit, keeping your hand steady.
- Sand the drilled holes and the rough outer edges of the board with your 120-grit sandpaper.
- Wipe away any wood dust and buff a thin layer of natural furniture wax over the timber to highlight the grain.
- Drill two small, 1/4-inch holes at each top corner of the board to hold your hanging cord.
- Thread your natural jute twine or cotton cord through these corner holes, tying secure, heavy knots underneath.
- Carefully slide each glass test tube down into the predrilled openings, letting their lipped rims catch on the wood.
- Fill the test tubes halfway with water and insert your favourite green vine cuttings.
- Suspend your living botanical display from a decorative wall hook near natural sunlight.
4. Vintage Aged Botanical Fern Gallery Wall
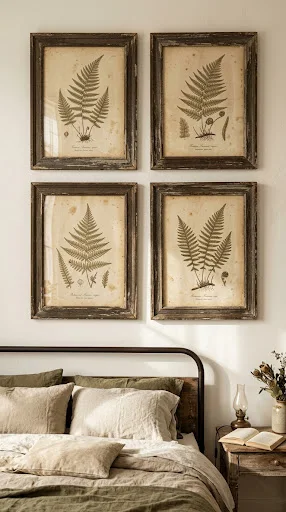
Traditional heavy picture frames with high-gloss glass can sometimes look clinical and reflect annoying bedroom window glares. Creating a gallery of antique nature illustrations instantly adds the curated feel of a historic European manor. An aged tea bath on standard cardstock prints produces a warm, authentic patina, bringing vintage soul to empty walls.
Capturing Historic European Patina with Natural Tea Stains
Art and framed prints play a crucial role in giving bedroom interiors a traveled, put-together-over-time character. Tea-staining is a foolproof, accessible technique to distress paper with a rich, historic sepia tone. Paired with dark thrifted frames, these aged prints provide sophisticated visual layers. It’s an inexpensive project that immediately elevates a plain bedroom with artistic history.
Materials and Notions Needed
- White cardstock with printed public-domain botanical illustrations (such as ferns, leaves, or flora)
- Two to three bags of strongly brewed black tea (cooled)
- Wide foam paint brush or a shallow baking tray
- Salvaged, ornate vintage picture frames from your local thrift store
- Sandpaper block or steel wool for lightly distressing the frames
Step-by-Step Tea-Staining Technique
- Print your chosen public-domain botanical illustrations onto matte, heavy cardstock.
- Brew two to three black tea bags in 2 cups of boiling water, letting the dark tea cool down completely.
- Pour the cooled tea into a shallow baking tray or utilize a wide foam brush to apply it directly.
- Place each print flat in the baking tray, or coat the paper evenly with the foam brush.
- Allow the paper to absorb the tea for 5 to 15 minutes, depending on your desired vintage shade.
- Carefully remove the wet prints, laying them flat on paper towels or cardboard to air-dry.
- To simulate aged wear, gently crumple the paper once dry, or lightly brush on more tea for mottled spots.
- While the prints are drying, lightly rub the ornate vintage frames with sandpaper to reveal raw wood or base coats.
- Wipe the distressed frames clean, and insert your aged botanical prints once they’re fully dry.
- Mount the finished artwork in a symmetrical grid above your bed or dresser to create an elegant natural focus.
5. Architectural Modern Magnetic Wood Poster Rail
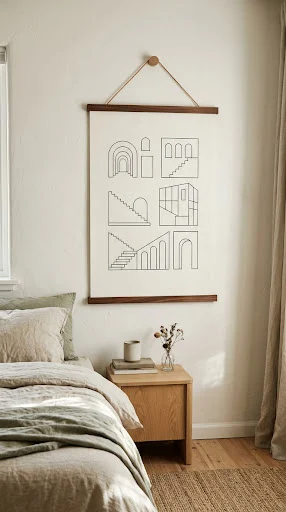
Standard bulky picture frames with glass can often reflect harsh glares from bedroom windows, distracting from the cozy mood. Slender, magnetic wooden poster rails offer an airy, minimalist solution for displaying large paper art and prints. Using rare-earth neodymium magnets allows you to clamp and hang delicate posters without puncturing, stapling, or tape.
Displaying Paper Art with Clean Scandinavian Rail Frames
Traditional bedroom frames can feel visually heavy, especially in smaller rooms where open floor space and light are key. Magnetic rails frame paper art subtly, allowing the texture of the paper and natural artwork to take center focus. The warm timber tones harmonize with natural bedroom finishes, adding organic warmth to blank walls. It’s a stylish and budget-conscious way to hang oversized prints without the visual bulk.
Materials and Notions Needed
- Four identical flat strips of pine, oak, or walnut craft wood (matching the width of your print)
- Small, powerful neodymium disc magnets (with countersunk screw holes or flat adhesive-backed)
- Natural leather cord, twine, or twisted cotton rope for hanging
- Fast-setting super glue or two-part epoxy adhesive
- Hand saw (if cutting your own wood), fine sandpaper, and natural wood stain
Step-by-Step Poster Rail Guide
- Cut four flat wood strips to be exactly 1 inch wider than the paper art print you plan to hang.
- Sand all sides of the wood strips smooth using fine-grit sandpaper, erasing any splinters.
- Apply a natural wood stain or oil to the wood with a cloth, letting it dry completely.
- On the inside faces of all four strips, mark equal points for placing your magnets (aim for 3 to 4 magnets per rail).
- Glue the small neodymium magnets flush into these points using strong epoxy, ensuring the magnetic poles will attract when paired up.
- Staple or glue the ends of a natural leather cord to the back of one of the top strips to form your hanger.
- Place the top edge of your paper art between the top pair of magnetic rails, letting the magnets clamp the paper secure.
- Clamp the bottom edge of the print between the remaining pair of magnetic rails to serve as a weighted anchor.
- Gently pull the paper flat, letting the weighted lower rails keep your print hanging perfectly straight.
- Hang your new Scandinavian-style poster rail from a decorative brass wall nail or hook.
6. Easy Textured Minimalist Plaster Canvas Wall Art
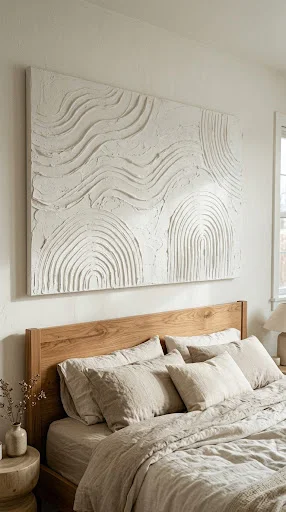
Blank bedroom drywall can often feel flat and plain, particularly above bed frames where a rich focal point is needed. Designing textured plaster art provides deep visual dimension without relying on loud, distracting painted patterns. Joint compound and notched tools from the hardware store allow you to easily sculpt stunning, minimalist wave and arch patterns.
Designing Textured Canvas Waves for Calm Bedroom Dimensions
Large-scale abstract canvas art immediately makes a bedroom feel custom-designed, intentional, and expensive. This easy plaster technique allows you to become the abstract artist of your own home with zero professional training. When painted in matte, neutral hues, the thick textured waves reflect natural sunlight and bedroom shadows with a soothing, dimensional presence.
Materials and Notions Needed
- Large, inexpensive stretched artist canvas (about 24×36 inches)
- Small tub of premixed drywall joint compound or patching spackle
- Notched plastic adhesive trowel or a coarse spackle comb (to create textured ridges)
- Wide putty knife or spatula for spreading
- Can of ultra-matte white, beige, or sand-colored interior paint and a brush or roller
Step-by-Step Plaster Sculpting Guide
- Lay your stretched canvas completely flat on a protective drop cloth or piece of cardboard.
- Scoop the premixed joint compound generously onto the canvas using your putty knife.
- Spread the compound evenly across the entire surface, aiming for about a 1/4-inch to 1/2-inch thickness.
- Drag your notched plastic trowel or spackle comb firmly through the wet plaster in smooth, sweeping motions.
- Create artistic, organic wave patterns, geometric arches, or continuous vertical ridges according to your taste.
- Gently smooth any excess plaster build-up along the outer edges of the canvas with a damp sponge or your spatula.
- Allow your plaster creation to dry undisturbed for a full 24 hours until it has hardened completely.
- Inspect the dry plaster for any unexpected deep cracks, smoothing lightly with sandpaper if desired.
- Coat the textured canvas entirely with matte white, sand, or warm cream interior paint to protect it.
- Let the paint dry completely before mounting your new sculptural masterpiece proudly above your headboard.
7. Natural Moss and Pressed Flower Fairy Light Clutter Jar

Nightstands easily accumulate messy loose accessories, while bedside tables often lack cozy, layered ambient task lighting. Repurposing a thrifted glass jar with natural moss and pressed backyard flowers creates a magical, illuminated fairy jar. The glowing natural elements function as romantic nightlights, adding soft biophilic drama to your evening routine.
Bringing Glowing Biophilic Magic to Bedside Tables
Biophilic interior design aims to bring the outdoor natural world directly inside, promoting a calm, restful bedroom atmosphere. The glowing, organic display adds whimsical warmth while softly lighting up dark, shadowy corners of the room. Using battery-operated LED wire strings means you enjoy beautiful, warm illumination without the worry of tangled cords or hot light sockets.
Materials and Notions Needed
- Large, clear glass mason jar, apothecary jar, or vintage bottle (with a secure lid)
- Set of battery-operated micro LED wire “fairy” string lights (warm white)
- Handful of preserved natural forest moss, dried botanicals, and pressed leaves or ferns
- Craft tweezers or a long wooden skewer for precise placement
- Clear-drying craft glue or hot glue for securing dried flowers
Step-by-Step Fairy Jar Assembly
- Wash and dry the glass jar thoroughly, ensuring there are no fingerprints or streaks on the inside.
- Carefully place a soft layer of preserved natural green forest moss at the bottom to serve as an earthy base.
- Use craft tweezers to apply tiny dots of clear glue to the backs of your pressed leaves and colorful dried flowers.
- Press the botanical elements gently against the inside glass walls of the jar so they are visible from the outside.
- Tuck the battery pack of your LED string lights toward the back of the moss layer, or attach it underneath the lid.
- Untangle the micro LED wire and gently feed it down into the jar, letting the lights weave loosely through the moss.
- Add a few extra sprigs of dried botanical stems and ferns in the center to create natural depth.
- Arrange the wire lighting evenly so the glowing bulbs scatter from the bottom up to the top.
- Place the lid on securely, hiding any loose wire or adhesive backings out of sight.
- Turn on the soft lights and enjoy a whimsical, glowing natural accent right on your nightstand.
8. Neutral Boho Brushed Cotton Macramé Feather Wall Hanging

Heavy bed frames and flat bedroom drywall can often make sleeping quarters feel acoustically harsh and visually rigid. Adding woven fiber art above headboards introduces inviting, cozy movement while absorbing stray sound waves effectively. Brushed macramé feathers require only basic, repetitive knotting techniques to produce stunning, organic bohemian accents on walls.
Softening Bedroom Acoustics with Artful Natural Fibers
Traditional bedroom wall decor can occasionally feel clinical, while woven fibers inject tactile softness and dimensional warmth. Alternating unbleached cotton cords and natural jute twine on a rustic branch creates rich, natural variety. This peaceful, meditative craft is incredibly relaxing to try, and the result adds beautiful, handmade artistry to your space.
Materials and Notions Needed
- Single-strand natural macramé cotton cord (4mm or 5mm thickness, in natural or cream)
- Foraged natural tree branch, driftwood, or smooth wooden dowel (about 18 to 24 inches long)
- Sharp fabric scissors
- Fine-tooth metal comb, pet brush, or sturdy wire brush
- Extra-hold aerosol hairspray or liquid fabric stiffener
Step-by-Step Feather Weaving Guide
- Cut one central support cord about 12 inches (30 cm) long—this will be the “spine” of your feather.
- Cut twenty to thirty smaller pieces of cotton cord, each about 8 inches (20 cm) long.
- Fold your central support cord exactly in half lengthwise, looping it over your branch or dowel using a lark’s head knot.
- Take two of your smaller 8-inch cords and fold them both in half.
- Place one folded cord horizontally underneath your central spine.
- Thread the second folded cord through the loops of the first, wrapping them securely around the spine.
- Pull the cord ends firmly in opposite directions to form a tight, horizontal square knot along your central spine.
- Repeat this knotting process down the length of the spine, sliding the knots upward to keep them dense.
- Continue tying knots until you’ve used all your cords, leaving 2 inches of the spine open at the bottom.
- Use your sharp fabric scissors to trim the fringe roughly into a leaf or feather shape.
- Vigorously brush out the cotton cords using your metal comb or pet brush until the fringe becomes entirely soft.
- Trim the combed fringe carefully to create a sleek, tapered feather shape.
- Generously coat both sides of the feather with hairspray or fabric stiffener to help it retain its flat shape.
- Tie the finished piece to your branch, and repeat the process to create multiple feathers for a full, tiered wall hanging.
9. Cozy Textured Punch Needle Throw Cushion
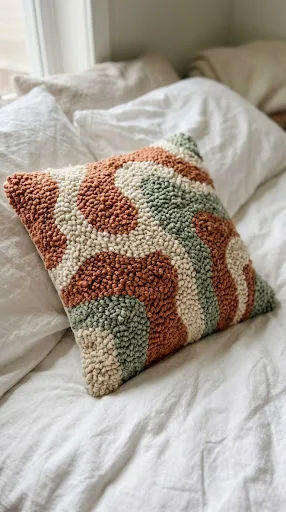
The bed is the natural centerpiece of the bedroom, but plain bedding and off-the-shelf throw pillows can make it feel uninspired. Crafting a custom punch needle cushion allows you to introduce rich, nubby yarn patterns that echo expensive designer imports. With its loop-stitch technique, punch needling adds tactile warmth that instantly elevates any bed frame.
Adding Fluffy, Dimensional Textile Comfort to Beds
Bedding layout heavily impacts how comforting and inviting your master suite feels every evening. Combining various weights and yarn textures makes the bed feel cozy and traveled. You can design custom organic shapes, abstract lines, or natural floral motifs that reflect your personality. This beginner-friendly textile project delivers a rich, artisanal touch for very little material cost.
Materials and Notions Needed
- Punch needle tool (suitable for yarn) and matching threader
- Square of monk’s cloth, primitive linen, burlap, or sturdy canvas
- Rug hoop, embroidery hoop, or wooden frame to hold your fabric taut
- Assorted skeins of thick yarn in your favorite colors (such as terracottas, sage, or cream)
- Plain cushion cover (or fabric to sew your own) and stuffing/insert
Step-by-Step Punch Needle Cushion Guide
- Transfer your selected geometric or organic pattern outline onto your monk’s cloth with a marker.
- Stretch the fabric tightly over your rug hoop or wooden frame, ensuring it is as taut as a drum.
- Thread your punch needle tool with your first yarn color following the kit instructions.
- Hold the needle like a pencil and push it straight down through the fabric from the back to the front.
- Pull the needle back up gently, keeping the tip close to the fabric, and punch your next stitch about 1/4-inch away.
- Continue punching rows of loop stitches, filling in the spaces of your pattern methodically.
- Always check that your loops on the front side are uniform and even.
- Switch yarn colors as you complete different sections of your design.
- Once your punch needling is finished, apply fabric glue or interfacing to the back of the work to secure the loops.
- Sew or bond the textured textile face onto your plain throw cushion cover.
- Insert your pillow stuffing, and throw your new, nubby creation onto your bed.
10. Distressed Wooden Crate Bedside Pedestal
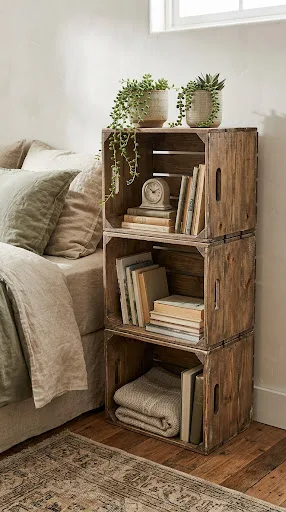
Small bedrooms easily become cluttered, and traditional bulky nightstands often crowd limited floor space. Screwing sanded raw wooden craft crates together creates an affordable, rustic bedside pedestal. Stacking them provides open-face shelves to neatly organize books, alarm clocks, and decorative baskets while maintaining an airy, open footprint on the floor.
Adding Flexible Bedside storage to Cramped Spaces
Compact bedroom design requires you to use smart storage that serves multiple functional purposes. Transforming basic wooden crates allows you to assign specific, custom compartments to your favorite books, magazines, and electronics. Distressing the wood with rich natural finishes brings a cozy farmhouse charm to bedside layouts. Adding hairpin or caster wheels makes it easy to glide the pedestal away for effortless cleaning.
Materials and Notions Needed
- Two or three sturdy raw pine wooden craft crates
- Strips of 1/2-inch plywood (if adding extra internal shelf dividers)
- Walnut, oak, or weathered grey penetrating wood stain
- Handheld sandpaper block (120-grit) or orbital sander
- Pack of 1-inch wood screws, washers, and an electric hand screwdriver or drill
Step-by-Step Bedside Pedestal Assembly
- Sand all rough interior and exterior surfaces of your crates using a 120-grit sandpaper block.
- Wipe away any wood dust completely using a damp microfiber cloth or tack rag.
- Apply your penetrating wood stain across all surfaces, using a rag to highlight the natural grain.
- Let the stain dry for a few hours, then use sandpaper on the edges and corners to create a rustic, weathered look.
- Apply a coat of clear wood sealer or wax to protect the finish, allowing it to dry.
- Arrange your crates on the floor, stacking them on their sides with the open compartments facing forward.
- Clamp the stacked crates together tightly to prevent them from moving.
- Drive 1-inch wood screws through the connecting slats of the crates, securing them together.
- Screw the entire stacked pedestal into your wall studs to prevent any chance of tipping over.
- Slide in any optional plywood divider slats to create extra shelves.
- Add felt furniture pads to the bottom, and fill the cubbies with books, alarm clocks, and bins.
11. Dreamy Sheer Bed Canopy Curtains

Dainty, romantic draping has long been a classic way to bring comfort, softness, and drama to master bedroom suites. Traditional four-poster canopy bed frames are often incredibly expensive and can overpower smaller bedrooms. Installing simple ceiling-mounted tension rods and lightweight sheer curtains creates a dreamy, floating canopy above your mattress. The cascading fabric catches natural morning breezes, giving your bed a luxurious sanctuary feel.
Framing Sleeping Spaces with Floating Romantic Drapes
Beds often look visual and structural without intentional, soft, and comforting decorative framing. Hanging drapes from the ceiling allows you to create the cozy feel of a four-poster bed without the visual bulk. The lightweight sheer curtains filter natural morning sunlight, casting a dreamy, romantic glow across your bedding. It’s an inexpensive, high-impact update that instantly transforms your bed into a peaceful, cozy haven.
Materials and Notions Needed
- Four adjustable tension rods, lightweight curtain rods, or sturdy ceiling-mounted tracks
- Pair of extra-long, lightweight sheer white or cream curtain panels
- Sturdy ceiling hooks, mounting brackets, or heavy-duty adhesive hooks (if renter-friendly)
- Flexible measuring tape, pencil, and bubble leveling tool
- Set of decorative curtain tie-backs, ribbons, or drapery rings
Step-by-Step Bed Canopy Installation Guide
- Measure the exact width and length of your bed on the ceiling to map out your canopy square.
- Mark the four corners on the ceiling with a pencil, using a tape measure to ensure they are even and centered.
- Mount your curtain rods, tracks, or heavy-duty hooks securely into the ceiling at these marked spots.
- Ensure all mounting brackets are leveled and anchored tightly to prevent any sagging.
- Thread your lightweight sheer curtain panels onto the ceiling-mounted rods or rings.
- Place the rods into their brackets, allowing the sheer panels to cascade gracefully down to the floor.
- Adjust the drapery so the fabric gathers evenly around the corners and head of your bed.
- Use decorative ribbons, rope, or brass tie-backs to secure the curtains to the bed posts or wall.
- Ensure the fabric falls naturally, creating a soft, draped canopy effect around your mattress.
- Gently steam the sheer panels with a garment steamer to remove any packaging folds.
- Tuck yourself into your new, dreamy bed, enjoying a cozy, romantic oasis every evening.