
13 Epic Minecraft Castle Gate Ideas to Fortify Your Kingdom
Building a magnificent castle gate transforms your Minecraft base into an impenetrable medieval empire. In addition, an imposing entrance establishes defensive strength across your realm. Waterways, moats, and tall stone battlements naturally converge at this entrance. Furthermore, master builders prioritize gatehouses to protect valuable survival stockpiles. A sturdy gate deters hostile mobs during dark midnight sieges. Therefore, proper fortress planning requires exceptional architectural balance and depth.

Planning Your Royal Castle Entrance
Every legendary kingdom requires an imposing, well-defended castle entrance. First, survey the surrounding terrain for natural defensive advantages. Steep mountain cliffs and deep rivers provide incredible tactical protection. In addition, wide clearings prevent enemy forces from staging sneak attacks. Leveling the surrounding land provides clean lines of sight. Consequently, your gatehouse commands the entire surrounding landscape effortlessly. Smooth stone pathways should guide travelers directly toward your grand portals.
Choosing Your Fortress Block Palette
Selecting the right building blocks establishes your kingdom’s unique visual identity. For instance, deepslate bricks create an imposing, dark gothic fortress. Meanwhile, smooth stone bricks supply a clean, classic medieval appearance. In addition, mixing cracked and mossy stone introduces realistic historical wear. Mud bricks provide earthy, textured undertones for rustic bastions. Therefore, combine contrasting textures to enhance structural realism across every wall.
Creating Structural Depth and Realism
Flat wall designs make castle entrances look artificial and weak. Instead, add substantial depth by layering multiple stone tiers. Use stairs, slabs, and walls to build recessed murder holes. Furthermore, cantilevered battlements project outward over the main archway. Heavy support pillars create bold, dramatic shadows across smooth surfaces. Consequently, your fortification looks structurally sound, ancient, and truly formidable.
Essential Survival Tools for Gate Construction
Constructing grand fortress gates demands specific high-tier survival gear. First, craft multiple diamond or netherite picks with Unbreaking III. In addition, scaffolding blocks allow you to reach dizzying gatehouse heights. Brew swiftness potions to speed up large-scale stone placement. Moreover, keep water buckets on your hotbar for rapid descents. Therefore, organize your building inventory before placing foundational stone blocks.
Integrating Working Defensive Mechanisms
A true fortress gate must offer practical survival defenses. Install concealed dispensers loaded with fire charges and arrows. Furthermore, wire redstone tripwires across entrance thresholds for automatic defense. Build deep defensive moats crossed by raised wooden drawbridges. In addition, craft secure interior murder holes above the inner tunnel. Consequently, invading hostile forces face complete annihilation upon arrival.
Designing High Guard Towers
Flanking guard towers provide essential vertical scale to your entrance. Build dual circular towers on either side of the archway. Next, add arrow slits using stone walls and iron bars. Top the towers with crenelated battlements for archer patrols. Furthermore, hang heavy iron chains and glowing lanterns from overhangs. As a result, your entrance intimidates visitors from extreme distances.
Illuminating Your Kingdom Entrance
Proper illumination keeps your castle gate secure from hostile mob spawns. Hide sea lanterns beneath decorative iron trapdoors along walkways. In addition, mount soul fire braziers atop high stone bastions. Hang soul lanterns along dark corridors for moody blue lighting. Furthermore, place redstone lamps connected to automated daylight sensors. Therefore, your fortress automatically illuminates as night falls over the kingdom.
1. Grand Medieval Portcullis Gate
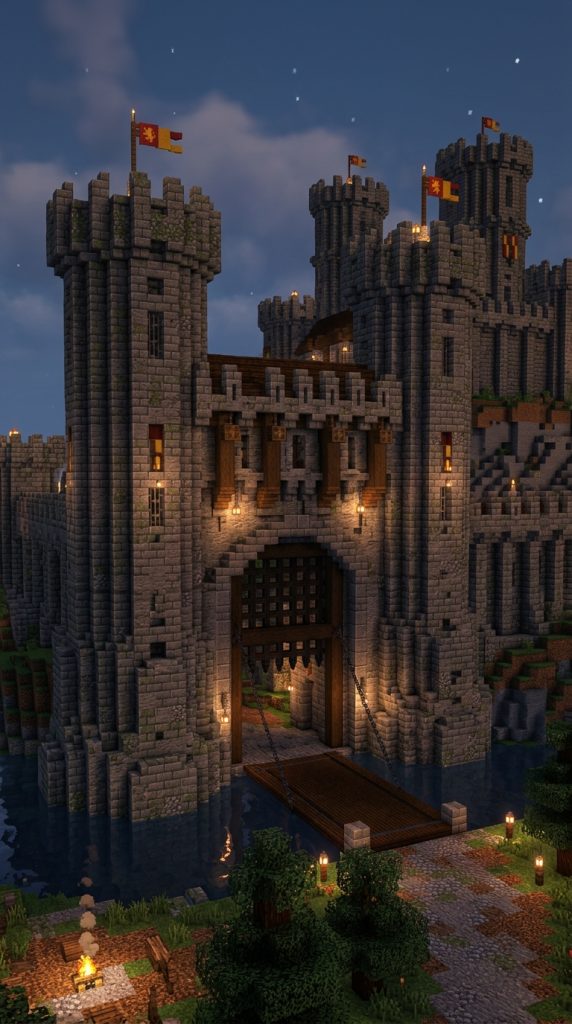
A grand medieval portcullis gate represents the pinnacle of historic defensive architecture. It combines heavy stone towers with an iron-reinforced sliding wooden grate.
Authentic Medieval Fortification Design
The medieval portcullis gate defines classic kingdom defense with towering stonework. Massive twin drum towers flank a deeply recessed central archway. Furthermore, a heavy vertical wooden lattice protects the inner portal. Machicolations protrude outward from the top wall to repel attackers. Consequently, this design provides absolute security for wealthy survival empires.
Portcullis Construction Materials
- Stone bricks, cracked stone bricks, and mossy stone bricks
- Dark oak logs, stripped dark oak, and spruce planks
- Iron bars, heavy chains, and iron trapdoors
- Cobblestone stairs, slabs, and stone brick walls
- Lanterns, redstone torches, and polished andesite
- Dispensers, arrows, and oak fence gates
Building Tower Foundations
Begin by laying two circular tower foundations ten blocks apart. Make each circular tower base seven blocks in diameter. Next, raise the stone brick tower walls twenty-five blocks high. Mix in cracked and mossy bricks along the lower waterline. Therefore, the tower base looks ancient, weathered, and exceptionally solid.
Framing the Main Gate Archway
Span a majestic gothic arch between the twin guard towers. Use stone brick stairs and upside-down slabs to shape the curve. Next, build a deep entrance tunnel measuring five blocks wide. Line the interior ceiling with iron trapdoors and murder holes. Consequently, defenders drop lava or arrows directly onto invading enemies.
Installing the Vertical Portcullis Grate
Construct the lowered portcullis inside the central archway channel. Alternate dark oak fences and iron bars in a grid. Next, attach heavy iron chains from the top grate beams. Extend the chains into the upper gatehouse winch room. Finally, place lanterns along parapets to ensure bright night defense.
2. Fantasy Elven Tree-Woven Archway Gate
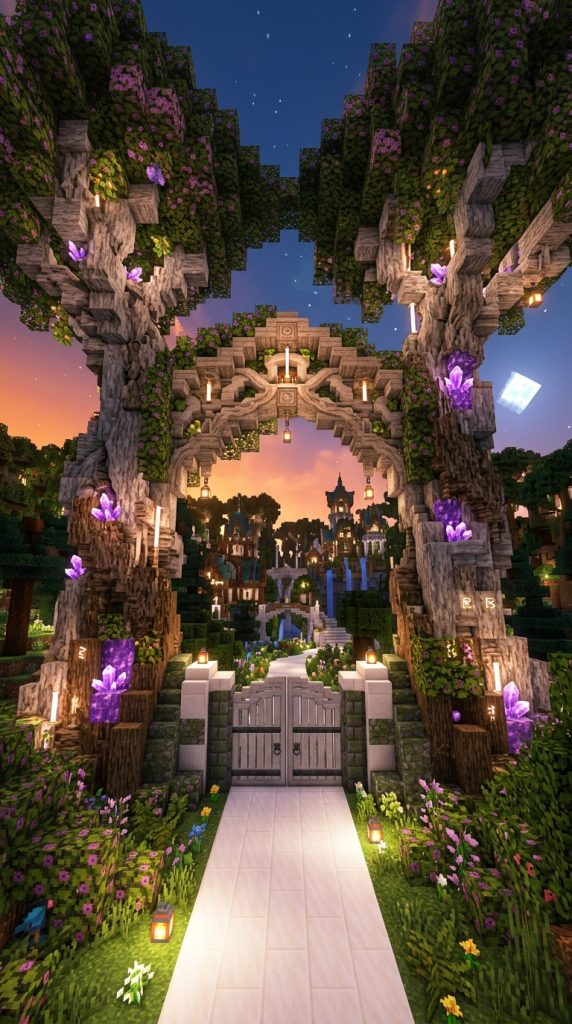
Fantasy elven gates merge living nature with elegant white stone masonry. Towering ancient trees weave together to form an enchanted kingdom portal.
Mystical Woodland Gate Architecture
Elven tree gates capture the organic grace of ancient enchanted forests. Living pale oak trunks twist gracefully into sweeping overhead arches. Furthermore, glowing amethyst clusters and hanging lanterns illuminate emerald canopies. Delicate quartz carvings reinforce the natural wooden framework perfectly. Consequently, this magical gate welcomes peaceful travelers while barring evil forces.
Elven Gate Resource List
- Stripped pale oak logs and oak wood
- Smooth quartz blocks, stairs, and quartz pillars
- Flowering azalea leaves and oak leaf blocks
- Amethyst clusters, amethyst blocks, and end rods
- Warped planks, slabs, and trapdoors
- Glow berries, weeping vines, and sea lanterns
Growing the Living Tree Trunks
Plant two massive custom tree trunks twelve blocks apart. Use stripped pale oak logs to build sweeping, organic curves. Next, twist the upper trunks inward until they meet overhead. Weave flowering azalea leaves through the high branches for volume. Therefore, the gate appears grown naturally over hundreds of centuries.
Carving the Quartz Promenade
Pave a wide entrance pathway using smooth quartz and prismarine. In addition, erect slender quartz pillars along the road borders. Carve sweeping floral motifs into the stone using quartz stairs. Inset sea lanterns beneath cyan stained glass for soft under-lighting. Consequently, the pathway radiates an ethereal, magical woodland glow at dusk.
Hanging Magical Light Accents
Drape weeping vines and glowing glow berries from upper branches. Next, attach end rods horizontally to support delicate amethyst clusters. Install delicate warped trapdoor gates between the main tree roots. Furthermore, scatter blooming azalea bushes along all exterior stone borders. Your breathtaking elven forest gate now stands completely finished.
3. Gothic Nether-Forged Obsidian Gate

Forged from dark obsidian and nether bricks, this gothic gate intimidates foes. Ominous soul fire burns eternally across sharp volcanic spires.
Dark Volcanic Defense Design
Nether-forged gothic gates project ruthless dominance across dark survival lands. Jagged obsidian pillars frame an imposing, pitch-black fortress entrance. Furthermore, crying obsidian veins leak glowing purple energy down walls. Soul fire braziers cast haunting cyan light over spiked iron parapets. Consequently, this forbidding gate terrifies invaders before battle even commences.
Nether-Forged Material Checklist
- Obsidian, crying obsidian, and polished blackstone
- Polished deepslate bricks, stairs, and wall segments
- Nether brick fences, stairs, and red nether bricks
- Soul sand, soul campfires, and soul lanterns
- Tinted glass, iron bars, and heavy chains
- Respawn anchors and magma blocks
Raising Jagged Obsidian Spires
Construct two sharp, asymmetrical towers using polished blackstone and obsidian. Taper the towers upward into razor-sharp spires thirty blocks high. Next, scatter crying obsidian randomly throughout the stone face. Add polished deepslate stairs to create aggressive, pointed wall buttresses. Therefore, the structure projects extreme hostility and ancient dark magic.
Assembling the Nether Gate Portal
Frame a massive twelve-block-high portal archway using blackstone stairs. Inset rows of red nether brick fences for defensive bars. Next, conceal magma blocks behind iron bars within wall crevices. Dig soul sand trenches along the threshold to ignite soul fire. Consequently, a permanent wall of mystical blue flame guards the entry.
Adding Spikes and Soul Lighting
Mount pointed dripstone and iron bars atop all parapet peaks. Next, hang heavy chains supporting soul lanterns from high archways. Place decorative respawn anchors in corner niches for glowing energy accents. Finally, pave the entry road with cracked polished deepslate tiles. Your terrifying gothic nether gate now guards your dark realm.
4. Mountain Fortress Drawbridge Gatehouse

Carved into sheer mountain cliffs, this fortified gatehouse features a drawbridge. Deep ravines ensure total isolation from ground-based enemy attacks.
Impenetrable Cliffside Stronghold Entrance
Mountain drawbridge gates maximize natural terrain defenses to stop invading hordes. A massive stone gatehouse anchors directly into vertical rock faces. Furthermore, a heavy wooden bridge spans across an endless, yawning chasm. Thick iron winches and heavy chains simulate a functional lifting mechanism. Consequently, this fortress design proves entirely invincible against siege weaponry.
Mountain Gatehouse Materials
- Cobblestone, mossy cobblestone, and stone bricks
- Dark oak logs, stripped spruce, and spruce slabs
- Iron blocks, heavy chains, and iron bars
- Campfires, spruce trapdoors, and stone walls
- Anvils, grindstones, and redstone dust
- Water buckets and lava buckets
Carving the Mountain Gateway
Excavate a deep cavern entrance directly into the mountain cliff. Line the perimeter with heavy stone bricks and rough cobblestone. Next, construct a fortified exterior gatehouse projecting outward from rock. Add stone wall battlements along the upper mountain parapet edge. Therefore, cliffside defenders easily shower arrows down onto distant approaches.
Constructing the Suspended Drawbridge
Extend a horizontal bridge platform five blocks wide across the canyon. Use spruce planks bordered by dark oak log support beams. Next, angle the outer bridge section upward using spruce stairs. Attach heavy iron chains from the bridge tips to gatehouse winches. Consequently, the drawbridge appears frozen midway through a rapid defensive raising.
Detailing the Winch Room and Moat
Install grindstones and iron blocks inside the upper gatehouse chamber. These mechanical blocks simulate heavy industrial cable winches convincingly. Next, pour lava buckets into the deep ravine canyon below. Place unlit campfires topped with spruce trapdoors for bridge decking. Your rugged mountain drawbridge gatehouse is fully prepared for battle.
5. Royal Imperial White Quartz Barbican Gate
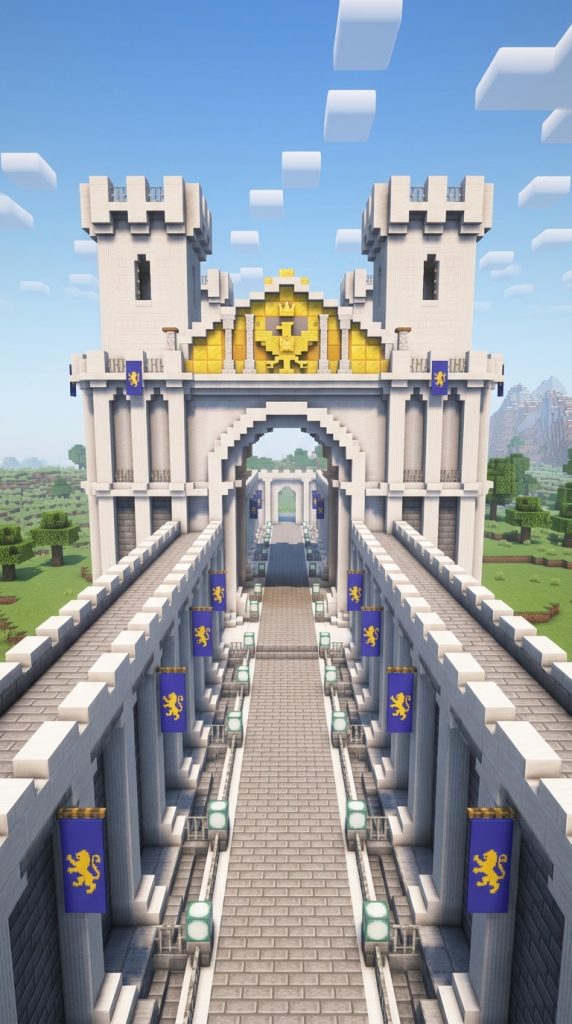
Gleaming white quartz, polished diorite, and gold accents define this entrance. It welcomes foreign dignitaries with unmatched imperial grandeur.
Majestic Imperial Architecture
Imperial quartz barbicans display wealth, power, and architectural refinement effortlessly. Flawless white quartz columns support sweeping classical triumphal arches. Furthermore, golden royal crests shimmer brightly in the midday sun. An extended fortified barbican corridor forces visitors through secure checkpoints. Consequently, this entrance symbolizes supreme authority across peaceful civilized kingdoms.
Imperial Barbican Palette
- Smooth quartz blocks, quartz stairs, and quartz pillars
- Polished diorite, diorite stairs, and calcite
- Gold blocks, raw gold blocks, and yellow banners
- Sea lanterns, smooth sandstone, and iron bars
- Blue wool, cyan carpet, and flowering azalea
- Light blue stained glass and end rods
Building the Outer Barbican Walls
Lay an extended rectangular corridor forty blocks ahead of the castle. Construct high exterior walls using smooth quartz and white calcite. Next, inset quartz pillars every four blocks for structural rhythm. Top the walls with polished diorite stairs forming elegant defensive crenellations. Therefore, the long approach channel funnels visitors safely toward inspection.
Sculpting the Triumphal Entrance Arch
Construct a monumental triple-arch gatehouse at the barbican entrance. Use smooth quartz stairs to carve wide, rounded Roman arches. Next, crown the central peak with shimmering solid gold blocks. Inset sea lanterns behind light blue stained glass for hidden radiance. Consequently, the monumental gateway shines brilliantly across the entire kingdom.
Furnishing Royal Checkpoints and Parapets
Hang long imperial blue banners embroidered with gold patterns. Next, lay a luxurious royal cyan carpet down the central avenue. Place iron bars within side archways for secure guard checkpoints. Furthermore, plant clipped azalea shrubs in polished quartz planter boxes. Your breathtaking imperial white quartz barbican now stands proudly complete.
6. Steampunk Iron Gear Mechanical Gate

Industrial copper pipes, rotating iron gears, and steam vents power this gate. It brings futuristic clockwork engineering to survival strongholds.
Industrial Clockwork Fortress Entrance
Steampunk mechanical gates showcase complex clockwork engineering within fantasy settings. Massive rotating gear wheels appear to raise heavy iron barriers. Furthermore, exposed copper pipes hiss white steam across stone walkways. Polished andesite and deepslate provide a gritty, industrial architectural aesthetic. Consequently, this gate proves ideal for inventive survival redstone engineers.
Steampunk Resource Checklist
- Cut copper, exposed copper, and copper grates
- Polished andesite, andesite walls, and smooth stone
- Iron blocks, heavy chains, and lightning rods
- Campfires, dispensers, and redstone comparators
- Dark oak planks, trapdoors, and spruce slabs
- Redstone lamps and daylight sensors
Framing the Industrial Gatehouse
Construct a blocky, utilitarian gatehouse using polished andesite and deepslate. Build heavy structural buttresses reinforced with vertical iron block pillars. Next, install copper grates across exterior windows for ventilation shafts. Add exposed copper stairs along roof borders for industrial trim. Therefore, the building radiates immense mechanical power and structural durability.
Assembling Decorative Clockwork Gears
Design large circular gear patterns on the exterior tower walls. Use dark oak stairs and trapdoors to shape interlocking teeth. Next, place smooth stone and iron blocks at gear centers. Run horizontal lightning rods between gears to mimic mechanical drive shafts. Consequently, the facade looks like an intricate, functioning clockwork machine.
Installing Steam Exhaust Vents
Conceal campfires beneath floor-mounted copper grates along the entryway. Thick columns of white smoke drift upward continuously through grates. Next, install dispensers loaded with water buckets for hiss sound effects. Wire redstone lamps to illuminate the mechanical works at dusk. Your intricate steampunk mechanical castle gate is now fully operational.
7. Desert Sandstone Citadel Gate
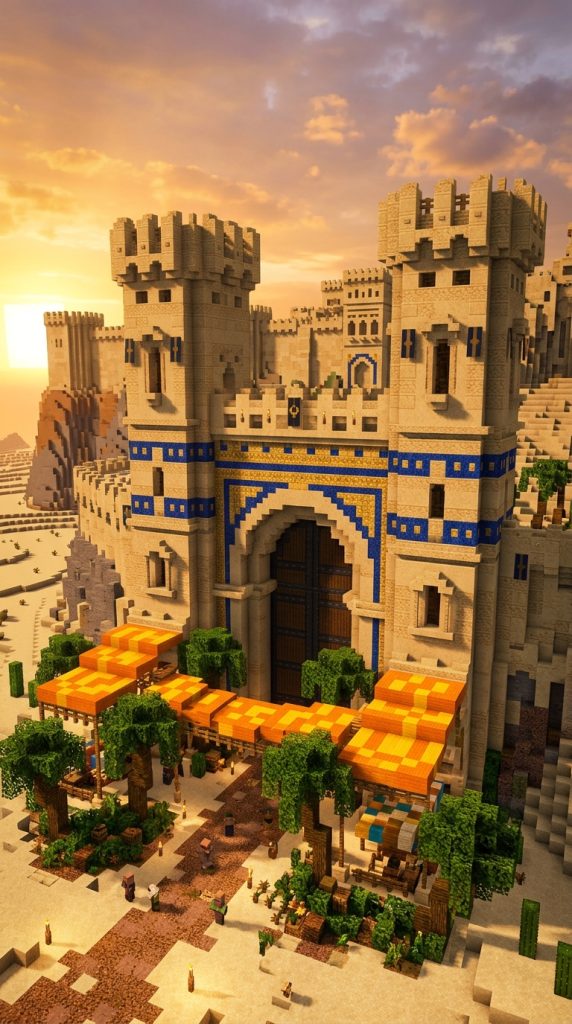
Sun-drenched sandstone, lapis lazuli mosaics, and palm wood define this desert citadel gate. It protects wealthy desert kingdoms from sandstorms.
Sun-Baked Oasis Fortress Design
Desert citadel gates rise like shimmering golden mirages above sand dunes. Multi-tiered cut sandstone towers withstand fierce, blinding desert sandstorms. Furthermore, vibrant lapis lazuli and turquoise mosaic bands line high battlements. Shaded fabric canopies offer cool relief over dusty merchant caravans. Consequently, this fortress gate establishes a wealthy, exotic desert empire.
Desert Citadel Palette
- Smooth sandstone, cut sandstone, and sandstone stairs
- Red sandstone, chiseled sandstone, and mud bricks
- Lapis lazuli blocks, gold blocks, and glazed terracotta
- Jungle fences, jungle trapdoors, and stripped jungle logs
- Orange, cyan, and yellow wool banners
- Decorated pots and cactus plants
Raising Sandstone Bastion Towers
Construct two thick square bastion towers using warm cut sandstone. Taper the tower walls inward slightly as they climb upward. Next, mix in chiseled sandstone blocks featuring carved creeper faces. Crown the upper towers with stepped sandstone stair battlements. Therefore, the towers maintain structural integrity against heavy siege attacks.
Insetting Royal Lapis Mosaics
Carve ornamental horizontal relief bands across the main gate arch. Fill these recessed channels with deep blue lapis lazuli blocks. Next, add accents of cyan glazed terracotta and shimmering gold. Frame the entire mosaic band using smooth sandstone upside-down stairs. Consequently, the colorful patterns contrast brilliantly against the warm desert stone.
Adding Shaded Caravan Checkpoints
Stretch vibrant orange and yellow wool canopies across the gateway. Support the colorful awnings using sturdy jungle wood fence posts. Next, place large decorated pottery jars filled with desert flora. Hang bright custom banners along the upper stone defensive battlements. Your grand desert sandstone citadel gate now protects your kingdom.
8. Viking Heavy Timber Fortified Palisade Gate
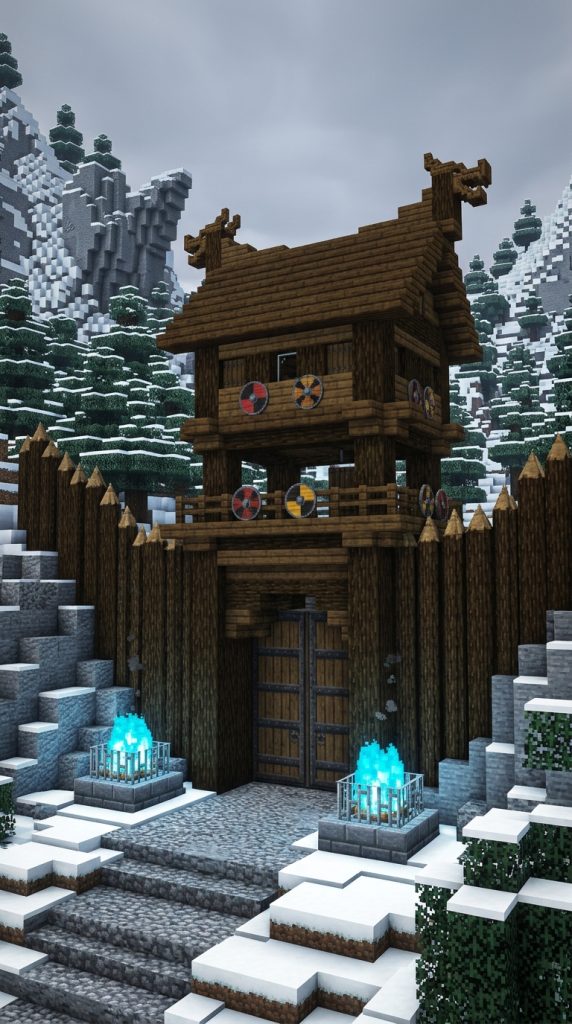
Constructed from rough spruce logs and sharp defensive spikes, this palisade gate repels invaders. Roaring bonfires guide northern warriors home safely.
Rugged Nordic Bastion Architecture
Viking palisade gates emphasize raw strength, heavy timber, and practical survival. Giant unstripped spruce logs form impenetrable, pointed wooden wall barriers. Furthermore, carved dragon heads crown the towering wooden gatehouse peaks. Roaring soul fire braziers cast dramatic shadows across snowy ground. Consequently, this gate embodies the fierce spirit of ancient northern warriors.
Nordic Palisade Materials
- Spruce logs, stripped spruce wood, and spruce planks
- Dark oak fences, gates, and dark oak trapdoors
- Cobblestone, mossy stone, and coarse dirt
- Campfires, soul campfires, and iron chains
- Shields, custom wolf banners, and carved pumpkins
- Snow layers and packed ice
Driving Heavy Log Foundations
Dig a deep trench and place vertical unstripped spruce logs. Vary log heights between twelve and sixteen blocks for organic defense. Next, sharpen wall peaks by placing pointed spruce fence posts. Reinforce the palisade base with rough cobblestone and coarse dirt. Therefore, the timber barrier resists battering rams and heavy axe strikes.
Framing the Dragon-Crest Gatehouse
Build an elevated wooden guardhouse above the central log archway. Construct a steep, pitched wooden roof using dark oak stairs. Next, carve sweeping wooden dragon prows extending from roof gables. Hang iron chains supporting glowing lanterns beneath the wooden overhangs. Consequently, the gatehouse radiates imposing tribal authority over cold northern valleys.
Adding Nordic Defensive Details
Mount crafted wooden shields along the upper palisade walkway rails. Next, place soul fire campfires atop corner wooden lookout towers. Hang black and red wolf banners beside the main entry. Furthermore, scatter snow layers across wooden roof eaves for realism. Your fierce Viking heavy timber gatehouse stands ready for battle.
9. Oriental Pagoda Moon Arch Gate
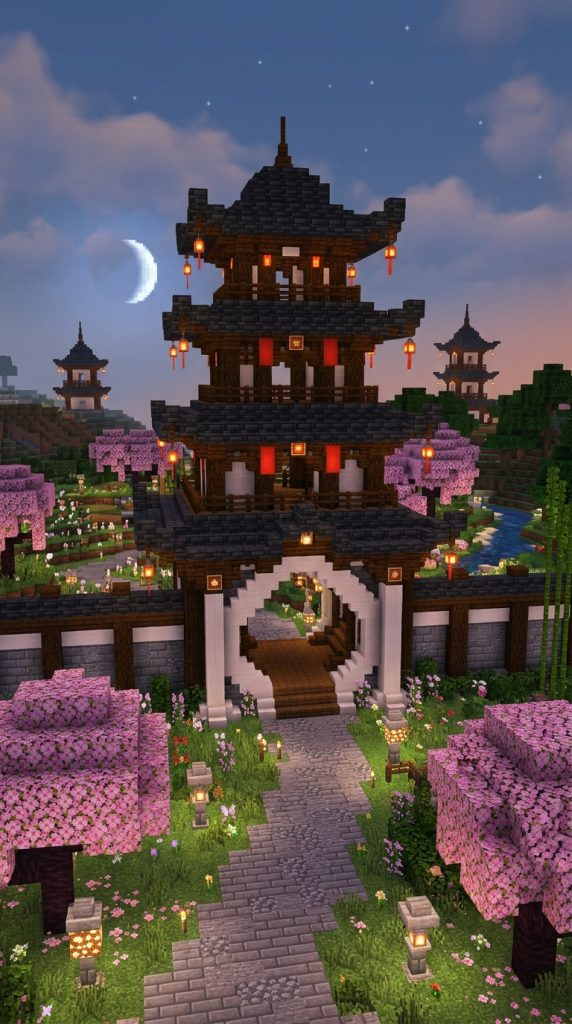
Tiered sweeping pagoda roofs, crimson mangrove pillars, and circular moon arches define this gate. It brings harmonious oriental elegance to kingdoms.
Serene East Asian Gate Design
Oriental pagoda gates combine spiritual harmony with formidable castle defenses. Multi-tiered, upward-curving tiled roofs shelter the heavy wooden entrance beneath. Furthermore, a perfectly circular stone moon arch frames the inner courtyard. Glowing red paper lanterns cast soft, warm reflections across polished paths. Consequently, this design brings peace, balance, and historic Asian grandeur.
Oriental Gate Resource Checklist
- Mangrove logs, stripped mangrove, and mangrove planks
- Deepslate tiles, deepslate tile stairs, and slabs
- Smooth quartz, white concrete, and red terracotta
- Red lanterns, regular lanterns, and bamboo stalks
- Dark oak fences, gates, and cherry leaf blocks
- Lily pads and water cauldrons
Sculpting the Stone Moon Arch
Construct a large circular archway using smooth quartz and concrete. Make the interior circular opening exactly six blocks in diameter. Next, border the outer ring with dark deepslate tile stairs. Contrast the white stone circle with bold red terracotta perimeter walls. Therefore, the entrance frames the interior kingdom garden like art.
Building Tiered Pagoda Roofs
Construct sweeping, multi-layered roofs above the main gate structure. Use deepslate tile stairs to build dramatic, upward-curved roof corners. Next, support the wide eaves using stripped mangrove wood brackets. Add an upper observation pagoda crowned with a sharp spire. Consequently, the elegant roofline commands attention from across the map.
Hanging Glowing Red Lanterns
Suspend glowing red lanterns from every curved roof corner eave. Next, plant flowering cherry blossom trees flanking both exterior walls. Place potted bamboo stalks inside decorative entrance niches along walkways. Furthermore, build small water basins using cauldrons topped with lily pads. Your magnificent oriental pagoda moon gate is now completely finished.

10. Ancient Roman Triumphal Arch Gate
Classical marble columns, triumphal friezes, and grand rounded arches define this Roman gate. It commemorates victorious legions returning from distant wars.
Monumental Classical Roman Architecture
Ancient Roman triumphal gates celebrate imperial conquest, order, and monumental engineering. Three majestic rounded archways allow simultaneous entry for chariots and legions. Furthermore, classical Corinthian columns frame decorative marble friezes and statues. Golden inscriptions and bronze braziers crown the top attic story. Consequently, this gate projects unmatched imperial power and timeless cultural glory.
Roman Triumphal Palette
- Quartz blocks, quartz pillars, and chiseled quartz
- Smooth stone, stone brick stairs, and stone slabs
- Gold blocks, yellow terracotta, and red wool
- Fire braziers, netherrack, and flint and steel
- Armor stands, iron armor, and golden swords
- Oak trapdoors and polished granite
Laying Monumental Quartz Piers
Construct four massive quartz foundation piers spaced across the avenue. Make the central chariot opening six blocks wide for traffic. Next, make the two outer pedestrian side arches three blocks wide. Wrap pier bases with smooth stone slabs for classical architectural weight. Therefore, the triumphal gateway accommodates massive imperial traffic flows smoothly.
Turning Classical Rounded Arches
Connect the quartz piers using smooth quartz stairs and slabs. Curve the blocks carefully to form perfect semi-circular Roman arches. Next, erect tall fluted quartz pillars flanking every arch opening. Cap each pillar with chiseled quartz blocks to mimic capitals. Consequently, the facade displays authentic classical symmetry and exquisite proportions.
Crowning the Attic Story
Build a solid rectangular attic story atop the triumphal arches. Inset yellow terracotta and gold blocks to simulate historical inscriptions. Next, install netherrack fire braziers burning atop all four corners. Place armor stands clad in shining iron gear within niches. Your monumental Roman triumphal arch gate stands eternally unconquered.
11. Submerged Atlantis Sea Prismarine Gate

Submerged beneath ocean waves, this mythical gate utilizes glowing prismarine and conduits. It guards sunken aquatic palaces from deep-sea monsters.
Oceanic Sunken Citadel Entrance
Atlantis sea prismarine gates guard mythical underwater kingdoms with magical brilliance. Sweeping dark prismarine arches blend seamlessly into deep ocean trenches. Furthermore, pulsating conduit cores grant permanent underwater vision and breathing power. Giant bubble column airlocks prevent water from flooding interior palace halls. Consequently, this gate provides an awe-inspiring entrance for aquatic bases.
Atlantis Gate Resource List
- Prismarine, prismarine bricks, and dark prismarine
- Sea lanterns, conduits, and heart of the sea
- Nautilus shells, cyan glass, and soul sand
- Magma blocks, iron bars, and polished diorite
- Kelp, sea grass, and flowering coral blocks
- Water source blocks and warped slabs
Erecting Prismarine Sea Columns
Construct two massive spiraling pillars using alternating dark and brick prismarine. Anchor the pillar bases deep into the rocky ocean floor. Next, crown the column peaks with glowing sea lantern beacons. Twist warped slabs around pillars to create flowing, organic oceanic curves. Therefore, the underwater portal stands out brilliantly in dark trenches.
Activating the Central Conduit Core
Build an underwater conduit frame using dark prismarine brick rings. Place the heart of the sea inside to activate oceanic power. The activated conduit emits a mystical blue eye and defensive aura. Furthermore, it bathes the entire aquatic gateway in bright light. Consequently, hostile drowned mobs are effortlessly eliminated upon approaching the gate.
Installing Bubble Column Airlocks
Dig trenches beneath the entrance arch and place soul sand blocks. Rising bubble columns create a natural barrier that recharges player oxygen. Next, plant vibrant fire coral and tube coral along walls. Allow wild kelp forests to grow densely around exterior boundaries. Your magical underwater Atlantis prismarine gate now guards the depths.
12. Industrial Redstone Piston Iron Gate
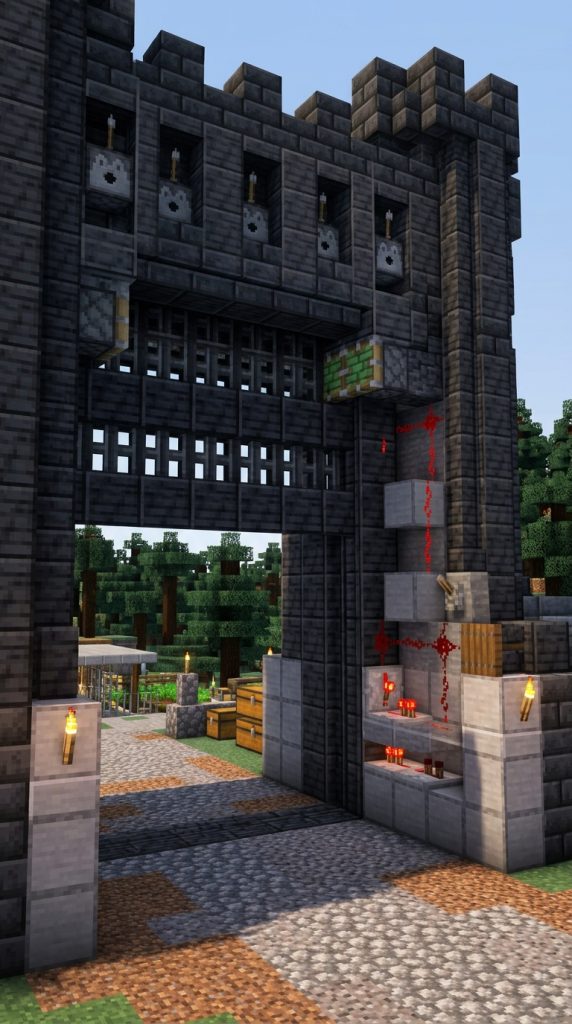
Featuring automated redstone mechanics, this heavy iron door opens seamlessly. Hidden pistons raise and lower reinforced iron block barriers automatically.
Automated Survival Redstone Engineering
Industrial redstone gates deliver functional high-tech security for modern survival bases. Concealed sticky pistons effortlessly retract heavy iron block portcullis grates. Furthermore, automated pressure plates allow smooth, convenient entry for base owners. Hidden wall dispensers instantly shoot hostile invaders attempting unauthorized entry. Consequently, this build combines impenetrable defense with ultimate survival convenience.
Redstone Gate Materials
- Sticky pistons, regular pistons, and redstone dust
- Redstone repeaters, comparators, and redstone torches
- Iron blocks, heavy weighted pressure plates, and levers
- Polished deepslate, smooth stone, and iron bars
- Dispensers, arrows, and target blocks
- Observers and obsidian blocks
Digging the Redstone Mechanism Pit
Excavate a pit five blocks deep beneath the entrance floor. Place a horizontal row of five upward-facing sticky pistons below. Next, place solid iron blocks directly atop the sticky piston heads. Wire redstone repeaters behind each piston set to single-tick delays. Therefore, the lower iron gate section retracts cleanly below ground.
Wiring the Overhead Drop Pistons
Mount five downward-facing regular pistons five blocks above the floor. Attach iron bars beneath piston heads to form upper grates. Next, run redstone dust lines connecting upper and lower piston mechanisms. Install redstone torches to create a stable, synchronized logic inverter circuit. Consequently, a single lever flip opens both gate halves simultaneously.
Enclosing Mechanism and Traps
Encase all exposed redstone wiring inside polished deepslate wall casings. Place stone pressure plates on interior sides for hands-free opening. Next, conceal arrow dispensers behind decorative stairs facing the outer threshold. Wire hidden target blocks to trigger arrow traps during mob attacks. Your automated industrial redstone iron gate is now fully armed.
13. Ruined Overgrown Ancient Bastion Gate
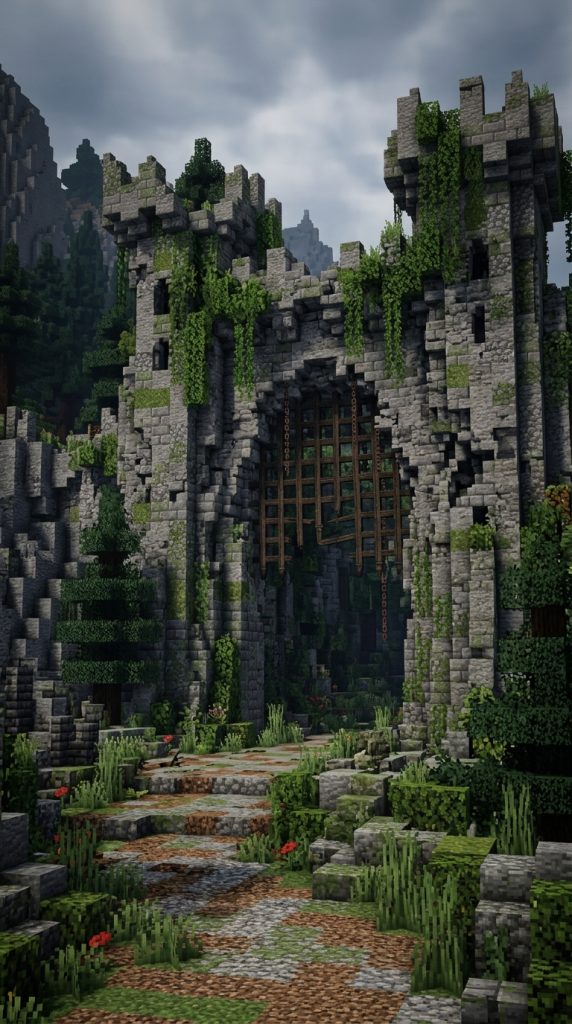
Crumbling stone, weeping vines, and cracked obsidian define this ruined bastion gate. It tells haunting stories of forgotten ancient kingdom wars.
Atmospheric Post-Apocalyptic Fortification
Ruined overgrown bastion gates evoke deep mystery and lost historical lore. Collapsed stone brick arches reveal ancient defensive skeletons beneath. Furthermore, lush moss carpets and weeping vines reclaim towering military walls. Broken portcullis grates hang frozen in decaying, asymmetrical ruin. Consequently, this atmospheric gate provides unforgettable character for fantasy adventure worlds.
Ruined Bastion Materials
- Cracked stone bricks, mossy stone, and cobblestone
- Mud bricks, coarse dirt, and rooted dirt
- Moss blocks, moss carpet, and weeping vines
- Spore blossoms, glow lichen, and azalea leaves
- Dark oak fences, broken chains, and lanterns
- Pointed dripstone and gravel
Framing the Crumbling Stone Bastion
Construct an asymmetrical stone gatehouse using mixed stone and mud bricks. Replace large wall sections with coarse dirt and rough cobblestone. Next, carve deep structural fractures using cracked stone brick stairs. Leave one flanking tower half-collapsed with fallen rubble below. Therefore, the structure looks authentically battered by centuries of violent sieges.
Weaving Overgrown Flora and Foliage
Drape weeping vines and glow lichen across crumbling wall faces. Next, place lush moss blocks and carpets along broken parapets. Hang fragrant spore blossoms beneath cracked ceiling arches for drifting particles. Scatter flowering azalea leaves across fallen stone rubble piles on ground. Consequently, nature appears to aggressively reclaim the ancient military ruin.
Detailing the Broken Portcullis Grate
Construct a crooked, partially collapsed portcullis using dark oak fences. Hang broken iron chains unevenly from damaged ceiling winches above. Next, place unlit, rusted lanterns on leaning stone fence posts. Scatter gravel, coarse dirt, and cobwebs across the abandoned road. Your atmospheric ruined overgrown bastion gate is now fully completed.