21 Cute And Spooky Halloween Crochet Ideas You Need to Make
Crocheting for Halloween is one of the most delightful creative rituals of the autumn season. When the leaves begin to turn and the air turns crisp, crafters around the world pick up their hooks to weave whimsical amigurumi, cozy home decor, and festive wearable accessories. The charm of Halloween crochet lies in its versatility: you can lean into adorable, smiling pumpkin creatures or embrace moody, vintage-gothic curiosities that elevate your seasonal interior styling.
Whether you are an absolute beginner looking for quick weekend projects or an experienced fiber artist seeking intricate heirloom patterns, this guide covers 21 cute, spooky, and highly aesthetic Halloween crochet projects to inspire your handmade seasonal collection.
Essential Crochet Techniques for Halloween Amigurumi & Decor
Before diving into specific patterns, mastering a few core amigurumi and decorative techniques will ensure your Halloween projects look polished and professional:
- The Magic Ring (Magic Circle): The foundational starting technique for round amigurumi projects like pumpkins, skulls, and ghost bodies. It eliminates the center hole, preventing fiberfill stuffing from spilling out.
- Invisible Single Crochet Decrease (Inv Dec): Inserting your hook only through the front loops of two consecutive stitches before yarning over creates a seamless decrease without gaps or bumps.
- Yarn Under (YU/YO) Stitching: Yarning under instead of yarning over creates tight “X”-shaped stitches rather than traditional “V” shapes. This tightens your fabric weave, providing maximum structural firmness for stuffed toys.
- Surface Crochet & Embroidery: Using contrasting embroidery floss or sport-weight yarn to embroider delicate smiles, spiderweb lines, or blushing pink cheeks adds personality and detail to flat or stuffed crochet surfaces.
- Blocking Flat Motifs: Wet-blocking or steam-blocking lace spiderweb coasters, bunting banners, and granny squares squares off their edges and opens up intricate lace stitches.
1. Plump Velvet Ribbed Heirloom Pumpkins
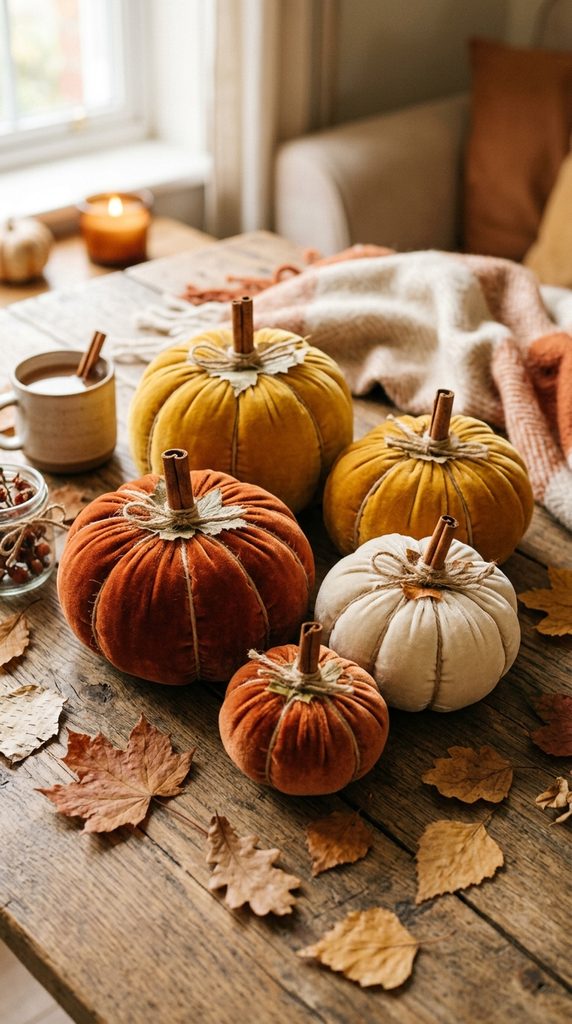
Ultra-soft chenille yarn worked in simple back-loop-only rows, gathered tightly and cinched with real cinnamon stick stems and jute twine.
Cozy Cottagecore Autumn Harvest
These squishy, tactile velvet pumpkins are a staple of cozy autumn home decor. By working flat rectangles in back-loop-only single or half-double crochet, the fabric naturally creates distinct vertical ridges that resemble natural pumpkin segments. Adding a real cinnamon stick for the stem infuses your living room with a subtle, warm autumn fragrance.
Pattern & Construction Blueprint
- Skill Level: Beginner
- Yarn Weight: Super Bulky (Size 6) Chenille or Velvet Yarn
- Hook Size: 6.00 mm (J-10)
- Dimensions: 6″ to 8″ diameter
Step-by-Step Making Guide
- Crochet the Ribbed Panel: Chain 21. Work 30 rows of half-double crochet exclusively into the back loops only (BLO) to produce a stretchy, ribbed rectangle.
- Seam the Cylinder: Fold the rectangle in half and slip stitch the starting edge to the final row to form an open fabric tube.
- Cinch the Base: Thread a tapestry needle with matching yarn, weave in and out through the bottom edge of the cylinder, pull tightly to close the base completely, and knot securely.
- Stuff and Shape: Fill the cavity firmly with polyester fiberfill stuffing. Weave yarn through the top rim, pull the opening almost closed, and anchor the yarn.
- Segment and Stem: Wrap heavy embroidery thread or yarn around the exterior of the pumpkin four times from top to bottom, pulling firmly to define deep ribbed segments. Insert a 3-inch cinnamon stick into the center top and secure it with craft glue.
2. Little Floating Sheet Ghost with Blushing Cheeks
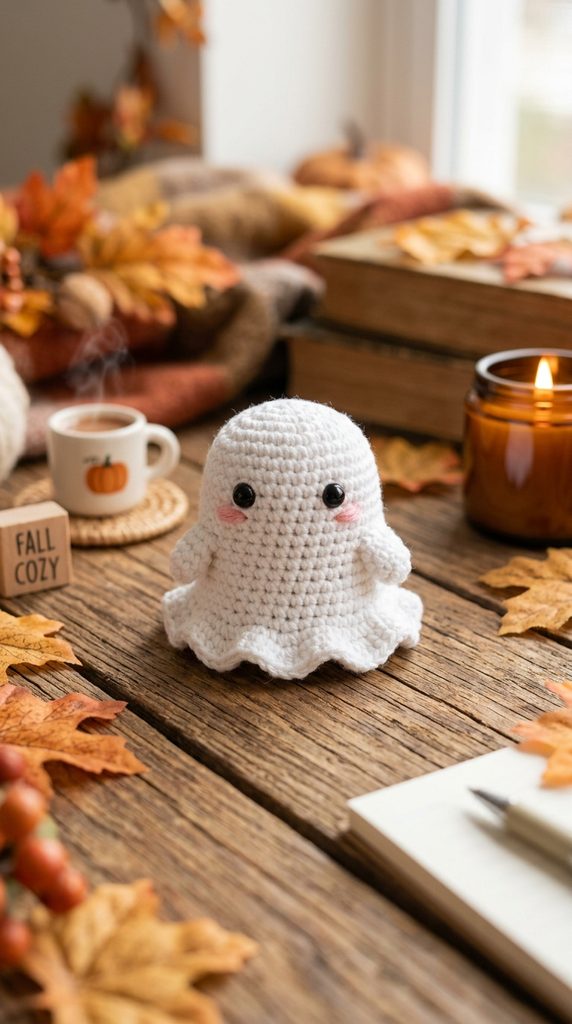
A seamless, bell-shaped white amigurumi ghost featuring tiny safety eyes, embroidered pink blush, and an undulating shell-stitch bottom hem.
Sweet Ethereal Desk Companion
This darling desk buddy brings gentle, friendly spookiness to any workspace or bookshelf. Worked from the top of the rounded head down in continuous spirals, the base flares out into a delicate scalloped ruffle that lets the ghost stand upright independently on flat surfaces.
Pattern & Construction Blueprint
- Skill Level: Advanced Beginner
- Yarn Weight: Worsted Weight (Size 4) Cotton or Acrylic
- Hook Size: 3.50 mm (E-4)
- Dimensions: 4″ tall
Step-by-Step Making Guide
- Crochet the Dome Head: Work 6 single crochet (sc) into a Magic Ring. Increase evenly over 5 rounds until you reach 30 stitches.
- Form the Ghost Body: Work even sc rounds for 12 rounds to create the straight, cylindrical sheet body.
- Insert Eyes: Snap 6 mm black safety eyes between rounds 8 and 9, spaced approximately 5 stitches apart.
- Create the Wavy Base: In the final round, work a repeating pattern of
[Slip stitch, skip 1 stitch, 5 double crochet in next stitch, skip 1 stitch]around the entire hem to create floating ruffled ripples. - Embroider Details: Use soft pink yarn or watered-down fabric paint to dab rosy circular cheeks beneath the eyes, and stitch a tiny “o”-shaped mouth with black floss.
3. Gothic Black Lace Spiderweb Coasters
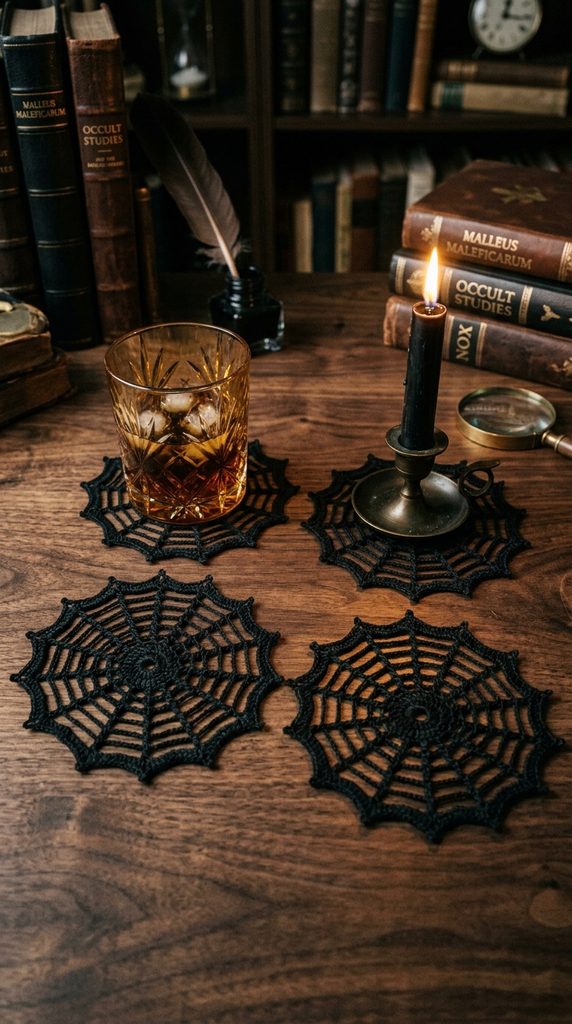
Intricate circular doilies worked with fine black mercerized cotton thread, featuring radiating spokes and delicate picot-point web borders.
Victorian Dark Academia Tablescape
Protect your wooden tabletops with gothic sophistication. These delicate, starched black spiderweb coasters look striking beneath amber cocktail glasses, ceramic mugs, and pillar candles. Despite their intricate lace appearance, the pattern works up quickly using basic chains, treble crochets, and picot stitches.
Pattern & Construction Blueprint
- Skill Level: Intermediate
- Yarn Weight: Size 10 Mercerized Cotton Crochet Thread (or Sport Weight Yarn)
- Hook Size: 2.25 mm (B-1)
- Dimensions: 5″ to 6″ diameter
Step-by-Step Making Guide
- Center Ring: Work 12 double crochet (dc) into a magic ring, joining with a slip stitch.
- Radial Spoke Rounds: Chain 4 (counts as treble crochet), chain 3, then work
[1 treble crochet, chain 3]into every stitch around to create 12 distinct spokes. - Expand Web Arcs: Increase the chain lengths between spokes on subsequent rounds (Chain 5, then Chain 7), securing each spoke intersection with a front-post treble crochet to give the web structural relief.
- Picot Outer Edge: Finish the final round with decorative picots (chain 3, slip stitch in 3rd chain from hook) at the tip of each spoke.
- Blocking: Submerge the coaster in a mixture of water and fabric stiffener, pin each picot tip outward onto a blocking board, and let dry completely.
4. Kawaii Candy Corn Softie with Tiny Witch Hat
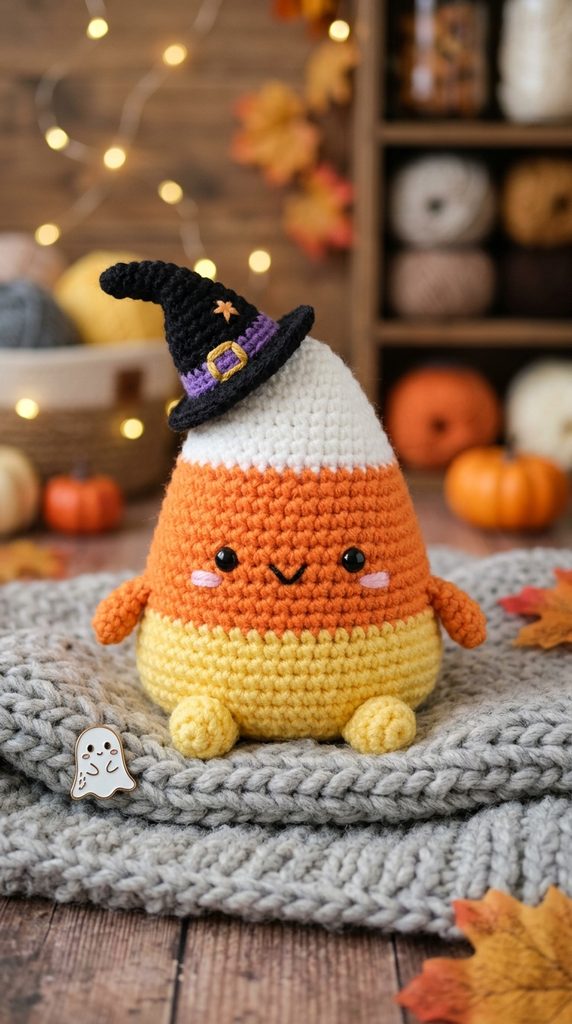
Tri-colored triangular amigurumi layered in buttercup yellow, creamsicle orange, and marshmallow white, topped with a crooked black witch hat.
Nostalgic Autumn Confection
Reimagining traditional candy corn into a squishy plushie brings cheerful harvest warmth to your seasonal decor. The triangular shape is constructed from the flat yellow base upward, shifting smoothly into orange and tapering to a rounded white tip, adorned with a tiny removable black witch hat.
Pattern & Construction Blueprint
- Skill Level: Easy
- Yarn Weight: Worsted Weight (Size 4)
- Hook Size: 3.50 mm (E-4)
- Dimensions: 5.5″ tall
Step-by-Step Making Guide
- The Yellow Base: Start with a chain of 15, working in an oval around both sides of the foundation chain to establish the wide, flat base.
- Color Shifts & Tapering: Work 4 rounds of yellow, seamlessly switch to pumpkin orange for 6 rounds while making gradual side decreases, then switch to white for the final 6 rounds to form the point.
- Face Details: Insert 8 mm safety eyes in the center of the orange band and embroider a wide smiling mouth with black thread.
- Miniature Witch Hat: Using black yarn, crochet a tiny cone starting with 4 sc in a magic ring, expanding outward over 6 rounds, and finishing with a wide-brim round of double crochets.
- Assembly: Sew the witch hat onto the top white point at a jaunty angle and add a tiny purple yarn band around the crown.
5. Cozy Pocket-Sized Posable Black Cat
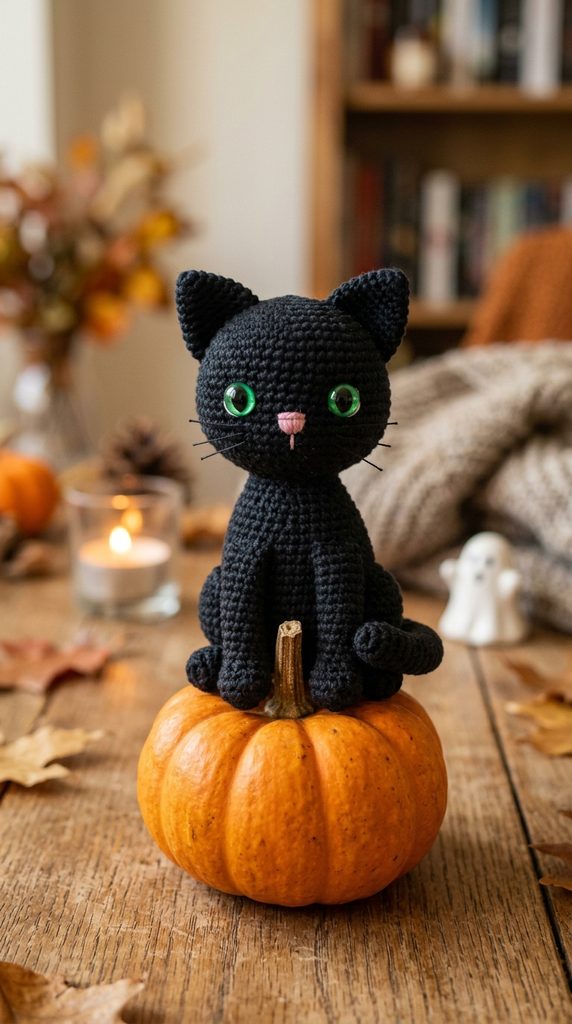
Sleek matte-black yarn shaped into an alert feline with pointed triangular ears, emerald-green safety eyes, and a pipe-cleaner wire posable tail.
Classic Midnight Familiar
No Halloween collection is complete without a sleek black cat. This compact amigurumi design can sit on a shelf or perch atop a pumpkin. Inserting a chenille pipe cleaner inside the tail allows you to bend and curl it around objects.
Pattern & Construction Blueprint
- Skill Level: Intermediate
- Yarn Weight: DK (Size 3) or Worsted (Size 4) Black Acrylic/Wool
- Hook Size: 3.00 mm
- Dimensions: 4.5″ tall
Step-by-Step Making Guide
- Body & Head: Crochet an oval-shaped head and an elongated pear-shaped body in black yarn, stuffing firmly.
- Pointed Ears: Work two small triangles: 4 sc in magic ring, increasing by 2 stitches every round for 3 rounds. Pinch flat and sew to the top corners of the head.
- Facial Features: Snap 8 mm bright green safety eyes into the head, embroider a miniature pink nose using a satin stitch, and add white embroidery thread whiskers.
- Posable Tail: Chain 21 in black yarn, work single crochets back down the chain around a folded black pipe cleaner, and sew the tail to the base of the spine.
- Front Paws: Crochet two tiny cylindrical paws and sew them to the front chest so the cat sits upright securely.
6. Whimsical Flying Witch Broomstick Garland
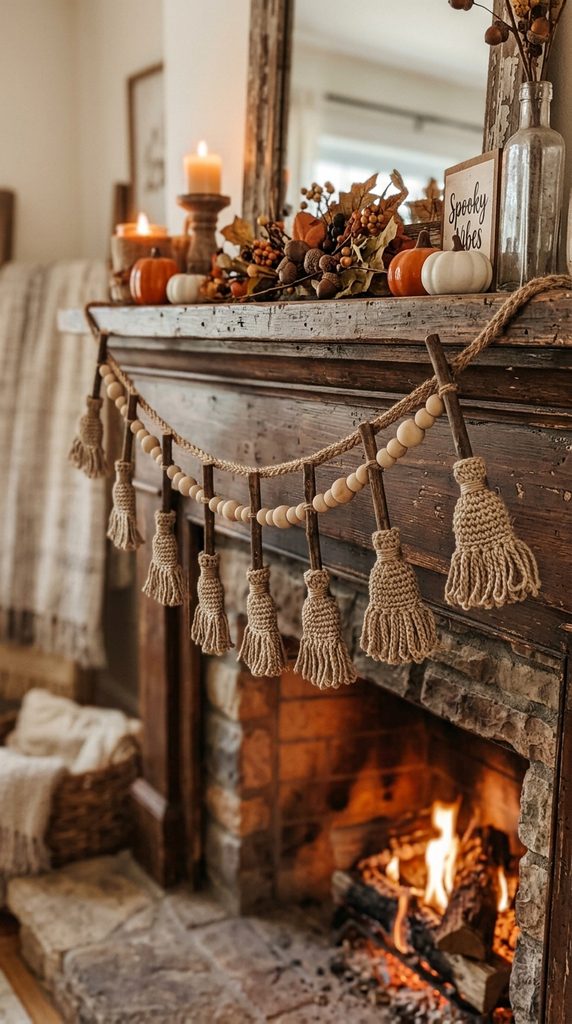
Miniature crocheted broomsticks featuring textured jute twine bristles and dark wood handles, strung along a rustic braided yarn bunting.
Rustic Farmhouse Mantel Bunting
Drape cozy seasonal character across your fireplace mantel, kitchen window, or staircase. This garland combines rustic jute twine with warm brown yarn to create miniature vintage broomsticks separated by wooden beads.
Pattern & Construction Blueprint
- Skill Level: Easy
- Yarn Weight: Worsted Weight (Brown) & Natural Jute Twine
- Hook Size: 4.00 mm (G-6)
- Dimensions: 60″ garland length (each broom measures 5″)
Step-by-Step Making Guide
- Broomstick Handles: Using dark brown or espresso yarn, chain 16, work single crochets back along the chain, fold in half lengthwise, and slip stitch closed to form a sturdy wooden dowel shape.
- Jute Bristles: Cut 12 strands of natural jute twine measuring 4 inches in length. Fold them in half around the bottom tip of the crocheted handle.
- Secure the Broom Head: Wrap a length of black or purple yarn tightly around the top of the folded twine bristles multiple times, knot securely, and trim the bottom bristles evenly.
- Fray the Twine: Use a wide-tooth comb or wire pet brush to separate the jute plies, creating fluffy, realistic broom bristles.
- Assemble Garland: Crochet a 6-foot chain, slip stitching through the tops of 7 to 9 broomsticks spaced evenly, alternating with natural wooden craft beads.
7. Chunky Cauldron Candy Bowl with Dripping Slime
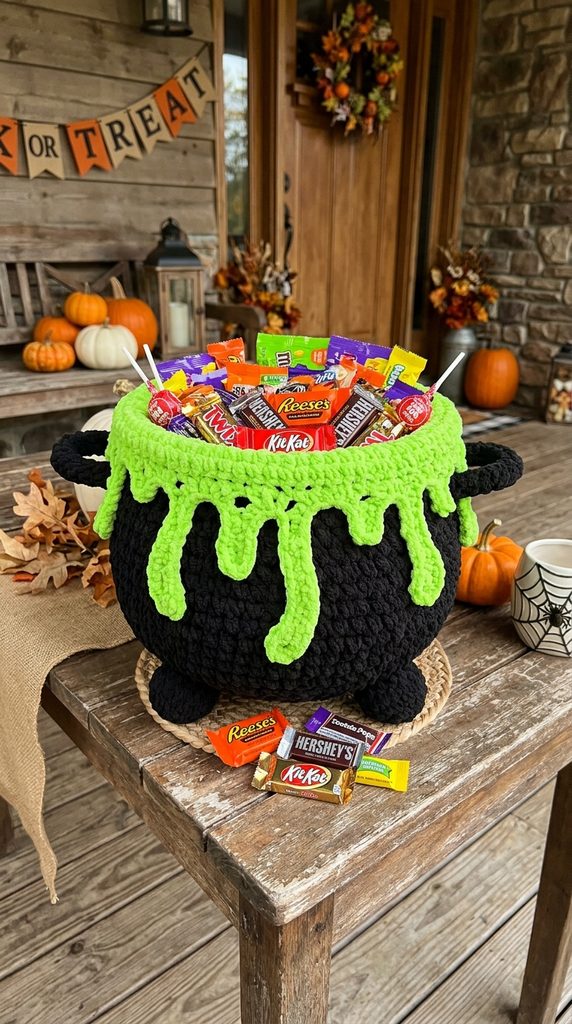
A sturdy, flat-bottomed black cauldron bowl detailed with side handles, four ball feet, and an overhanging lime-green wavy slime rim.
Functional Trick-or-Treat Accent
This sturdy, functional candy bowl is perfect for holding wrapped Halloween sweets by your front entryway. Worked with two strands of black yarn held together for rigidity, the bowl features a distinct flared belly and a dripping toxic-green slime border along the rim.
Pattern & Construction Blueprint
- Skill Level: Intermediate
- Yarn Weight: Chunky (Size 5) or Two Strands of Worsted Weight Held Together
- Hook Size: 5.00 mm (H-8)
- Dimensions: 8″ wide by 6″ deep
Step-by-Step Making Guide
- Sturdy Cauldron Base: Double-strand black yarn and work single crochets in an expanding circular base up to 48 stitches.
- Shaping the Belly: Work 6 rounds even, increase slightly over 3 rounds to form the rounded belly, then decrease to form the neck before flaring the top lip outward.
- Cauldron Feet: Crochet four small spheres (6 sc in magic ring for 3 rounds), stuff firmly, and sew symmetrically to the flat bottom so the cauldron stands elevated.
- Side Handles: Chain 12, slip stitch back down, and fasten to opposite sides of the cauldron rim.
- Dripping Slime Lip: Join vibrant neon-green yarn to the inner rim. Work a round of single crochet, followed by alternating drop stitches (chains of 3, 5, and 7 slip-stitched back into the rim) to create dripping green slime.
8. Gothic Granny Square Skull Motif Blanket
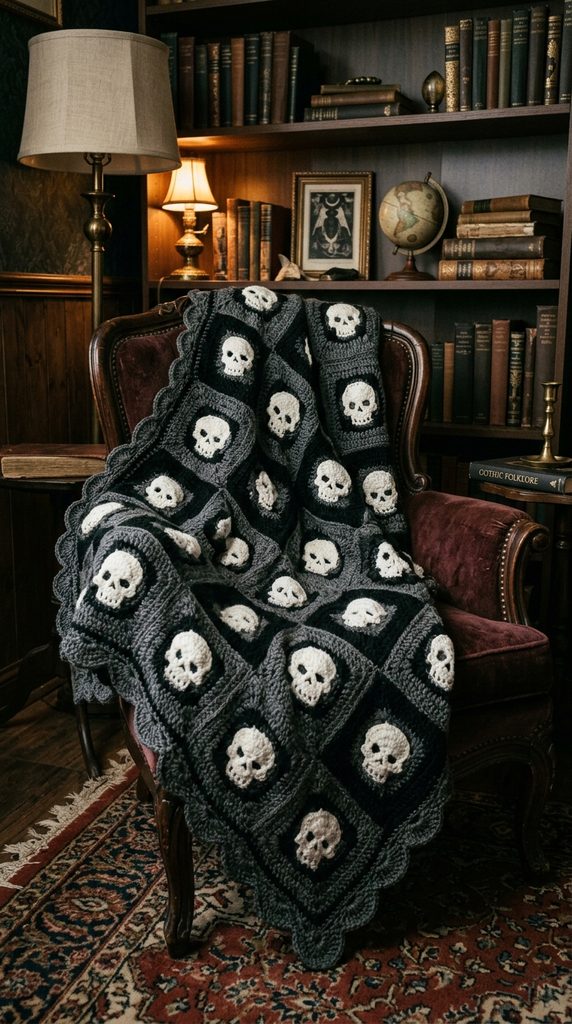
Classic black-and-charcoal granny squares centered with a dimensional white sugar skull motif, joined into an elegant gothic throw blanket.
Heirloom Moody Autumn Throw
Elevate traditional granny square blankets into a sophisticated gothic accent piece. Each square features an intricate, raised white skull silhouette in the center, framed by deep charcoal and jet-black granny stitch rounds.
Pattern & Construction Blueprint
- Skill Level: Intermediate
- Yarn Weight: Worsted Weight (Size 4) Acrylic/Wool Blend
- Hook Size: 4.50 mm (7)
- Dimensions: 48″ x 60″ finished blanket (40 individual squares)
Step-by-Step Making Guide
- The Center Skull Motif: Using white yarn, crochet the cranial dome and jawline using a combination of half-double and treble crochets. Embroider hollow eye sockets and a triangular nasal cavity with black yarn.
- Squaring the Circle: Join charcoal gray yarn around the outer perimeter of the skull motif, using treble crochets in corners and single crochets along sides to convert the skull into a flat, 4-cornered square.
- Granny Stitch Border: Work two rounds of classic granny clusters (3 double crochet clusters separated by 1 chain) using jet-black yarn around the charcoal frame.
- Join the Squares: Use the flat-slip-stitch join method on the wrong side to assemble the squares into a 5×8 grid.
- Scalloped Border: Finish the blanket perimeter with a picot-edged shell border in charcoal gray.
9. Smiling Halloween Pumpkin Pot Cozies
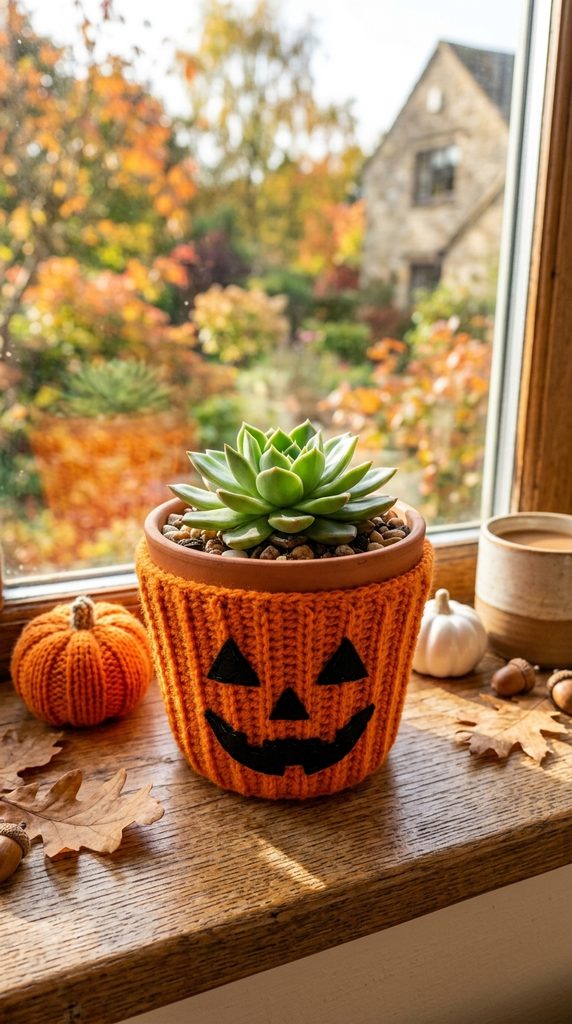
Textured orange yarn cozies ribbed with post stitches, fitted snugly around terracotta plant pots, and finished with stitched jack-o’-lantern faces.
Instant Plant Shelf Transformation
Give your indoor houseplant collection a seasonal makeover in minutes. These stretchy, ribbed plant cozies slide over standard 4-inch and 6-inch terracotta pots, featuring stitched jack-o’-lantern grins that brighten up window sills and plant stands.
Pattern & Construction Blueprint
- Skill Level: Easy
- Yarn Weight: Bulky (Size 5) or Worsted Weight (Size 4)
- Hook Size: 5.00 mm (H-8)
- Dimensions: Custom-fitted for standard 4″ or 6″ pots
Step-by-Step Making Guide
- Measure Your Pot: Chain a foundation row matching the circumference of your plant pot base.
- Work Ribbed Sides: Work in continuous rounds of front-post double crochet (FPDC) and back-post double crochet (BPDC) alternating stitches. Increase 2 to 4 stitches evenly every few rounds to match the flared taper of the pot.
- Top Rim: Finish with a round of reverse single crochet (crab stitch) to create a neat, sturdy lip.
- Stitch Jack-o’-Lantern Faces: Cut triangular eyes, a nose, and a jagged toothy smile from black felt sheets, and hand-sew or glue them to the front of the cozy.
- Fitting: Slide the cozy onto your potted pothos, succulent, or snake plant.
10. Amigurumi Haunted Eyeball Pod Monster
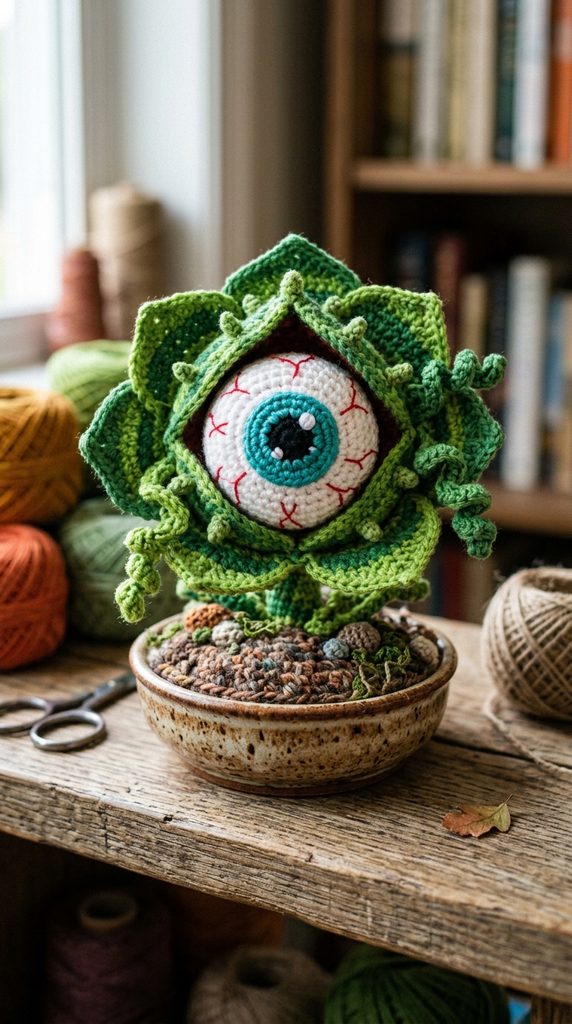
A quirky, colorful fantasy monster featuring a giant white central eyeball, red embroidered capillaries, and a leafy succulent body pod.
Whimsical Botanical Oddity
Combining retro sci-fi creature features with cute desk plants, this quirky monster looks like a magical carnivorous houseplant. The bloodshot center eye sits nested inside an open, leafy floral pod, complete with tiny resting root feet.
Pattern & Construction Blueprint
- Skill Level: Intermediate
- Yarn Weight: DK (Size 3) or Worsted (Size 4)
- Hook Size: 3.25 mm (D-3)
- Dimensions: 5″ tall
Step-by-Step Making Guide
- The Eyeball Sphere: Start with a turquoise or purple yarn iris (6 sc in magic ring), switch to white yarn, and expand to 30 stitches. Stuff firmly and close the sphere.
- Embroider Bloodshot Veins: Use single strands of crimson embroidery floss to stitch jagged, branching capillary veins across the white eye.
- Crochet the Leaf Pod: Using forest-green yarn, crochet a wide, cup-shaped base. Work five petal-like pointed leaves around the rim that cup upward around the eyeball.
- Assembly: Nest the eyeball into the green leaf pod, securing it with hidden stitches.
- Potting: Place the finished eyeball plant inside a miniature ceramic succulent pot filled with brown yarn soil.
11. Dainty Hanging Micro-Bat Ornaments
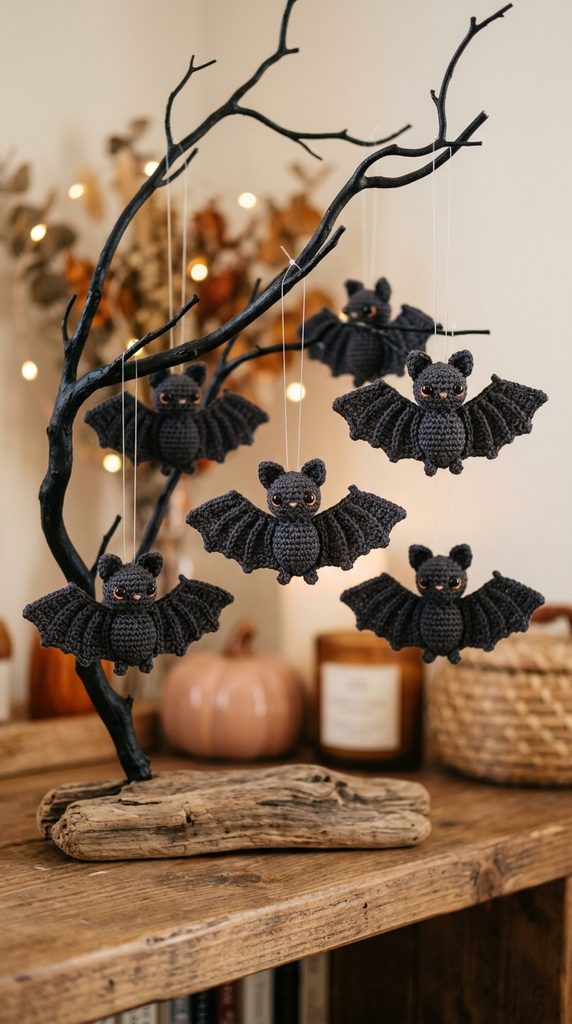
Folded charcoal-gray amigurumi bodies with scalloped ribbed wings, tiny pointed ears, and suspension loops for hanging on seasonal branch trees.
Charming Treetop Swarm
Create a miniature flock of cute bats to hang from indoor houseplants or painted black Halloween branch displays. Their wings feature delicate, ribbed scallop details created through short-row shaping.
Pattern & Construction Blueprint
- Skill Level: Advanced Beginner
- Yarn Weight: Sport (Size 2) or DK (Size 3)
- Hook Size: 2.75 mm (C-2)
- Dimensions: 6″ wingspan
Step-by-Step Making Guide
- The Bat Body: Crochet a small cylindrical body in dark charcoal yarn, tapering slightly at the bottom. Insert 4 mm black safety eyes near the top.
- The Scalloped Wings: Chain 12. Work down the row using graduated stitches (sc, hdc, dc, tr), chain 3, and turn, working back in the back loops to create dimensional wing ridges with three pointed scallops.
- Ears & Feet: Crochet two miniature triangular ears and stitch them to the top of the head. Add two tiny thread loops at the base for claws.
- Assembly: Sew the wings to the back of the body, curving them forward slightly.
- Hanging Loop: Fasten a loop of clear nylon thread or black yarn through the top of the head for hanging.
12. Vintage Stuffed Frankenstein Monster Bear
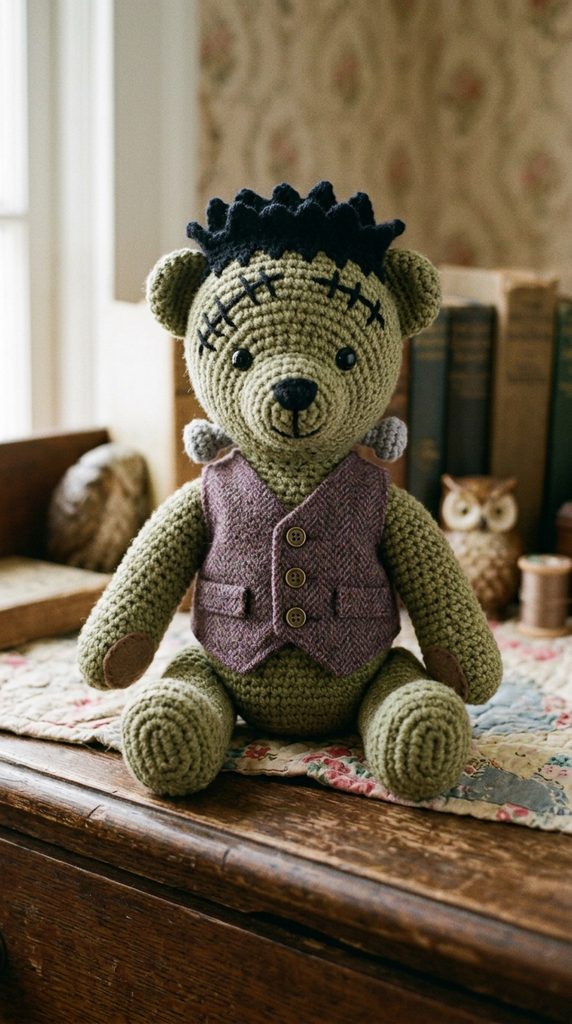
A classic teddy bear shape reimagined with olive-green skin, embroidered suture scars, a purple tweed waistcoat, and neck bolts.
Nostalgic Monster Mashup
This heirloom-style plushie merges vintage stuffed teddy bear charm with Mary Shelley’s classic creature. Worked in muted olive-drab yarn, the bear features embroidered black scalp stitching, jagged hair, and soft gray neck bolts.
Pattern & Construction Blueprint
- Skill Level: Intermediate
- Yarn Weight: Worsted Weight (Size 4)
- Hook Size: 3.75 mm (F-5)
- Dimensions: 9″ seated height
Step-by-Step Making Guide
- Olive-Green Bear Form: Crochet a standard teddy bear head, torso, and rounded limbs using muted olive yarn.
- Jagged Flat Haircap: Using black yarn, crochet a circle to fit the top of the head, finishing the final round with irregular zigzag spikes (alternating chains and slip stitches).
- Neck Bolts: Crochet two small gray cylinders (4 sc in magic ring for 2 rounds), stuffing lightly and sewing one to each side of the neck.
- Suture Embroidery: Use black embroidery floss to hand-stitch realistic surgical scars and “X” marks across the forehead, arms, and chest.
- Costume Accents: Crochet a small removable open-front vest using plum or mustard yellow yarn to complete the dapper monster look.
13. Macabre Anatomical Human Heart Pouch
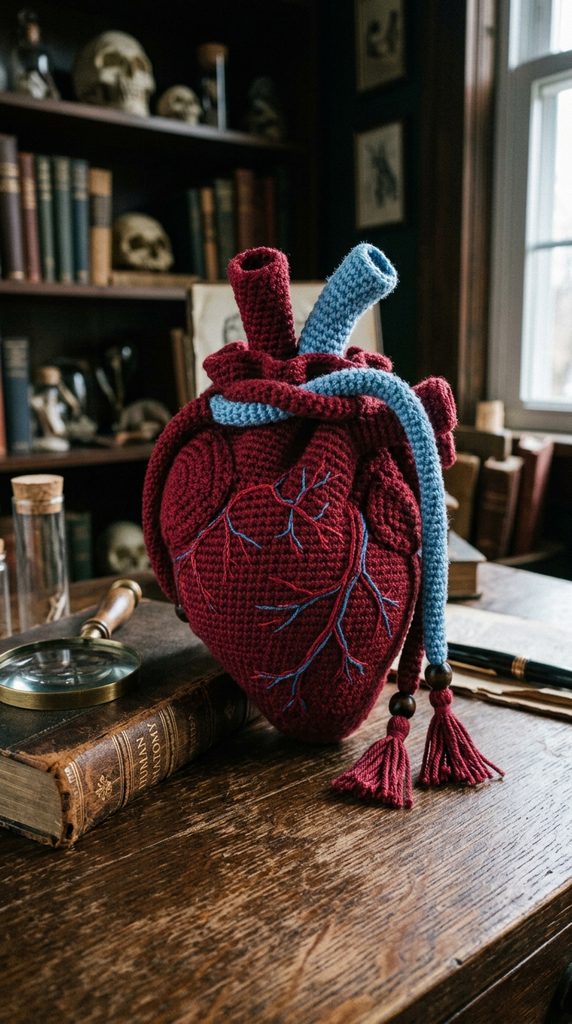
A surprisingly cute, heart-shaped crimson pouch detailed with aorta and pulmonary vein drawstring openings for candy or dice storage.
Dark Academia Keepsake Pouch
Equal parts anatomical curiosity and functional pouch, this project makes a statement as a tabletop coin purse, tabletop dice bag, or unique Halloween treat sack. The ventricles form the storage cavity, while the hollow aorta tubes serve as channels for drawstrings.
Pattern & Construction Blueprint
- Skill Level: Advanced
- Yarn Weight: DK (Size 3) Cotton Yarn
- Hook Size: 3.00 mm
- Dimensions: 5″ x 4″
Step-by-Step Making Guide
- Dual Ventricle Base: Crochet two separate curved cones in deep oxblood crimson yarn, joining them together in the center to form the lower heart chambers.
- Upper Chamber Body: Continue working in rounds up from the joined cones to create a hollow pouch interior.
- Vascular Tubes: Crochet three small hollow tubes in contrasting sky-blue (vena cava) and red (aorta), sewing them along the top rim.
- Drawstring Integration: Thread braided cord or ribbon through the vascular tubes along the top opening.
- Surface Veins: Embroider delicate branching blue and red surface veins across the front of the heart using a backstitch.
14. Cute Striped Witch Legs Door Wreath Accent
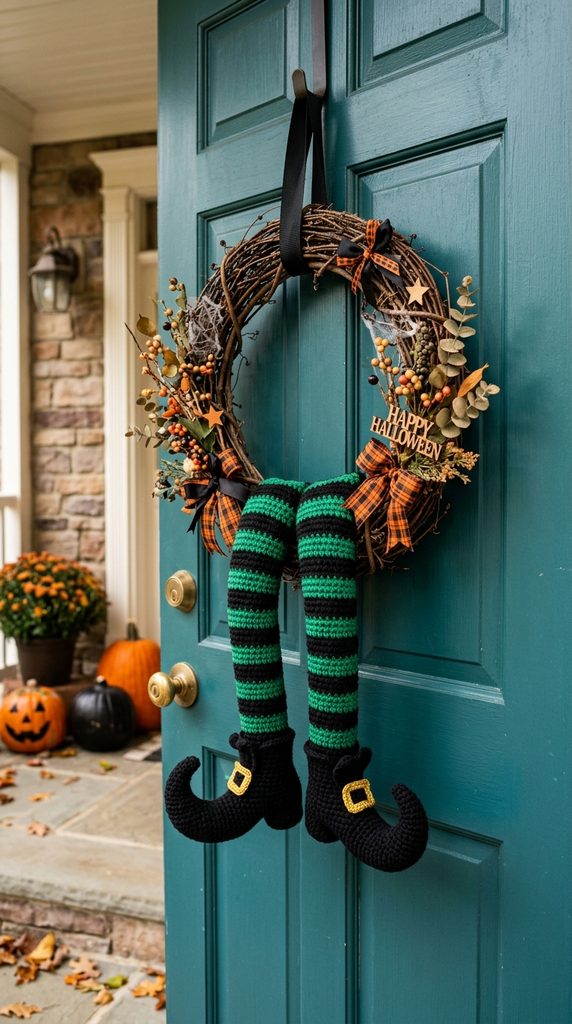
A pair of stuffed, bent legs wearing striped emerald-green and black stockings with pointy buckled witch boots, designed to tuck into floral door wreaths.
Playful Front Entryway Humor
Make it look like a witch took a tumble directly into your front door wreath. These stuffed legs feature bold horizontal stripes and curled elf-like boots with gold buckle accents. Tucked into a grapevine or black feather wreath, they create a playful, eye-catching entryway display.
Pattern & Construction Blueprint
- Skill Level: Easy
- Yarn Weight: Worsted Weight (Size 4)
- Hook Size: 3.50 mm (E-4)
- Dimensions: 14″ total leg length
Step-by-Step Making Guide
- Curled Witch Boots: Start with black yarn at the pointed toe, creating a tight cone that curls upward with short-row increases. Expand into the heel and ankle.
- Striped Stockings: Join alternating rounds of vibrant emerald green (or purple) and black yarn, working straight up for 24 rounds.
- Knee Joint Bend: Work three decrease stitches along the front center of the knee and three corresponding increases along the back to give the legs a natural bent angle.
- Boot Buckles: Embroider or crochet small square buckles using metallic gold yarn and sew them across the ankle bridges.
- Wreath Mounting: Insert wooden skewers or floral wire into the tops of the stuffed legs, securing them into the bottom twigs of your wreath.
15. Spooky Poison Apple Drawstring Backpack
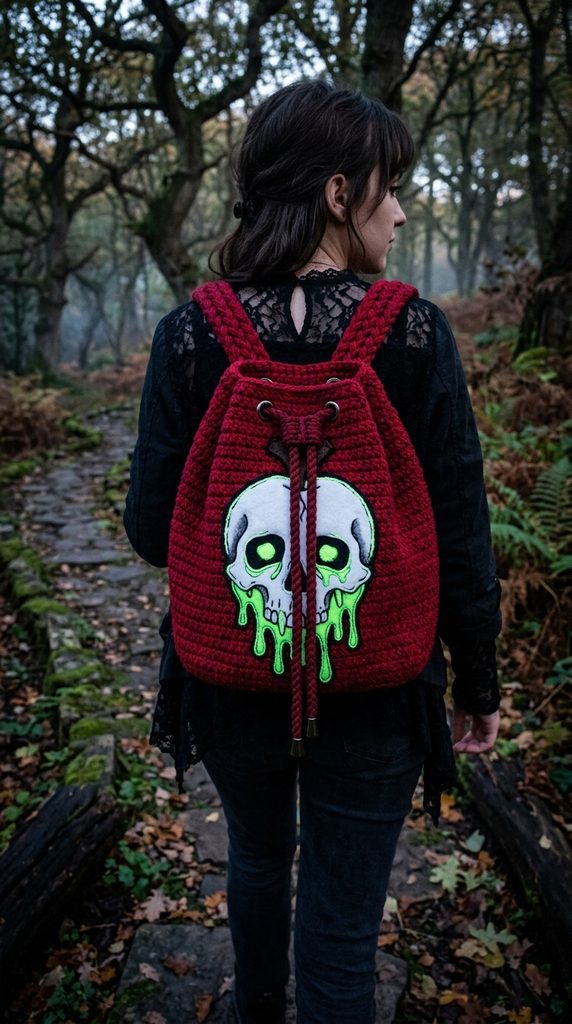
A large, glossy red drawstring bag featuring a dripping toxic-white or neon-green poison skull overlay across the front.
Wearable Fairytale Villain Accessory
Channel the Evil Queen from Snow White with this functional, roomy drawstring backpack. A deep ruby-red crocheted background is overlaid with a dripping, white-and-green poison mask design that forms a stylized skull face.
Pattern & Construction Blueprint
- Skill Level: Intermediate
- Yarn Weight: Bulky (Size 5) or Two Strands of Worsted Cotton
- Hook Size: 5.50 mm (I-9)
- Dimensions: 12″ wide by 14″ tall
Step-by-Step Making Guide
- Backpack Bag Base: Using sturdy ruby-red yarn, crochet an expansive flat oval base, working upward in continuous rounds of double crochet for 28 rounds.
- Drawstring Eyelets: In the penultimate round, work
[dc 2, chain 2, skip 2]repeatedly around the top rim to create evenly spaced drawstring holes. - The Poison Drip Appliqué: Using glowing white or neon-green yarn, crochet a circular mask with two large hollow eye cutouts and a nose cutout. Work long, uneven scalloped drip lines along the bottom edge.
- Sew Appliqué: Pin and hand-sew the poison drip flat onto the front face of the red backpack.
- Straps & Closure: Crochet two thick 40-inch braided cord straps, feed them through the eyelets, and anchor them to the bottom bag corners.
16. Smiling Mummy Jar Candle Lantern Cozy
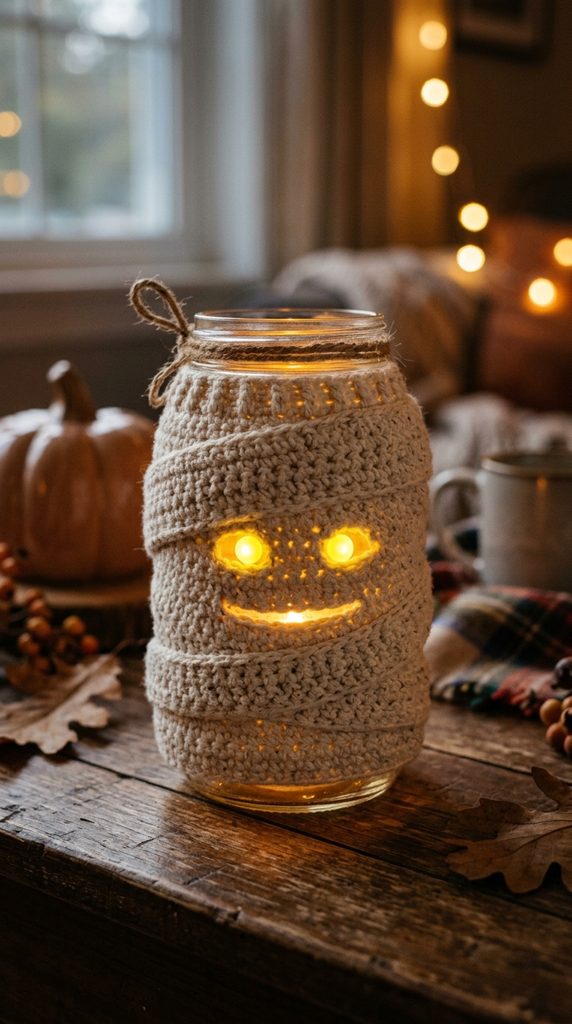
A textured, wrapped-bandage cozy in off-white yarn with peekaboo peepers, fitted around recycled mason jars to house LED tea lights.
Upcycled Ambient Glow Lantern
Transform discarded glass pickle or mason jars into glowing mummy lanterns for your porch or dining table. The cozy is crocheted in textured, overlapping cream-colored bands, leaving a small slit open in the center where glowing safety eyes peek out.
Pattern & Construction Blueprint
- Skill Level: Easy
- Yarn Weight: Worsted Weight (Size 4) Unbleached Cotton
- Hook Size: 4.00 mm (G-6)
- Dimensions: Fits standard 16 oz Mason Jars
Step-by-Step Making Guide
- Circular Jar Base: Crochet a flat circular base in unbleached cream cotton matching the diameter of your mason jar.
- Bandage Body: Work upward in rounds of single crochet, using textured front-loop-only stitches to simulate layered gauze wraps.
- The Eye Peekaboo Slit: On round 10, chain 8 and skip 8 stitches to create a wide horizontal slit. On the next round, crochet directly across the chain to resume the cylinder.
- Insert Eyes: Snap two 10 mm glowing or yellow safety eyes onto a piece of black felt, and glue the felt to the glass jar directly behind the cozy opening.
- Frayed Wrap Detailing: Crochet a separate long, thin strand of linen cord and wrap it haphazardly around the outside of the jar, tying off with frayed ends. Place a battery-operated LED candle inside.
17. Delicate Gothic Bat-Wing Shawl & Wrap
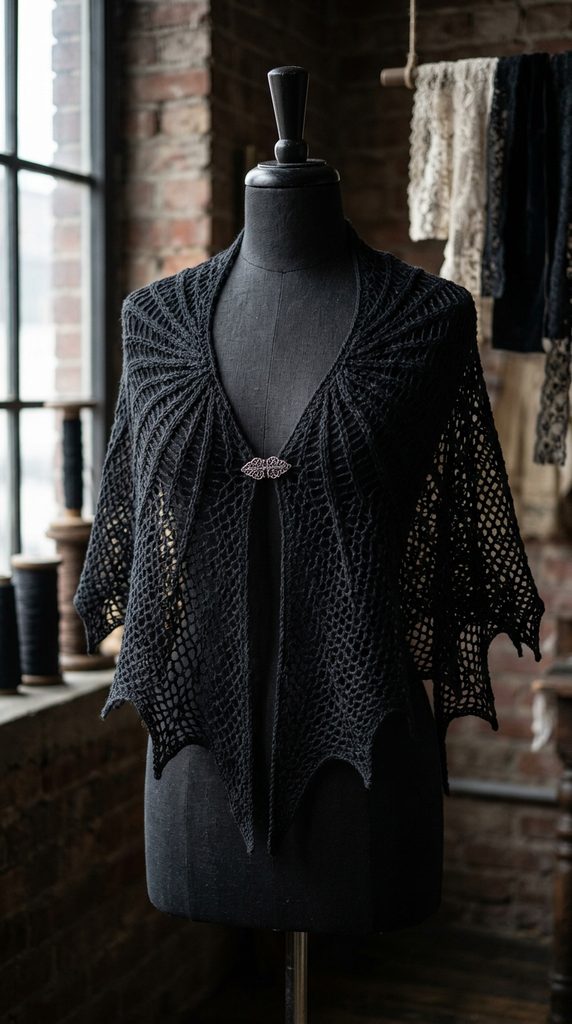
A dramatic crescent-shaped shoulder wrap crocheted in black or deep plum yarn, featuring scalloped bat-wing ribs and an open lace drape.
Elegant Autumn Evening Wear
This crescent lace shawl blends wearable autumn warmth with dramatic gothic style. The shawl expands outward in concentric ribs that drape over your shoulders, terminating in pointed, scalloped edges that resemble the spread wings of a bat.
Pattern & Construction Blueprint
- Skill Level: Advanced
- Yarn Weight: Fingering (Size 1) or Sport (Size 2) Wool/Silk Blend
- Hook Size: 4.00 mm (G-6)
- Dimensions: 64″ wingspan by 22″ center depth
Step-by-Step Making Guide
- Garter Tab Cast-On / Center Wedge: Begin at the center top neck with a small 6-stitch tab, expanding rapidly with double-crochet increases along the edges.
- Radial Wing Spines: Establish 7 distinct spine lines using raised front-post treble stitches that radiate outward across the crescent body.
- Lace Infill: Work alternating rows of open mesh lace and solid stitches between the structural spines to create an airy, lightweight drape.
- Pointed Scallop Edging: Finish the lower perimeter by creating deep, dramatic points between each spine with chain loops and picots.
- Wet-Blocking: Thoroughly wet-block the shawl, pinning every individual wing tip outward to lock the dramatic scalloped silhouette in place.
18. Cute Amigurumi Voodoo Pin-Cushion Doll
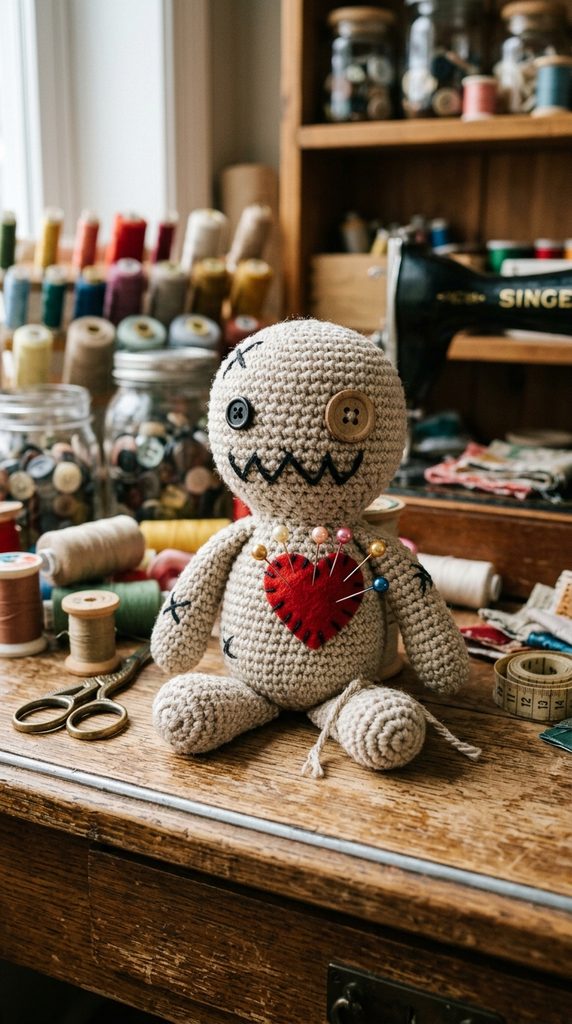
A burlap-colored ragdoll with mismatched button eyes, a felt heart appliqué with embroidered stitches, and functional sewing-pin storage.
Quirky Maker’s Studio Essential
This adorable voodoo doll makes a practical pin-cushion for your craft desk. Worked in oatmeal or linen-colored yarn, the doll features mismatched black buttons for eyes, jagged mouth stitches, and a small red felt heart stitched to the chest.
Pattern & Construction Blueprint
- Skill Level: Easy
- Yarn Weight: Worsted Weight (Size 4) Linen/Oatmeal Acrylic
- Hook Size: 3.50 mm (E-4)
- Dimensions: 6″ tall
Step-by-Step Making Guide
- Head & Torso: Crochet an oval head and tapered cylindrical torso in one continuous piece, stuffing firmly with dense fiberfill so it holds sewing pins easily.
- Ragdoll Limbs: Crochet simple tube arms and legs with rounded ends, sewing them loosely to the torso for a floppy, vintage doll feel.
- Mismatched Eyes: Sew one large black 4-hole button and one tiny wooden button onto the face using black thread.
- Stitched Mouth: Use thick black yarn to embroider a jagged, cross-stitched Frankenstein grin across the lower face.
- Heart Patch: Cut a miniature heart from red felt, sew it over the chest with contrasting black thread, and insert decorative pearl-headed pins.
19. Friendly Amigurumi Jack-o’-Lantern Scarecrow
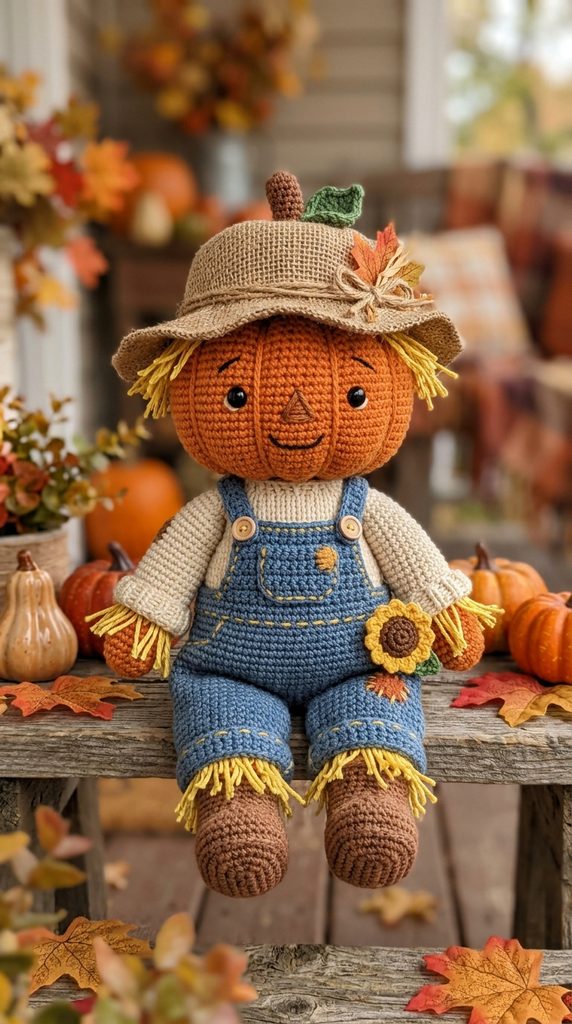
A harvest scarecrow featuring an amigurumi pumpkin head, rope-tied burlap sleeves, denim-blue overalls, and yarn straw poking out from the cuffs.
Whimsical Countryside Guardian
This pumpkin-headed scarecrow captures harvest folklore charm. Dressed in tiny denim overalls with bits of yellow yarn “straw” poking out from the sleeves and boots, he brings cozy autumn warmth to any tabletop display.
Pattern & Construction Blueprint
- Skill Level: Intermediate
- Yarn Weight: DK (Size 3) in Orange, Navy, Brown, and Yellow
- Hook Size: 3.00 mm
- Dimensions: 8″ tall
Step-by-Step Making Guide
- The Pumpkin Head: Crochet a ribbed orange sphere, cinching the segments with thread and topping with a dark-brown wooden stem.
- Denim Overalls: Work the legs and lower torso in navy-blue yarn, adding two small chest straps fastened with yellow french knots as buttons.
- Plaid Shirt & Sleeves: Work the upper chest and arms in alternating stripes of brown and rust-orange yarn.
- Straw Tufts: Loop short 1-inch lengths of golden-yellow yarn into the wrist cuffs, ankles, and neck, brushing them out with a comb to look like straw.
- Rustic Hat: Crochet a wide-brimmed conical burlap-brown farmer’s hat and secure it atop the pumpkin head.
20. Gothic Ouija Planchette Wall Hanging
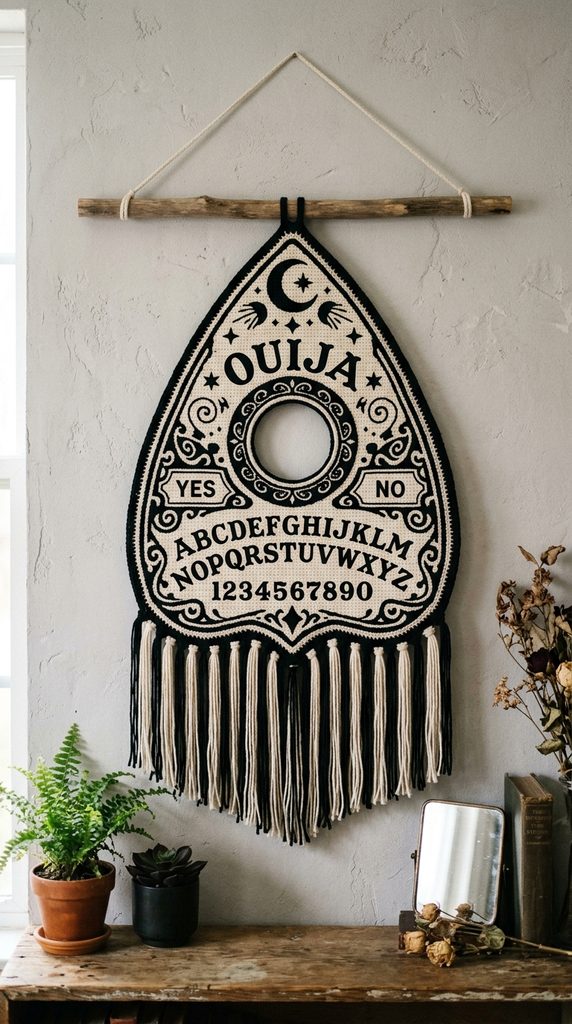
A flat, heart-shaped planchette tapestry worked in black and cream tapestry crochet, featuring a hollow magnifying viewing circle in the center.
Modern Mystical Fiber Art
Display your love for the mystical with a geometric planchette wall hanging. Using the flat tapestry crochet color-work technique, a crisp cream-colored mystical eye, crescent moon, and gothic flourishes emerge from a solid black planchette silhouette.
Pattern & Construction Blueprint
- Skill Level: Advanced
- Yarn Weight: Worsted Weight (Size 4) Sturdy Cotton
- Hook Size: 3.75 mm (F-5)
- Dimensions: 10″ x 12″
Step-by-Step Making Guide
- Chart Layout: Follow a 45-row tapestry crochet grid chart, working back and forth in solid single crochet while carrying unused yarn floats neatly inside the stitches.
- Heart Planchette Shaping: Form the signature pointed heart contour using precise decreases at the bottom point and split-side increases at the top lobes.
- The Viewing Hole: Work around a central 2-inch hollow circle in the upper third of the planchette using a wrapped foundation ring.
- Fringe & Rod Mounting: Fasten the top straight edge of the piece around a natural wooden dowel or copper pipe.
- Bottom Tassels: Attach long strands of black and cream yarn fringe to the lower perimeter, trimming them into a clean inverted chevron point.
21. Adorable Little Grim Reaper with Wooden Scythe
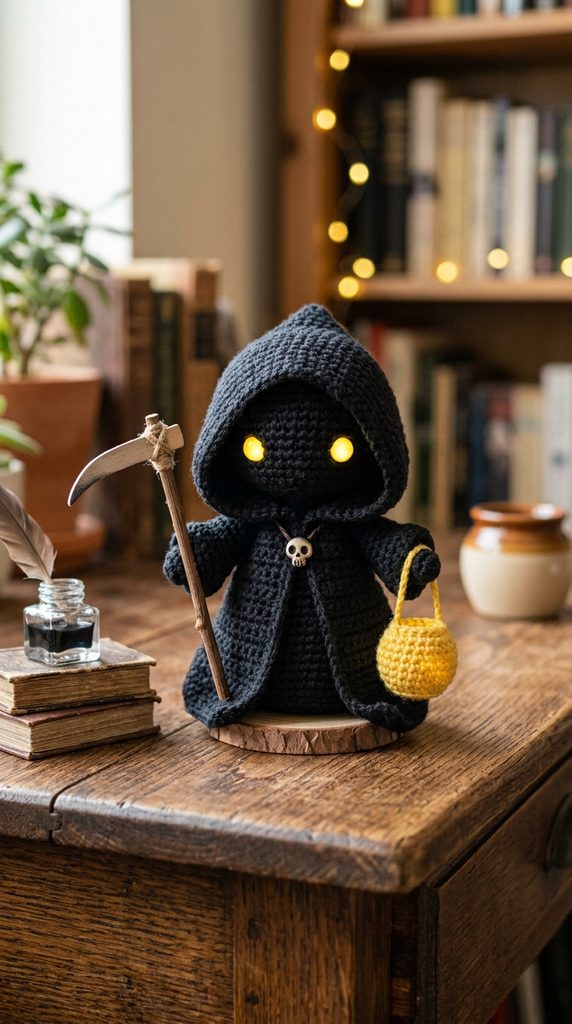
A cute, hooded figure draped in textured black robes, holding a felt-wrapped wooden dowel scythe and a glowing yellow lantern.
Gentle Guide of the Spirit Realm
The Grim Reaper gets an adorable makeover with this sweet amigurumi. Draped in an oversized pointed black cowl that shadows a dark face with glowing safety eyes, he holds a miniature wooden scythe and a tiny lantern to guide spirits through the night.
Pattern & Construction Blueprint
- Skill Level: Intermediate
- Yarn Weight: Worsted Weight (Size 4)
- Hook Size: 3.50 mm (E-4)
- Dimensions: 5.5″ tall
Step-by-Step Making Guide
- The Inner Body: Crochet a simple solid black cylindrical body, stuffing firmly up to the rounded head.
- The Flowing Robe Cowl: Crochet an oversized, draped hood using black yarn, starting from a long pointed cone in the back and flaring outward into a wide, rippling mantle that drapes over the shoulders.
- Glow Eyes: Snap two 6 mm glowing yellow safety eyes into the dark cavity of the hood before securing it over the head.
- The Miniature Scythe: Wrap a 4-inch wooden toothpick or craft stick in brown thread, and affix a curved silver felt or gray crocheted blade to the top tip.
- Accessories: Stitch the miniature scythe into one sleeve cuff and attach a tiny yellow yarn lantern to the opposite hand.
Project Planning & Yarn Selection Guide
| Project Idea | Best Yarn Choice | Approx. Time to Make | Primary Function |
| Ribbed Velvet Pumpkins | Super Bulky Chenille | 45–60 Minutes | Table & Hearth Decor |
| Floating Sheet Ghost | Worsted Cotton | 1–2 Hours | Desk Accent & Toy |
| Spiderweb Coasters | Size 10 Cotton Thread | 30–45 Minutes | Coasters & Table Settings |
| Kawaii Candy Corn | Worsted Acrylic | 1.5 Hours | Shelf Plushie |
| Posable Black Cat | DK or Worsted Wool | 2–3 Hours | Keepsake Toy |
| Witch Broomstick Garland | Worsted Yarn & Jute | 2 Hours | Mantel & Wall Bunting |
| Cauldron Candy Bowl | Double-Stranded Chunky | 2.5–3 Hours | Functional Treat Bowl |
| Skull Granny Blanket | Worsted Acrylic Blend | 15–20 Hours | Throw Blanket |
| Pumpkin Pot Cozies | Bulky Wool | 1 Hour | Houseplant Decor |
| Eyeball Pod Monster | DK Cotton | 2 Hours | Plant Shelf Decor |
| Micro-Bat Ornaments | Sport Weight Cotton | 45 Minutes | Tree & Branch Hanging |
| Frankenstein Bear | Worsted Wool/Acrylic | 4–5 Hours | Collectible Plushie |
| Anatomical Heart Pouch | DK Cotton | 2–3 Hours | Dice Bag & Coin Purse |
| Witch Legs Wreath Accent | Worsted Acrylic | 2 Hours | Front Door Wreath Decor |
| Poison Apple Backpack | Bulky Cotton | 5–6 Hours | Wearable Bag |
| Mummy Jar Lantern | Worsted Cotton | 1 Hour | Candle & LED Lantern |
| Bat-Wing Lace Shawl | Fingering Wool Blend | 10–12 Hours | Wearable Fashion |
| Voodoo Pin-Cushion | Worsted Linen Blend | 1.5 Hours | Craft Room Tool |
| Pumpkin Scarecrow | DK Acrylic | 3–4 Hours | Tabletop Doll |
| Ouija Wall Hanging | Worsted Cotton | 4–5 Hours | Wall Art Tapestry |
| Little Grim Reaper | Worsted Acrylic | 2 Hours | Desk Figurine |
5 Expert Tips for Perfect Halloween Crochet Projects
- Choose the Right Yarn Fiber for the Job: Use durable cotton yarn for coasters, dishcloths, plant cozies, and bags where stitch definition and washability matter. Opt for plush velvet, chenille, or acrylic yarns for huggable toys and soft home decor.
- Size Down Your Hook for Amigurumi: Always use a crochet hook 0.5 mm to 1.0 mm smaller than the yarn label recommends when making stuffed amigurumi. This keeps your stitches tight, preventing white polyester fiberfill from showing through the gaps.
- Invest in Quality Safety Eyes & Backings: For child-safe toys, ensure safety eyes are securely locked with metal or heavy plastic washers. For decor meant purely for display, you can also use glossy black glass cabochons attached with fabric glue.
- Embroider Before Fully Closing Amigurumi: Always stitch facial features, blushing cheeks, and surface scars onto amigurumi heads before you finish decreasing and stuffing the base. This allows you to knot and hide your thread tails securely inside the body cavity.
- Block Your Finished Flat Projects: Never skip blocking lace spiderwebs, wall tapestries, and garment shawls. Soaking your finished piece in lukewarm water and pinning it out to dry sharpens points, straightens edges, and gives your handmade creations a professional finish.