15 Functional Minecraft Animal Build Ideas for Your Base
Integrating livestock and wildlife into your Minecraft survival base is essential for automating renewable resources, gathering food, breeding transport mounts, and harvesting utility drops. However, placing mobs into bare dirt pens or fence enclosures frequently leads to mob pathfinding glitches, escaped livestock, predator attacks from wild wolves and foxes, and visual clutter across your landscape.
Combining mechanical redstone sorting, automatic harvesting systems, and predator-proof enclosures with aesthetic architecture allows you to transform standard mob farms into functional landmarks. These 15 functional animal build concepts merge high-yield survival mechanics with intentional design to elevate your homestead.
Planning Functional Animal Infrastructure in Survival
Before laying foundations, evaluate the mechanical requirements of each mob species to ensure high yields and zero maintenance friction:
- Mob Pathfinding & Containment: Standard wooden fences possess an effective physical collision height of 1.5 blocks. However, specific mobs—such as foxes, horses, and goats—can leap over basic fences. Utilizing double-height fences, solid blocks with overhanging lip slabs, or sunken yards prevents escapes.
- Hopper Funneling Physics: Items dropped by livestock (feathers, raw wool, leather, eggs, and scute) pass through non-solid top layers including carpet, bottom-half slabs, mud blocks, and open trapdoors into hoppers situated directly beneath.
- Automated Redstone Integration: Incorporating daylight sensors, observer-triggered shear dispensers, item water-transport canals, and collection hopper minecarts eliminates the need for manual resource collection while keeping wiring concealed within architectural masonry.
- Lighting and Mob-Proofing Thresholds: Hostile monsters spawn in complete darkness (light level 0). Recessing hidden light blocks (glowstone, sea lanterns, froglights, or redstone lamps) beneath carpets, hay bales, or water troughs guarantees predator-proof boundaries.
1. Automated Multi-Tiered Wool Shearing Barn
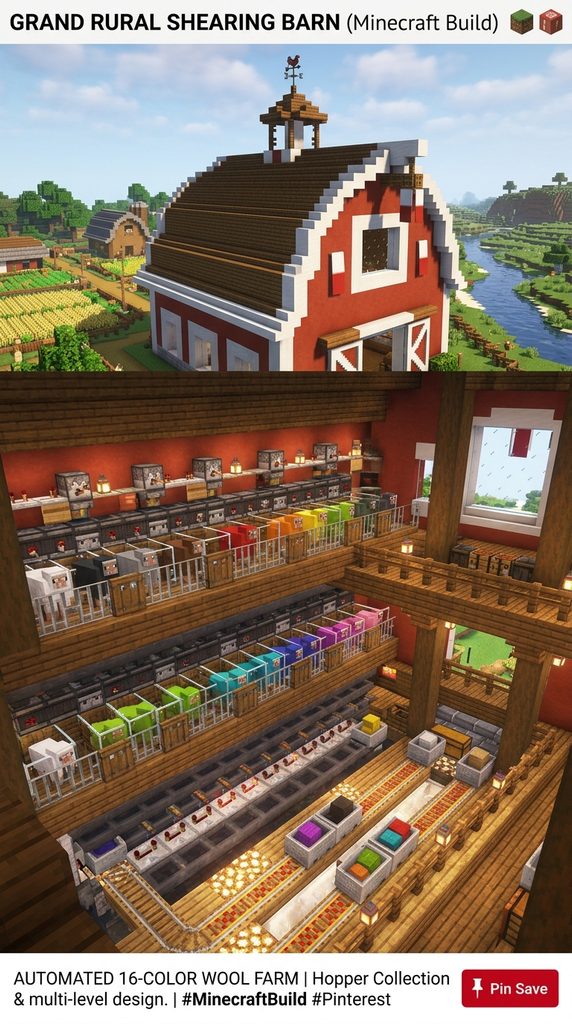
A grand red-and-white country livestock barn housing sixteen isolated sheep color stalls with automated observer-triggered shear dispensers and sub-floor hopper collection.
Mechanical Wool Automation Blueprint
This design automates wool harvesting for all sixteen dye variations without manual player shearing. Each sheep stands on a dedicated grass block above an observer. When the sheep eats the grass, the observer detects the block update, triggering an overhead dispenser loaded with shears to collect the fleece instantly. A hidden subterranean hopper minecart runs continuously beneath the grass blocks, depositing wool into a categorized storage chest room.
Material Checklist
- 16 Observers, 16 Dispensers, and 16 Stacks of Shears
- 16 Redstone dust, 16 Glass blocks, and 16 Grass blocks
- Powered rails, regular rails, and 1 Hopper Minecart
- Red terracotta, smooth quartz blocks, and spruce planks
- Dark oak stairs, dark oak slabs, and iron trapdoors
- 16 Sheep (dyed in all 16 Minecraft colors)
Step-by-Step Construction Guide
- Sub-Floor Collection Line: Dig a trench sixteen blocks long and two blocks deep. Lay a continuous loop of powered rails running over hoppers connected to categorized storage chests. Place a hopper minecart onto the track.
- Grass Deck & Observer Grid: Lay sixteen grass blocks directly above the rail line. Face sixteen observers upward from behind each grass block to detect when the turf converts to dirt upon feeding.
- Dispenser Mounting: Place sixteen dispensers facing downward over each sheep stall, loading each with nine pairs of shears. Wire a single redstone dust line connecting each observer output to its respective dispenser.
- Framing the Gambrel Barn: Enclose the mechanical core within a classic rural barn structure. Use red terracotta for the main exterior walls and smooth quartz for corner trim. Pitch a high curved gambrel roof using dark oak stairs and slabs.
- Livestock Stalling: Guide one sheep of each dye color into each individual glass-fronted stall. Mount labeled item frames with corresponding wool blocks on the exterior aisle pillars.
2. All-in-One Horse Breeding Stables & Speed Testing Track
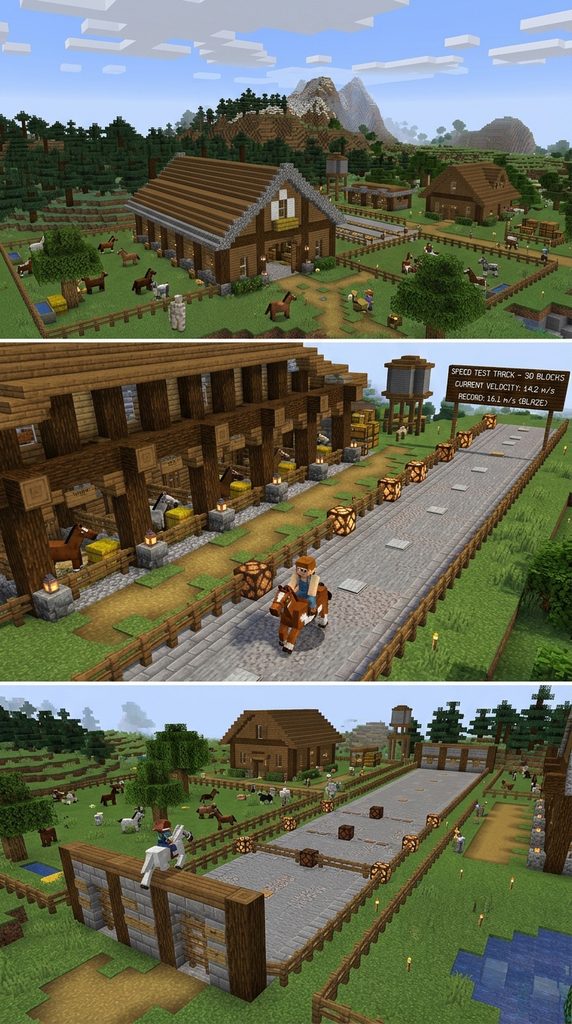
A sprawling timber equestrian estate featuring individual stall bays, an automated potion-brewing vet station, and an integrated redstone pressure-plate speed measuring track.
Mechanical Horse Infrastructure
Breeding optimal horses requires systematic stat measurement. This functional stable provides individual breeding stalls, a vertical jump-height testing wall marked with color-coded concrete, and an automated redstone-powered speed trial lane utilizing tripwire hooks and redstone lamps to record velocity.
Material Checklist
- Spruce logs, stripped spruce wood, and spruce planks
- Mud bricks, cobblestone, and dark oak fences
- Tripwire hooks, string, redstone repeaters, and redstone lamps
- Brewing stands, cauldrons, water buckets, and golden carrots
- Hay bales, iron bars, and item frames
- Saddles, horse armor, and lead ropes
Step-by-Step Construction Guide
- Stable Bay Foundations: Construct a central ten-block-wide stable concourse flanked by eight four-by-four private stalls using stripped spruce logs and mud bricks.
- Stall Gates & Feeders: Install dark oak fence gates and iron bar partitions between stalls. Place water-filled cauldrons and hay bales in the rear corners of each stall.
- Velocity Testing Lane: Build a straight thirty-block runway beside the stables. Place tripwire hooks connected to a series of redstone repeaters and a numbered wall of redstone lamps to visually measure how fast a horse triggers the distance.
- Jump Measurement Wall: Erect a vertical wall graduated from one to five blocks high using distinct colored wool stripes to measure vertical jump clearances.
- Veterinary & Breeding Loft: Construct an elevated loft equipped with brewing stands for swiftness potions, chests stocked with golden carrots, and saddle racks.
3. High-Yield Automated Leather & Beef Cooker Tower
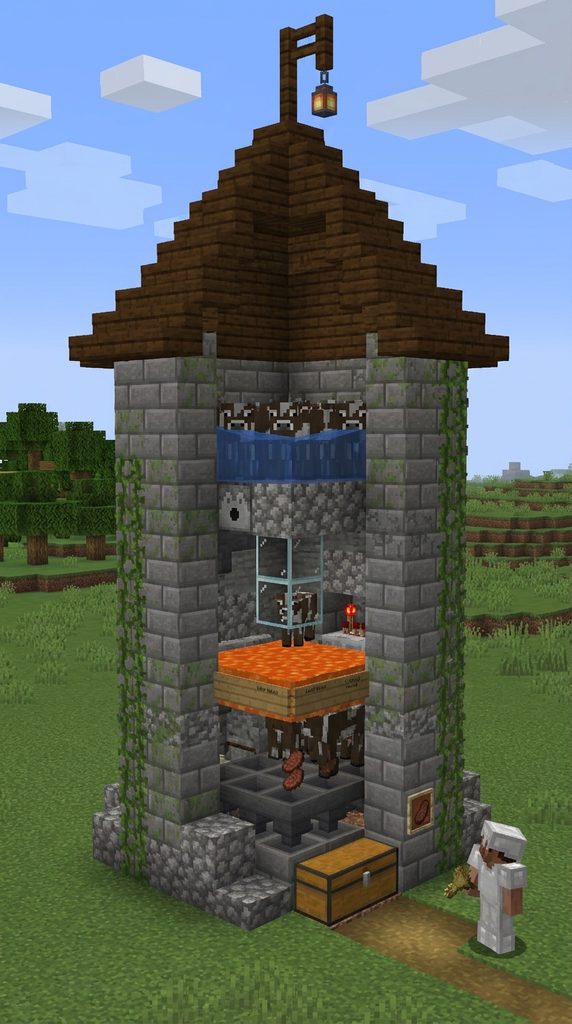
A compact, multi-level masonry silo utilizing entity cramming, water agitation, and suspended lava cooking to produce cooked steak and leather.
Automatic Cooking Mechanics
Adult breeding cows are suspended in an upper water-bobbing chamber. When bred with wheat, baby cows fall through a narrow one-block gap into a lower maturation chamber. Upon maturing to full height, their hitboxes reach an overhead lava blade, instantly cooking them and dropping cooked steak and leather into an output hopper.
Material Checklist
- Stone bricks, cracked stone bricks, and stone stairs
- 2 Dispensers, 1 Lava bucket, and 1 Water bucket
- 1 Hopper, 1 Double chest, and 1 Stone slab
- 2 Oak signs, 1 Glass block, and 1 Wooden button
- Wheat stacks and 2+ Adult cows
Step-by-Step Construction Guide
- Output Chest & Base: Place a double chest on the floor. Crouch and connect an iron hopper into the back of the chest. Place a smooth stone slab directly on top of the hopper.
- Maturation Chamber: Enclose the slab with glass blocks and stone bricks. Mount a dispenser containing a bucket of lava directly above the slab, held back by an open sign so lava only flows when triggered or kept static.
- Breeding Chamber: Build a second chamber directly above the lower maturation room. Place an open fence gate or trapdoor that allows baby cows to fall down while keeping adult cows suspended.
- Water Agitation System: Pour a water source block into the upper chamber to keep adult cows bobbing, allowing players to feed wheat continuously from an upper walkway.
- Exterior Silo Architecture: Disguise the farm as a rustic stone grain silo using mixed stone bricks, mossy cobblestone, and a conical dark oak roof with an access ladder.
4. Modern Glass Beehive Sanctuary & Auto-Honey Bottler
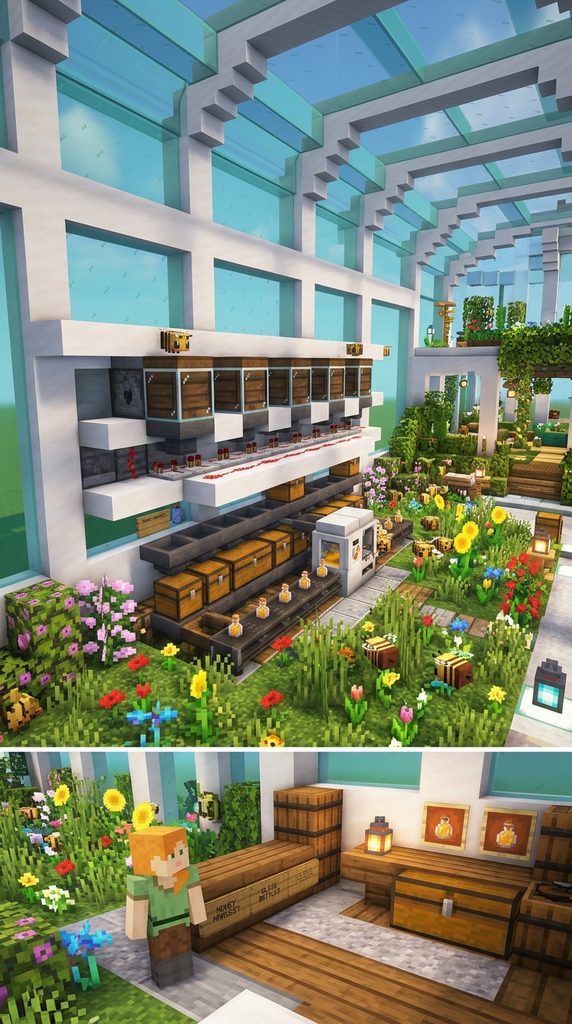
A temperature-regulated, fully enclosed botanical glass conservatory housing beehives with automated dispenser bottling and honeycomb shearing mechanisms.
Honey & Wax Automation Mechanics
Beehives emit redstone comparator signal strengths from 0 to 5 based on honey levels. When a hive reaches maximum capacity (level 5), a comparator triggers a dispenser loaded with glass bottles (for honey) or shears (for honeycomb). The harvested products fall into a sub-floor collection hopper, preventing bees from becoming aggressive.
Material Checklist
- Beehives or Bee Nests, Glass bottles, and Shears
- Redstone comparators, Redstone dust, and Dispensers
- Smooth quartz, white concrete, and tinted glass panes
- Flowering azalea, dandelions, poppies, and sunflowers
- Sea lanterns, iron trapdoors, and hoppers
- Captured Bees (harvested using Silk Touch)
Step-by-Step Construction Guide
- Automated Hive Array: Mount beehives facing forward in a horizontal row. Place a dispenser loaded with empty glass bottles directly above each hive, facing into the hive.
- Comparator Signal Wiring: Run a redstone comparator out of the back of each beehive into a solid block, stepping the signal up to five blocks of redstone dust to trigger the top dispenser only when full.
- Internal Botanical Meadow: Fill the conservatory floor with grass blocks planted with dandelions, sunflowers, and flowering azalea bushes to provide continuous pollen collection.
- Glass Conservatory Framing: Enclose the entire build in a sleek modern greenhouse using white concrete frames and seamless tinted glass blocks.
- Under-Floor Lighting & Sealing: Conceal sea lanterns beneath moss carpets and seal all exterior doorways with iron doors to prevent bees from escaping.
5. Medieval Stone Pig Breeding & Saddle Smuggler Tavern
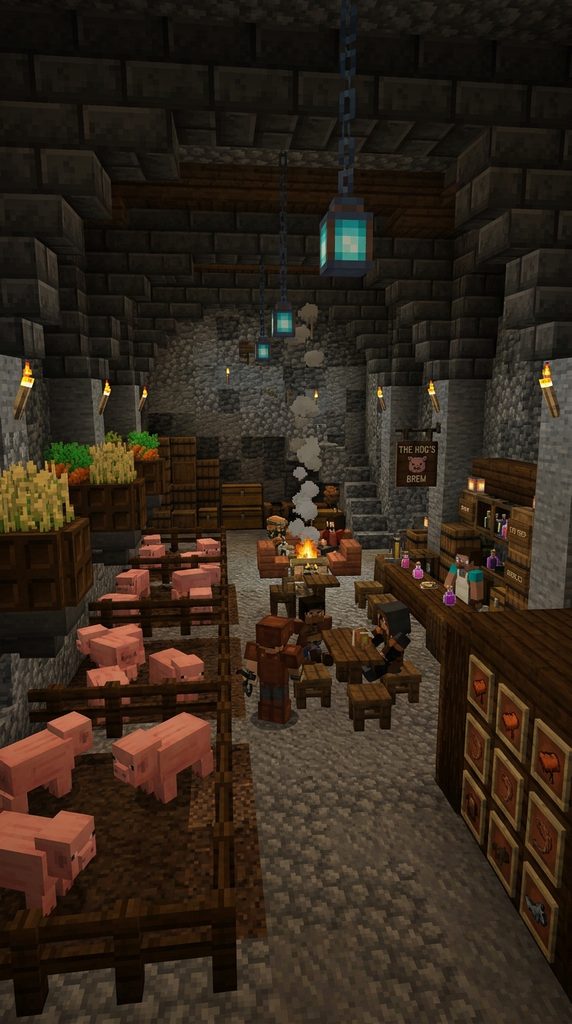
A subterranean tavern cellar featuring an automated pig breeding sty, potato sorting chutes, and a secret saddle storage vault for mount training.
Porcine Agriculture Mechanics
Pigs provide an early-game source of porkchop saturation and functional rideable mounts using saddles and carrot-on-a-stick mechanics. This build combines a rustic tavern cellar setting with high-efficiency potato gravity feeders, breeding stalls, and an underground slaughter chute.
Material Checklist
- Deepslate bricks, mud bricks, and cobblestone stairs
- Stripped dark oak logs and spruce trapdoors
- Hoppers, droppers, chests, and water cauldrons
- Saddles, Carrots, Potatoes, and Carrot on a Stick
- Barrels, chains, and soul lanterns
Step-by-Step Construction Guide
- Cellar Excavation: Excavate an eight-by-twelve subterranean room lined with deepslate bricks and rough cobblestone.
- Gravity Feeding Chute: Install overhead hoppers connected to upper tavern floor barrels to drop potatoes directly into the pig pens below.
- Sunken Mud Wallers: Construct sunken floor enclosures lined with mud blocks and water cauldrons to simulate authentic pig wallows.
- Separation Gates: Install spruce trapdoor gates along the stall floor to filter piglets into a dedicated feeding pen.
- Tavern Saddlery Outfitting: Mount item frames holding saddles and carrot-on-a-stick accessories along the tavern walls, illuminated by hanging soul lanterns.
6. High-Altitude Goat Mountain Chalet & Horn Harvesting Arena
A reinforced alpine stone chalet integrated into jagged mountain cliffs, featuring padded drop walls to harvest goat horns and automated milk stations.
Goat Mechanics & Horn Harvesting
When goats ram solid natural blocks (such as stone, packed ice, or iron ore), they drop valuable Goat Horns. This build features an alpine stone arena with stone pillars designed to safely bait goat rams, alongside automatic bucket dispensers for milk collection.

Material Checklist
- Stone bricks, andesite, packed ice, and iron ore blocks
- Spruce logs, spruce planks, and spruce stairs
- Iron bars, dispensers, empty buckets, and stone buttons
- Snow layers, powdered snow cauldrons, and leads
- Goats and wheat stacks
Step-by-Step Construction Guide
- Cliffside Foundation: Anchor a mountain platform into a sheer peak using stone bricks and raw andesite buttresses.
- Ramming Arena Core: Erect solid columns of iron ore and packed ice in the center of an enclosed courtyard to encourage goats to ram solid blocks and drop horns.
- Padded Safety Walls: Line the arena perimeter with iron bars and spruce slabs to prevent goats from jumping over high mountain boundaries.
- Milking Stalls: Install side stalls with bucket-loaded dispensers wired to floor pressure plates for automated milk collection.
- Alpine Chalet Architecture: Frame an A-frame chalet with steep spruce stairs, snow-dusted roof eaves, and smoking campfire chimneys.
7. Coastal Sea Turtle Hatchery & Scute Harvester Beach House
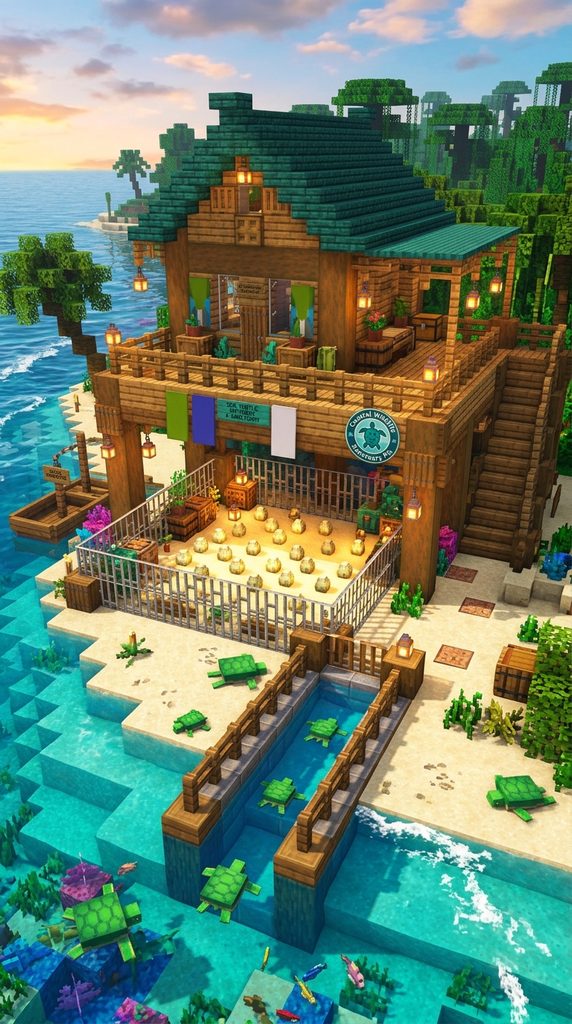
A seaside stilt sanctuary featuring protected warm-sand egg nurseries, automated zombie-bait collection traps, and scute harvesters.
Scute & Turtle Breeding Physics
Sea turtles lay eggs exclusively on their home beach sand. The eggs require protection from hostile zombies, skeletons, and foxes. When baby turtles hatch and mature into adults, they drop Scute, the essential component for crafting Turtle Shell helmets and Water Breathing potions.
Material Checklist
- Sand blocks, smooth sandstone, and cut sandstone stairs
- Stripped jungle logs, jungle planks, and jungle fences
- Iron bars, hoppers, chests, and water source blocks
- Turtle eggs, Seagrass, and trapped zombie lure
- Lanterns, lily pads, and sea pickles
Step-by-Step Construction Guide
- Protected Sand Nursery: Lay a five-by-five bed of natural beach sand inside an elevated wooden stilt house.
- Zombie-Proof Enclosure: Enclose the sand nursery behind iron bars and clear glass to keep hostile mobs from stomping on fragile turtle eggs.
- Automated Scute Drainage: Place an under-floor hopper grid covered with bottom-half sandstone slabs directly beneath the nursery. When babies grow into adults, their dropped scute is collected automatically.
- Water Access Chute: Construct an open water channel leading from the nursery into the open ocean, secured by iron trapdoors.
- Tropical Stilt Architecture: Build a breezy beach house over the nursery using stripped jungle logs, bamboo fences, and warm lanterns.
8. Fortified Wolf Training Compound & Bone Armory
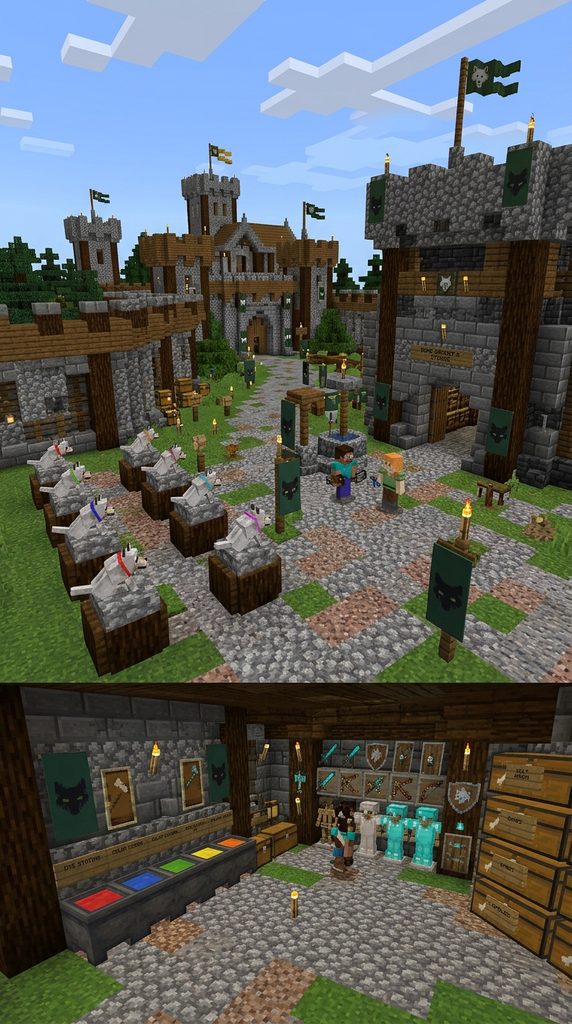
A heavy stone-and-timber castle courtyard designed for breeding, color-coding, and mobilizing a tamed wolf army for base defense.
Wolf Combat Infrastructure
Tamed wolves serve as dedicated combat companions. This fortified training yard features color-coded dye stations for collar customization, meat storage pantries, and multi-tier command pedestals for staging defensive wolf packs around your base perimeter.
Material Checklist
- Cobblestone, stone bricks, and polished andesite
- Dark oak logs, dark oak planks, and iron bars
- All 16 Dye colors, Bones, Cooked beef, and Rotten flesh
- Armor stands, chests, barrels, and banners
- Tamed wolves and leads
Step-by-Step Construction Guide
- Courtyard Perimeter: Lay a fortified perimeter wall eight blocks wide by twelve blocks long using stone bricks and iron bars.
- Command Kennels: Construct individual raised stone pedestals with dark oak trapdoor dividers for staging sitting guard wolves.
- Collar Dyeing Station: Set up dye cauldrons and supply chests containing all sixteen dye types along the central training walkway.
- Armory & Meat Pantry: Build an attached stone storehouse stocked with chests of bones, cooked steaks, and rotten flesh for rapid healing and breeding.
- Watchtower Entry: Crown the compound gateway with a fortified timber watchtower equipped with warning bells and soul lanterns.
9. Subterranean Axolotl Sanctuary & Auto-Glow Squid Farm

A crystal-lit subterranean cavern integrating automated glow ink harvesting with lush axolotl breeding pools and clay water gardens.
Aquatic Combat & Drop Automation
Axolotls naturally hunt hostile and neutral aquatic mobs, including drowned, guardians, and glow squids. By channeling wild glow squid spawns into an enclosed underground water chamber staffed with axolotls, glow ink sacs and experience points are collected automatically.
Material Checklist
- Polished deepslate, deepslate tiles, and smooth basalt
- Amethyst blocks, amethyst clusters, and tinted glass
- Clay blocks, moss blocks, and spore blossoms
- Water source blocks, hoppers, and chests
- Tropical fish buckets, lead ropes, and Axolotls
Step-by-Step Construction Guide
- Cavern Basin Excavation: Carve a deep underground basin measuring ten blocks wide by ten blocks long within the subterranean deepslate layer.
- Water Chutes & Hopper Sinks: Flood the basin with water source blocks, angling currents toward a central floor collection hopper.
- Lush Flora & Amethyst Framing: Line the cavern walls with purple amethyst clusters, dripping spore blossoms, and lush moss blocks.
- Axolotl Colonization: Introduce various colored axolotls (pink, brown, gold, cyan) using water buckets, feeding them live tropical fish to initiate breeding.
- Observation Deck: Install a panoramic tinted-glass viewing gallery along the cavern wall illuminated by concealed sea lanterns.
10. Desert Camel Caravan Oasis & Cactus Farm Stable
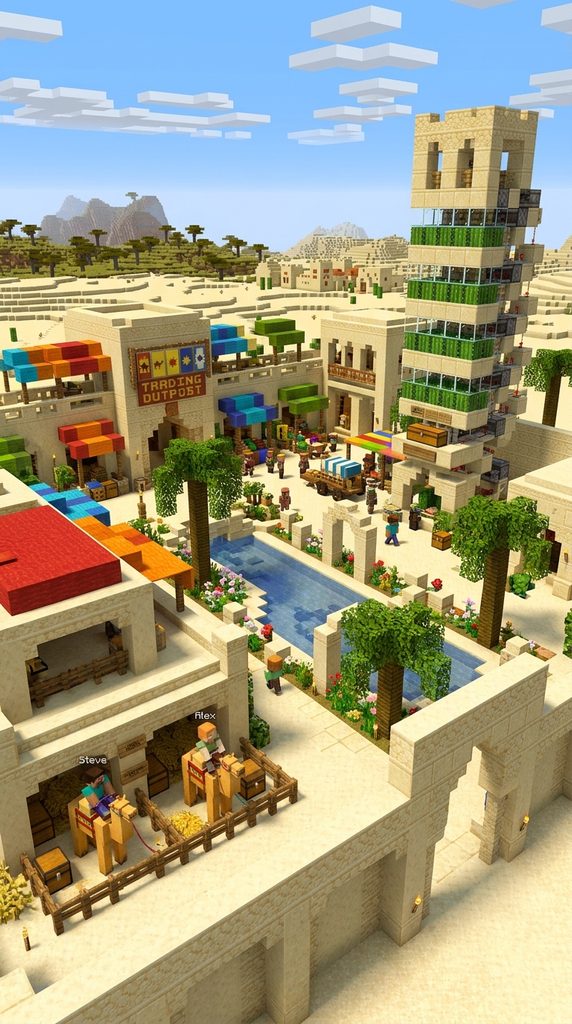
An exotic desert oasis estate featuring elevated camel resting pavilions, automated cactus collection silos, and desert trading facilities.
Camel Mechanics & Transport Design
Camels can step over 1.5-block-tall fences naturally, accommodate two players simultaneously, and dash across wide desert chasms. This build combines shaded camel stables with an integrated automatic cactus farm to provide continuous breeding food.
Material Checklist
- Smooth sandstone, cut sandstone, and sandstone stairs
- Stripped acacia logs, acacia planks, and acacia fences
- Terracotta, cyan glazed terracotta, and lapis lazuli
- Cactus blocks, sand, iron bars, and hoppers
- Water cauldrons, carpets, and decorated pots
Step-by-Step Construction Guide
- Oasis Stabling Yard: Build a walled desert enclosure using cut sandstone and stripped acacia wood, leaving doorways two blocks wide to accommodate camels.
- Automated Cactus Harvester: Erect a compact vertical cactus farm in an attached sandstone tower using sand, cactus, and offset iron bars to shear growing nodes into hoppers.
- Shaded Fabric Pergolas: Stretch colorful yellow, cyan, and orange wool carpets across overhead acacia fence beams to create sun shelters.
- Reflecting Watering Canal: Dig a central water channel lined with smooth sandstone, water cauldrons, and desert flora.
- Caravan Tack Room: Install supply barrels stocked with saddles, leads, and golden apples along the stable entrance.
11. Overgrown Cottagecore Fox Berry Garden & Auto-Harvester

A whimsical fairy-tale cottage surrounded by sweet berry gardens where tamed foxes automatically harvest and drop ripe berries into collection hoppers.
Fox Harvesting Mechanics
Tamed foxes naturally harvest ripe sweet berries from bushes without taking thorn damage. When a fox picks up a harvested berry, it drops the item whenever it finds food or encounters an open hopper, completely automating sweet berry gathering.
Material Checklist
- Sweet berry bushes, Moss blocks, and Flowering azalea
- Spruce logs, stripped spruce, and spruce planks
- Hoppers, chests, and rail lines
- Glass panes, iron trapdoors, and lanterns
- Captured Foxes (bred using sweet berries)
Step-by-Step Construction Guide
- Sub-Floor Collection Deck: Lay a hopper minecart track system underneath an eight-by-eight square of dirt blocks.
- Sweet Berry Planting: Plant sweet berry bushes across the dirt blocks, leaving single-block access aisles between rows.
- Fox Containment: Enclose the garden within a two-block-high wall of flowering azalea leaves and clear glass to prevent foxes from jumping out.
- Introducing Fox Harvesters: Lure two or more foxes into the garden using sweet berries, allowing them to roam freely across the bushes.
- Cottagecore Architecture: Build an attached rustic timber cottage with smoking brick chimneys, mossy shingle roofs, and hanging lanterns.
12. Industrial Iron Golem Foundry & Village Bastion
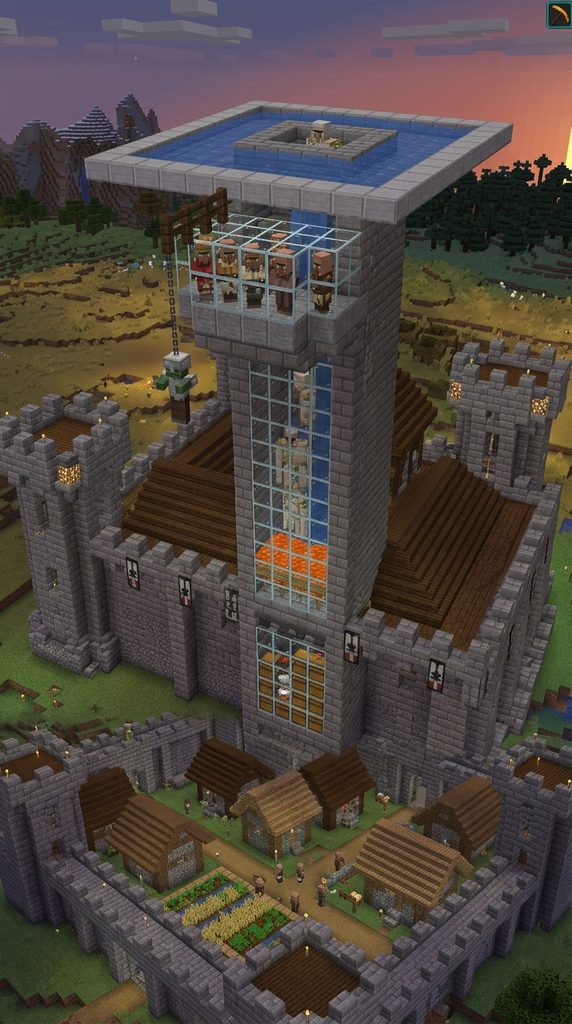
A fortified medieval fortress keep containing an automated iron golem spawning chamber with villager panic pods and a lava kill-floor.
Iron Golem Spawning Physics
When three or more villagers are terrified by an enclosed zombie line-of-sight, they summon an Iron Golem on the nearest valid surface within an eight-block radius. The golem is pushed by water currents into a central lava blade, yielding massive quantities of iron ingots and poppy flowers.
Material Checklist
- Stone bricks, cracked stone bricks, and deepslate stairs
- 3 Beds, 3 Villagers, and 1 Zombie with a Name Tag
- 1 Lava bucket, 3 Water buckets, and 4 Iron signs
- Hoppers, double chests, and iron bars
- Campfires, banners, and chains
Step-by-Step Construction Guide
- Villager Panic Pod: Construct a secure elevated chamber holding three beds and a named zombie suspended in a boat to maintain continuous line-of-sight terror.
- Spawning Platform: Build an eight-by-eight stone spawning deck directly above the villager pod, surrounded by smooth walls.
- Water Flow Channels: Pour water buckets at the platform corners to funnel summoned golems into a central three-by-three drop hole.
- Lava Blade Kill Floor: Suspend a lava blade using signs three blocks above an iron hopper floor, melting golems while leaving their dropped iron ingots intact.
- Castle Bastion Styling: Enclose the mechanical farm within a fortified stone keep featuring crenelated parapets, corner watchtowers, and hanging iron lanterns.
13. Japanese-Inspired Panda Sanctuary & Bamboo Silo

A serene oriental bamboo pavilion featuring play pits for pandas of all personality types, paired with an automated high-speed bamboo harvesting engine.
Panda Breeding & Slime Farming
Pandas require at least eight nearby bamboo blocks to breed and drop slimeballs when baby pandas sneeze. This design merges a Zen panda habitat with an automated piston-driven bamboo farm that provides endless bamboo feed.
Material Checklist
- Bamboo stalks, stripped dark oak logs, and dark oak planks
- Deepslate tiles, deepslate tile stairs, and slabs
- Red paper lanterns, white banners, and water cauldrons
- Observers, pistons, redstone dust, and hoppers
- Pandas (Normal, Lazy, Worried, Playful, Aggressive, Brown)
Step-by-Step Construction Guide
- Zen Pavilion Framing: Erect a circular courtyard using stripped dark oak logs and dark deepslate tile roofs with sweeping upturned pagoda eaves.
- Automated Bamboo Tower: Build an observer-and-piston bamboo harvester behind the pavilion walls to slice growing bamboo stalks into collection hoppers.
- Panda Lounging Pits: Construct sunken interior pens filled with grass blocks, water ponds, and cake feeding tables.
- Slimeball Collection Grate: Place hoppers covered with green carpet beneath baby panda resting perches to catch dropped slimeballs.
- Shoji Screen Partitions: Install white banner screen walls and hanging red lanterns to complete the peaceful aesthetic.
14. Nether Strider Lava Marina & Warped Fungus Harbor
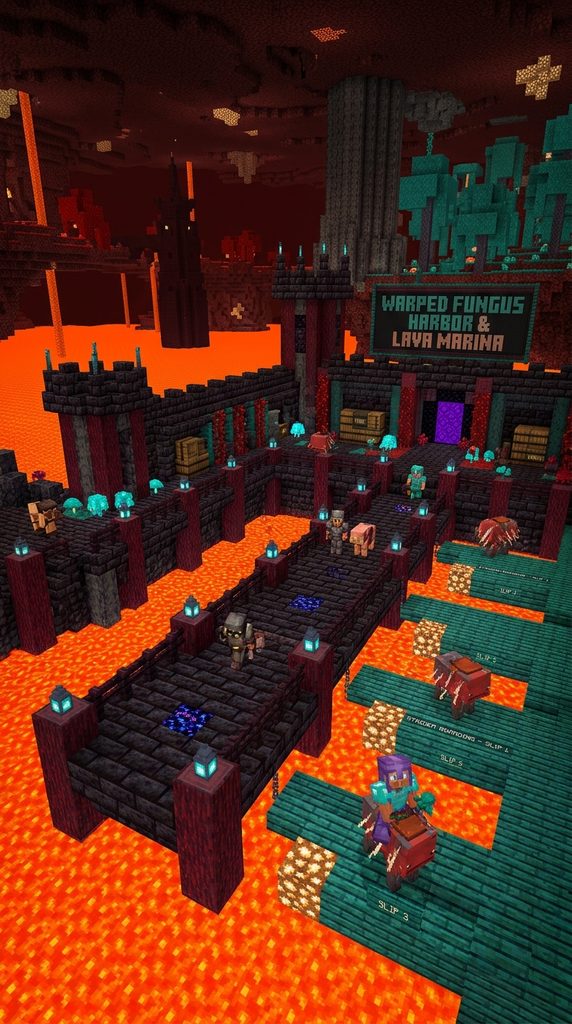
A fortified obsidian-and-blackstone dock built over Nether lava oceans, featuring enclosed strider stables, fungus lures, and basalt launch ramps.
Nether Transportation Infrastructure
Striders provide effortless, high-speed transit across hazardous Nether lava seas when guided with a Warped Fungus on a Stick. This build establishes a safe lava marina complete with boarding docks, breeding incubators, and fungus supply lockers.
Material Checklist
- Polished basalt, smooth basalt, and basalt pillars
- Polished blackstone bricks, stairs, and slabs
- Crying obsidian, crimson planks, and warped planks
- Warped fungus on a stick, saddles, and leads
- Soul lanterns, iron bars, and lava cauldrons
Step-by-Step Construction Guide
- Lava Shoreline Pylons: Drive polished basalt columns deep into the Nether lava sea to support an elevated harbor deck.
- Recessed Strider Slips: Construct individual water-free boat slips extending directly into the lava, equipped with iron bar gates.
- Boarding Platforms: Build stepped blackstone walkways allowing players to mount saddled striders directly from the dock.
- Fungus Greenhouse Vault: Construct an airtight side chamber with crimson and warped Nylium blocks to farm fresh warped fungus for breeding.
- Underworld Lighting: Mount soul lanterns and glowing crying obsidian veins along the dock balustrades to illuminate the Nether fog.
15. Sunken Frog Marsh & Automated Froglight Foundry
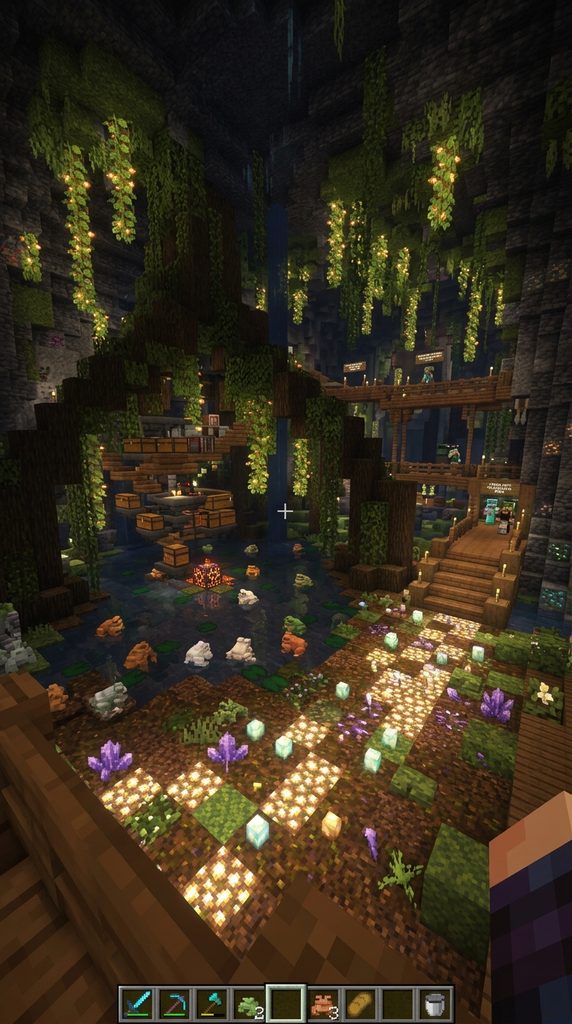
A subterranean mangrove swamp hollow housing all three frog variants (warm, temperate, cold), paired with a small magma cube spawner chute for mass froglight production.
Froglight Generation Mechanics
When a frog attacks and consumes a small magma cube, it drops a colored Froglight (Pearlescent, Verdant, or Ochre, depending on the frog breed). Connecting a subterranean swamp habitat to an automated magma cube crusher produces endless radiant building blocks.
Material Checklist
- Mangrove logs, mud bricks, and mud brick stairs
- Water source blocks, lily pads, and big dripleaf
- 3 Frog variants (Warm/White, Temperate/Orange, Cold/Green)
- Slimeballs (for breeding), hoppers, and chests
- Froglights, spore blossoms, and hanging weeping vines
Step-by-Step Construction Guide
- Subterranean Marsh Chamber: Carve a large natural cavern lined with mud blocks, water channels, and dripping spore blossoms.
- Magma Cube Funnel: Construct a drop chute connected to an upper magma cube spawner, crushing large cubes down to micro-size using iron golems or water hazards.
- Frog Feeding Arena: Release all three frog variants into the bottom collection basin where they immediately consume incoming micro magma cubes.
- Floor Hopper Grid: Install a subterranean hopper array covered with bottom-half mud slabs to collect dropped froglights.
- Overgrown Botanical Architecture: Frame the cavern with arching mangrove roots, blooming azaleas, and dangling weeping glow berries.
Technical Summary of Functional Animal Builds
| Build Concept | Primary Output | Core Automation Mechanic | Key Structural Palette |
| Wool Shearing Barn | 16 Colored Wools | Observer block-update shear dispensers | Red terracotta & Dark oak |
| Horse Stables & Track | Optimized Mounts | Redstone tripwire timer & jump markers | Spruce logs & Mud bricks |
| Leather & Beef Cooker | Steak & Leather | Entity cramming & lava blade ignition | Stone bricks & Glass |
| Beehive Sanctuary | Honey & Wax | Comparator signal level-5 bottle dispensers | Quartz & Tinted glass |
| Pig Breeding Tavern | Porkchops & Mounts | Gravity feed chutes & sorting pens | Deepslate & Dark oak |
| Goat Mountain Chalet | Horns & Milk | Impact-block ramming & bucket dispensers | Stone & Spruce timber |
| Sea Turtle Hatchery | Scute & Helmets | Protected sand bed & hopper drainage | Sandstone & Jungle wood |
| Wolf Training Base | Combat Companions | Color-coded dye racks & staging stalls | Cobblestone & Iron bars |
| Axolotl Sanctuary | Glow Ink & XP | Natural aquatic predator targeting | Deepslate & Amethyst |
| Camel Caravan Oasis | Two-Player Mounts | Automated cactus slicing silo | Sandstone & Acacia wood |
| Fox Berry Garden | Sweet Berries | Fox mob foraging & hopper pickup | Spruce & Azalea leaves |
| Iron Golem Foundry | Iron Ingots & Poppies | Villager panic line-of-sight & lava drop | Stone bricks & Banners |
| Panda Zen Pavilion | Slimeballs & Bamboo | Observer-piston bamboo slicing array | Dark oak & Bamboo |
| Strider Lava Marina | Lava Transport | Basalt boarding slips & fungus feeders | Blackstone & Basalt |
| Froglight Foundry | 3 Froglight Types | Micro-magma cube feeding chute | Mangrove roots & Mud |
5 Practical Tips for Building Functional Mob Infrastructure
- Always Prevent Entity Cramming Disasters: On Java Edition servers, placing more than 24 mobs on a single block causes automatic suffocation damage. Design breeding pens with adequate surface area or utilize vines and ladders to bypass entity cramming limits where necessary.
- Master Under-Block Hopper Suction: Items fall through mud blocks, wool carpets, and bottom-half slabs into hoppers positioned below. Use these non-full blocks to conceal metallic hopper nozzles while keeping your livestock walking on natural turf.
- Isolate Audio Clutter: Large groups of livestock generate constant ambient noise. Position massive livestock processing plants at least sixteen to twenty blocks away from your primary sleeping quarters or utilize sound-muffling wool blocks within wall cavities.
- Install Airlock Safety Portals: Never rely on a single fence gate for high-traffic mob pens. Construct double-door airlock vestibules or carpet-topped fence boundaries so you can step across pens freely while mob pathfinding artificial intelligence treats the boundary as an impassable barrier.
- Automate Lighting with Concealed Sources: Hostile mobs require complete darkness (light level 0) to spawn. Conceal sea lanterns, froglights, and glowstone underneath carpets, hay bales, and water cauldrons to mob-proof your animal enclosures without scattering unsightly torches across the floor.