12 Functional And Cozy Minecraft Chicken Coop Egg Farms That Work
Building a functional and cozy chicken coop egg farm brings life to your survival base. In addition, automated egg collection saves valuable gameplay time. Basic wooden pens often look messy and cluttered over time. However, blending rustic aesthetics with redstone mechanics creates stunning, productive farm structures. You can easily craft charming cottagecore barns, automated egg sorters, and high-yield cooked chicken kitchens. Therefore, mastering cozy coop construction elevates your entire agricultural and homesteading experience.
Planning Your Homestead Chicken Farm Layout
Every successful chicken coop build requires thoughtful planning and spatial positioning. First, determine your farming goals, such as passive egg gathering or automated cooking. In addition, position the coop near your main kitchen or bakery workshops. Proximity to wheat and seed crop fields simplifies breeding routines significantly. Furthermore, terraforming a flat, grassy pasture ensures natural outdoor foraging zones. Consequently, your livestock facilities integrate smoothly into the surrounding survival homestead landscape.
Choosing Cozy Rustic Building Palettes
Selecting a warm, earthy block palette defines your coop’s farmhouse character. For instance, stripped oak and spruce wood supply a classic rustic aesthetic. Meanwhile, red terracotta and bricks create traditional red countryside barn styles. In addition, incorporating mud bricks and cobblestone adds weathered foundations to walls. White wool or calcite creates clean, whitewashed cottage walls. Therefore, thoughtful block mixing makes simple farm structures feel authentic and cozy.
Designing Humane and Natural Grazing Runs
Chickens look far happier when roaming spacious, naturally detailed outdoor pastures. Replace bare dirt patches with lush grass, coarse dirt, and podzol. Furthermore, surround grazing pens with varied oak and spruce fence styles. Scatter hay bales, composters, and water troughs throughout the open yard. In addition, place low shrubbery and sweet berry bushes around pen perimeters. Consequently, your outdoor foraging areas look vibrant, organic, and beautifully maintained.
Essential Survival Materials for Farm Builders
Constructing automated poultry farms demands basic functional redstone and building resources. First, gather ample iron ingots for crafting hoppers and cauldrons. In addition, stock up on chests, barrels, dispensers, and comparators. Wood logs and slabs are essential for structural frames and roofing. Moreover, craft water buckets and leads to transport birds safely. Therefore, organizing your inventory beforehand streamlines the entire construction process considerably.
Integrating Hidden Automatic Egg Mechanics
A truly functional coop collects produce automatically beneath rustic wooden floors. Place iron hoppers directly under nesting perches and feeding stations. Furthermore, funnel collected items into concealed storage barrels or sorting systems. Carpet placed over hoppers prevents adult chickens from snagging feet. In addition, comparator circuits can feed eggs directly into automated hatching dispensers. Consequently, your farm produces endless survival resources without visible industrial clutter.
Illuminating Pens and Preventing Predator Spawns
Proper illumination keeps your poultry safe from hostile mobs and wild foxes. Hide glowing froglights and sea lanterns beneath hay bales and barrels. In addition, hang copper or iron lanterns from ceiling timber rafters. Mount lanterns on fence posts along outdoor perimeter walking paths. Furthermore, fully enclose roofs with solid blocks to block phantom attacks. As a result, your livestock stays completely secure through the darkest nights.
1. Traditional Red Barn Egg Siphon Coop
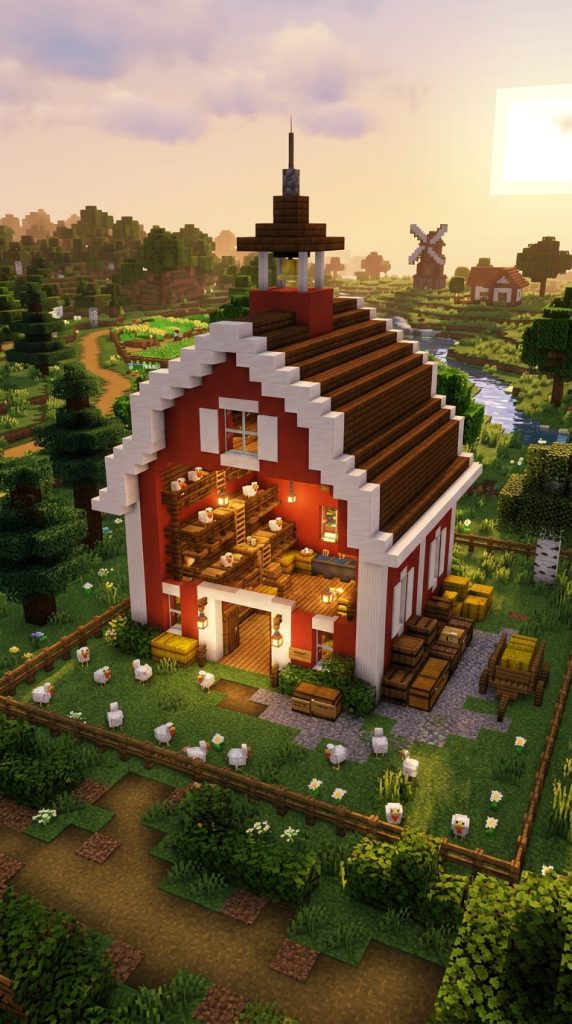
Classic red barn styling, white trim, and automated egg collection hoppers define this farm. It brings iconic countryside charm directly to survival homesteads.
Iconic Countryside Barn Design
Traditional red barns capture the timeless nostalgia of peaceful countryside homesteads. Deep red terracotta walls contrast crisply against bright white quartz window trim. Furthermore, a high-pitched gambrel roof shelters multi-tiered indoor roosting perches. Concealed floor hoppers siphon dropped eggs directly into outdoor collection crates. Consequently, this build combines picturesque rustic architecture with effortless resource automation.
Red Barn Construction Materials
- Red terracotta, red concrete, and bricks
- White concrete, smooth quartz stairs, and slabs
- Spruce logs, stripped spruce, and spruce planks
- Iron hoppers, storage barrels, and chests
- Hay bales, oak fences, and glass panes
- Lanterns, chains, and iron trapdoors
Building the Barn Foundation and Walls
Begin by laying a rectangular foundation twelve blocks wide and sixteen blocks long. Erect stripped spruce corner pillars six blocks high at all corners. Next, fill the exterior wall panels using vibrant red terracotta blocks. Frame wide double-door openings and window borders using clean white quartz. Therefore, the barn structure establishes a bold, classic rural aesthetic immediately.
Pitching the White-Trimmed Gambrel Roof
Construct a traditional curved gambrel roof using dark spruce stairs and slabs. Edge the exterior roof overhangs with smooth quartz stairs for sharp trim. Next, build a high hayloft window above the main front entrance. Place hanging lanterns from exposed spruce ceiling beams inside the barn. Consequently, the interior feels spacious, airy, and warmly illuminated throughout.
Installing the Automatic Floor Siphon
Excavate the central interior floor and install a grid of connected hoppers. Funnel all hoppers directly into a large sorting barrel near the doorway. Next, cover the hopper grid using rustic brown and green wool carpets. Populate the barn with breeding pairs of chickens using wheat seeds. Your traditional red barn egg farm now produces supplies automatically.
2. Cozy Cottagecore Thatch-Roofed Hen House
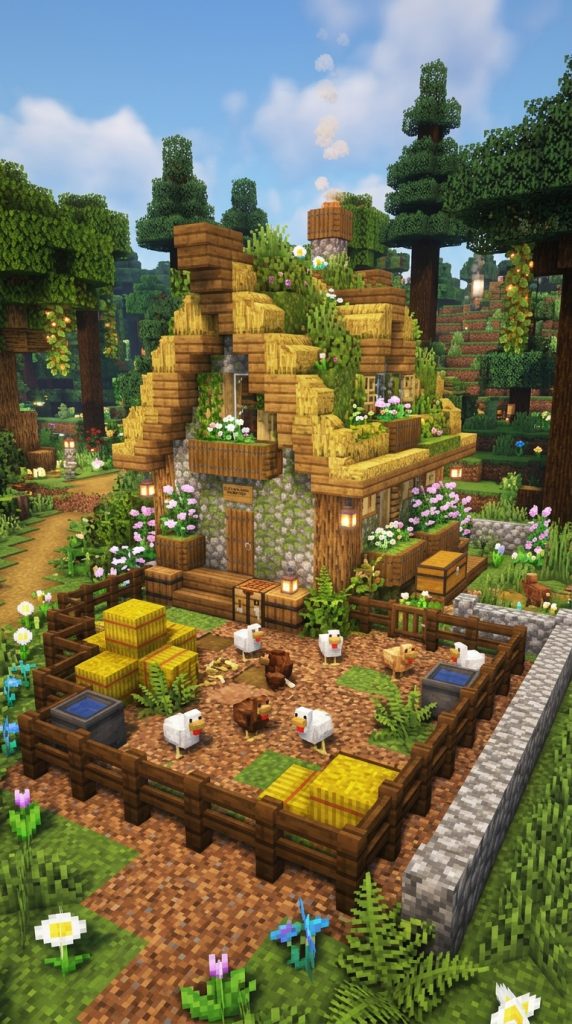
Curved thatch roofs, flowering window boxes, and mossy stone footings define cottagecore charm. This hen house looks like a fairy-tale homestead.
Whimsical Woodland Homestead Styling
Cottagecore hen houses celebrate storybook warmth through natural, organic building materials. Soft hay bale thatch roofs slope gently over weathered spruce plank walls. Furthermore, colorful flower boxes overflow with blooming azaleas beneath leaded windows. A stone path winds through an outdoor scratching yard bordered by fences. Consequently, this design blends seamlessly into dense forests and wildflower meadows.
Cottagecore Hen House Checklist
- Hay bales, spruce stairs, and spruce slabs
- Stripped oak logs, oak planks, and spruce trapdoors
- Cobblestone, mossy stone bricks, and mud bricks
- Iron hoppers, barrels, and composters
- Flower pots, azalea leaves, and sweet berries
- Lanterns, leads, and oak fences
Laying the Mossy Stone Footing
Construct an asymmetrical stone foundation using mixed cobblestone and mud bricks. Raise the foundation two blocks high to keep wooden timbers dry. Next, build rustic wooden walls using a blend of stripped oak logs. Add small picture window openings framed with spruce trapdoors as shutters. Therefore, the structure achieves an authentic, hand-built storybook appearance effortlessly.
Building the Curved Thatch Roof
Construct a sweeping, organic roof using layered hay bales and spruce slabs. Angle the roof eaves downward steeply to simulate thick rustic straw thatch. Next, place moss carpet and blooming azalea leaves along roof valleys. Hang iron lanterns from copper chains underneath the deep front eaves. Consequently, the cozy hen house radiates welcoming, whimsical forest warmth.
Detailing the Outdoor Scratch Yard
Enclose a grassy outdoor run using mismatched oak and spruce fence posts. Scatter coarse dirt, composters, and water cauldrons across the grazing yard. Next, install a concealed hopper beneath a wooden nesting box corner. Cover the collection hopper with a decorative spruce trapdoor for easy access. Your cozy cottagecore thatch hen house is now fully operational.
3. A-Frame Alpine Timber Chicken Chalet
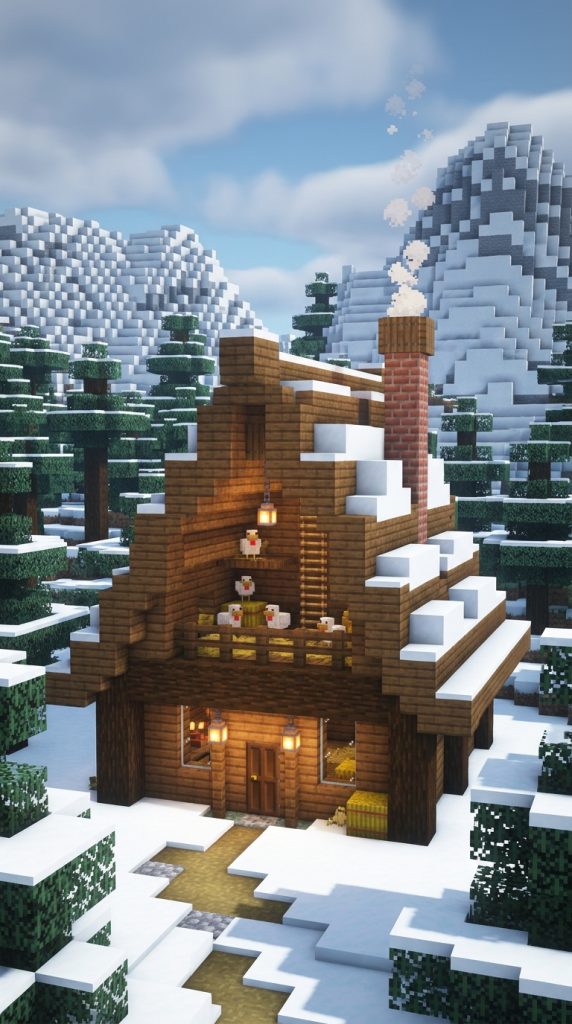
Steep sloping timber rafters, stone fireplaces, and compact interiors define alpine chalets. This design handles snowy mountain biomes with ease.
Mountain Chalet Poultry Architecture
Alpine timber chalets provide heavy weather protection across cold, mountainous biomes. A dramatic steep A-frame roof sheds falling snow and blocks howling winds. Furthermore, warm interior fireplaces keep livestock comfortable during freezing midnight blizzards. Elevated roosting lofts maximize vertical floor space within the compact footprint. Consequently, this sturdy build proves ideal for high-altitude survival bases.
Alpine Chalet Palette
- Spruce logs, stripped spruce wood, and spruce planks
- Spruce stairs, dark oak slabs, and trapdoors
- Bricks, cobblestone, and campfire blocks
- Iron hoppers, chests, and iron bars
- Glass panes, lanterns, and hay bales
- Snow layers and coarse dirt
Erecting the Steep A-Frame Rafters
Lay a stone brick foundation measuring ten blocks wide by fourteen blocks long. Construct steep A-frame roof trusses extending from ground level upward ten blocks. Use dark oak stairs and spruce slabs to shape the sharp peak. Next, fill the front and rear gable walls with stripped spruce logs. Therefore, the chalet structure resists harsh weather and heavy snow accumulation.
Installing the Brick Hearth and Chimney
Construct a compact brick fireplace along the chalet’s rear interior wall. Place a campfire safely behind iron bars to provide radiant indoor warmth. Next, route the brick chimney upward through the timber roof peak. Add a campfire atop the chimney flue for realistic rising smoke. Consequently, the poultry interior remains pleasantly warm throughout alpine winters.
Setting Up Multi-Level Roosting Lofts
Install horizontal spruce fence perches across the upper A-frame rafters. Place iron hoppers beneath roosting stations to catch all dropped eggs. Next, link the hoppers to an exterior collection barrel built into walls. Add a small wooden ramp leading chickens into upper nesting bunks. Your alpine timber chicken chalet is secure, warm, and highly productive.
4. Fully Automated Redstone Cooked Chicken Kitchen
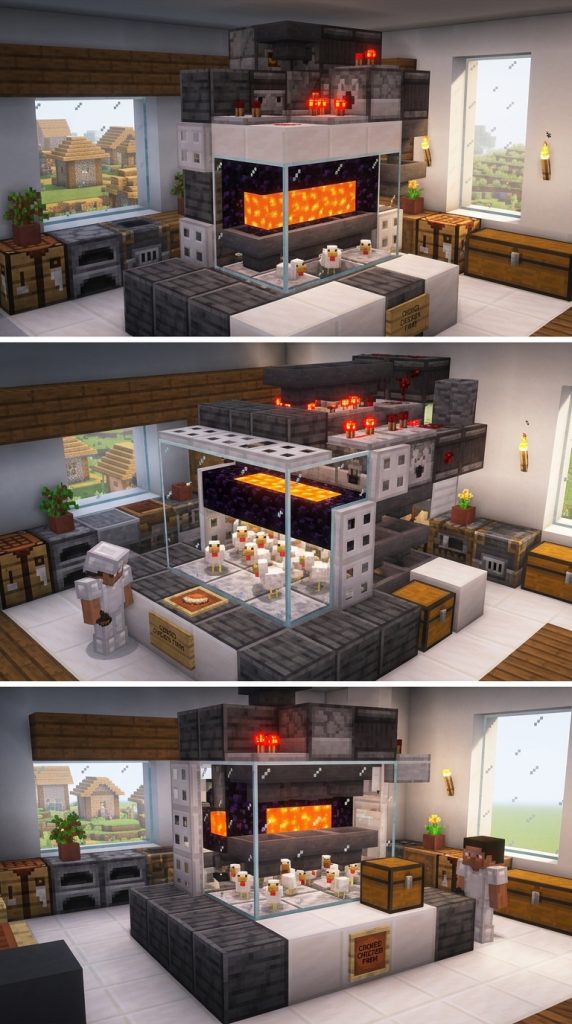
Compact iron hoppers, lava blades, and automated dispensers define this survival cooker. It provides endless cooked food without manual effort.
Compact High-Yield Survival Engineering
Automated chicken cookers represent the pinnacle of compact survival food production. Breeding adult chickens lay eggs that funnel directly into an automated dispenser. Furthermore, redstone comparators trigger eggs to hatch onto lower slab platforms. When chicks mature, a lava blade instantly cooks them into roasted food. Consequently, this functional machine supplies infinite food within a single kitchen counter.
Chicken Cooker Resource Checklist
- Dispensers, redstone comparators, and redstone dust
- Redstone repeaters, observers, and levers
- Iron hoppers, chests, and smooth stone slabs
- Lava buckets, glass blocks, and iron trapdoors
- Polished deepslate, smooth quartz, and bricks
- Item frames, cooked chicken, and feathers
Assembling the Lower Hatching Chamber
Place a double chest with an iron hopper feeding directly into it. Place a single smooth stone slab directly atop the collection hopper. Next, position a dispenser facing into the slab from the rear. Enclose the hatching chamber using clear glass blocks for easy viewing. Therefore, baby chicks stand safely on the slab without suffocating.
Installing the Overhead Lava Blade
Place an iron trapdoor or sign directly above the stone slab. Next, place a single bucket of lava above the trapdoor barrier. Baby chicks stand harmlessly beneath the lava due to their small height. However, maturing adult chickens immediately touch the lava and cook instantly. Consequently, cooked chicken and feathers drop directly into the lower hopper.
Wiring the Automatic Redstone Clock
Place an iron hopper above the dispenser to hold breeding adult chickens. Connect a redstone comparator to detect incoming eggs within the dispenser. Next, wire a repeater clock to fire the dispenser automatically upon detection. Encase the entire redstone machine inside stylish quartz and brick kitchen cabinetry. Your automated cooked chicken kitchen is fully functional and ready.
5. Medieval Stone Windmill Coop & Granary
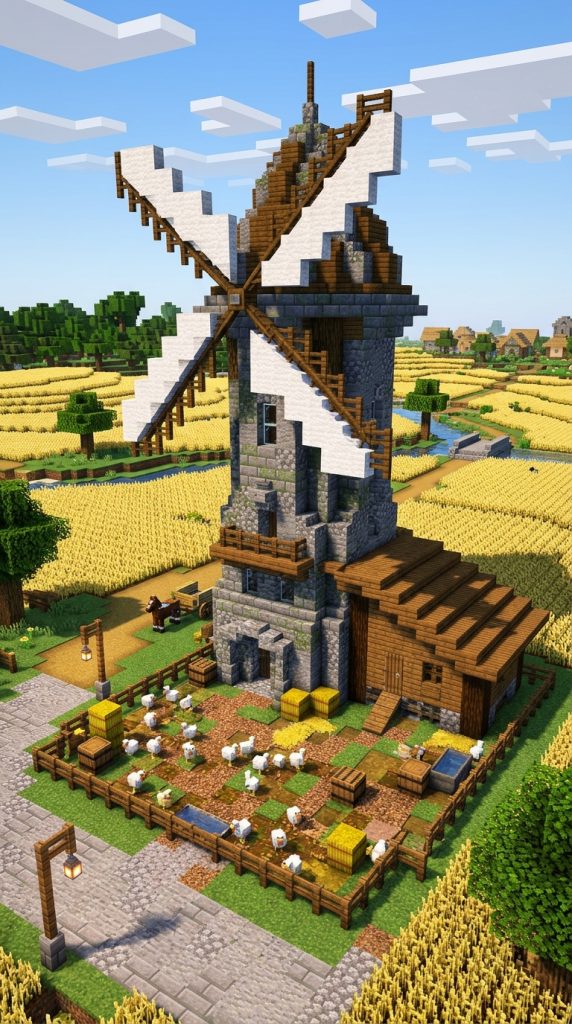
Towering stone walls, rotating wooden sails, and attached hen runs define this build. It merges grain processing with poultry farming.
Multi-Functional Farm Estate Design
Medieval windmill coops combine grain milling with livestock care in one estate. A circular stone tower houses grinding machinery alongside an automated chicken coop. Furthermore, massive wooden sails rotate gracefully above expansive golden wheat fields. Attached timber lean-tos shelter nesting hens and egg collection bins below. Consequently, this grand build acts as a picturesque centerpiece for farming empires.
Windmill Coop Materials
- Cobblestone, mossy cobblestone, and stone bricks
- Dark oak wood, stripped dark oak, and spruce planks
- White wool, oak fences, and iron bars
- Iron hoppers, barrels, and composters
- Wheat bales, lanterns, and chains
- Oak trapdoors and glass panes
Raising the Tapered Stone Tower
Lay an octagonal stone brick foundation eight blocks across in diameter. Taper the tower walls inward slightly as they rise fifteen blocks high. Next, mix in cracked and mossy stone bricks along lower wall sections. Install small slit windows using iron bars and dark oak trapdoors. Therefore, the windmill tower appears sturdy, ancient, and historically authentic.
Constructing the Giant Windmill Sails
Build an upper rotating hub using dark oak logs and iron bars. Extend four large sail arms outward eight blocks in a cross formation. Next, stretch clean white wool blocks across sails to simulate canvas cloth. Angle the wool planes slightly to create an authentic wind-catching appearance. Consequently, the windmill adds dramatic vertical scale to your survival landscape.
Attaching the Lower Chicken Lean-To
Construct a low timber shed attached directly to the windmill’s base. Lay an iron hopper floor beneath nesting boxes to collect dropped eggs. Next, funnel all eggs into large grain barrels inside the tower. Enclose an outdoor scratching yard using oak fences and hay bales. Your medieval windmill coop and granary operates with total efficiency.
6. Greenhouse Glass Atrium Poultry Sanctuary
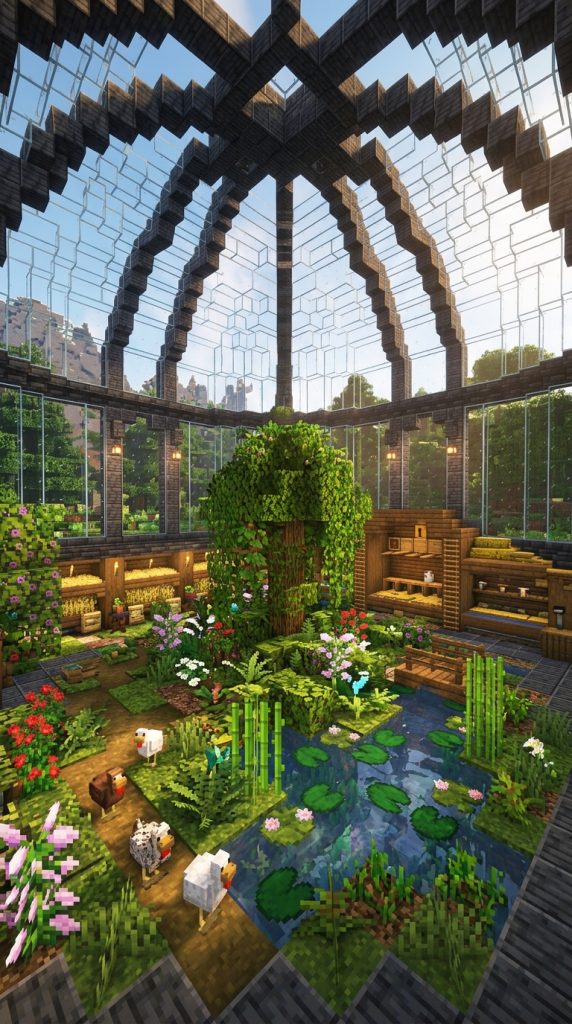
Iron-framed glass domes, interior trees, and tropical foliage define this greenhouse coop. It keeps chickens warm in controlled indoor climates.
Botanical Indoor Livestock Architecture
Greenhouse atrium coops merge lush botanical conservatory styling with poultry care. Soaring glass vaulted ceilings flood the interior with bright, warm natural sunlight. Furthermore, mature fruit trees and hanging vines create a lush tropical garden. Hidden subterranean hoppers collect eggs while preserving the clean botanical aesthetic. Consequently, this design provides a luxurious, tranquil haven for prized livestock.
Greenhouse Atrium Palette
- Polished deepslate, deepslate bricks, and iron blocks
- Clear glass panes, tinted glass, and copper grates
- Dirt, grass blocks, moss blocks, and moss carpet
- Jungle logs, flowering azalea leaves, and spore blossoms
- Iron hoppers, barrels, and sea lanterns
- Water buckets and lily pads
Erecting the Deepslate Framework
Construct a vaulted conservatory skeleton using polished deepslate arches. Make the greenhouse structure twelve blocks wide and sixteen blocks long. Next, fill the curved roof and sidewall grids with clear glass panes. Inset copper grates along lower baseboards for realistic greenhouse ventilation. Therefore, the structure achieves an elegant, industrial-botanical architectural look.
Landscaping the Lush Indoor Garden
Fill the interior floor with rich grass blocks and mossy patches. Plant a small indoor jungle tree draped with flowering azalea leaves. Next, suspend a fragrant spore blossom centrally to release drifting green particles. Dig a small stone-lined water pond complete with floating lily pads. Consequently, chickens forage happily inside an enchanting, climate-controlled indoor jungle.
Concealing the Subterranean Egg Siphon
Excavate trenches beneath main feeding zones and install iron hopper lines. Cover the hoppers using green moss carpets to match the floor. Next, route hopper lines into an exterior brass-trimmed collection barrel. Add hidden sea lanterns beneath glass floor tiles for subtle night lighting. Your greenhouse glass atrium poultry sanctuary is complete and thriving.
7. Rustic Underground Dwarven Mine Coop
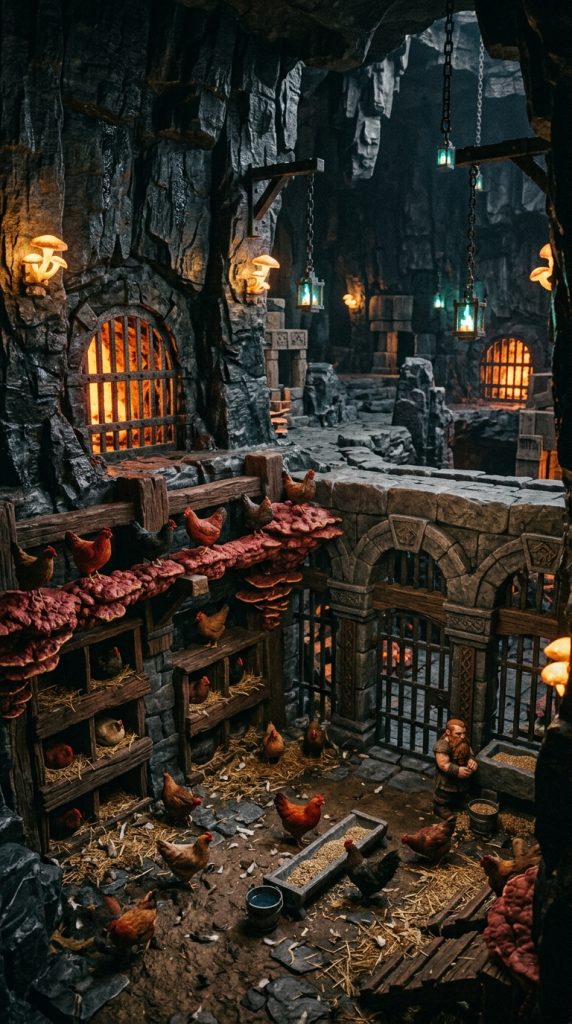
Chiseled deepslate, glowing lava vents, and underground fungal runs define this build. It brings farming to deep subterranean bases.
Subterranean Dwarven Homesteading
Underground dwarven coops solve food production challenges within deep cavern bases. Heavy stone archways and iron grates secure livestock safely underground. Furthermore, glowing shroomlights and lava vents illuminate the dark rocky cavern. Specially adapted fungal perches allow chickens to thrive without direct sunlight. Consequently, this rugged build proves essential for underground bunker survivalists.
Dwarven Mine Resource List
- Deepslate tiles, polished deepslate, and basalt
- Crimson planks, warped planks, and nether bricks
- Shroomlights, lava cauldrons, and iron bars
- Iron hoppers, droppers, and redstone dust
- Chains, soul lanterns, and anvils
- Warped roots and weeping vines
Excavating the Underground Cavern
Carve a vaulted cavern room ten blocks wide inside solid deepslate. Line the perimeter walls with heavy deepslate tile arches and pillars. Next, inset polished basalt columns along corners to simulate mine supports. Install iron bar grates across wall alcoves to view glowing lava. Therefore, the subterranean chamber feels structurally reinforced and atmospheric.
Building Heavy Stone Roosting Bins
Construct terraced stone feeding troughs along the cavern walls using deepslate stairs. Inset iron hoppers inside troughs to catch all dropped eggs automatically. Next, craft roosting perches using crimson and warped wood fence posts. Place glowing shroomlights beneath perches to provide essential growth lighting. Consequently, chickens roost comfortably despite living deep beneath the surface.
Installing the Vertical Dropper Elevator
Connect floor hoppers to a vertical dropper item elevator system. Wire a silent redstone clock to shoot eggs upward into base kitchens. Next, decorate the room with anvils, chains, and hanging soul lanterns. Scatter crimson roots across the floor for a rich underworld aesthetic. Your rustic underground dwarven mine coop is fully operational.
8. Japanese Pagoda Zen Garden Hen House

Curving dark roofs, crimson mangrove pillars, and bamboo yards define this coop. It brings peaceful Asian-inspired aesthetics to farms.
Serene East-Asian Agricultural Design
Japanese pagoda coops celebrate architectural harmony, balance, and natural elegance. Tiered, upward-curving dark roofs shelter elevated wooden chicken roosts. Furthermore, a tranquil pebble Zen garden surrounds the peaceful hen house. Crimson mangrove pillars and paper screen windows create authentic cultural style. Consequently, this design serves as a meditative, productive feature in Asian-themed bases.
Zen Hen House Checklist
- Mangrove logs, stripped mangrove, and mangrove planks
- Deepslate tiles, deepslate tile stairs, and slabs
- Smooth sandstone, gravel, and white concrete
- Bamboo stalks, pink cherry leaves, and lily pads
- Red lanterns, iron hoppers, and barrels
- Dark oak trapdoors and white banners
Turning Sweeping Pagoda Roofs
Construct a rectangular pavilion using stripped crimson mangrove wood pillars. Build a sweeping, tiered roof overhead using dark deepslate tile stairs. Next, curve the roof corners upward using upside-down deepslate slabs. Hang glowing red paper lanterns from every flared roof corner eave. Therefore, the pavilion captures authentic historic East Asian pagoda design.
Styling the Raked Zen Gravel Yard
Surround the hen house with smooth gravel and sand paths. Rake geometric swirl patterns across the ground using varied stone slabs. Next, plant tall bamboo stalks and blooming cherry trees nearby. Build a small stone water basin using a cauldron and bamboo tap. Consequently, the outdoor yard radiates tranquil, peaceful garden atmosphere.
Installing Raised Roosting Platforms
Build an elevated interior roosting deck using smooth bamboo wood slabs. Place iron hoppers beneath sleeping perches to collect dropped eggs silently. Next, run hopper lines into a concealed barrel behind white banners. Install dark oak trapdoors as sliding window shutters along exterior walls. Your Japanese pagoda Zen garden hen house is complete and balanced.
9. Mediterranean Stucco & Terracotta Roost

Whitewashed stucco walls, orange tile roofs, and citrus planter boxes define Mediterranean style. It brings sun-drenched coastal holiday warmth.
Sun-Kissed Seaside Farm Architecture
Mediterranean chicken roosts celebrate sunny coastal living with bright, cheerful palettes. Crisp whitewashed walls reflect bright daytime sunshine across warm terracotta patios. Furthermore, climbing flowering vines wrap around rustic birch wood shade pergolas. Built-in ceramic feeding troughs automatically collect eggs beneath shaded sleeping alcoves. Consequently, this charming design turns standard farm pens into coastal paradises.
Mediterranean Roost Palette
- White concrete, calcite, and smooth diorite
- Terracotta, brick stairs, and brick slabs
- Birch logs, stripped birch, and birch fences
- Flower pots, flowering azalea, and jungle leaves
- Iron hoppers, chests, and water cauldrons
- Lanterns and yellow carpets
Raising Whitewashed Stucco Walls
Construct clean perimeter walls using a mix of white concrete and calcite. Add soft rounded arch openings for chicken entryways using quartz stairs. Next, pave the surrounding outdoor patio using warm orange terracotta tiles. Install terracotta brick trim along the baseboards to resist ground dirt. Therefore, the building radiates bright, clean coastal resort elegance.
Building the Arched Terracotta Tile Roof
Construct a low-sloped roof using warm orange brick stairs and slabs. Overhang the roof edges slightly over whitewashed walls for authentic Mediterranean shadow lines. Next, erect a rustic birch pergola adjoining the front coop entrance. Drape lush jungle leaves and blooming azaleas across overhead pergola beams. Consequently, chickens enjoy cool, shaded outdoor foraging during hot middays.
Setting Up Ceramic Collection Troughs
Line the interior walls with ceramic feeding troughs using brick stairs. Inset iron hoppers inside troughs covered with soft yellow wool carpets. Next, funnel hoppers into a large storage chest styled as a patio bench. Place decorative potted citrus shrubs around the outdoor chicken run. Your Mediterranean stucco chicken roost is sunny, functional, and productive.
10. Desert Oasis Adobe Mud-Brick Coop
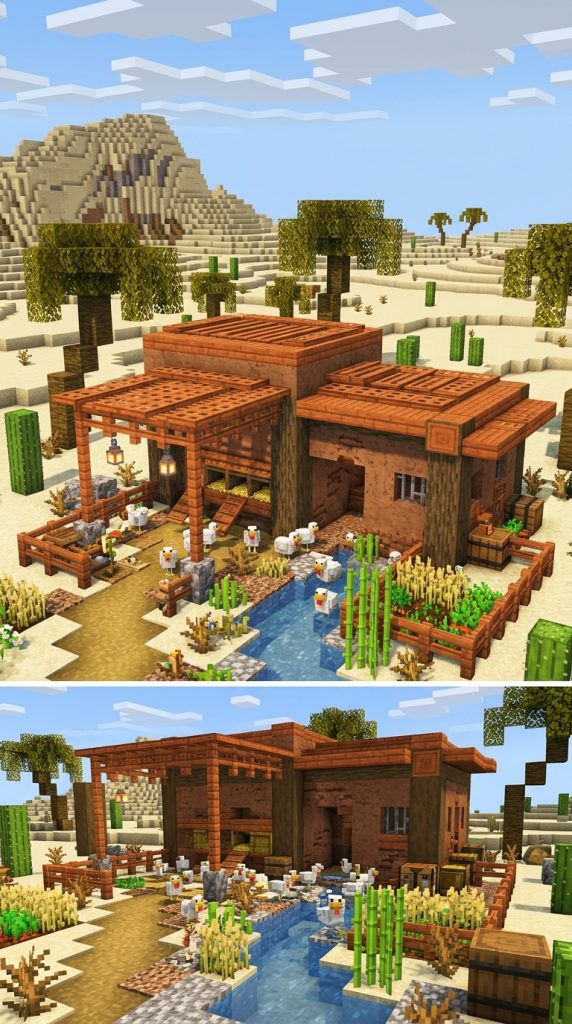
Warm mud bricks, acacia wood shade slats, and palm trees define desert oasis coops. This build keeps poultry cool in arid biomes.
Sun-Baked Desert Livestock Shelter
Desert adobe coops provide cool, shaded shelter across scorching desert biomes. Thick mud brick and sandstone walls insulate interior nesting chambers from heat. Furthermore, slatted acacia wood pergolas filter blinding midday sun over sandy runs. Flowing water channels provide continuous hydration for foraging desert poultry. Consequently, this functional build blends seamlessly into desert villages and pyramids.
Desert Adobe Material List
- Mud bricks, packed mud, and mud brick stairs
- Smooth sandstone, cut sandstone, and chiseled sandstone
- Acacia planks, acacia fences, and acacia trapdoors
- Iron hoppers, barrels, and decorated pots
- Water cauldrons, sand, and cactus plants
- Lanterns and yellow banners
Molding Thick Mud-Brick Walls
Construct a sturdy rectangular shelter using textured mud brick blocks. Leave the wall surfaces uneven and blocky to mimic handcrafted adobe clay. Next, carve out narrow slit windows to keep hot desert winds outside. Inset cut sandstone blocks along doorways for solid structural framing. Therefore, the coop interior stays naturally cool and shaded all day.
Framing Acacia Wood Shade Pergolas
Extend horizontal acacia wood fence beams over the outdoor grazing run. Place acacia trapdoors across the beams with gaps to filter sunlight. Next, plant tall palm trees using jungle logs and jungle leaves nearby. Dig a clear water channel bordered by smooth sandstone through the yard. Consequently, chickens forage comfortably without overheating under harsh desert skies.
Installing Concealed Sand-Hoppers
Bury iron hoppers beneath the indoor nesting boxes in the sand. Funnel the hoppers into large decorative ceramic pottery jars outside. Next, hang copper lanterns from acacia pergolas for evening perimeter lighting. Scatter decorated pots containing small flowering cacti around the yard. Your desert oasis adobe mud-brick coop stands resilient against heat.
11. Overgrown Ancient Jungle Ruins Coop
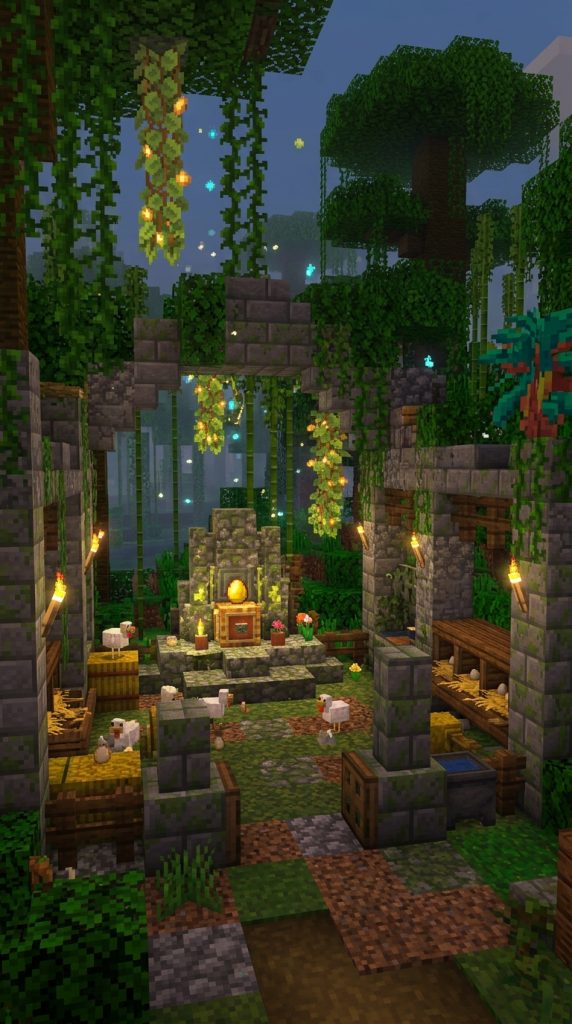
Crumbling stone bricks, winding jungle roots, and dangling vines define this ancient ruins coop. It turns forgotten temples into productive farms.
Mysterious Lost-Temple Poultry Haven
Jungle ruins coops transform crumbling ancient stone temples into thriving poultry habitats. Giant mossy stone pillars support fractured, vine-draped temple archways. Furthermore, lush jungle foliage and spore blossoms overtake ancient stone floors. Hidden hoppers buried beneath ancient altar stones collect eggs automatically. Consequently, this atmospheric design adds deep adventure lore to survival worlds.
Jungle Ruins Resource Checklist
- Mossy stone bricks, cracked stone bricks, and cobblestone
- Mud bricks, coarse dirt, and rooted dirt
- Jungle logs, stripped jungle wood, and bamboo
- Spore blossoms, weeping vines, and glow berries
- Iron hoppers, barrels, and moss blocks
- Lily pads and water cauldrons
Carving Fractured Temple Ruins
Erect four crumbling stone pillars using mixed mossy and cracked stone bricks. Connect the pillars with broken stone archways to mimic ruined shrines. Next, replace random floor blocks with coarse dirt and lush moss. Leave sections of the stone roof collapsed to allow sunlight through. Therefore, the structure looks authentically battered by centuries of jungle growth.
Weaving Living Jungle Flora
Drape weeping vines and glowing glow berries across broken stone walls. Next, suspend a fragrant spore blossom centrally for gentle floating particles. Plant dense bamboo stalks and large jungle ferns around the exterior. Place water-filled cauldrons topped with lily pads within ruined stone corners. Consequently, the ancient ruin feels alive, vibrant, and lush.
Burying the Sacrificial Egg Altar
Build an ancient stone altar inside the temple center using chiseled stone. Install iron hoppers directly beneath the altar block to siphon eggs. Next, route the collection hoppers into a hidden barrel beneath moss carpets. Populate the ruined sanctuary with colorful chickens feeding on jungle seeds. Your overgrown ancient jungle ruins coop is complete and magical.
12. Floating Steampunk Airship Chicken Aviary

Brass copper hulls, spinning propellers, and glass observation domes define this flying aviary. It brings futuristic aerial farming to life.
High-Flying Victorian Industrial Aviary
Steampunk airship aviaries take livestock farming into the upper survival skies. A gleaming copper-and-wood dirigible hull houses elevated poultry roosts. Furthermore, spinning brass propellers and steam exhaust pipes add industrial energy. Clear glass observation bays allow players to inspect flying flocks from below. Consequently, this imaginative build proves perfect for mountain and sky bases.
Steampunk Aviary Palette
- Cut copper, exposed copper, and copper grates
- Dark oak planks, spruce logs, and iron blocks
- White wool, yellow concrete, and glass panes
- Lightning rods, chains, and campfires
- Iron hoppers, droppers, and observers
- Redstone repeaters and levers
Assembling the Copper Airship Hull
Construct an aerodynamic gondola hull using cut copper and dark oak. Allow copper blocks to oxidize slightly for an authentic vintage patina. Next, install clear glass observation panes along the gondola floor. Frame the upper deck with heavy iron bars and copper lightning rods. Therefore, the airship structure radiates Victorian industrial engineering charm.
Installing Propellers and Steam Vents
Mount rotating propeller blades at the hull stern using dark oak trapdoors. Next, place campfires beneath floor copper grates to emit continuous steam. Run copper grates and lightning rods across walls to mimic pressure pipes. Add redstone repeaters to simulate complex flight clockwork systems. Consequently, the aviary looks fully powered, airborne, and dynamically active.
Wiring the High-Altitude Egg Dropper
Install an iron hopper grid beneath roosting perches inside the cabin. Connect the hoppers to a downward-facing dropper item chute. Furthermore, wire an observer clock to drop collected eggs down to bases. Construct a white wool hot-air balloon envelope above the gondola hull. Your floating steampunk airship chicken aviary rules the skies effortlessly.