13 Budget-Friendly DIY Home Projects Ideas You Want to Try
Elevating your home’s visual appeal does not require massive investments or contractors. In fact, small intentional updates often deliver the greatest interior design transformations. Many homeowners assume luxurious living environments demand expensive showroom purchases and furniture. However, resourceful handmade craftsmanship introduces timeless authenticity and cozy warmth into spaces. Pinterest feeds are constantly buzzing with viral home upgrades that anyone can try. You can effortlessly recreate these high-end aesthetics using humble, accessible raw materials. Simple weekend projects instantly revive outdated rooms without causing prolonged renovation disruptions. Budget-friendly home decorating combines clever resourcefulness, balanced color schemes, and practical craft techniques.

Achieving Designer Looks Without Overspending
Achieving a high-end designer polish depends primarily on balanced textures and understated palettes. Raw wood, unbleached linen, sculpted plaster, and warm metallics inherently project sophisticated refinement. You can easily find these budget supplies at local suburban hardware centers. Thrift stores also hide sturdy vintage pieces waiting patiently for modern surface updates. Simply coating outdated glass containers in textured matte hues creates stunning faux stoneware. Furthermore, systematically decluttering flat surfaces instantly elevates the visual caliber of your rooms. Clean, intentional tabletop styling always mimics the composed perfection of luxury architectural magazines.
Why Custom Handcrafted Projects Define Spaces
Handcrafted accents infuse genuine character and personal narratives into contemporary home environments. Mass-produced retail decorations often feel completely impersonal, generic, and uninspired across modern homes. In contrast, thoughtful bespoke creations tell meaningful stories while honoring your unique resourcefulness. Crafting functional home additions also provides deeply satisfying, mindful creative relaxation on weekends. Transforming plain wooden boards into functional, chic wall art brings lasting personal pride. Every completed craft project adds an undeniably unique layer of tailored textural interest. Inexpensive craft supplies adapt smoothly to match your family’s personal practical living requirements.
Smart Project Planning for Busy Beginners
Every triumphant interior transformation begins with methodical, organized preparation before handling any tools. First, walk through every individual room to evaluate blank corners needing visual attention. You likely already possess basic glass containers, scrap boards, or spare hardware fasteners. Grouping your existing materials prevents unnecessary, redundant purchases during trips to craft suppliers. Next, establish a sensible, fixed monetary budget for each specific room improvement idea. Keeping individual material costs around twenty dollars ensures home decorating remains delightful and stress-free. Always prioritize sturdy structural silhouettes when browsing through affordable secondhand flea market furniture aisles.
Elevating Compact Spaces with Deliberate Accents
Cramped apartments benefit dramatically from intentional, space-conscious decorating decisions and smart vertical displays. Empty drywall walls present tremendous unused opportunities for mounting sleek floating shelves and sconces. Upright displays clear valuable tabletop surfaces while creating dynamic, airy focal interest across rooms. Selecting warm, light-colored finishes brightens up shadowy hallway alcoves and compact bedroom sitting areas. Furthermore, hanging reflective mirrored accents naturally bounces radiant outdoor daylight directly across interior spaces. Small decorative adjustments keep domestic upgrade projects manageable for solo weekend crafters working alone. You can assemble charming decorative wall accents quickly without creating lingering renovation household chaos.
Organizing an Inspiring Creative Work Surface
Establishing an orderly crafting table ensures your entire creative process remains smooth and joyful. Protect wide kitchen workspaces completely by rolling out heavy, recycled brown packaging paper beforehand. This fundamental protective layer catches accidental hot glue droplets and stray drips of wet paint. Keep everyday utility supplies like sharp shears, craft rulers, brushes, and adhesives neatly gathered together. Clear plastic containers keep tiny hardware screws, twine skeins, and sandpaper grits immediately accessible. Always open windows wide to ensure proper room ventilation whenever applying aerosol lacquers or glues. Working within tidy surroundings keeps your creative ideas flowing effortlessly toward professional, high-end finished results.
1. Upcycled Textured Faux Terracotta Stone Vases
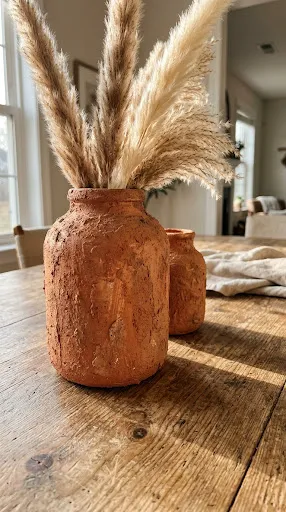
Transforming cheap thrift store glassware into faux stoneware is remarkably easy and affordable. Modern home trends heavily emphasize coarse, matte ceramic styling pieces on open shelves. Buying genuine artisanal ceramics from designer boutiques can quickly become costly and prohibitive. Thankfully, a simple baking soda and latex paint mixture works miraculous surface transformations. This clever hack instantly mimics coarse, expensive earthen terracotta vessels using forgotten glass.
Transforming Plain Glass into Designer Stoneware
Thrift shops contain countless outdated floral vases for mere pennies on clearance racks. Their glossy printed patterns might appear old, but silhouettes often remain completely timeless. A textured paint layer covers unsightly glass patterns in minutes with thick coats. This easy craft gives forgotten vessels an elegant, organic transformation for your mantels.
Materials Needed for Textured Vases
- Assorted smooth glass bottles or thrifted ceramic vases
- Flat interior latex paint or matte acrylic craft paint
- Regular baking powder or pure baking soda
- Coarse bristle paintbrush or synthetic foam sponge
- Disposable mixing container and stirring craft stick
Step-by-Step Textured Painting Tutorial
- Wash the glass surface thoroughly with warm soapy dishwater.
- Dry the glass completely using a clean microfiber cloth.
- Pour half a cup of matte paint into containers.
- Stir two tablespoons of fresh baking soda into paint.
- Mix the paint mixture well until it foams lightly.
- Apply a thick layer using horizontal, deliberate brush strokes.
- Allow the first coat to dry for forty minutes.
- Brush on a second coat to hide transparent patches.
- Dab slightly with a dry sponge for organic stone textures.
- Let the vase cure fully overnight before adding stems.
2. Minimalist Wooden Hanging Plant Propagation Station
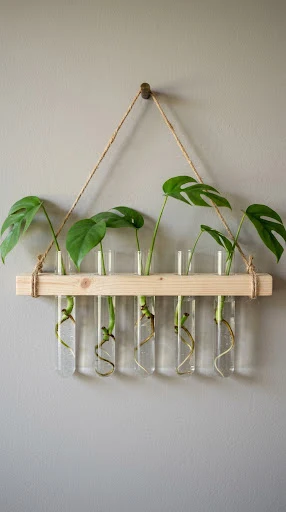
Indoor plants effortlessly introduce vibrant greenery and life into plain, sterile urban rooms. Propagating houseplant cuttings in water creates stunning organic wall art for empty walls. This minimalist timber propagation station merges natural blonde wood with clear laboratory glass. It displays rooted plant clippings while conserving limited tabletop space on desks and counters.
Bringing Natural Greenery to Empty Walls
Empty walls frequently look uninspired, chilly, and stark without natural botanical artwork displays. Wooden hanging stations create an eye-catching, living decorative gallery wall in bright kitchens. Watching tender green roots grow inside water brings continuous joy to plant lovers. It transforms standard vegetative propagation into a striking modern installation with zero maintenance hassle.
Materials Needed for Propagation Displays
- Clear glass test tubes with secure lip rims
- Sanded pine craft wood strip (two inches wide)
- Natural jute twine or soft twisted cotton cord
- Hand drill with specialized wood spade drill bit
- Fine 120-grit sandpaper and matte protective wood wax
Step-by-Step Wood Station Assembly
- Measure equal spaces across your timber strip for holes.
- Mark drilling locations carefully using a sharp lead pencil.
- Secure the timber firmly against a sturdy workbench surface.
- Drill through marked holes using your wide spade bit.
- Sand rough timber edges until the wood feels smooth.
- Apply a thin layer of natural finishing furniture wax.
- Drill two smaller hanging holes through the top edges.
- Thread natural jute rope securely through both hanging holes.
- Knot the cord ends underneath the pine board tightly.
- Slide glass test tubes safely into the predrilled openings.
- Fill glass tubes with water and insert green cuttings.
3. Neutral Boho Brushed Cotton Macramé Feather Hanging
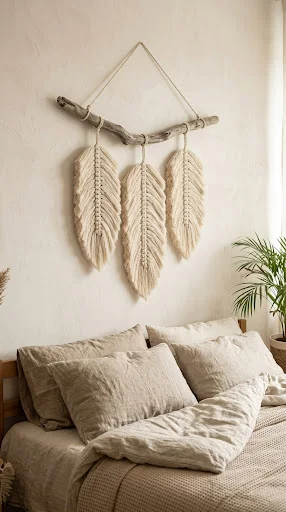
Boho home design remains wildly popular across visual Pinterest feeds and interior magazines. Macramé art adds tactile softness and welcoming warmth to stark, bare living rooms. Traditional woven fiber designs can feel intimidating and tedious for beginner craft lovers. Fortunately, brushed macramé feathers require only simple, repetitive knotting techniques and basic supplies.
Softening Bedroom Walls with Brushed Fiber Art
Sharp furniture edges and flat drywall can feel cold and unwelcoming in bedrooms. Woven cotton feathers introduce inviting, cozy movement into bedroom areas above wooden headboards. Suspended along a rustic branch, they bring rich artisan texture to neutral walls. You can match the cotton cords with your existing bedding and drapery sets.
Materials Needed for Macramé Feathers
- Single-strand natural macramé cotton cord (4mm thickness)
- Foraged natural tree branch or smooth wooden craft dowel
- Sharp fabric scissors or precision rotary fabric cutter
- Fine-tooth metal pet comb or sturdy wire brush
- Extra-hold matte aerosol hairspray or fabric stiffener liquid
Step-by-Step Feather Weaving Guide
- Cut one central support cord thirty centimeters in length.
- Cut twenty smaller horizontal cords twenty centimeters each individually.
- Fold the central cotton cord exactly in half lengthwise.
- Loop pairs of smaller cords across the center spine.
- Tie square lark’s head knots down the spine evenly.
- Pull all knots firmly to guarantee a tight weave.
- Comb the cotton cord strands out using wire brushes.
- Continue brushing until the cotton fringe separates completely soft.
- Trim cord edges carefully into a sleek oval leaf.
- Coat feathers with hairspray so they retain flat shapes.
- Tie the completed feather securely to your wooden branch.
4. Vintage Botanical Nature Prints with Antique Aging
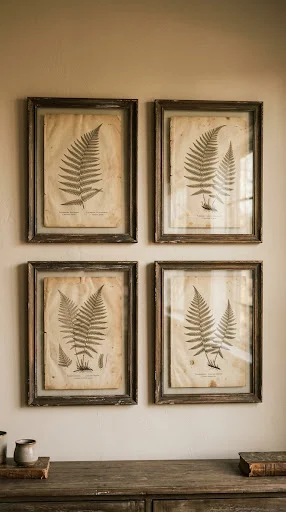
Classic botanical wall galleries instantly make casual homes look curated, historic, and collected. Antique nature illustrations present refined vintage elegance across blank dining spaces and hallways. Original historical art prints often fetch exorbitant prices at antique stores and galleries. However, free public-domain botanical archives allow free digital home printing on standard cardstock.
Recreating Timeless European Gallery Charm
Historic illustrations feature delicate floral details and warm, muted palettes from another era. Giving regular paper an aged tea bath produces realistic, authentic historic patina. Paired with dark thrifted frames, they evoke storied estates and European manor libraries. This project delivers maximum vintage sophistication for mere pennies without specialized artistic skill.
Materials Needed for Aged Botanical Prints
- Standard white cardstock with printed public-domain botanical illustrations
- Two bags of cheap, strongly brewed black tea
- Wide foam brush or shallow kitchen baking sheet
- Secondhand ornate picture frames from your local thrift
- Rubbing sandpaper or fine steel wool for distressing
Step-by-Step Tea-Staining Technique
- Print botanical nature drawings on matte heavy cardstock paper.
- Brew two black teabags inside boiling water for strength.
- Allow the dark tea bath to cool down completely.
- Lay the cardstock paper flat inside a baking pan.
- Coat paper generously with tea using a foam sponge.
- Leave the paper submerged for fifteen minutes to stain.
- Dry the sheet flat using an electric hair dryer.
- Rub frame edges with sandpaper to reveal raw timber.
- Insert the aged botanical paper inside your prepared frame.
- Mount the framed prints in symmetrical groups of four.
5. Architectural Scandinavian Raw Wood Bead Garland
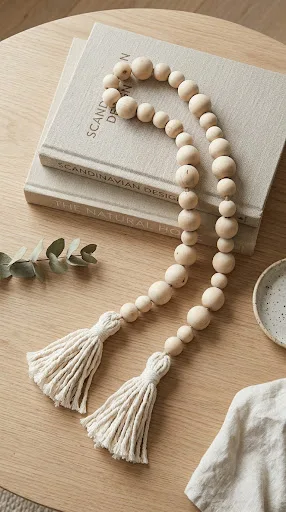
Minimalist interior design thrives on quiet, purposeful structural focal accents on coffee tables. Wooden bead garlands add warm Scandinavian charm across styled bookshelves and wooden mantels. Draped across chunky books, they soften stark, modern linear surfaces with organic symmetry. Making this viral Pinterest accent requires zero complex craft tools or expensive materials.
Adding Organic Scandinavian Warmth to Shelves
Living rooms frequently look rigid with boxy furniture and rectangular electronics on displays. Rounded natural wood beads gracefully disrupt these harsh linear layouts with tactile flow. They introduce organic, grounding symmetry to coffee tables, sideboards, and decorative stone trays. Unfinished birch timber keeps your overall aesthetic feeling calm, serene, and naturally grounded.
Materials Needed for Wooden Garlands
- Assorted raw unfinished birch wood craft beads (various diameters)
- Skein of natural unbleached cotton embroidery floss or twine
- Large blunt tapestry needle with a wide threading eye
- Sharp craft scissors
- Six-inch piece of sturdy cardboard for wrapping tassels
Step-by-Step Garland Crafting Instructions
- Unroll two yards of strong cotton thread or twine.
- Wrap cotton floss fifty times around your sturdy cardboard.
- Slide wrapped loops off and tie tightly near top.
- Cut bottom loops open cleanly to create lush tassels.
- Secure the tassel onto your long piece of twine.
- Thread your tapestry needle with the opposite twine tail.
- String raw wooden beads along thread in deliberate patterns.
- Alternate larger wooden spheres with smaller decorative spacer beads.
- Continue stringing beads until your garland reaches four feet.
- Tie your second handmade cotton tassel to the end.
- Snip excess twine neatly using your sharp craft scissors.
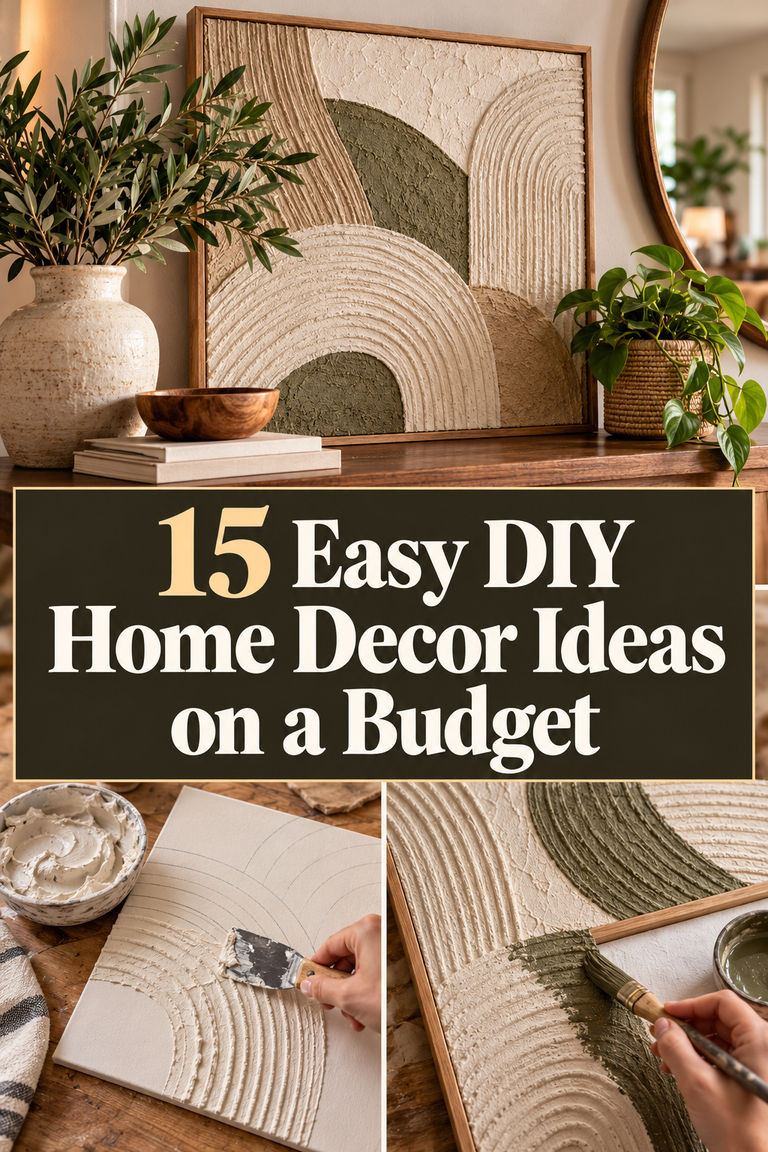
6. Easy Textured Minimalist Plaster Canvas Wall Art

Large-scale abstract wall canvases make spaces look custom, intentional, and designer-built. Buying giant framed canvas paintings often costs hundreds of dollars at modern galleries. Fortunately, joint compound from hardware stores creates magnificent textured art on cheap canvases. You can sculpt gorgeous minimalist waves using basic notched spackle trowels and spatulas.
Designing Monumental Minimalist Canvas Textures
Textured plaster art provides deep visual dimension without loud, distracting painted patterns. Neutral white wall pieces reflect shadows dynamically throughout sunny afternoons across living rooms. This technique lets you become the inspired abstract artist of your own home. It delivers an upscale museum vibe with remarkably little financial effort or training.
Materials Needed for Plaster Artwork
- Large, inexpensive stretched artist canvas from any discount shop
- Tub of premixed drywall joint compound or patching spackle
- Notched plastic adhesive trowel or coarse plastic texture comb
- Wide putty spatula knife
- Can of ultra-matte white interior paint and rollers
Step-by-Step Plaster Sculpting Guide
- Lay your stretched canvas flat upon protective work surfaces.
- Scoop joint compound directly onto canvas with your spatula.
- Spread the paste evenly across canvas half-inch thick.
- Drag notched plastic trowels firmly across wet joint compound.
- Form sweeping circular arches or clean vertical geometric ridges.
- Smooth messy outer canvas edges using damp craft sponges.
- Allow plaster to dry undisturbed for twenty-four full hours.
- Inspect cured plaster for unexpected cracks or structural flaws.
- Roll matte white paint completely over textured dry compound.
- Let paint dry before mounting artwork in bright rooms.
7. Chic Upcycled Ribbed Wood Slat Plant Pedestal
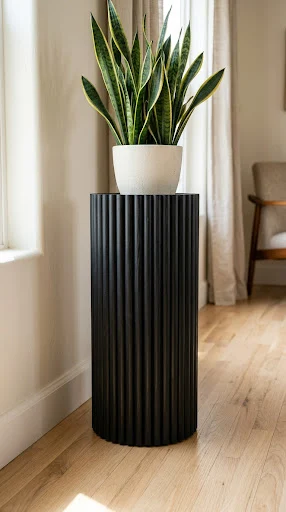
Fluted furniture remains a dominant, enduring visual trend across Pinterest and architectural spreads. Ribbed decorative surfaces bring mid-century modern luxury to plain, builder-grade residential interiors. You can craft stunning fluted pedestal stands using sturdy recycled cardboard concrete tubes. Inexpensive wooden dowels transform simple cylinders into high-end architectural furniture for leafy plants.
Elevating Potted Houseplants with Fluted Pedestals
Houseplants sitting directly on floor tiles often look uninspired, neglected, and low. Lifting greenery on fluted stands instantly creates layered, dynamic heights across room corners. The repetitive wooden dowel slats cast gorgeous vertical shadows throughout sunny daytime hours. It is a fantastic, lightweight accent for compact living rooms needing visual interest.
Materials Needed for Fluted Pedestals
- Heavy-duty round cardboard concrete form tube or mailer
- Bundle of half-round unfinished pine wooden craft dowels
- Fast-grabbing heavy-duty construction adhesive or hot melt glue
- Fine handsaw or garden shears for cutting soft timber
- Walnut wood stain or matte black spray lacquer can
Step-by-Step Fluted Stand Construction
- Cut the cardboard concrete tube to your desired height.
- Cut wooden half-round dowels to match the tube length.
- Sand cut timber dowel tips using medium grit sandpaper.
- Run generous lines of construction glue along one dowel.
- Press the dowel vertically against outer cardboard tube walls.
- Hold firmly in place until the strong adhesive sets.
- Glue subsequent timber dowels tightly beside the first slat.
- Continue wrapping dowels all around the cylindrical cardboard circumference.
- Wipe away wet glue seepages using damp cleaning rags.
- Spray the fluted cylinder entirely with matte black lacquer.
- Position your favorite leafy houseplant right on the stand.
8. Hand-Poured Scented Botanical Soy Wax Jar Candles
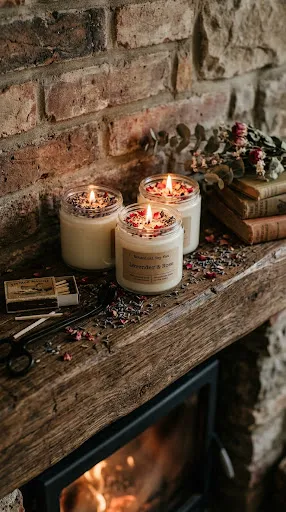
Flickering candlelight instantly establishes relaxing, welcoming warmth in dark living rooms and bedrooms. Boutique scented soy candles can be wildly overpriced in luxury home decor stores. Crafting custom candles lets you control clean fragrances and non-toxic natural wax ingredients. Furthermore, repurposing unique thrifted glassware creates gorgeous sustainable coffee table decor for entertaining.
Infusing Mood Lighting and Cozy Scents
Scent powerfully influences how relaxing your home feels each evening after work. Hand-poured soy wax burns cleaner and longer than petroleum-based commercial paraffin waxes. Embellishing tops with pressed dried florals adds lovely boutique flair to simple jars. They make enchanting decor accents and thoughtful, luxurious handmade gifts for close friends.
Materials Needed for Botanical Candles
- Natural soy wax flakes designed specifically for glass containers
- Cotton core candle wicks with metal base stabilizer tabs
- Natural essential oils like lavender, vanilla, or cedarwood
- Clean thrifted ceramic mugs or vintage clear glass jars
- Wooden clothespins or wick centering clips for candle making
Step-by-Step Candle Pouring Instructions
- Glue metal wick tabs securely to inside jar bases.
- Suspend wicks upright using clothespins across jar mouths.
- Melt soy wax flakes inside a metal pouring pitcher.
- Heat wax gently using the safe double-boiler kitchen method.
- Remove hot liquid wax from heat once completely liquefied.
- Stir favorite aromatic essential oils thoroughly into liquid wax.
- Pour scented wax carefully into your prepared glass vessels.
- Leave half an inch of clearance beneath the rim.
- Cool undisturbed at room temperature for several quiet hours.
- Trim the cotton wick to one-quarter inch before lighting.
9. Rustic Farmhouse Reclaimed Timber Floating Wall Shelves
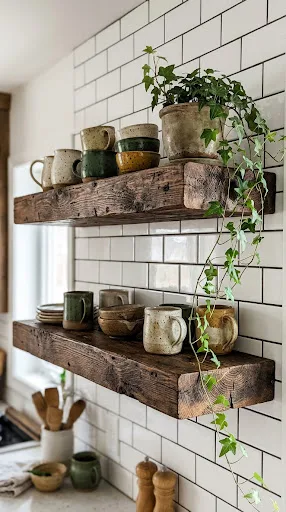
Empty kitchen or bathroom walls crave functional, warm vertical storage for everyday necessities. Thick timber floating shelves provide open display space without visual clutter or bulky brackets. Authentic reclaimed barn wood shelves often carry outrageous boutique price tags at showrooms. However, you can achieve that identical look using cheap construction lumber from retailers.
Expanding Vertical Storage with Rustic Timber
Floating shelves keep kitchen counters completely clear of everyday clutter and cooking spices. Displaying mismatched mugs and ceramics creates cozy, curated open shelving reminiscent of cafes. Staining inexpensive construction pine brings out deep, gorgeous woodgrain patterns across every board. They deliver genuine farmhouse functionality to small, cramped living spaces with ease.
Materials Needed for Floating Shelves
- Construction lumber board (two-by-eight inch kiln-dried pine wood)
- Heavy-duty concealed floating steel shelf mounting bracket rods
- Dark walnut penetrating wood stain and protective polyurethane varnish
- Electric hand drill fitted with specialized extra-long auger bit
- Level tool, pencil, and heavy-duty drywall toggle anchors
Step-by-Step Floating Shelf Installation
- Cut the pine board cleanly to your preferred length.
- Sand rough wood grain using progressive grits of sandpaper.
- Wipe penetrating dark walnut wood stain across all sides.
- Seal dried stained timber with satin protective polyurethane coat.
- Drill mounting holes deep into the back shelf edge.
- Hold heavy-duty steel bracket against the targeted drywall wall.
- Check the bracket placement with your bubble leveling tool.
- Fasten the steel wall bracket firmly into wall studs.
- Slide your prepared timber shelf smoothly onto steel rods.
- Ensure shelf fits flush against painted drywall for stability.
- Style surface with ceramic vessels, small plants, and art.
10. Textured Braided Jute Rope Mirror Frame

Frameless bathroom vanity mirrors often feel basic, unfinished, and institutional in modern rentals. Adding a natural woven jute border brings welcoming coastal texture and beachside warmth. Thick rope softens shiny reflective glass while masking chipped or imperfect glass edges. This beginner-friendly project instantly transforms plain mirrors in under an hour of crafting.
Transforming Plain Glass into Coastal Accents
Reflective glass bounces bright natural sunlight throughout dark entrance foyers and tiny hallways. Surrounding reflective mirrors with nautical jute rope adds breezy, organic texture to walls. It blends farmhouse charm with breezy, relaxed coastal design motifs without high framing costs. You achieve a custom framed appearance without paying for professional frame shop services.
Materials Needed for Rope Mirrors
- Inexpensive round frameless beveled wall mirror from discount stores
- Thick natural twisted jute rope (half-inch or thicker diameter)
- High-temperature electric hot glue gun with multiple glue sticks
- Sturdy corrugated cardboard or thin plywood backing base panel
- Sharp utility knife and heavy-duty shears for trimming rope
Step-by-Step Mirror Framing Technique
- Trace mirror circumference onto sturdy backing cardboard with pencil.
- Add two inches around outline before cutting with knife.
- Glue mirror firmly onto center of round cardboard base.
- Apply thick bead of hot glue along mirror perimeter.
- Press the jute rope firmly into the hot adhesive.
- Wrap rope continuously around mirror edge in tight coils.
- Add glue under every successive layer of coiled rope.
- Complete three to four concentric rings for substantial framing.
- Cut rope diagonally at the bottom to hide ends.
- Secure loose rope fiber ends with extra hot glue.
- Attach strong sawtooth wall hanger onto the cardboard back.
11. Modern Faux Terracotta Geometric Clay Drink Coasters
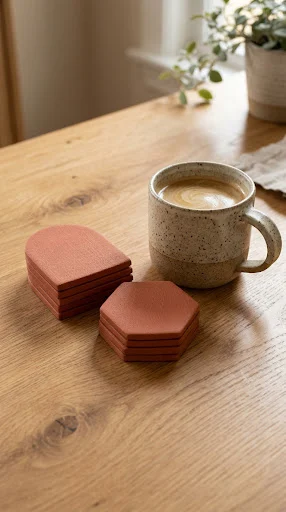
Coffee tables quickly collect unsightly water rings without proper absorbent drink coasters placed. Plain store-bought coasters often lack distinct personality, texture, or visual interest on tables. Oven-bake polymer clay allows you to craft gorgeous custom geometric sets at home. You can easily produce organic terracotta shapes matching your existing living room decor.
Protecting Table Surfaces with Modern Stoneware
Drink coasters sit directly at eye level during social gatherings and coffee dates. Handcrafted clay pieces serve as mini sculptural art for living room tables. Sculpting custom arches or ribbed geometric designs feels endlessly satisfying and deeply creative. They protect precious timber tables from moisture while showing your personal creative flair.
Materials Needed for Clay Coasters
- Blocks of oven-bake polymer clay in terracotta or cream
- Non-stick rolling pin or smooth glass beverage bottle
- Geometric metal cookie cutters or sharp craft utility blade
- Sheet of parchment baking paper and kitchen baking tray
- Water-resistant clear matte spray lacquer for sealing porous surfaces
Step-by-Step Clay Coaster Sculpting
- Knead polymer clay between palms until soft and pliable.
- Place clay on flat baking sheet lined with parchment.
- Roll clay out flat to a quarter-inch thickness.
- Cut stylish organic arches or hexagons using cookie cutters.
- Press textured fabric lightly into clay for linen impressions.
- Smooth out rough clay perimeter edges using wet fingertips.
- Bake clay coasters inside oven per clay packaging instructions.
- Cool clay pieces fully on baking tray after baking.
- Spray coasters with matte lacquer to resist liquid spills.
- Glue tiny felt bumper pads underneath each finished coaster.
12. Upcycled Fluted Bamboo Skewer Desk Organizers

Messy desks and vanity tables severely drain your daily productivity and clear thinking. Buying matching metal desk organizers can be surprisingly expensive in modern office boutiques. Ordinary soup cans can be repurposed into stylish fluted containers with basic supplies. Wrapping tin cans with split bamboo skewers produces high-end Scandinavian desktop organizing accessories.
Elevating Workspaces with Sustainable Storage
Clutter on your home office desk disrupts peaceful creative focus during busy workdays. Reusing household pantry cans keeps useless metal out of local municipal landfills completely. Adding wooden bamboo ribbed slats introduces clean Scandinavian organizational aesthetics to workspace tables. These versatile pencil cups look like they came directly from European design stores.
Materials Needed for Ribbed Organizers
- Clean empty food tin cans with smooth interior rims
- Pack of wooden bamboo kitchen skewers or matchsticks
- Pair of sharp wire cutters or heavy craft shears
- High-temperature hot melt glue gun and plenty of glue
- Neutral cream, sage green, or matte white spray paint
Step-by-Step Can Organizer Assembly
- Remove paper labels and adhesive from cans with water.
- Wash inner can cavities thoroughly using grease-cutting dish soap.
- Measure the exact vertical wall height of your can.
- Snip bamboo skewers into equal lengths with wire cutters.
- Apply hot glue vertically along outside of the can.
- Press the wooden skewer flat into the hot glue.
- Continue gluing bamboo skewers tightly around the can perimeter.
- Keep skewers perfectly vertical and aligned with bottom edges.
- Spray entire exterior with two coats of sage paint.
- Allow paint to dry completely in a well-ventilated room.
- Fill completed organizer with pens, makeup brushes, or scissors.
13. Pressed Backyard Fern Floating Glass Picture Frames
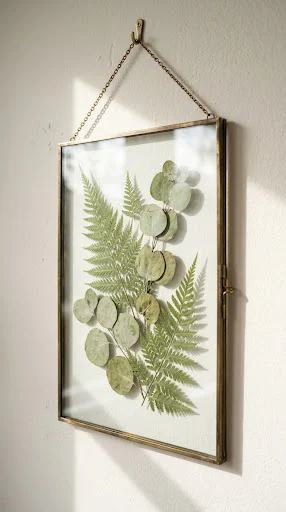
Preserving backyard botanicals captures delicate seasonal beauty for calm modern interior spaces. Standard opaque picture frames can visually crowd tight, narrow hallways and small alcoves. Glass floating frames present dried botanical specimens with light airiness and botanical transparency. The transparent glass reveals wall color behind delicate pressed leaves for modern aesthetics.
Displaying Wild Flora in Transparent Glass
Connecting modern indoor rooms with nature reduces daily mental stress after busy days. Foraging backyard fern fronds costs absolutely nothing for resourceful modern home decorators. Sandwiched between clear glass, leafy silhouettes create elegant naturalist art for living rooms. They add charming vintage apothecary flair to bedrooms, studies, and guest powder rooms.
Materials Needed for Floating Botanical Art
- Foraged green fern fronds, eucalyptus leaves, or flat flowers
- Heavy vintage books or wooden flower press for drying
- Double-glass floating picture frames with thin metallic metal edges
- Small tweezers for carefully handling delicate dried paper-thin botanicals
- Microfiber glass cleaning cloth and streak-free window cleaner spray
Step-by-Step Botanical Pressing Guide
- Collect fresh botanical leaves on dry, sunny afternoon walks.
- Place leaves between sheets of parchment inside heavy books.
- Stack extra books on top to press botanicals flat.
- Leave leaves undisturbed for two full weeks until dry.
- Clean both glass panes thoroughly using streak-free window spray.
- Lift delicate dried leaves gently using your craft tweezers.
- Position botanical specimen right onto the center glass pane.
- Secure leaf with a tiny dot of clear glue.
- Sandwich second glass pane firmly over your dried specimen.
- Slide glass assembly into metal frame and secure clasps.
- Hang floating glass art near windows to catch sunlight.