11 Chic Minecraft Bridges Ideas
In Minecraft, bridges serve a much greater purpose than simply connecting two pieces of land. A thoughtfully designed bridge can completely transform the appearance of your world by adding elegance, character, and architectural balance. Whether you’re building a peaceful survival village, a grand medieval kingdom, a modern city, or a fantasy-inspired landscape, the right bridge design helps tie every area together while enhancing both functionality and visual appeal. Instead of relying on basic dirt or cobblestone crossings, players are increasingly creating detailed bridges that become focal points of their worlds. Pinterest is filled with inspiring Minecraft bridge designs because they are relatively small projects that make a massive impact. From rustic wooden crossings to elegant stone arches and futuristic glass walkways, there are endless possibilities to match every building style and biome.

The Importance of Choosing the Right Bridge Style
Every Minecraft world has its own unique environment, and choosing a bridge that complements the surrounding landscape is essential. A medieval castle looks more authentic when connected by a grand stone bridge, while a cozy forest village benefits from rustic wooden pathways that blend naturally with trees and rivers. In snowy biomes, spruce wood and stone create beautiful winter bridges, whereas sandstone bridges fit perfectly in desert environments. Modern cities often feature sleek concrete and glass bridges, while fantasy builds can incorporate glowing blocks, decorative arches, and magical lighting. Selecting the right style creates harmony throughout your world, making every build feel intentionally connected rather than randomly placed. A well-designed bridge not only improves navigation but also strengthens the overall aesthetic of your Minecraft landscape.
Planning Before You Start Building
One of the biggest mistakes players make is building a bridge without planning its size, proportions, or surroundings. Taking a few minutes to sketch a simple blueprint or outline can save significant time and resources later. Consider the width of the river or ravine, the height needed for boats or pathways underneath, and the style of nearby structures. Decide whether your bridge should be simple and practical or highly decorative with towers, arches, railings, and lighting. Material selection is equally important. Combining blocks like stone bricks, deepslate, spruce wood, oak logs, lanterns, chains, slabs, and stairs adds depth and texture while preventing flat-looking designs. Landscaping around both ends of the bridge also creates smoother transitions between different areas of your world.
Making Bridges Beautiful and Functional
The best Minecraft bridges combine practicality with outstanding design. They should allow easy movement while also becoming memorable architectural landmarks. Adding details such as decorative railings, support pillars, hanging lanterns, flower boxes, vines, banners, or custom arches can dramatically improve the final appearance without requiring a huge amount of extra work. Lighting is another key element, especially for Survival Mode, where properly illuminated bridges prevent hostile mobs from spawning. Many experienced builders also landscape around their bridges by adding pathways, waterfalls, cliffs, docks, trees, and gardens to create a more immersive environment. Whether your goal is to build a cozy countryside crossing, an elegant castle entrance, or a spectacular fantasy bridge, the following chic Minecraft bridge ideas will inspire you to create beautiful connections that are both functional and Pinterest-worthy.
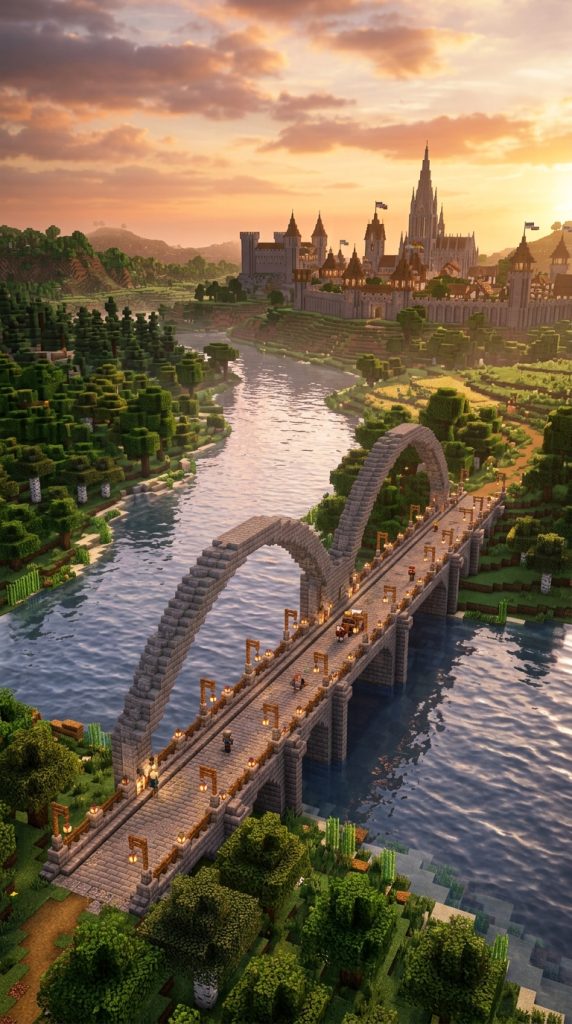
1. Elegant Stone Arch Bridge
An elegant stone arch bridge is one of the most timeless and sophisticated bridge designs you can build in Minecraft. Inspired by historic European bridges, this blueprint combines graceful arches, textured stonework, decorative railings, and symmetrical proportions to create a crossing that feels both practical and luxurious. Whether you’re connecting two sections of a medieval village, leading visitors to a grand castle, or crossing a peaceful river, a stone arch bridge instantly elevates the surrounding landscape.
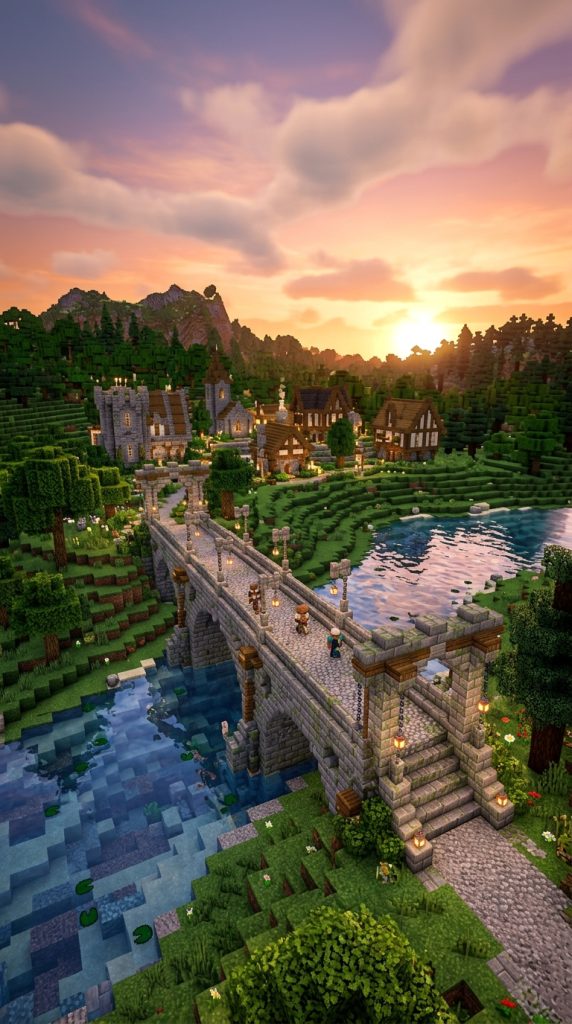
One of the reasons this bridge remains so popular on Pinterest is its versatility. It complements nearly every biome and blends beautifully with castles, villages, mountain bases, and fantasy kingdoms. The curved arch beneath the bridge creates architectural depth, while lanterns and detailed supports make the structure feel realistic from every angle.
Why Choose a Stone Arch Bridge?
Stone bridges have a classic appearance that never goes out of style. Their solid construction makes them look realistic while fitting naturally into survival worlds.
Benefits include:
- Timeless medieval design.
- Perfect for castles and villages.
- Strong survival-friendly structure.
- Beautiful from every viewing angle.
- Easy to customize.
- Works across rivers and valleys.
Recommended Building Materials
For the most elegant appearance, gather:
- Stone bricks
- Cracked stone bricks
- Mossy stone bricks
- Cobblestone
- Stone slabs
- Stone stairs
- Lanterns
- Chains
- Stone walls
- Iron bars
Mixing several stone textures prevents the bridge from looking flat and adds natural weathering.
Blueprint Dimensions
A balanced design creates the best visual impact.
Recommended measurements:
- Bridge width: 7 blocks.
- Arch height: 6 blocks.
- Total length: 24 blocks.
- Side railings: 2 blocks high.
- Support pillars: Every 8 blocks.
These dimensions can easily be adjusted depending on the width of your river.
Step-by-Step Building Guide
Step 1: Mark the Foundation
Measure both riverbanks and outline the bridge.
Step 2: Build the Support Pillars
Construct sturdy pillars extending into the water.
Step 3: Create the Main Arch
Use stairs and slabs to build a smooth curved arch underneath.
Step 4: Build the Walking Surface
Lay stone bricks across the top.
Step 5: Add Decorative Railings
Alternate stone walls with lanterns.
Step 6: Finish with Details
Use cracked bricks, moss, and vines to give the bridge an aged appearance.
Decorative Features
Improve realism with:
- Hanging lanterns.
- Flower pots.
- Banners.
- Moss blocks.
- Stone statues.
- Small waterfalls.
Best Locations
This bridge looks amazing connecting:
- Medieval villages.
- Castle entrances.
- Mountain pathways.
- Forest rivers.
- Riverside towns.
Pro Building Tips
Slight elevation in the middle of the bridge creates a graceful curve that makes the structure appear far more realistic than a completely flat design.
An elegant stone arch bridge becomes more than a crossing—it becomes an architectural centerpiece that gives your Minecraft world a polished, Pinterest-worthy appearance.
2. Chic Wooden Suspension Bridge
A wooden suspension bridge brings together rustic charm and impressive engineering. Suspended by chains or fences and supported by tall wooden towers, this bridge creates a dramatic crossing over rivers, ravines, or deep valleys. Its lightweight appearance contrasts beautifully with the surrounding landscape while maintaining excellent functionality.

This style is especially popular for survival bases located in forests, mountains, or jungle biomes. The combination of wood, chains, lanterns, and natural surroundings creates a cozy yet adventurous atmosphere that feels straight out of a fantasy world.
Why Suspension Bridges Are Popular
Suspension bridges create movement and visual excitement while requiring relatively simple materials.
Benefits include:
- Elegant floating appearance.
- Great for long crossings.
- Fits forest and mountain builds.
- Looks realistic.
- Beginner-friendly construction.
- Excellent screenshot potential.
Recommended Materials
Gather the following blocks:
- Spruce logs
- Spruce planks
- Dark oak slabs
- Chains
- Lanterns
- Fences
- Trapdoors
- Barrels
- Campfires
- Leaves
Spruce and dark oak create the warm rustic tones associated with classic suspension bridges.
Blueprint Dimensions
Suggested layout:
- Total length: 40 blocks.
- Width: 5 blocks.
- Tower height: 15 blocks.
- Chain supports: Every 4 blocks.
- Deck height: 2 blocks above water.
Step-by-Step Guide
Step 1: Build Support Towers
Construct two tall wooden towers on each side.
Step 2: Lay the Bridge Deck
Use spruce planks and slabs.
Step 3: Install Suspension Chains
Connect towers using chains.
Step 4: Add Side Railings
Use fences for safety.
Step 5: Install Lighting
Hang lanterns from the chains.
Step 6: Add Decorative Details
Place barrels, flower pots, or leaves around the entrance.
Decorative Ideas
Enhance the bridge with:
- Hanging vines.
- Lantern posts.
- Wooden benches.
- Rope-style railings.
- Custom signs.
Perfect Locations
Ideal for:
- Jungle rivers.
- Forest valleys.
- Mountain cliffs.
- Survival villages.
- Adventure maps.
Expert Tip
Slightly lowering the center of the bridge creates a realistic suspended effect that adds authenticity to the overall design.
A chic wooden suspension bridge combines functionality with natural beauty, making it one of the most eye-catching additions to any Minecraft landscape.
3. Grand Medieval Castle Entrance Bridge
Nothing creates a stronger first impression than a magnificent bridge leading directly to a medieval castle. This bridge is designed to act as the grand entrance to your kingdom, welcoming visitors with towering arches, decorative walls, banners, and elegant lighting.
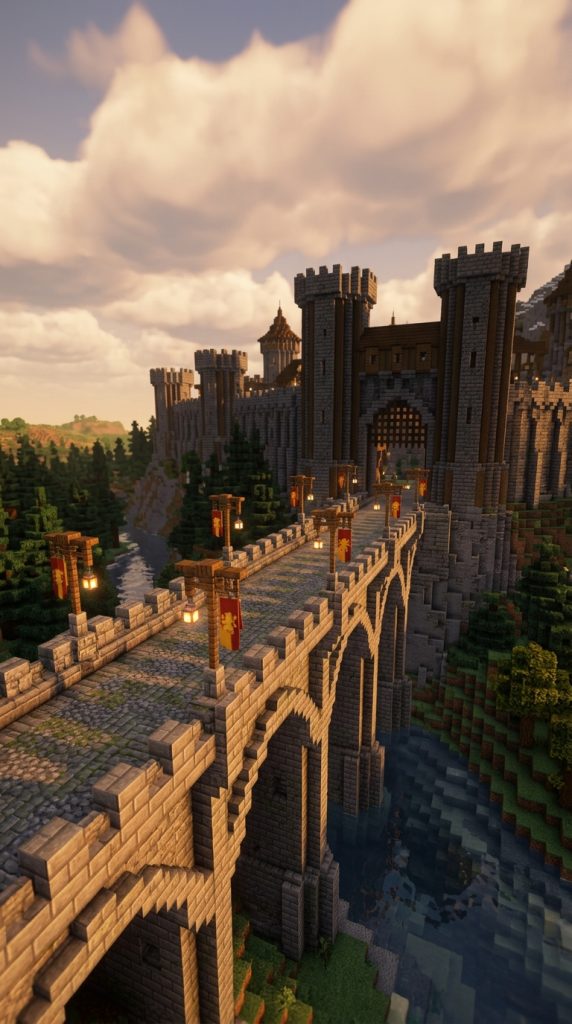
Rather than serving as a simple crossing, this bridge becomes an extension of the castle itself. Every detail—from the support pillars to the lantern-lined pathways—should match the architecture of the fortress beyond it. Pinterest builders often use this style because it immediately adds scale and prestige to castle builds.
Why Castle Entrance Bridges Stand Out
A grand entrance sets the tone for the entire kingdom.
Benefits include:
- Creates dramatic entrances.
- Connects naturally with castles.
- Highly decorative.
- Perfect for roleplay worlds.
- Increases realism.
- Becomes a focal point.
Recommended Building Materials
Use durable medieval blocks such as:
- Stone bricks
- Cobblestone
- Deepslate bricks
- Spruce wood
- Stone walls
- Lanterns
- Chains
- Iron bars
- Banners
- Mossy stone bricks
Blueprint Layout
Recommended dimensions:
- Width: 9 blocks.
- Length: 30 blocks.
- Central arch: 8 blocks high.
- Decorative towers: 12 blocks.
- Gate platform: 10×10 blocks.
Step-by-Step Construction
Step 1: Build the Foundation
Construct thick stone supports on both sides.
Step 2: Create the Main Walkway
Lay stone bricks with decorative edging.
Step 3: Add Side Walls
Use stone walls with evenly spaced pillars.
Step 4: Construct Entrance Towers
Place matching towers beside the castle gate.
Step 5: Install Lighting
Hang lanterns from chains along the bridge.
Step 6: Add Royal Decorations
Decorate with banners, statues, and arches.
Interior Connection Ideas
Connect the bridge directly to:
- Main courtyard.
- Throne hall.
- Castle gatehouse.
- Guard towers.
- Royal gardens.
Decorative Features
Include:
- Banner-lined railings.
- Stone gargoyles.
- Waterfalls beneath the bridge.
- Large arches.
- Watchtowers.
- Hanging lanterns.
Building Tips
Use slight elevation toward the castle entrance to create a more majestic approach and emphasize the importance of the structure.
A grand medieval castle entrance bridge transforms an ordinary castle into a breathtaking kingdom, creating an unforgettable first impression that looks stunning in both Survival and Creative Mode.
4. Elegant Japanese-Inspired Wooden Bridge
A Japanese-inspired wooden bridge brings peace, balance, and timeless beauty to any Minecraft world. Characterized by its graceful curved shape, clean lines, and natural materials, this bridge is ideal for connecting garden islands, koi ponds, bamboo forests, cherry blossom groves, or peaceful village pathways. Unlike heavily fortified medieval bridges, this design focuses on simplicity and harmony with nature.

This bridge style has become increasingly popular on Pinterest because it complements the new cherry blossom biome as well as custom Japanese gardens. The gentle arch over the water, combined with lanterns and lush landscaping, creates a calm and inviting atmosphere that looks beautiful during every season and time of day.
Why Choose a Japanese Bridge?
Japanese bridges blend naturally into the environment and create a relaxing focal point.
Benefits include:
- Elegant curved design.
- Perfect for gardens and ponds.
- Beginner-friendly construction.
- Beautiful in every biome.
- Fits peaceful survival worlds.
- Easy to customize.
Recommended Building Materials
For an authentic look, gather:
- Spruce planks
- Dark oak logs
- Stripped spruce logs
- Spruce stairs
- Spruce slabs
- Lanterns
- Chains
- Bamboo
- Moss blocks
- Stone bricks
Blueprint Dimensions
Recommended measurements:
- Length: 18 blocks.
- Width: 5 blocks.
- Highest arch: 4 blocks.
- Railings: 2 blocks high.
- Decorative supports: Every 3 blocks.
Step-by-Step Building Guide
Step 1: Mark the Crossing
Outline the bridge across the river or pond.
Step 2: Create the Curved Shape
Use stairs and slabs to gradually raise the center.
Step 3: Build Wooden Railings
Keep both sides symmetrical.
Step 4: Add Support Beams
Install wooden pillars underneath.
Step 5: Decorate with Lanterns
Hang lanterns evenly along the railings.
Step 6: Landscape the Surroundings
Add bamboo, flowers, rocks, and custom trees.
Decorative Features
Enhance the bridge using:
- Cherry blossom trees.
- Stone lanterns.
- Bamboo fences.
- Lily pads.
- Mossy rocks.
- Small waterfalls.
Best Locations
This bridge fits perfectly in:
- Japanese villages.
- Cherry blossom forests.
- Zen gardens.
- Bamboo jungles.
- Peaceful survival bases.
Pro Building Tip
Keep decorations balanced on both sides of the bridge to maintain the clean and harmonious appearance that defines Japanese architecture.
A Japanese-inspired wooden bridge transforms even a small pond into a breathtaking landscape and creates one of the most elegant bridge designs you can build in Minecraft.
5. Modern Concrete and Glass Bridge
For players building contemporary cities or luxury homes, a modern concrete and glass bridge offers a sleek and sophisticated solution. Unlike rustic or medieval bridges, modern designs focus on clean geometry, minimalism, and open spaces. White concrete, black concrete, smooth stone, and glass create sharp lines that look incredibly realistic when paired with shaders.
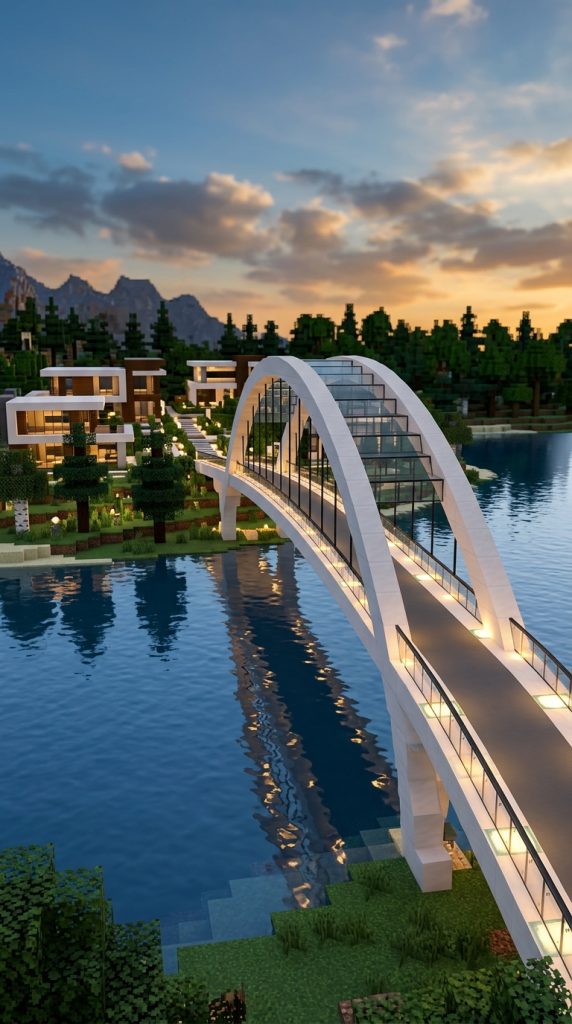
Pinterest modern Minecraft builds often include stylish pedestrian bridges over lakes, rivers, and landscaped gardens. This design fits beautifully with luxury mansions, modern villas, futuristic neighborhoods, and urban skylines.
Why Modern Bridges Stand Out
Simple shapes and premium materials create an elegant architectural statement.
Benefits include:
- Clean minimalist appearance.
- Ideal for modern cities.
- Excellent nighttime lighting.
- Highly customizable.
- Easy to expand.
- Looks realistic with shaders.
Recommended Building Materials
Gather these blocks:
- White concrete
- Black concrete
- Smooth quartz
- Glass panes
- Sea lanterns
- Smooth stone slabs
- Iron trapdoors
- End rods
- Polished andesite
- Quartz stairs
Blueprint Dimensions
Suggested layout:
- Length: 28 blocks.
- Width: 6 blocks.
- Side railings: 2 blocks.
- Lighting interval: Every 5 blocks.
- Walkway thickness: 2 blocks.
Step-by-Step Construction
Step 1: Build the Foundation
Create a straight symmetrical base.
Step 2: Construct the Walkway
Alternate concrete and smooth stone.
Step 3: Install Glass Railings
Use glass panes for an open appearance.
Step 4: Add Modern Lighting
Install sea lanterns beneath glass sections.
Step 5: Finish with Decorative Details
Add end rods, trapdoors, and polished accents.
Decorative Ideas
Include:
- LED-style lighting.
- Modern benches.
- Planters.
- Water features.
- Glass supports.
- Minimalist landscaping.
Perfect Locations
Best suited for:
- Modern cities.
- Luxury mansions.
- Contemporary neighborhoods.
- Waterfront homes.
- Futuristic bases.
Expert Tip
Hide sea lanterns beneath tinted or clear glass to create elegant floor lighting that illuminates the bridge without visible light sources.
A modern concrete and glass bridge adds sophistication and luxury, making it the perfect centerpiece for any contemporary Minecraft build.
6. Fantasy Floating Bridge with Magical Lighting
A floating fantasy bridge creates one of the most enchanting builds in Minecraft. Instead of relying on traditional supports, this design appears to hover magically above rivers, ravines, or glowing lakes. Decorative arches, suspended lanterns, glowing crystals, and elegant pathways give the bridge an otherworldly appearance that feels inspired by fantasy novels and magical kingdoms.
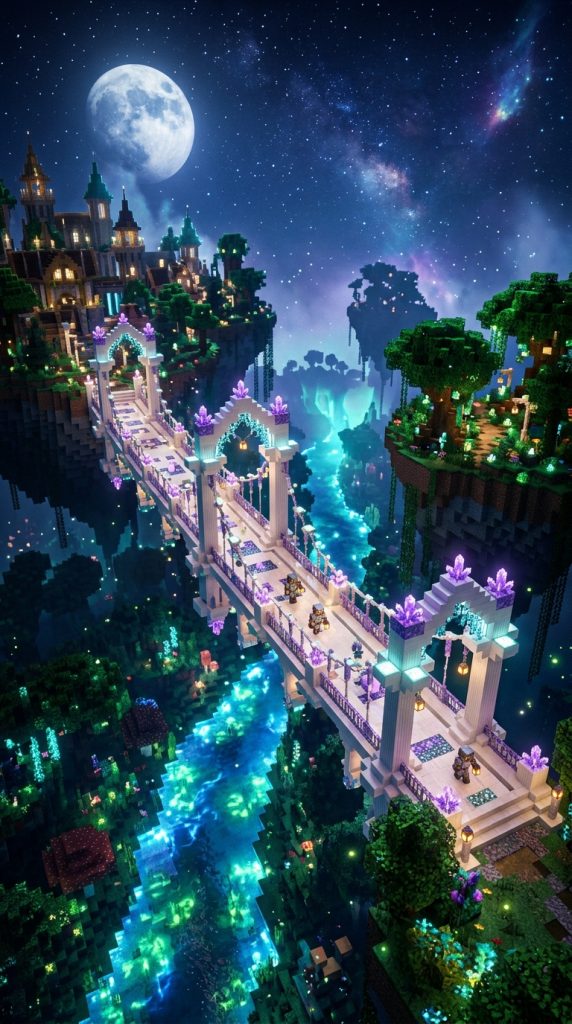
Fantasy bridges are extremely popular on Pinterest because they instantly become the highlight of any world. Whether connecting floating islands, wizard towers, enchanted forests, or magical castles, this design captures imagination while showcasing advanced building creativity.
Why Fantasy Bridges Are So Popular
Floating designs create visual wonder and stand apart from ordinary bridges.
Benefits include:
- Magical appearance.
- Highly unique design.
- Perfect for fantasy worlds.
- Beautiful nighttime lighting.
- Great screenshot opportunities.
- Endless customization.
Recommended Building Materials
For a magical aesthetic, use:
- Quartz blocks
- Purpur blocks
- End stone bricks
- Sea lanterns
- Glowstone
- Amethyst blocks
- Glass panes
- Chains
- End rods
- Crying obsidian accents
Blueprint Dimensions
Suggested measurements:
- Length: 26 blocks.
- Width: 5 blocks.
- Decorative arches: 7 blocks high.
- Floating supports: Hidden.
- Lighting placement: Every 3 blocks.
Step-by-Step Building Guide
Step 1: Plan the Floating Layout
Build the bridge without visible support pillars.
Step 2: Construct the Main Walkway
Use quartz and purpur for contrast.
Step 3: Add Decorative Arches
Frame the bridge with elegant curved structures.
Step 4: Install Magical Lighting
Use sea lanterns, glowstone, and end rods.
Step 5: Decorate the Edges
Add crystals, chains, and glowing accents.
Step 6: Enhance the Surroundings
Build waterfalls, floating islands, or enchanted trees.
Decorative Features
Improve the magical atmosphere with:
- Amethyst clusters.
- Floating lanterns.
- Glowing flowers.
- Crystal pillars.
- Enchanted trees.
- Mystic waterfalls.
Ideal Locations
Perfect for:
- Floating islands.
- Wizard towers.
- Fantasy kingdoms.
- Enchanted forests.
- Magical castles.
Pro Building Tip
Use hidden support blocks beneath water level or inside terrain to create the illusion that the bridge is floating entirely by magic.
A fantasy floating bridge transforms your Minecraft world into an enchanting realm, offering one of the most breathtaking and Pinterest-worthy bridge designs imaginable.
7. Rustic Covered Wooden Bridge
A rustic covered wooden bridge brings old-world charm and cozy countryside character to your Minecraft world. Inspired by historic covered bridges found in rural villages, this design protects travelers from the weather while adding warmth and architectural detail. The wooden roof, exposed support beams, lantern lighting, and stone foundations create a welcoming structure that blends naturally into forests, riversides, and farming communities.

Covered bridges are especially popular on Pinterest because they feel nostalgic and realistic. They work beautifully in survival worlds where players want practical builds that also enhance the landscape. Whether crossing a narrow river, connecting a village, or leading to a farmhouse, this bridge creates a peaceful and inviting atmosphere.
Why Choose a Covered Bridge?
Covered bridges add both beauty and function while standing out as charming landmarks.
Benefits include:
- Cozy countryside appearance.
- Great for survival villages.
- Weather-inspired realistic design.
- Excellent use of wood textures.
- Beginner-friendly blueprint.
- Fits multiple biomes.
Recommended Building Materials
For a traditional rustic style, collect:
- Spruce logs
- Spruce planks
- Dark oak stairs
- Oak fences
- Cobblestone
- Stone bricks
- Lanterns
- Trapdoors
- Barrels
- Campfires
Mixing different wood tones creates a more natural and weathered appearance.
Blueprint Dimensions
Suggested measurements:
- Length: 22 blocks.
- Width: 5 blocks.
- Roof height: 7 blocks.
- Entrance supports: 6 blocks tall.
- Stone foundations: 3 blocks high.
Step-by-Step Building Guide
Step 1: Build the Stone Foundation
Create solid supports on both riverbanks.
Step 2: Construct the Wooden Floor
Lay spruce planks across the bridge.
Step 3: Add Support Frames
Place wooden beams every few blocks.
Step 4: Build the Roof
Use dark oak stairs and slabs for a steep roof.
Step 5: Install Railings and Lanterns
Add fences along the edges and hang lanterns from the beams.
Step 6: Decorate the Entrances
Include flower pots, barrels, and small stone paths.
Decorative Features
Enhance the bridge with:
- Hanging flower baskets.
- Wooden signs.
- Mossy stone.
- Vines.
- Lantern posts.
- Custom pathways.
Best Locations
Ideal for:
- Forest villages.
- Cottagecore builds.
- Farmhouses.
- Riverside towns.
- Mountain valleys.
Pro Building Tip
Slightly overhang the roof beyond both ends of the bridge to create a more authentic covered bridge appearance.
A rustic covered wooden bridge adds warmth, charm, and timeless beauty, making it a perfect centerpiece for peaceful Minecraft landscapes.
8. Grand Double-Arch Stone Bridge
A grand double-arch stone bridge is designed for wider rivers, lakes, or deep valleys where a single arch would appear too small. Featuring two elegant stone arches supported by a central pillar, this blueprint creates a balanced and majestic structure that complements large castles, medieval cities, and expansive kingdoms.
The double-arch design adds visual depth while making the bridge appear more realistic. Decorative railings, stone pillars, lanterns, and detailed textures transform it into a landmark that enhances the surrounding landscape. This is one of the most elegant bridge styles for players who enjoy large-scale architectural projects.
Why Double-Arch Bridges Are Impressive
Multiple arches create better proportions and make long bridges feel stronger and more refined.
Benefits include:
- Elegant symmetrical design.
- Suitable for wide rivers.
- Realistic medieval appearance.
- Strong architectural detail.
- Excellent for large kingdoms.
- Highly Pinterest-worthy.
Recommended Building Materials
Gather these materials:
- Stone bricks
- Cracked stone bricks
- Cobblestone
- Stone slabs
- Stone stairs
- Stone walls
- Lanterns
- Chains
- Moss blocks
- Iron bars
Blueprint Dimensions
Recommended layout:
- Total length: 36 blocks.
- Width: 7 blocks.
- Two arches: 8 blocks each.
- Central support pillar: 5 blocks wide.
- Railings: 2 blocks high.
Step-by-Step Construction
Step 1: Mark the Bridge Length
Outline the crossing with temporary blocks.
Step 2: Build the Central Pillar
Construct a strong support in the middle.
Step 3: Create Both Stone Arches
Mirror each arch for perfect symmetry.
Step 4: Build the Walkway
Use stone bricks with slab edging.
Step 5: Add Decorative Railings
Install stone walls and lanterns.
Step 6: Finish with Details
Use cracked bricks, moss, and vines for realism.
Decorative Features
Include:
- Hanging banners.
- Lantern chains.
- Stone statues.
- Flower planters.
- Waterfalls beneath the bridge.
- Decorative arches.
Best Locations
Perfect for:
- Castle entrances.
- Medieval kingdoms.
- Large survival cities.
- Mountain valleys.
- Wide rivers.
Expert Tip
Keep both arches perfectly symmetrical by counting every block placement. Balanced proportions are what make this bridge look truly elegant.
A grand double-arch stone bridge combines strength, beauty, and classic medieval architecture, creating an unforgettable focal point for any Minecraft kingdom.
9. Elegant Rope Bridge Across a Ravine
A rope bridge offers a completely different aesthetic from stone or concrete bridges. Lightweight, adventurous, and full of rustic charm, it appears suspended high above deep ravines, canyons, or jungle valleys. Wooden planks, chains, fences, and hanging lanterns work together to create a bridge that feels both thrilling and beautiful.

This design is especially popular for adventure maps, mountain survival worlds, jungle villages, and fantasy landscapes. The slight sag in the middle and exposed support ropes give the bridge a realistic suspended appearance that photographs exceptionally well with shaders.
Why Rope Bridges Are So Popular
They create excitement while blending naturally into rugged environments.
Benefits include:
- Unique adventurous design.
- Ideal for ravines and cliffs.
- Uses simple materials.
- Beautiful natural appearance.
- Great for fantasy maps.
- Easy to expand.
Recommended Building Materials
For the best results, gather:
- Spruce planks
- Dark oak slabs
- Chains
- Fences
- Lanterns
- Stripped logs
- Trapdoors
- Campfires
- Barrels
- Leaves
Blueprint Dimensions
Suggested measurements:
- Length: 30 blocks.
- Width: 3 blocks.
- Support towers: 12 blocks tall.
- Chain spacing: Every 3 blocks.
- Lowest center point: 2 blocks below the ends.
Step-by-Step Building Guide
Step 1: Build Support Towers
Construct sturdy wooden towers on both sides.
Step 2: Lay the Bridge Deck
Use alternating planks and slabs.
Step 3: Create the Rope Effect
Attach chains and fences along both sides.
Step 4: Shape the Suspension Curve
Lower the center section slightly.
Step 5: Install Lantern Lighting
Hang lanterns from chains at regular intervals.
Step 6: Decorate the Surroundings
Add cliffs, vines, waterfalls, and custom trees.
Decorative Features
Enhance the design with:
- Hanging vines.
- Mossy rocks.
- Lantern clusters.
- Wooden signs.
- Campfires.
- Custom cliffs.
Ideal Locations
Best suited for:
- Jungle biomes.
- Mountain ravines.
- Adventure worlds.
- Fantasy kingdoms.
- Cliffside villages.
Pro Building Tip
Vary the height of the hanging chains slightly to create a more natural rope suspension effect instead of perfectly straight lines.
An elegant rope bridge transforms dangerous terrain into a spectacular architectural feature, making every crossing feel like an exciting adventure while adding rustic beauty to your Minecraft world.
10. Chic Nether Fortress Bridge
A Nether fortress bridge offers a bold and dramatic way to connect different sections of your Nether base while maintaining an elegant architectural style. Unlike ordinary overworld bridges, this design embraces the dark, mysterious atmosphere of the Nether by combining deep-colored blocks, glowing lighting, and fortress-inspired details. Whether you’re crossing a lava lake, linking Bastions, or connecting Nether portals, a well-designed bridge makes traveling much safer while dramatically improving the appearance of your world.
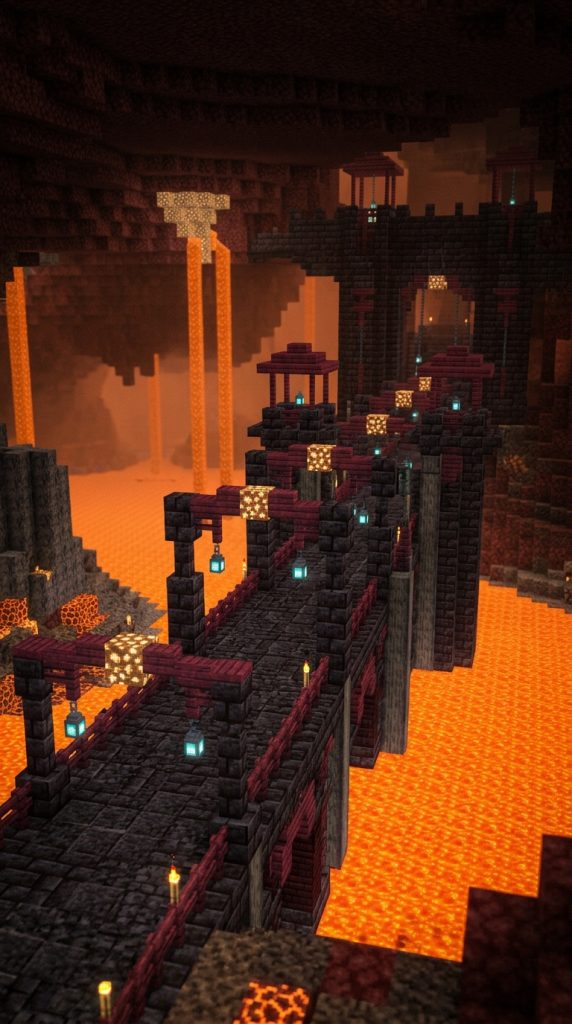
Pinterest-worthy Nether bridges often feature strong support pillars, decorative arches, blackstone railings, and warm crimson lighting that contrasts beautifully against the glowing lava below. Besides looking impressive, this blueprint is also practical for Survival Mode because it provides a protected path across one of Minecraft’s most dangerous dimensions.
Why Build a Nether Bridge?
A dedicated Nether bridge improves safety while creating an unforgettable architectural centerpiece.
Benefits include:
- Safe travel across lava oceans.
- Elegant fortress-inspired design.
- Perfect for Nether hubs.
- Highly durable appearance.
- Great for multiplayer worlds.
- Stunning cinematic views.
Recommended Building Materials
For an authentic Nether aesthetic, gather:
- Polished Blackstone Bricks
- Blackstone
- Basalt
- Crimson Planks
- Crimson Fences
- Nether Brick Blocks
- Chains
- Soul Lanterns
- Crying Obsidian
- Magma Blocks
Using multiple dark block textures prevents the bridge from looking flat while adding depth and realism.
Blueprint Dimensions
Suggested layout:
- Bridge length: 34 blocks.
- Walkway width: 5 blocks.
- Side railings: 2 blocks high.
- Decorative arches: 8 blocks high.
- Support pillars: Every 7 blocks.
Step-by-Step Building Guide
Step 1: Mark the Route
Choose the safest and shortest path across the lava lake.
Step 2: Build the Main Walkway
Lay polished blackstone bricks across the span.
Step 3: Construct Support Pillars
Extend basalt or blackstone pillars into the lava for a realistic fortress appearance.
Step 4: Install Railings
Use crimson fences and chains for decorative safety barriers.
Step 5: Add Lighting
Place soul lanterns evenly to illuminate the bridge.
Step 6: Finish Decorative Details
Add arches, chains, and crying obsidian accents.
Decorative Features
Enhance the bridge using:
- Soul fire braziers.
- Hanging chains.
- Crimson vines.
- Fortress towers.
- Decorative arches.
- Lava waterfalls.
Best Locations
Perfect for:
- Nether portal hubs.
- Lava oceans.
- Bastion connections.
- Nether fortresses.
- Multiplayer transportation routes.
Pro Building Tip
Keep the walkway at least five blocks wide so Ghasts and other hostile mobs are less likely to knock players into lava during combat.
A chic Nether fortress bridge combines elegance with practicality, transforming dangerous lava crossings into one of the most impressive architectural highlights in your Minecraft world.
11. Luxury Castle Garden Bridge
A luxury castle garden bridge is designed to connect beautiful outdoor spaces while adding refinement and elegance to your kingdom. Rather than serving as a large defensive structure, this bridge focuses on decorative landscaping. It gracefully spans ponds, narrow rivers, or garden streams, creating peaceful walkways surrounded by flowers, fountains, hedges, and carefully planned greenery.

This type of bridge is commonly featured in Pinterest castle builds because it softens the appearance of large stone fortresses. The combination of natural landscaping and elegant architecture creates a royal garden that feels luxurious and welcoming. Whether placed beside a palace, connecting courtyards, or leading toward a greenhouse, this bridge becomes an eye-catching feature without overwhelming the surrounding scenery.
Why Garden Bridges Look Elegant
Small decorative bridges add charm while making outdoor areas feel complete.
Benefits include:
- Beautiful landscaping feature.
- Perfect for castle gardens.
- Beginner-friendly build.
- Blends naturally with flowers and water.
- Creates relaxing pathways.
- Enhances luxury builds.
Recommended Building Materials
Gather these blocks:
- Stone Bricks
- Smooth Stone
- Quartz Slabs
- Spruce Wood
- Oak Fences
- Lanterns
- Moss Blocks
- Flower Pots
- Leaves
- Stone Stairs
Combining stone with warm wooden accents creates a balanced and sophisticated appearance.
Blueprint Dimensions
Recommended measurements:
- Bridge length: 16 blocks.
- Width: 5 blocks.
- Gentle arch height: 3 blocks.
- Decorative railings: 2 blocks high.
- Garden pathways: 4 blocks wide.
Step-by-Step Construction
Step 1: Plan the Garden Layout
Design the surrounding paths before placing the bridge.
Step 2: Build the Stone Foundation
Create a smooth, slightly elevated arch over the water.
Step 3: Install Elegant Railings
Use fences, walls, or decorative stone supports.
Step 4: Add Soft Lighting
Place lanterns on short posts or hanging chains.
Step 5: Decorate the Garden
Plant flowers, hedges, trees, and shrubs around both entrances.
Step 6: Finish with Luxury Details
Add benches, fountains, statues, or flower pots nearby.
Decorative Features
Complete the design with:
- Rose gardens.
- Cherry blossom trees.
- Water fountains.
- Stone benches.
- Lantern posts.
- Decorative hedges.
Perfect Locations
Ideal for:
- Royal palace gardens.
- Castle courtyards.
- Botanical parks.
- Luxury estates.
- Peaceful village parks.
Expert Building Tip
Keep landscaping symmetrical on both sides of the bridge to create a formal royal garden appearance that perfectly complements elegant castle architecture.
A luxury castle garden bridge provides the perfect finishing touch to any grand kingdom, combining graceful architecture with lush landscaping to create a peaceful and Pinterest-worthy outdoor masterpiece.