11 Chic Minecraft Build Ideas Survival
Minecraft Survival is about much more than simply collecting resources and defeating hostile mobs. The place you return to after every mining trip, adventure, or farming session becomes the heart of your entire world. That’s why more players are choosing chic survival builds that combine everyday functionality with beautiful architecture. Instead of settling for a basic wooden starter house, you can create a stylish base that feels warm, organized, and enjoyable to live in for hundreds of in-game days. Chic survival builds focus on elegant proportions, cozy interiors, practical storage, and thoughtful landscaping while remaining completely achievable with survival-friendly materials. Whether you’re playing alone or with friends, a well-designed survival home transforms the overall experience by making every return to base feel rewarding. From peaceful cottages surrounded by flowers to contemporary homes overlooking lakes and mountains, beautiful design makes every part of your survival journey feel more immersive and memorable.

The best part is that you don’t need extremely rare blocks to build something impressive. Common materials like Spruce Wood, Oak, Stone Bricks, Cobblestone, Deepslate, Glass, Lanterns, and Stripped Logs can be combined in creative ways to produce stunning results. Careful planning, balanced color palettes, layered roofing, and realistic landscaping often have a much greater impact than expensive building blocks alone.
Balance Beauty with Survival Functionality
A truly successful survival base should always prioritize practicality before decoration. Think about how you’ll use the space every day. Crafting tables, furnaces, storage systems, enchanting rooms, crop farms, animal pens, brewing stations, and sleeping areas should all be positioned for quick access. Creating dedicated zones for each activity keeps the base organized while reducing unnecessary movement throughout the day. Wide hallways, open living spaces, and efficient storage walls make daily tasks much easier while giving the house a spacious appearance.
Natural lighting also plays an important role in survival builds. Large windows brighten interiors during the day, while lanterns, campfires, glowstone, and hidden lighting prevent hostile mobs from spawning after sunset. Outside, stone pathways connecting gardens, workshops, and farms help create a realistic village atmosphere that feels alive rather than disconnected. Small outdoor seating areas, pergolas, bridges, and decorative ponds further improve both functionality and visual appeal.
Small Design Details Make Every Build Feel Premium
Many of the most beautiful Minecraft survival worlds stand out because of the small details rather than oversized structures. Layered roofs, window shutters, flower boxes, custom chimneys, support beams, balconies, and detailed entrances immediately make even compact houses look professionally designed. Inside the home, carpets, bookshelves, barrels, banners, paintings, potted plants, and carefully arranged furniture create warm interiors that feel lived in instead of empty.
Landscaping deserves just as much attention as the buildings themselves. Preserve natural terrain whenever possible, adding custom trees, flower gardens, waterfalls, winding paths, retaining walls, and decorative fencing that complement the surrounding biome. These finishing touches help every structure blend naturally into the environment while making your entire survival world feel cohesive and realistic.
Build a Survival World You’ll Enjoy for Hundreds of Days
The most satisfying Minecraft worlds continue growing long after the starter house is finished. Every new project should complement the existing architecture while adding useful functionality. As your resources increase, you can expand your base with beautiful greenhouses, fishing docks, enchanting towers, blacksmith workshops, stables, windmills, storage barns, watchtowers, and peaceful gardens without losing the cohesive style of your world.
Whether your preferred aesthetic is cozy, rustic, cottagecore, modern, medieval, or minimalist, thoughtful planning will help you create a survival base that’s both practical and visually stunning. The following chic Minecraft survival build ideas are designed to inspire beautiful homes and functional structures that look incredible while supporting every stage of your survival adventure.
1. Chic Survival Starter Cottage with Cozy Interiors
A chic survival starter cottage proves that your very first Minecraft home doesn’t have to be a plain wooden box. With thoughtful planning and a few carefully chosen materials, you can create a cozy cottage that looks beautiful while providing everything needed for long-term survival. This build focuses on warm textures, practical layouts, and timeless architecture that can easily be expanded as your world grows. Using readily available resources like Spruce Wood, Oak Logs, Cobblestone, Stone Bricks, and Glass, the cottage feels welcoming without requiring rare materials. A steep layered roof, charming front porch, flower boxes, and glowing lanterns immediately elevate the design beyond a basic starter house. Whether built beside a river, in a meadow, or at the edge of a forest, this cozy home blends naturally into almost any biome while giving you a comfortable place to begin your survival adventure.

Build a Practical Yet Beautiful Layout
Start with a compact rectangular floor plan that leaves room for future expansion. Divide the interior into separate areas for sleeping, crafting, smelting, storage, and food preparation instead of combining everything into one room. Install large windows to maximize daylight and reduce dark corners inside the house. Build a covered front porch supported by wooden beams where lanterns and flower pots create a welcoming entrance. A layered roof using Spruce Stairs and Slabs adds depth while giving the cottage a classic countryside appearance.
Create Warm and Functional Interiors
Inside, combine practicality with comfort by arranging double chests into organized storage walls and placing furnaces close to crafting tables for efficient workflow. Decorate with bookshelves, barrels, carpets, item frames, potted flowers, and hanging lanterns to create a lived-in atmosphere. Use stripped logs and stone accents to add texture without making the room feel cluttered. Upstairs or inside a loft, create a peaceful bedroom with large windows overlooking the surrounding landscape.
Complete the Cottage with Natural Landscaping
Surround the cottage with stone pathways, wooden fences, flower gardens, berry bushes, and vegetable plots. Add a small pond, custom trees, and simple outdoor seating to make the area feel like a complete homestead. Lanterns placed along pathways improve nighttime visibility while adding warmth to the overall design. Every decorative element should blend naturally with the environment rather than overpower it.
Materials You’ll Need
Gather:
- Spruce Wood
- Oak Logs
- Cobblestone
- Stone Bricks
- Glass Panes
- Spruce Stairs
- Spruce Slabs
- Lanterns
- Barrels
- Bookshelves
- Flower Pots
- Leaves
- Stone Path Blocks
- Campfires
Step-by-Step Building Guide
Step 1: Build the cottage foundation.
Step 2: Construct walls and layered roof.
Step 3: Create organized interior rooms.
Step 4: Add porch and windows.
Step 5: Build gardens and pathways.
Step 6: Finish with lighting and decorations.
Expert Tip
Leave enough open space around your starter cottage for future survival expansions like farms, storage buildings, or animal barns while maintaining the same architectural style.
2. Elegant Lakeside Survival build House
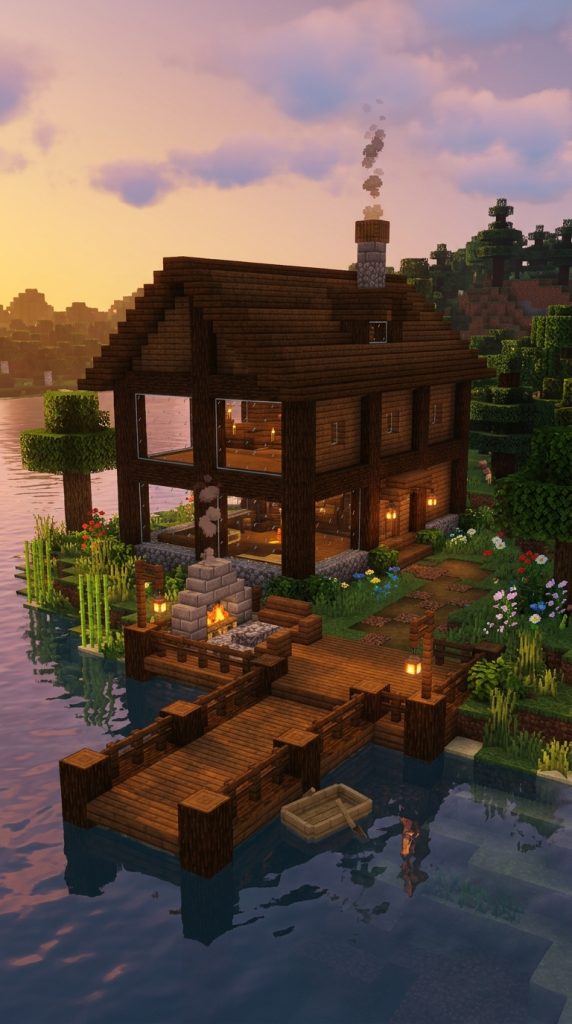
A lakeside survival house combines peaceful scenery with efficient survival living, creating a relaxing home that feels connected to nature. Positioned beside calm water, this build takes advantage of beautiful reflections, fishing opportunities, and easy transportation while providing a stylish place to live. Natural materials such as Spruce Wood, Stone Bricks, and Oak blend effortlessly with the shoreline, while expansive windows allow stunning water views from nearly every room. A spacious wooden dock, cozy fire pit, and landscaped shoreline transform the property into a picturesque lakeside retreat that feels both luxurious and practical.
Design Around the Waterfront
Choose a gently sloping shoreline with enough room for gardens and future expansion. Raise the house slightly above ground level using stone foundations to create visual depth while protecting against uneven terrain. Build wide windows facing the lake and include a covered deck extending over the water for outdoor relaxation. A pitched roof with wooden beams reinforces the cozy survival aesthetic while maintaining architectural balance.
Organize an Efficient Interior
Design the main floor with an open living area that combines crafting, cooking, storage, and dining into one functional space. Position furnaces and crafting stations close together to reduce unnecessary movement. The upper floor can feature a peaceful bedroom overlooking the lake along with extra storage and bookshelves. Decorative carpets, lanterns, barrels, and potted plants make the interior feel comfortable without sacrificing practicality.
Transform the Shoreline into a Retreat
Construct a wooden dock for fishing and boat access while adding lantern posts for nighttime safety. Landscape the shoreline using reeds, flowers, stone paths, and custom trees to create a natural transition between the house and water. Build a campfire seating area and include a small farm nearby to provide food while enhancing the cozy atmosphere.
Materials You’ll Need
Gather:
- Spruce Wood
- Oak Wood
- Stone Bricks
- Cobblestone
- Glass Panes
- Lanterns
- Campfires
- Barrels
- Leaves
- Stone Path Blocks
- Wooden Slabs
- Flower Pots
- Fences
- Water Buckets
Step-by-Step Building Guide
Step 1: Build the stone foundation.
Step 2: Construct the lakeside house.
Step 3: Design the interior layout.
Step 4: Build the dock.
Step 5: Landscape the shoreline.
Step 6: Install lighting and decorative details.
Expert Tip
Face the largest windows toward sunrise across the lake. Morning light reflecting on the water creates one of the most beautiful views in any survival world.
3. Modern Rustic Survival Cabin
A modern rustic survival cabin perfectly balances contemporary architecture with the warmth of natural materials. Clean lines, oversized windows, exposed wooden beams, and textured stone walls create a stylish home that remains fully practical for everyday survival. This design works especially well in forests, taigas, mountain valleys, and snowy biomes where the surrounding landscape enhances the cozy atmosphere. The cabin feels sophisticated without becoming overly modern, making it ideal for players who appreciate timeless architecture built from survival-friendly resources.

Blend Modern Design with Natural Materials
Construct the foundation using Stone Bricks and Cobblestone before building walls from Spruce Logs and Stripped Wood. Introduce Smooth Stone accents and expansive glass windows to give the cabin a contemporary appearance while preserving its rustic character. A dramatic sloped roof with deep overhangs protects the home while adding architectural interest. Large covered patios connect indoor living spaces with the surrounding wilderness.
Design Comfortable Open Living Spaces
Arrange the interior around a spacious central living room featuring a stone fireplace as the focal point. Connect the kitchen, storage wall, and crafting area into one efficient workspace while maintaining an open layout. Upstairs, create a cozy loft bedroom with exposed beams, bookshelves, and panoramic forest views. Hidden storage beneath staircases helps maintain a clean and organized appearance.
Finish with Woodland Landscaping
Surround the cabin with gravel paths, mossy stone, custom trees, flower beds, stacked firewood, and lantern-lit walkways. Build a small greenhouse, vegetable garden, and outdoor seating area beside a campfire to extend the living space outdoors. Preserve as much of the natural forest as possible so the cabin appears to have grown naturally within its surroundings.
Materials You’ll Need
Gather:
- Spruce Logs
- Stripped Spruce Wood
- Stone Bricks
- Cobblestone
- Smooth Stone
- Glass Panes
- Lanterns
- Campfires
- Leaves
- Moss Blocks
- Barrels
- Stone Paths
- Wooden Slabs
- Bookshelves
Step-by-Step Building Guide
Step 1: Build the stone foundation.
Step 2: Construct cabin walls and roof.
Step 3: Install large windows.
Step 4: Design the open interior.
Step 5: Landscape the woodland surroundings.
Step 6: Finish with lighting and decorative details.
Expert Tip
Mix several natural textures such as stone, stripped wood, moss, and gravel instead of relying on one material. Layering textures creates a cabin that feels richer, more realistic, and naturally aged.
4. Stylish Mountain Survival Base
A stylish mountain survival base offers breathtaking views while providing one of the safest and most rewarding places to live in Minecraft. Building into the mountainside naturally protects your home from hostile mobs while allowing you to create dramatic architecture that blends with the terrain. Instead of flattening the landscape, embrace the mountain’s natural shape by incorporating stone cliffs, waterfalls, terraces, and elevated balconies into the design. Using Stone Bricks, Deepslate, Spruce Wood, and Glass creates a balanced palette that feels rugged yet refined. Large panoramic windows frame incredible sunrise and sunset views, while layered roofs and wooden support beams soften the strong stone textures. This type of survival base grows beautifully over time as you add new rooms, storage areas, farms, and lookout towers carved directly into the mountainside.

Design Around the Natural Landscape
Rather than excavating an entire mountain, preserve its natural contours and build with the terrain. Create multiple levels connected by staircases, bridges, and terraces to separate living spaces, storage, enchanting rooms, and workshops. Large windows facing the valley allow natural light to flood the interior while showcasing spectacular views. Stone retaining walls, waterfalls, and hanging lanterns help the structure blend seamlessly into the mountain instead of looking artificially placed.
Build Comfortable Interior Spaces
Organize the lower levels with storage systems, furnaces, and crafting stations for maximum efficiency. Reserve the upper floors for cozy bedrooms, libraries, and enchanting areas where large windows create relaxing spaces overlooking the landscape. Decorate with barrels, bookshelves, carpets, lanterns, flower pots, and stone fireplaces to introduce warmth without sacrificing practicality.
Complete the Mountain Retreat
Landscape the surrounding cliffs using spruce trees, custom waterfalls, stone pathways, rope bridges, and observation decks. Build a small greenhouse or terraced farm near the entrance to maintain easy food production. Hidden lighting throughout pathways and cliffs ensures safe movement at night while preserving the natural beauty of the mountain.
Materials You’ll Need
Gather:
- Stone Bricks
- Cobbled Deepslate
- Spruce Logs
- Stripped Spruce Wood
- Glass Panes
- Lanterns
- Stone Stairs
- Spruce Stairs
- Campfires
- Barrels
- Bookshelves
- Moss Blocks
- Leaves
- Stone Slabs
Step-by-Step Building Guide
Step 1: Shape the mountain foundation.
Step 2: Build stone retaining walls.
Step 3: Construct wooden upper levels.
Step 4: Install panoramic windows.
Step 5: Landscape the surrounding cliffs.
Step 6: Finish with lighting and decorative details.
Expert Tip
Let the mountain remain visible throughout the build. Exposed cliffs and natural stone textures create a far more realistic survival base than completely covering the terrain.
5. Cozy Forest Survival Lodge
A cozy forest survival lodge creates the perfect woodland retreat surrounded by towering trees, wildlife, and peaceful natural scenery. Built primarily from Spruce Wood, Stone Bricks, and Mossy materials, this lodge feels warm, rustic, and inviting throughout every season. Large windows connect the interior with the surrounding forest, while covered porches and outdoor seating encourage exploration beyond the house itself. The design focuses on comfortable living spaces, practical storage, and beautiful landscaping that makes the lodge appear as though it has existed in the forest for generations.

Build a Warm Woodland Home
Construct a sturdy stone foundation before raising timber-framed walls using Spruce Logs and stripped wood. Add a steep roof with generous overhangs to create depth and visual interest. A wide front porch supported by wooden beams welcomes visitors while providing shelter during rainy weather. Large windows framed with flower boxes brighten the interior and provide uninterrupted forest views.
Create Cozy Functional Interiors
Arrange the living room around a large stone fireplace that serves as the heart of the home. Combine crafting stations, furnaces, and organized storage into one practical workspace while leaving enough room for decorative furniture. Upstairs, design a comfortable bedroom with bookshelves, rugs, potted plants, and wooden beams that reinforce the rustic atmosphere.
Blend the Lodge into Nature
Surround the lodge with gravel pathways, custom trees, berry bushes, lantern posts, flower gardens, and a small fishing pond. Build a greenhouse or vegetable garden nearby while preserving the natural forest canopy. Small wooden bridges, moss-covered rocks, and outdoor campfires make the property feel alive and beautifully integrated into its environment.
Materials You’ll Need
Gather:
- Spruce Logs
- Stone Bricks
- Cobblestone
- Moss Blocks
- Glass Panes
- Lanterns
- Campfires
- Barrels
- Bookshelves
- Leaves
- Flower Pots
- Gravel
- Wooden Slabs
- Fences
Step-by-Step Building Guide
Step 1: Lay the stone foundation.
Step 2: Construct timber walls.
Step 3: Build the layered roof.
Step 4: Design cozy interiors.
Step 5: Landscape the forest surroundings.
Step 6: Complete with lighting and décor.
Expert Tip
Preserve mature trees whenever possible. Designing around existing trees makes the lodge feel naturally established instead of recently constructed.
6. Chic Survival Farmhouse with Beautiful Gardens
A chic survival farmhouse combines efficient food production with elegant countryside architecture, creating one of the most practical and visually appealing survival builds. Instead of separating farms from your home, this design integrates gardens, crop fields, barns, animal pens, and decorative landscaping into one cohesive property. Warm wood textures, stone foundations, flower-filled pathways, and charming outdoor spaces create a welcoming homestead that feels peaceful throughout every stage of your survival adventure. The farmhouse can easily expand over time while maintaining its timeless rural character.

Design an Organized Farming Layout
Place the farmhouse at the center of the property with crop fields, animal barns, and storage buildings arranged around it. Wide gravel pathways connect every area while wooden fences define individual spaces. Include dedicated zones for wheat, carrots, potatoes, pumpkins, and sugar cane, ensuring efficient harvesting without sacrificing visual appeal. Decorative windmills, wells, and small gazebos add character while serving as attractive landmarks.
Build Comfortable Living Spaces
Design the interior with an open farmhouse kitchen, spacious dining area, organized storage wall, and cozy living room featuring a stone fireplace. Upstairs, create relaxing bedrooms with exposed wooden beams, bookshelves, carpets, and large windows overlooking the surrounding farmland. Barrels and chests can be incorporated into furniture to maximize storage while maintaining the farmhouse aesthetic.
Finish with Beautiful Countryside Landscaping
Plant flower gardens around the entrance, line pathways with lanterns, and surround fields with hedges or wooden fencing. Add a pond, orchard, bee area, and outdoor picnic space to create a lively countryside atmosphere. Small decorative details such as wagons, stacked hay bales, barrels, and custom scarecrows make the farm feel realistic and lived in.
Materials You’ll Need
Gather:
- Oak Logs
- Spruce Wood
- Stone Bricks
- Cobblestone
- Glass Panes
- Lanterns
- Fences
- Hay Bales
- Barrels
- Campfires
- Leaves
- Flower Pots
- Gravel
- Wooden Trapdoors
Step-by-Step Building Guide
Step 1: Build the farmhouse.
Step 2: Create crop fields.
Step 3: Add barns and animal pens.
Step 4: Construct pathways.
Step 5: Landscape the gardens.
Step 6: Finish with decorative countryside details.
Expert Tip
Mix functional farms with decorative landscaping instead of hiding agricultural areas. Beautifully designed crop fields and gardens become one of the strongest visual features of any survival base.
7. Elegant Cliffside Survival House
An elegant cliffside survival house combines dramatic architecture with breathtaking scenery, creating one of the most impressive survival bases in Minecraft. Perched high above valleys, rivers, or oceans, this build takes advantage of elevated terrain to provide unmatched panoramic views while naturally protecting your home from hostile mobs. Rather than fighting against the landscape, the design embraces the cliff itself by incorporating stone walls, wooden balconies, suspended bridges, and layered terraces that appear to grow directly from the mountainside. Using materials like Stone Bricks, Deepslate, Spruce Wood, and large glass windows creates a sophisticated balance between rugged natural textures and refined architectural details. As your survival world expands, additional towers, storage rooms, and lookout platforms can be carved into the cliff while maintaining a cohesive style.

Build with the Terrain Instead of Against It
Start by identifying a cliff with a wide, stable ledge that can support the main structure. Use the natural rock face as the rear wall of the house while extending wooden balconies and terraces outward. Support overhanging sections with large wooden beams and stone pillars to create a realistic appearance. Multiple levels connected by staircases allow you to separate crafting areas, bedrooms, storage, and enchanting rooms while maximizing the available space.
Design Bright and Functional Interiors
Use open floor plans with large windows facing the landscape to fill every room with natural light. Organize storage walls near the entrance while keeping bedrooms and relaxation areas on the upper floors where the views are most impressive. Decorate using lanterns, barrels, bookshelves, carpets, fireplaces, and potted plants to soften the rugged stone surroundings without reducing functionality.
Complete the Cliffside Retreat
Connect nearby mountains with decorative suspension bridges and create winding stone pathways leading down to farms or docks below. Add waterfalls, hanging lanterns, flower gardens, and custom trees to make the entire property feel naturally integrated into the landscape. Hidden lighting placed throughout pathways ensures safe movement after dark without disrupting the elegant atmosphere.
Materials You’ll Need
Gather:
- Stone Bricks
- Cobbled Deepslate
- Spruce Logs
- Stripped Spruce Wood
- Glass Panes
- Lanterns
- Campfires
- Stone Stairs
- Wooden Slabs
- Barrels
- Bookshelves
- Leaves
- Moss Blocks
- Chains
Step-by-Step Building Guide
Step 1: Prepare the cliff foundation.
Step 2: Construct the main structure.
Step 3: Build balconies and terraces.
Step 4: Design the interior layout.
Step 5: Landscape the surrounding cliffs.
Step 6: Finish with lighting and decorative details.
Expert Tip
Leave sections of the natural cliff exposed. Visible rock formations make the house feel like it belongs to the environment instead of sitting awkwardly on top of it.
8. Charming Survival Village Base
A charming survival village base transforms your Minecraft world into a thriving community rather than a single isolated home. Instead of building one oversized structure, this design spreads functionality across multiple smaller buildings connected by beautifully landscaped pathways. Individual cottages, workshops, barns, storage houses, blacksmiths, greenhouses, and enchanting towers each serve a dedicated purpose while maintaining a consistent architectural style. The result feels realistic, organized, and highly immersive, encouraging continuous expansion throughout your survival adventure.

Plan a Connected Village Layout
Begin by placing your main house at the center of the village before surrounding it with specialized buildings. Stone paths should connect every structure while decorative lantern posts improve visibility after sunset. Reserve open areas for gardens, fountains, marketplaces, and meeting spaces to prevent the village from feeling overcrowded. Maintaining consistent roof styles and building materials creates visual harmony throughout the settlement.
Give Every Building a Purpose
Dedicate individual buildings to specific survival activities such as storage, enchanting, brewing, farming, animal care, and crafting. Smaller structures are easier to organize and naturally encourage exploration throughout your base. Decorate interiors with bookshelves, barrels, item frames, carpets, fireplaces, and potted plants to create warm, lived-in spaces while maintaining full functionality.
Bring the Village to Life
Landscape every pathway using flowers, hedges, benches, custom trees, wells, and decorative fences. Add market stalls, bridges, ponds, and outdoor seating areas that make the settlement feel active even when you’re playing alone. If villagers are nearby, integrating them into the design further enhances the realism of the entire community.
Materials You’ll Need
Gather:
- Spruce Wood
- Oak Logs
- Stone Bricks
- Cobblestone
- Glass Panes
- Lanterns
- Barrels
- Campfires
- Fences
- Leaves
- Flower Pots
- Gravel
- Wooden Slabs
- Bookshelves
Step-by-Step Building Guide
Step 1: Build the central house.
Step 2: Construct supporting buildings.
Step 3: Connect everything with pathways.
Step 4: Decorate individual interiors.
Step 5: Landscape public spaces.
Step 6: Complete with lighting and finishing touches.
Expert Tip
Avoid placing buildings in perfectly straight lines. Slight variations in spacing and elevation create a more natural, realistic village appearance.
9. Chic Riverside Survival Cabin
A chic riverside survival cabin offers the perfect combination of peaceful scenery, practical transportation, and cozy architecture. Positioned along a winding river, this build provides easy boat access while creating beautiful reflections that enhance the overall atmosphere. The cabin features warm timber construction, expansive windows, covered porches, and inviting outdoor spaces that encourage players to enjoy the surrounding landscape. Stone pathways, wooden docks, and lush gardens connect the house to the water while preserving the area’s natural beauty. This build works especially well in forests, plains, and meadow biomes where rivers naturally become the focal point of the environment.

Build Beside the Water
Choose a section of river with gentle curves and stable terrain to create a balanced layout. Raise the cabin slightly above the riverbank using stone foundations to protect against uneven ground and seasonal flooding. Extend a covered porch toward the water and build a wooden dock where boats can be stored. Large glass windows facing the river provide beautiful views while filling the home with natural light.
Create a Comfortable Interior
Arrange crafting stations, furnaces, and organized storage along one side of the cabin while leaving the center open for comfortable living spaces. Include a stone fireplace, bookshelves, rugs, and decorative furniture that reinforce the cozy woodland atmosphere. The upper loft can serve as a peaceful bedroom overlooking the river through oversized windows.
Landscape the Riverbank
Decorate the shoreline using reeds, flowers, lanterns, custom trees, stone pathways, and small wooden bridges crossing narrow sections of the river. Build fishing areas, vegetable gardens, and outdoor seating near the water to make full use of the location. Soft lighting throughout the landscape keeps the property safe while creating a warm evening atmosphere.
Materials You’ll Need
Gather:
- Spruce Logs
- Oak Wood
- Stone Bricks
- Cobblestone
- Glass Panes
- Lanterns
- Wooden Slabs
- Campfires
- Leaves
- Barrels
- Flower Pots
- Gravel
- Stone Stairs
- Fences
Step-by-Step Building Guide
Step 1: Prepare the riverside foundation.
Step 2: Build the cabin structure.
Step 3: Construct the dock and porch.
Step 4: Design the cozy interior.
Step 5: Landscape the riverbank.
Step 6: Finish with decorative lighting.
Expert Tip
Allow the river to remain the focal point of the design. Avoid excessive landscaping that hides the shoreline, and instead use pathways, flowers, and docks to naturally frame the beautiful water views.
10. Modern Survival Base with Underground Storage
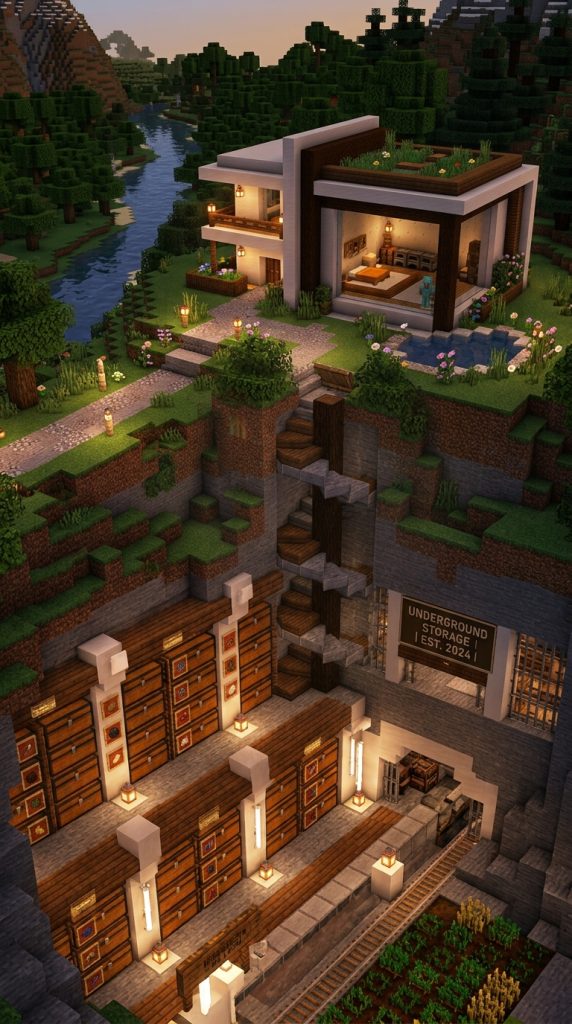
A modern survival base with underground storage is the perfect combination of sleek architecture and practical organization. Instead of filling your home with rows of visible chests, this design hides large storage systems beneath the main house, creating clean, open living spaces while still providing room for thousands of collected resources. Above ground, the home features minimalist architecture with large glass windows, smooth stone accents, warm wooden textures, and carefully designed landscaping. Below ground, dedicated rooms for storage, enchanting, brewing, smelting, and valuable resources keep every item neatly organized. This approach allows your survival base to remain stylish and uncluttered while supporting long-term gameplay. As your world expands, the underground section can continue growing without changing the beautiful appearance of the home above.
Build a Functional Modern Layout
Construct the main house using a combination of Smooth Stone, Stone Bricks, Spruce Wood, and large glass windows. Keep the floor plan open with separate zones for cooking, crafting, sleeping, and relaxing. Beneath the house, excavate multiple organized rooms connected by wide hallways and staircases. Create dedicated storage sections for mining resources, farming supplies, Redstone items, building blocks, food, and rare materials. Hidden entrances beneath staircases or trapdoors help maintain the clean modern aesthetic while providing quick access to the underground facility.
Design Comfortable Living Spaces
The upper level should feel bright and welcoming with oversized windows, warm lantern lighting, comfortable furniture, and decorative plants. Organize crafting stations together for efficient workflow while keeping everyday storage close to the main entrance. Underground rooms can feature labeled chest walls, item frames, barrels, bookshelves, and automatic sorting systems if available. Combining practical organization with thoughtful decoration ensures every room feels intentional rather than purely functional.
Complete the Base with Elegant Landscaping
Surround the home with smooth stone pathways, trimmed hedges, flower gardens, decorative ponds, and custom trees that soften the modern architecture. Install subtle lantern lighting throughout the property and build a small greenhouse or crop field nearby for daily farming. Outdoor seating areas and minimalist water features create a peaceful atmosphere while preserving the clean contemporary style.
Materials You’ll Need
Gather:
- Smooth Stone
- Stone Bricks
- Spruce Wood
- Glass Panes
- Lanterns
- Barrels
- Chests
- Item Frames
- Stone Slabs
- Leaves
- Flower Pots
- Campfires
- Wooden Trapdoors
- Bookshelves
Step-by-Step Building Guide
Step 1: Build the modern house.
Step 2: Excavate underground rooms.
Step 3: Organize storage systems.
Step 4: Design the interior living space.
Step 5: Landscape the exterior.
Step 6: Finish with lighting and decorative details.
Expert Tip
Separate underground storage into clearly labeled sections from the beginning. Good organization saves countless hours as your survival world continues to grow.
11. Chic Castle-Inspired Survival Base
A chic castle-inspired survival base brings timeless medieval elegance into Minecraft without becoming overly massive or difficult to build. Instead of focusing solely on defense, this design blends graceful stone architecture with comfortable living spaces, organized storage, beautiful courtyards, and functional survival features. Tall towers, decorative walls, arched entrances, and layered roofs create an impressive silhouette while warm wooden interiors ensure the base feels welcoming rather than cold. Built with Stone Bricks, Deepslate, Spruce Wood, and carefully placed greenery, the castle becomes both a secure fortress and a luxurious home. As your survival world progresses, additional towers, workshops, farms, and gardens can be added without disrupting the original architectural style.
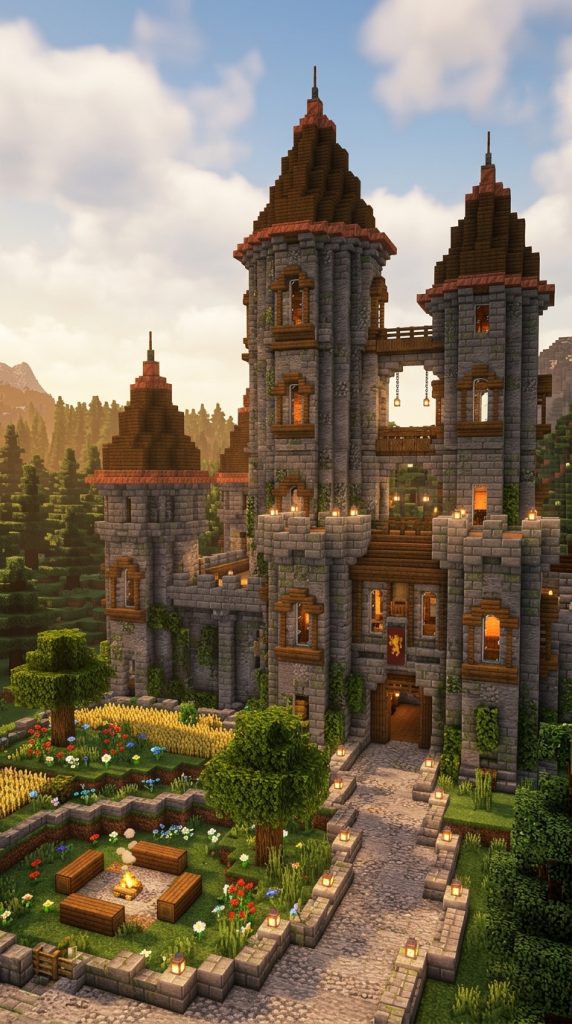
Build a Balanced Medieval Layout
Begin with a central courtyard surrounded by the main living quarters, storage rooms, enchanting areas, and crafting workshops. Build two or four elegant towers connected by stone walls and covered walkways. Instead of making every room enormous, create comfortable spaces that remain practical for everyday survival. Large windows with decorative arches bring natural light inside while balconies provide beautiful views of the surrounding landscape.
Design Warm Castle Interiors
Although the exterior uses strong stone textures, the interior should feel inviting through the use of Spruce Wood floors, exposed beams, fireplaces, bookshelves, lanterns, carpets, and banners. Organize storage rooms with labeled chests and barrels while keeping crafting stations grouped together for efficient gameplay. Private bedrooms, reading corners, and enchanting libraries make the castle feel like a real home instead of only a defensive structure.
Finish with Royal Landscaping
Transform the surrounding area with cobblestone roads, decorative gardens, fountains, custom trees, and lantern-lined pathways leading to the castle gates. Build a stable, greenhouse, blacksmith workshop, and small farming area inside or just outside the walls to support daily survival. Ivy, moss, flower beds, and carefully shaped hedges soften the stone architecture, giving the castle an elegant, lived-in appearance.
Materials You’ll Need
Gather:
- Stone Bricks
- Cobbled Deepslate
- Spruce Logs
- Spruce Planks
- Glass Panes
- Lanterns
- Chains
- Campfires
- Barrels
- Bookshelves
- Stone Stairs
- Moss Blocks
- Leaves
- Banners
Step-by-Step Building Guide
Step 1: Build the castle foundation.
Step 2: Construct towers and walls.
Step 3: Design organized interiors.
Step 4: Add decorative windows and roofs.
Step 5: Landscape the castle grounds.
Step 6: Complete with lighting and medieval décor.
Expert Tip
Focus on elegant proportions instead of massive size. A medium-sized castle with detailed architecture, beautiful interiors, and landscaped surroundings often feels far more impressive than an oversized fortress with empty rooms.