12 Spooky DIY Outdoor Halloween Decor Ideas for Front Porch And Yard
Transforming your front porch and yard for Halloween creates instant seasonal magic. When autumn arrives, neighbors and trick-or-treaters eagerly anticipate outdoor transformations. However, commercial store displays often look generic, flimsy, and overpriced. In contrast, handmade outdoor decor provides authenticity, scale, and rich atmosphere.
Consequently, your front yard becomes the highlight of the entire neighborhood. You can bypass cheap plastic novelty items with clever DIY hacks. Instead, focus on grand scale, moody silhouettes, and weather-resistant materials. These outdoor ideas evoke eerie cemetery folklore and haunted manor charm effortlessly. Even beginner crafters can build these dramatic yard displays quickly.
The Power of Scale and Silhouette in Yard Decor
Capturing attention from the street requires careful attention to visual scale. Tiny decorative accents easily get lost across expansive green lawn spaces. Therefore, outdoor installations must feature towering heights and wide, sweeping silhouettes. Floating phantoms, giant climbing spiders, and arched gateways create high impact.
Furthermore, high-contrast dark shapes stand out boldly against evening twilight skies. As a result, your home establishes an imposing, atmospheric presence instantly. Passersby will stop to admire your artistic craftsmanship and spooky vision. Pinterest boards thrive on these grand, cinematic outdoor yard scenes every October.
Weatherproofing Your DIY Creations for Long-Lasting Spooky Charm
Autumn weather frequently brings unpredictable chilly rain, wind, and heavy dampness. Fortunately, smart material selection protects your outdoor DIY creations from damage. Always choose exterior-grade acrylic paints, heavy-duty zip ties, and waterproof sealants. In addition, anchor tall lawn props deeply into soil using sturdy metal rebar stakes.
Weigh down porch installations with hidden sandbags or heavy landscaping stones. Consequently, your haunted displays withstand harsh autumn storms without collapsing. You avoid the heartbreak of seeing soggy paper decor ruin overnight. Your terrifying yard art remains pristine and imposing all month long.
Strategic Outdoor Lighting for Chilling Nighttime Drama
Proper landscape lighting turns good yard decorations into breathtaking theatrical spectacles. Harsh white porch floodlights completely wash out fine details and shadows. Instead, utilize directional colored LED spotlights placed at ground level. Deep purple, eerie green, and crimson red cast terrifying upward shadows.
Moreover, backlighting translucent fabrics makes glowing specters appear truly weightless and floating. Flickering solar path lanterns guide brave visitors toward your front entrance. This dynamic interplay of light and shadow creates captivating haunted depths. Thoughtful illumination ensures your porch looks mesmerizing both day and night.
Repurposing Inexpensive Hardware Materials into Epic Props
Building grand yard displays does not require massive hardware store budgets. In fact, versatile budget materials like PVC pipes and chicken wire yield wonders. Inexpensive landscaping burlap, foam insulation boards, and tomato cages form durable structures.
Additionally, natural elements like fallen tree branches cost nothing at all. You can easily craft towering graveyard scenes using basic recycled goods. Upcycling everyday materials keeps seasonal decorating affordable, sustainable, and endlessly creative. You achieve professional theme-park quality effects while spending very little cash.
Creating a Seamlessly Themed Haunted Porch Walkway
A truly unforgettable outdoor display tells a cohesive story from curb to door. Rather than scattering random mismatched props, choose one unifying seasonal theme. For instance, design an abandoned gothic cemetery leading to an overgrown crypt porch.
Alternatively, craft an eerie spider lair taking over your front siding. Guide guests along a designated, softly illuminated garden pathway toward doorsteps. Layer corn stalks, faux spiderwebs, and carved gourds along railings seamlessly. Now, let us explore twelve epic spooky DIY outdoor decor ideas.
1. Floating Cheesecloth Draped Yard Phantoms
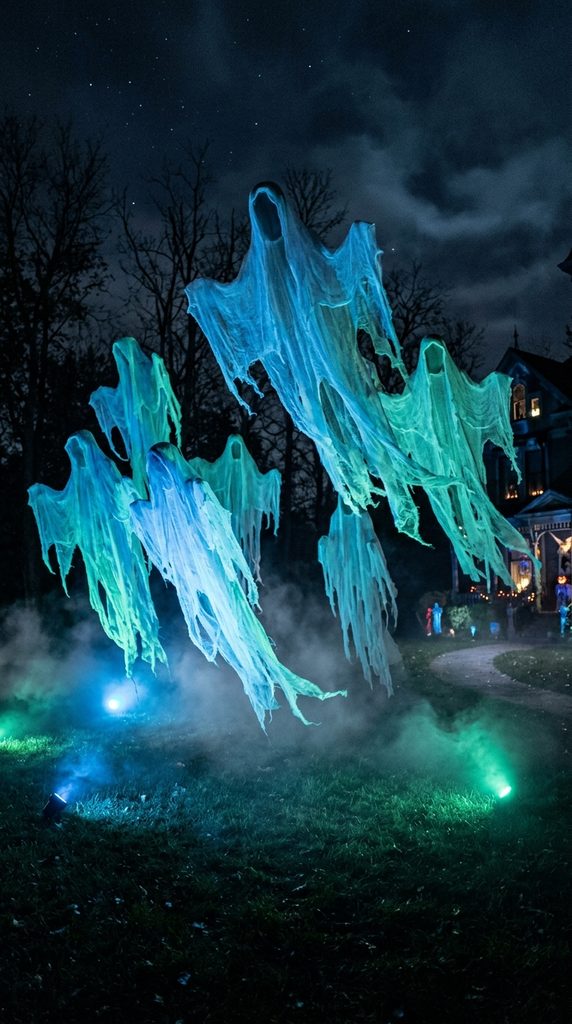
Towering Ethereal Specters Hovering Across Lawn Spaces
Large floating phantoms bring chilling paranormal energy to dark front lawns. By shaping lightweight chicken wire heads, you construct hollow floating silhouettes. Layering torn, weathered white cheesecloth over frames creates billowy phantom robes.
Furthermore, these spectral figures sway gently in crisp autumn night breezes. The subtle floating movement makes them appear genuinely alive and hovering. Trick-or-treaters will marvel at their imposing height and translucent glow. It delivers high-end theme-park haunting effects using remarkably simple materials.
How to Build Floating Yard Specters Step-by-Step
First, drive a six-foot metal fence T-post firmly into lawn soil. Next, slide a hollow PVC pipe over the post for height. Form a hollow human head shape using flexible metal chicken wire.
Attach the wire head securely to the top of the pipe. Then, attach a horizontal wooden dowel across shoulders for arm structure. Submerge large open-weave cheesecloth panels in liquid starch and water mixtures. Drape the damp starch-soaked cloth over the head and arm frame. Fray the bottom fabric edges heavily with sharp craft utility shears. Finally, position a blue LED ground spotlight angled upward beneath robes.
Required Materials for Yard Phantoms
- Heavy-duty metal T-posts or rebar ground stakes
- Ten-foot schedule 40 white PVC piping (1-inch diameter)
- Flexible galvanized steel chicken wire mesh roll
- Unbleached cotton cheesecloth panels (multiple yards)
- Liquid fabric craft starch for stiffening drapes
- Outdoor waterproof blue or green LED spotlights
2. Giant Giant Creepy Siding-Climber Spider

Massive Arachnid Nightmares Scaling Your Porch Columns
Giant oversized spiders scaling exterior house siding trigger instant playful chills. Transforming foam pool noodles and wire into massive arched legs looks incredible. Adding a large fur-covered body completes the terrifying, predatory arachnid illusion.
Moreover, positioning the spider climbing toward upper porch roofs maximizes scale. It transforms plain exterior siding into an action-packed haunted movie scene. The huge silhouette is clearly visible from far down the street. It serves as an unforgettable, photo-worthy centerpiece for your entire home.
How to Assemble Giant Climbing Spiders Step-by-Step
Start by carving two large oval foam body sections from styrofoam. Next, glue the smaller head piece onto the larger torso block. Wrap the foam body completely in black faux-fur fabric securely.
Then, insert thick flexible metal wire through eight foam pool noodles. Bend each pool noodle into dramatic, arched multi-jointed spider leg shapes. Push the sharp wire ends deep into the foam torso sides. Secure all leg joints firmly using heavy-duty black duct tape. Glue eight glossy red glass craft marbles onto heads for eyes. Finally, mount the giant spider to siding using exterior outdoor hooks.
Required Materials for Climbing Spider
- Dense foam blocks or large craft styrofoam spheres
- Eight black or dark foam swimming pool noodles
- Heavy-gauge flexible galvanized steel wire (12-gauge)
- Textured black faux-fur fabric or outdoor felt
- Large glossy red glass cabochons or craft marbles
- Heavy-duty exterior removable mounting hooks and cable ties
3. Weathered Foam Graveyard Tombstones
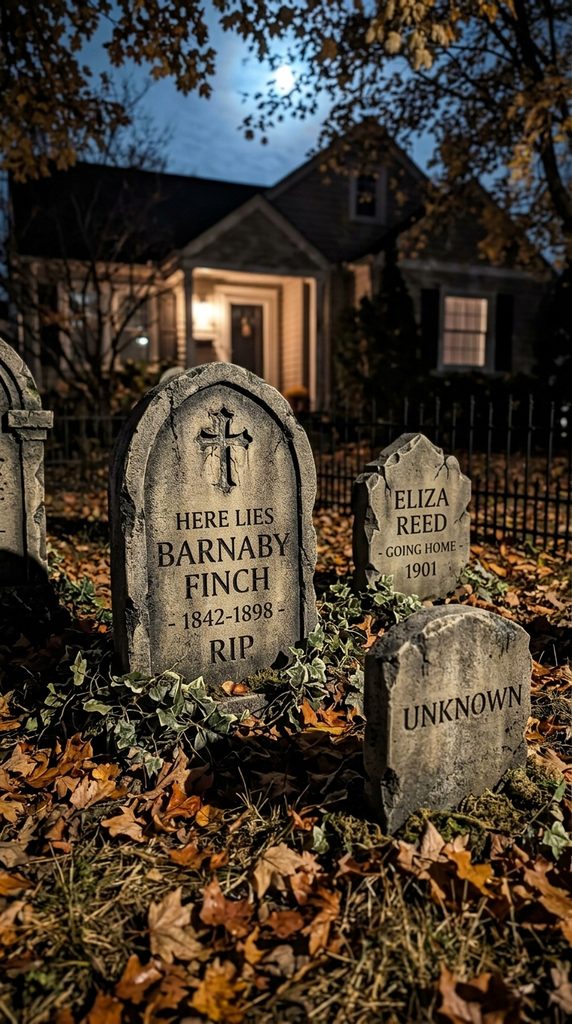
Realistic Aging Techniques for Haunted Cemetery Lawns
Plastic store-bought tombstones often look tiny, bright, and distinctly fake. However, crafting your own tombstones from pink insulation foam provides authenticity. You can carve historic gothic shapes, deep cracks, and custom epitaphs easily.
Additionally, layering textured stone-finish paints gives foam the weight of real granite. Grouping various tombstone heights together turns lawns into centuries-old forgotten graveyards. These sturdy foam headstones last for years of outdoor holiday use. They set a moody, historic foundation for your entire yard theme.
How to Carve Weathered Foam Tombstones Step-by-Step
Begin by sketching headstone silhouettes onto two-inch rigid foam insulation boards. Next, cut the outlines cleanly using a serrated hot-wire foam cutter. Use a soldering iron to carve deep crack lines and epitaphs.
Then, use a wire brush to scrape edges, creating weathered chips. Coat the entire foam headstone with textured grey stone-effect spray paint. Brush dark charcoal acrylic wash into carved cracks for deep shadows. Dry-brush pale ivory paint across raised edges to highlight stone textures. Finally, slide the foam over rebar stakes driven into garden soil.
Required Materials for Foam Tombstones
- Rigid extruded polystyrene (XPS) pink foam insulation sheets
- Electric hot-wire foam craft cutter or utility saw
- Electric soldering iron for engraving deep letter epitaphs
- Textured faux-stone spray paint and grey acrylic wash
- Wire bristle brush for weathering outer foam edges
- Two-foot metal rebar stakes driven into lawn soil
4. Glowing Chicken Wire Ghost Sculptures
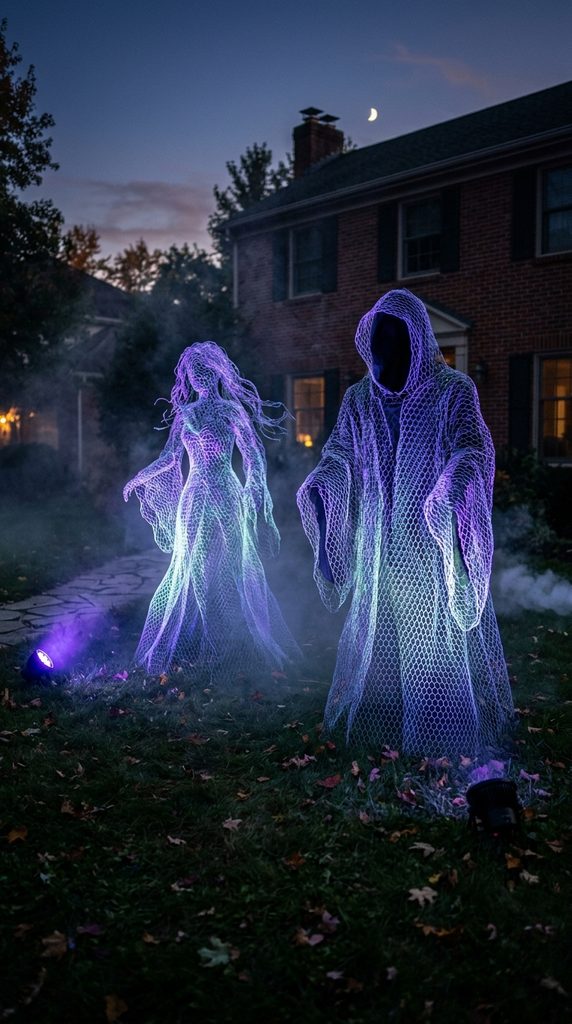
Luminescent Translucent Figures Emerging from Lawn Grass
Chicken wire sculptures create an uncanny, hyper-realistic translucent human form. When molded tightly over dress forms, galvanized wire holds shape permanently. In daylight, these sculptures look like faint, barely visible silvery mists.
However, under blacklights at night, they glow with intense paranormal energy. Placing them kneeling, walking, or rising from grass shocks passing neighbors. It delivers museum-level sculptural art to your front yard display effortlessly. These hollow figures withstand wind and rain completely without any maintenance.
How to Mold Chicken Wire Ghosts Step-by-Step
First, wrap galvanized chicken wire tightly around a plastic mannequin torso. Next, press and mold the wire mesh against anatomical body curves. Carefully unhook the wire seam and slide the molded torso off.
Then, shape hollow wire arms, legs, and a flowing skirt base. Connect all wire body parts securely using small zip ties or wire. Mold a detailed wire hood over an empty face cavity space. Spray the completed wire figure with glow-in-the-dark or white paint. Anchor the bottom wire skirt into lawn soil using metal landscape staples. Finally, illuminate the sculpture with a high-powered outdoor UV blacklight.
Required Materials for Wire Ghosts
- Rolls of 1-inch galvanized steel chicken wire fencing
- Plastic display mannequin torso (used as molding template)
- Heavy-duty wire cutters and thick leather work gloves
- Small clear plastic cable zip ties for joining wire
- Outdoor glow-in-the-dark or metallic silver spray paint
- Outdoor ground-mounted high-power UV LED blacklight floodlight
5. Menacing Tomato Cage Porch Witches
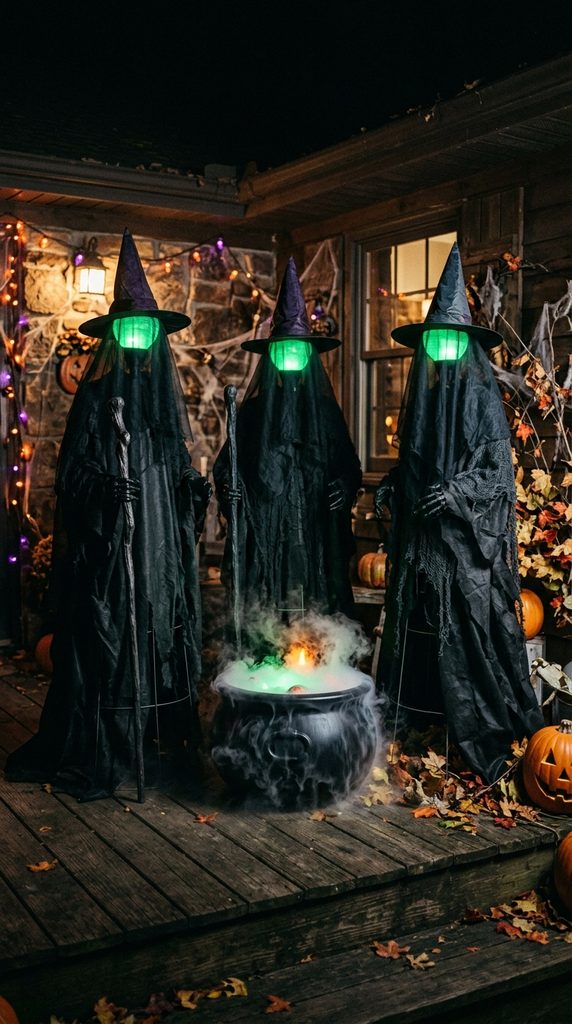
Gathering Coven Gatherings Assembled from Garden Tools
Upside-down wire tomato cages make fantastic, sturdy conical bodies for witches. Gathering a coven of three witches around a cauldron creates storytelling. Draping black landscaping fabric over frames provides dark, flowing robes.
Furthermore, placing glowing light-up globes under hoods makes witch faces illuminate. These figures stand tall on front porches without tipping over in wind. They look like dark sorceresses chanting ancient spells over bubbling brews. This quick DIY transforms basic garden equipment into dramatic theatrical porch art.
How to Build Tomato Cage Witches Step-by-Step
Start by flipping metal wire tomato cages upside-down on porches. Next, tie the pointed top wire prongs together using zip ties. Push a round eight-inch craft styrofoam ball onto the top tip.
Then, wrap dark black weed-barrier landscaping fabric around the wire cone. Gather the fabric at neck points and tie with black twine. Drape a black sheer chiffon veil loosely over the head ball. Place a classic pointed black witch hat atop each witch head. Afterward, join the witches’ fabric arms together in a circular ring. Finally, set an illuminated plastic cauldron center with green bubble lights.
Required Materials for Tomato Cage Witches
- Heavy-duty conical metal garden tomato plant cages
- Round smooth craft styrofoam or plastic sphere balls
- Roll of porous black weed-barrier landscape fabric
- Classic black fabric adult pointed witch hats
- Battery-operated green LED globe lights for glowing heads
- Large black plastic cauldron prop and mist maker
6. Overgrown Haunted Porch Corn Stalk Garland

Rustic Harvest Decay Framing Front Door Entrances
Framing your front door with dried natural corn stalks brings harvest decay. The towering, rustling tan stalks add organic texture and autumnal whispering sounds. Weaving tangled faux-spiderwebs and black faux-crows throughout heightens gothic tension.
Additionally, this design bridges traditional autumn farmhouse style with dark haunted themes. It looks exceptionally grand, welcoming, and photogenic across all porch entrances. The dried corn stalks dry naturally outdoors, lasting through November holidays. It transforms ordinary door frames into mysterious portals to abandoned countryside estates.
How to Assemble Corn Stalk Garlands Step-by-Step
Begin by gathering four large bundles of dried natural field corn stalks. Next, secure vertical stalk bundles tightly against porch support columns. Use heavy-duty outdoor zip ties to strap stalks firmly to posts.
Then, arch flexible dried willow branches over the top door header. Secure bundles of dried stalks along the overhead branch archway. Weave dense, thick white stretchable spiderwebs across all the stalks. Perch realistic feathered black faux-crows among the high corn leaves. Afterward, tuck dark artificial orange pumpkins along the column bases. Finally, wrap warm outdoor micro fairy lights through the dried husks.
Required Materials for Corn Stalk Garland
- Four to six dried natural farm field corn stalk bundles
- Long heavy-duty exterior UV-resistant cable zip ties
- Realistic black faux-feathered crow and raven props
- Outdoor stretchable synthetic cobwebbing material
- Artificial heirloom pumpkins and dried grapevine wreaths
- Warm amber outdoor mini LED string lights
7. Boarded-Up Haunted Window Silhouettes
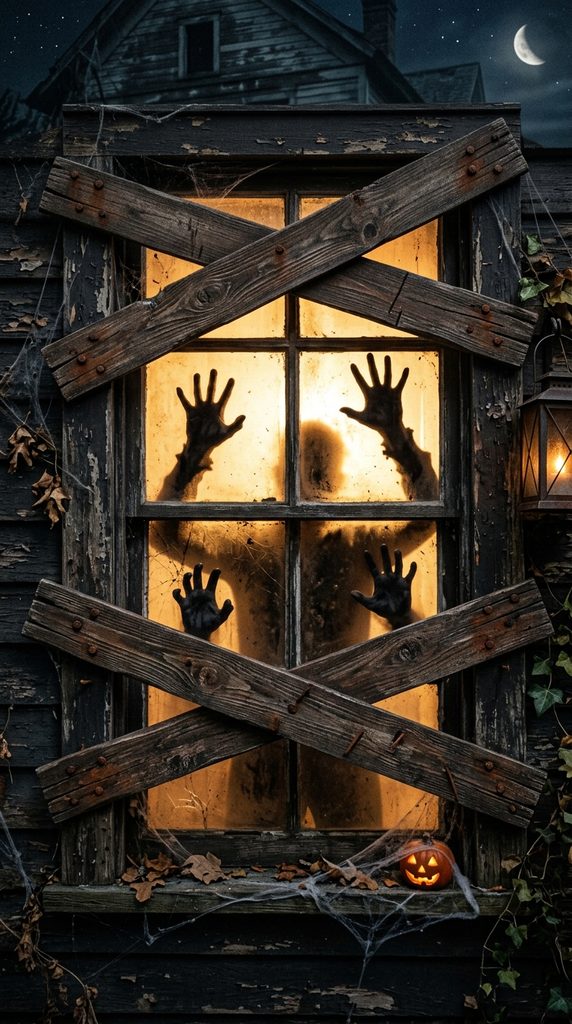
Zombie Apocalypse Defense on Exterior Glass Windows
Boarded-up windows make your home look completely abandoned, quarantined, or besieged. Crafting lightweight faux-wood planks from foam board protects your real window frames. Painting faux wood grain and rusted nail heads creates hyper-realistic textures.
Moreover, placing dark zombie silhouette cutouts behind glass adds terrifying panic. When interior room lights turn on, shadow figures press desperately against glass. It looks like a real horror film set from the street. Best of all, it attaches safely without drilling into house siding.
How to Build Faux Window Boards Step-by-Step
First, measure the width of your exterior front window frames. Next, cut foam core boards into varied four-inch-wide plank strips. Use a craft knife to carve wood grain textures and splintered ends.
Then, paint the foam planks with brown and black acrylic washes. Paint metallic silver nail circles with dark rust drips on ends. Fasten black construction paper zombie arm silhouettes behind window glass panes. Attach the foam wood planks criss-crossed over exterior window trim. Use exterior double-sided painter’s tape to secure planks safely without damage. Finally, turn on bright interior room lights to project silhouettes.
Required Materials for Faux Window Boards
- Sturdy cardboard or foam core display boards
- Brown, black, and burnt orange outdoor acrylic craft paints
- Sharp utility craft razor knife for scoring grain
- Black heavy cardstock paper for shadow silhouette cuts
- Heavy-duty exterior removable mounting tape or adhesive strips
- Wood-grain scoring tool or textured wire brush
8. Creepy PVC Pipe Gothic Cemetery Fence

Imposing Wrought-Iron Enclosures for Haunted Front Lawns
Enclosing your front lawn with a black wrought-iron fence establishes boundaries. However, real iron fencing is heavy, permanent, and exceptionally costly. Instead, assembling realistic gothic fence panels using PVC piping works brilliantly.
Plastic spear finials glued atop pipes mimic historic cemetery gates. Furthemore, painting panels matte black gives lightweight plastic authentic metal weight. You can construct long sections that stake effortlessly into lawn grass. It provides a stunning historic perimeter that frames your gravestone displays.
How to Build Gothic PVC Fencing Step-by-Step
Start by drilling evenly-spaced holes through one-by-two inch furring wood strips. Next, slide half-inch hollow PVC pipes through the drilled wooden holes. Space vertical pickets roughly six inches apart along the wooden rails.
Then, glue plastic decorative fleur-de-lis spear finials onto pipe tops. Spray the entire assembled fence panel with ultra-matte black paint. Dry-brush tiny patches of metallic bronze paint to simulate antique rust. Attach metal rebar stakes behind the fence at both ends. Slide the hollow end pipes directly over ground rebar in lawns. Finally, drape faux spanish moss loosely across the spear tips.
Required Materials for PVC Gothic Fence
- Half-inch thin-wall white PVC electrical or water pipes
- Lightweight wood furring strips (eight-foot lengths)
- Plastic injection-molded gothic spear fence finial caps
- Ultra-matte black exterior multi-surface spray paint
- Metallic copper or burnt umber paint for faux rust
- Metal rebar ground stakes for holding fence upright
9. Giant Skeletons Breaking Out of the Lawn
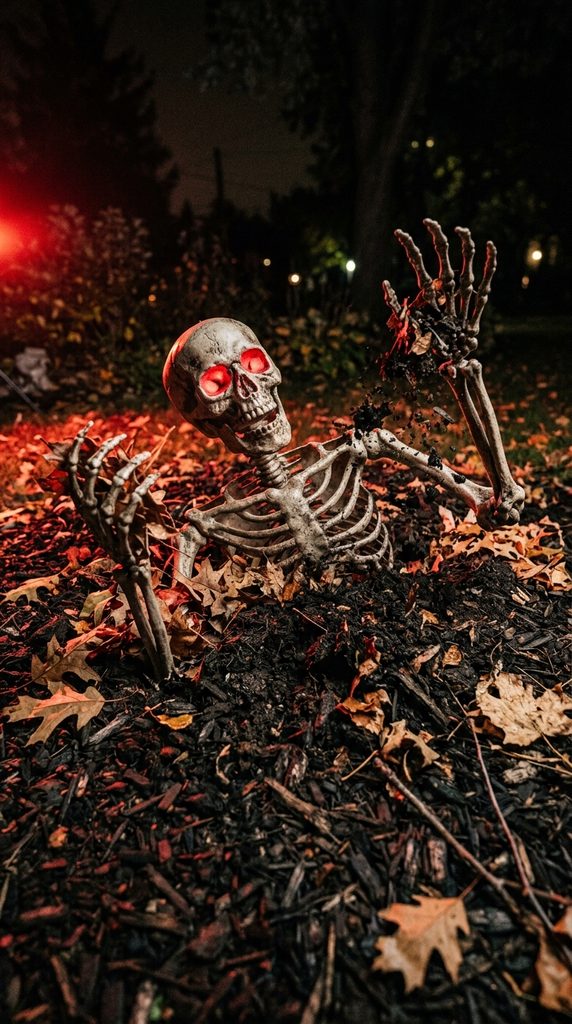
Colossal Bone Invasions Rising from Subterranean Graves
Give ordinary plastic skeletons dynamic storytelling by staging a dramatic lawn breakout. Positioning skeleton arms, skulls, and ribs emerging from dirt looks terrifying. It appears as though ancient buried corpses are clawing out of subterranean graves.
Additionally, mounding fresh dark mulch around bone joints sells the realism. Placing a cracked gravestone tilted backward behind the skeleton enhances the scene. It brings thrilling kinetic energy and humor to standard lawn decor. Neighbors will stop repeatedly to photograph this cinematic, bone-chilling resurrection moment.
How to Stage a Lawn Breakout Step-by-Step
Begin by driving two short wooden stakes deep into lawn grass. Next, disassemble a five-foot plastic skeleton into torso, arms, and skull. Fasten the skeleton ribcage securely to the wooden ground stakes.
Angle the spine forward so the torso rises halfway from turf. Then, position skeletal arms reaching outward, clawing directly into grass. Stake hand fingers into the soil using thin green floral wire. Mound dark organic landscaping mulch or potting soil over the base. Scatter dried autumn leaves and small plastic worms across the mound. Finally, place a red LED mini spotlight shining across the skull face.
Required Materials for Lawn Breakout
- Full-size five-foot posable plastic human skeleton prop
- Dark brown or black organic garden mulch bag
- Sturdy wooden ground stakes and cable zip ties
- Heavy-gauge green floral wire for staking fingers
- Weathered cracked foam gravestone prop
- Directional red or crimson outdoor mini LED spotlight
10. Glowing Eyes in Yard Bushes and Trees
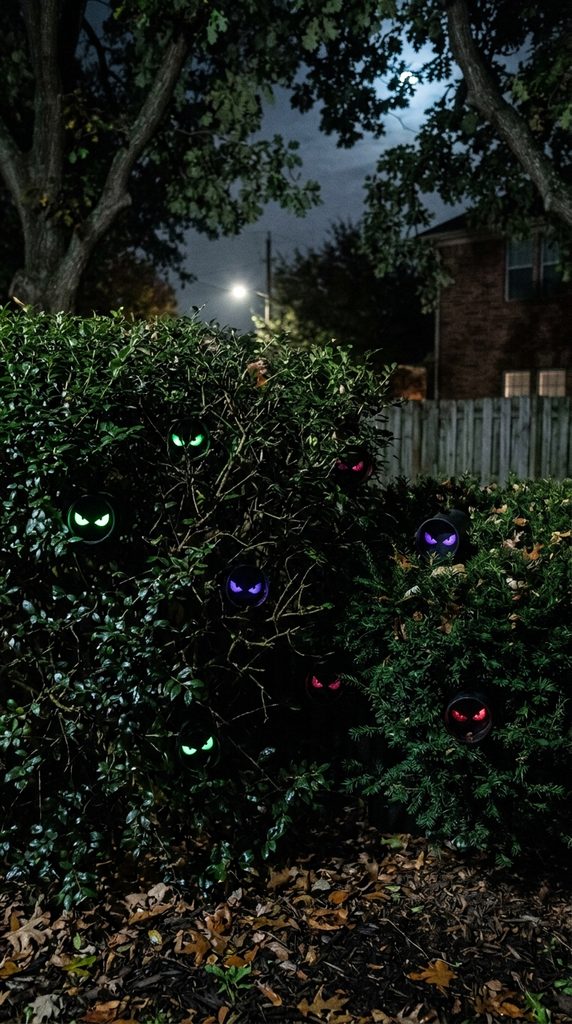
Sinister Woodland Lurkers Watching Trick-or-Treaters Silently
Filling dark porch bushes with glowing creature eyes creates paranoia. Carving menacing eye slits into cardboard tubes makes instant sinister monsters. Placing colorful glow sticks inside brings bushes to life after dark.
Furthermore, this budget-friendly craft costs mere pennies per pair of eyes. Tucking dozens of glowing eyes throughout landscaping creates a dense creature lair. It requires zero electrical cords, making placement completely versatile and portable. Kids will feel dozens of hidden nocturnal monsters tracking every step.
How to Make Glowing Bush Eyes Step-by-Step
First, gather empty cardboard toilet paper tubes or paper towel rolls. Next, draw pairs of angry, slanted monster eyes onto tube sides. Use an X-Acto craft knife to cut out eye slit shapes cleanly.
Then, paint the outer cardboard tubes matte black for daylight camouflage. Activate bright green, red, or purple chemical party glow sticks. Slide one glowing party stick securely inside each cardboard tube. Seal both tube ends loosely with dark tape to prevent light leaks. Tuck the tubes deeply into dense front yard hedges and trees. Finally, watch glowing monster eyes peer out menacingly from dark foliage.
Required Materials for Glowing Bush Eyes
- Recycled cardboard toilet paper or paper towel tubes
- Multi-colored chemical party glow sticks or LED light pods
- Sharp precision craft utility knife (X-Acto)
- Matte black acrylic craft paint and foam brushes
- Black electrical tape or masking tape
- Dense exterior yard hedges, shrubs, or tree branches
11. Creepy Floating Yard Lantern Path

Guiding Guests Down Haunted Trails with Flickering Flames
Lighting your front walkway with floating lanterns creates an immersive haunted path. Suspending black metal candle lanterns from shepherd’s hooks guides visitors safely. Placing flickering amber LED flameless candles inside provides mysterious dancing light.
Moreover, wrapping shepherd’s hooks with dark faux-vines adds aged gothic charm. This walkway installation looks sophisticated, welcoming, and delightfully eerie for night trick-or-treating. It provides practical pathway visibility while maintaining rich, cinematic haunted atmosphere. Your front yard instantly feels like the approach to an ancient manor.
How to Install a Floating Lantern Path Step-by-Step
Start by lining both sides of your front walkway with shepherd’s hooks. Space black metal garden hooks roughly four feet apart along paths. Push hook stakes deep into garden soil so they stand straight.
Next, wrap dark artificial berry garlands or black ivy around poles. Hang lightweight black metal or wooden candle lanterns from each hook. Insert battery-operated flickering amber LED pillar candles inside glass lantern housings. Set automatic candle timers to activate at dusk every single evening. Afterward, scatter dried autumn leaves lightly along pathway borders. Finally, place miniature carved jack-o’-lanterns at the base of every hook.
Required Materials for Lantern Path
- Black metal garden shepherd’s hooks (varied heights)
- Black metal or wooden glass-paneled outdoor lanterns
- Battery-operated flickering amber LED pillar candles with timers
- Artificial dark gothic black ivy or thorn garlands
- Real or foam carved mini glowing jack-o’-lanterns
- Sturdy rubber mallet for driving hooks into soil
12. Distressed Skull-Topped Porch Topiaries

Sinister Manicured Gardening Framing Front Porch Steps
Transform traditional elegant entryway topiaries into dark gothic statement urns. Nestling large, weathered realistic skulls atop manicured boxwood spheres looks striking. Painting urn planters in distressed antique stone completes the grand look.
Additionally, this design balances upscale formal architecture with fun spooky holiday traditions. Flanking both sides of your front door creates balanced, symmetrical grandeur. It feels like the manicured, haunted entryway of an eccentric aristocrat’s mansion. Guests will appreciate the clever combination of luxury gardening and macabre wit.
How to Style Skull Topiaries Step-by-Step
Begin by placing two tall black urn planters on front steps. Next, insert a dense faux-boxwood greenery sphere atop each urn rim. Secure the green topiary balls firmly using interior floral wire.
Then, paint large realistic plastic skulls with antique bone-wash acrylics. Drill a small central hole through the base of each skull. Push a wooden dowel rod into each topiary ball center. Mount the prepared skulls securely onto dowels atop the green spheres. Wrap trailing faux-black ivy around the skull base like dark collars. Finally, wind micro warm LED fairy lights throughout the boxwood leaves.
Required Materials for Skull Topiaries
- Pair of tall black fluted resin urn porch planters
- Artificial round faux-boxwood greenery topiary spheres
- Realistic life-size plastic anatomical human skulls
- Wooden dowel support rods and heavy floral wire
- Antique brown acrylic paint wash for distressing bone
- Battery-operated outdoor waterproof micro fairy lights