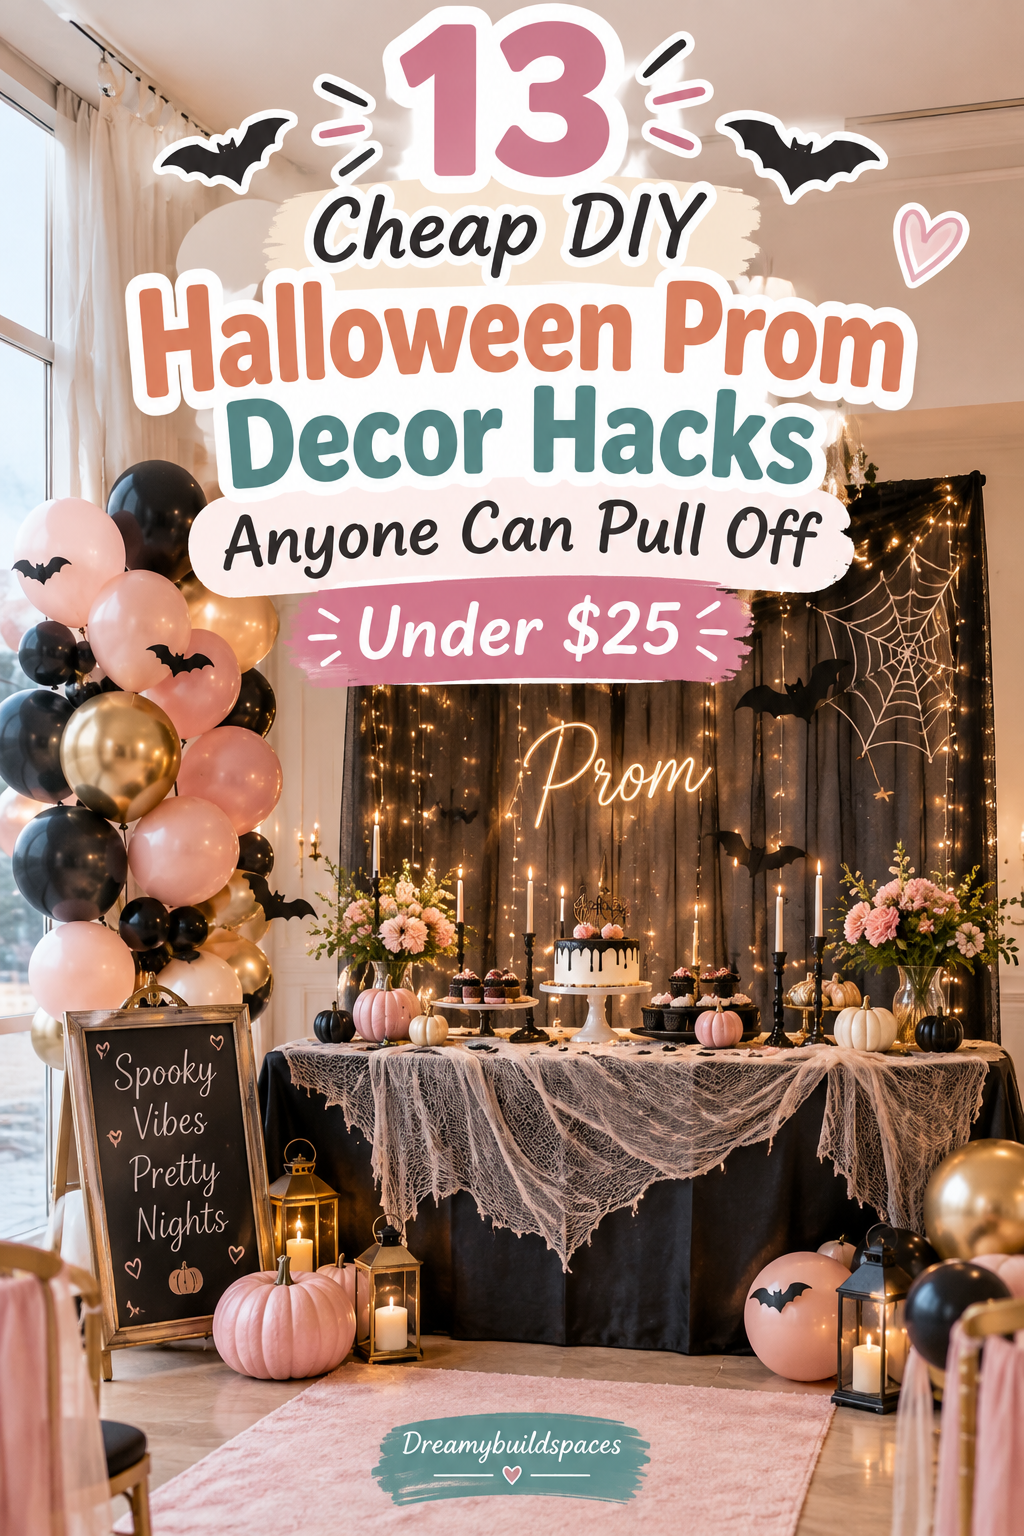
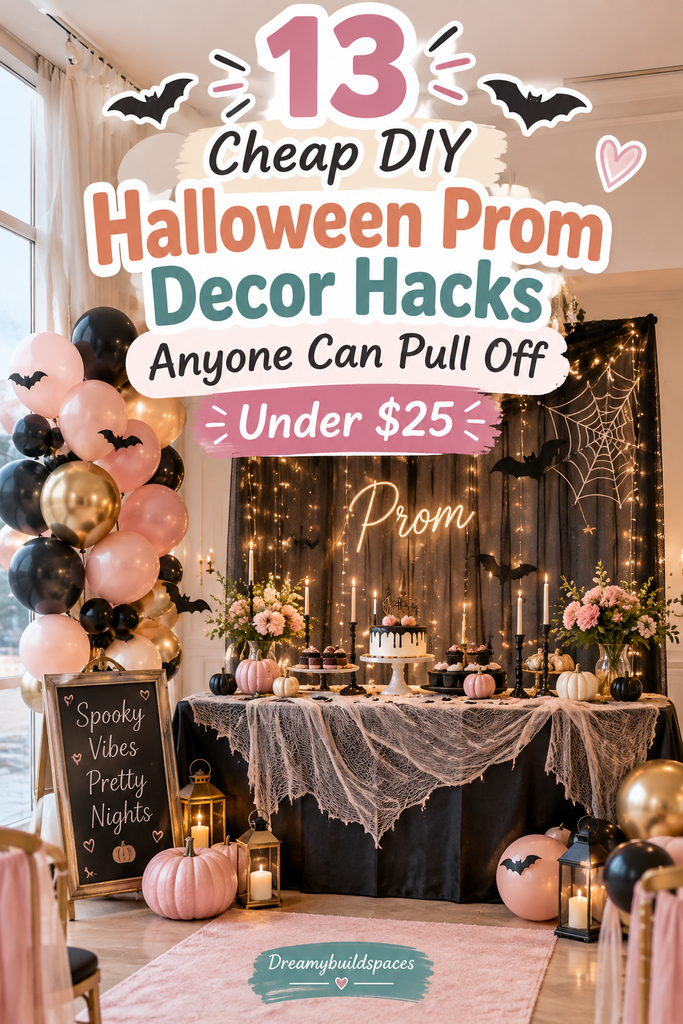
13 Cheap DIY Halloween Prom Decor Hacks Anyone Can Pull Off Under $25
Step into an extraordinary evening of dark elegance, moody grandeur, and unforgettable school dance memories Halloween Prom Decor. Planning a school prom or lavish themed party on a shoestring budget often feels overwhelming. Traditional event rental packages cost thousands of dollars for simple drapery, generic props, and lighting.
However, modern creative styling relies on clever upcycling, dramatic shadows, and high-impact visual illusions instead. You can construct an immersive haunted prom venue entirely through thrifty DIY transformation techniques. Ordinary everyday materials like cardboard, bedsheets, thrifty paint, and dollar-store finds deliver cinematic Hollywood results.
Embracing the High-Drama Aesthetic
First impressions establish the thrilling mood the moment students step through the gymnasium entrance. Skip tacky, cartoonish plastic decorations that look cheap and ruin mature high-school party photographs. Instead, lean into moody, romantic themes like Victorian gothic ballrooms, enchanted forests, and vintage masquerades.
Deep charcoal tones, rich crimson accents, and tarnished metallics instantly elevate cheap base components. Textured fabrics, tattered lace, and dramatic shadow play create luxury without the corresponding commercial price tag. These deliberate stylistic choices ensure party pictures look breathtaking, mysterious, and effortlessly shareable across social media.
Maximizing the Power of Texture
Texture transforms humble, inexpensive dollar-store materials into believable, time-worn architectural relics and grand ballroom set pieces. Smooth plastic and pristine poster boards always betray limited budgets under bright, overhead party lights. By tearing edges, applying heavy acrylic washes, and distressing smooth finishes, flat surfaces gain dimensional age.
Soak sheer fabrics in cheap concentrated black tea or dark walnut wood stains to produce vintage decay. Coat lightweight corrugated cardboard with textured plaster compound or joint compound to mimic heavy medieval cut stone. These tactile treatments fool the human eye into perceiving authentic weight, historical value, and structural substance.
Mastering Atmospheric Low-Cost Lighting
Harsh overhead gymnasium and hall fluorescent lighting immediately shatters magical party ambiance and exposes utilitarian walls. Switch off high-powered sports lighting completely and rely exclusively on layered, low-cost accent light sources. Proper illumination turns minor twenty-dollar DIY builds into dramatic, towering, shadow-casting ballroom centerpieces.
Inexpensive amber micro-fairy lights, warm flicker-flame LED bulbs, and colored party floodlights yield maximum visual drama. Cast cool blue or deep purple uplighting against sheer black drapery to produce immense theatrical depth. The dancing shadows soften room perimeters, hiding bleachers while highlighting gorgeous DIY student photo backdrops.
Transforming Large Spaces Affordably
The greatest logistical challenge for prom committees involves filling cavernous, echoing gymnasiums and cafeterias on tiny budgets. Small tabletop trinkets disappear completely inside massive rooms, wasting precious financial resources on invisible micro-details. Instead, prioritize large-scale, lightweight vertical installations that stretch toward high ceilings using inexpensive hardware store materials.
Suspend sweeping fabric swags, dramatic tree branch silhouettes, and towering cardboard archways to alter spatial proportions. Dollar-tree plastic tablecloth rolls, unbleached painters’ drop cloths, and thrifted sheets provide massive surface coverage for pennies. These grand architectural interventions enclose cavernous auditoriums, creating an intimate, exclusive ballroom lounge atmosphere effortlessly.
Sourcing Materials on a Shoestring
Scavenging the right raw materials is the foundational secret behind pulling off high-end looks under twenty-five dollars. Connect with local grocery stores, furniture outlets, and appliance centers to collect massive discarded cardboard boxes for free. Scour community thrift shops for vintage lace curtains, tarnished picture frames, brass candlesticks, and forgotten glassware.
Look outside your front door for organic styling elements like fallen oak branches, dead vines, and dried pinecones. Hardware store construction materials like PVC pipes, joint compound, and builder’s paper offer immense coverage for tiny investments. Smart scavenging stretches your committee’s limited budget across several gorgeous, interconnected party zones effortlessly.
Engaging Interactive Sensory Elements
A truly unforgettable haunted prom engages guest senses far beyond basic cardboard cutouts and fabric wall backdrops. Incorporate low-cost acoustic and olfactory storytelling cues to transport arriving students completely into your eerie fantasy world. Stream crackling vintage ballroom jazz mixed with distant midnight thunderclaps through existing school gymnasium sound systems.
Diffuse warm, seasonal scents like spiced pumpkin, smoked vanilla, and crisp amber wood using inexpensive essential oil diffusers. Arrange tactile elements like hanging fringe, mossy entry arches, and dry ice drink coolers along main footpaths. These layered atmospheric details build genuine suspense, making your budget prom feel like an expensive, professional theatrical production.
1. Floating Enchanted Candle Rafters
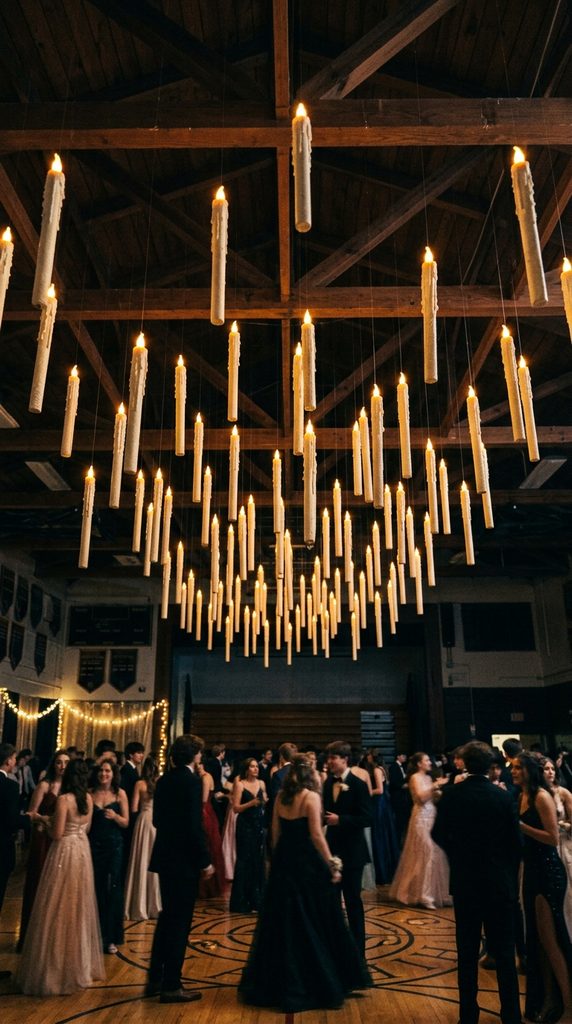
Hogwarts-Style Levitating Illumination
Create the awe-inspiring illusion of hundreds of glowing wax taper candles suspended magically over the dance floor. This viral Pinterest hack replicates the grandeur of historic castle banquet halls without risking open fire hazards. High gymnasium ceilings make clear fishing line completely invisible against dark backgrounds.
The warm flickering flames create a mesmerizing, undulating canopy of golden light dancing above dressed-up partygoers. Students will instinctively pull out their phones to capture selfies beneath the magical, floating illumination field. It delivers astonishing visual scale for under twenty dollars using upcycled household cardboard tubes.
Materials You Will Need
- 30 to 40 empty cardboard paper towel or toilet paper rolls
- Inexpensive hot glue gun and bulk glue sticks
- Matte ivory or bone-white acrylic craft paint and sponge brush
- 30 battery-operated flickering LED amber tea lights
- 1 roll of clear monofilament nylon fishing line
How to Style It
Collect discarded cardboard paper towel tubes and cut several into varied lengths for natural visual height variation. Run thick streams of hot glue around the top rim, letting glue cascade down sides like melting wax. Once dry, coat the entire cardboard tube and hardened glue drips with two layers of matte ivory paint.
Secure battery-powered flickering LED tea lights snugly inside the top openings using a dab of hot glue. Poke two small holes opposite each other through the upper tube rim, threading clear fishing line through. Tie the lines to high gymnasium ceiling beams or overhead grid wires at varying staggered suspension heights.
2. The Gothic Graveyard Photo Archway
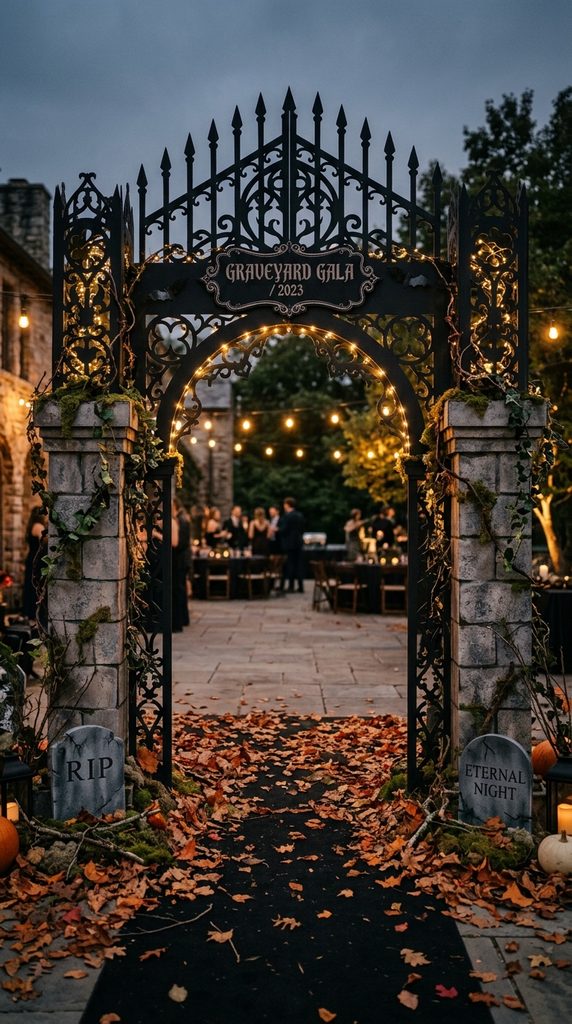
Baroque Cemetery Gates of Romance
Construct a towering, ornate cemetery archway that serves as the premier couple photo station of the night. Intricate wrought-iron cemetery gates evoke brooding gothic romance, abandoned cathedrals, and Victorian period ghost stories effortlessly. This imposing structural centerpiece looks like heavy forged metal yet weighs only a few pounds.
Couples posing in tuxedoes and floor-length gowns look stunning framed against the dark, creeping stone and iron silhouettes. Placing the archway at the main venue entrance builds immense anticipation for arriving students crossing the threshold. It completely disguises ordinary gymnasium double doors, transporting guests instantly into another historic realm.
Materials You Will Need
- 4 sheets of standard 30×40 inch black foam presentation board
- Sharp utility craft knife with extra replacement blades
- Hot glue gun and industrial adhesive sticks
- 1 roll of dollar-store stone-patterned peel-and-stick shelf liner
- 2 strings of battery-operated warm fairy wire lights
How to Style It
Trace elegant curved gothic arch outlines and pointed spear finials onto black foam presentation boards using chalk. Cut the curved gate patterns cleanly with a sharp utility knife, creating two matching symmetrical decorative fence halves. Cover two tall cardboard boxes in faux stone contact paper to serve as heavy masonry gate support pillars.
Glue the intricate foam gate panels firmly between the faux stone pillars, securing the joint seams with duct tape. Weave delicate warm fairy lights around the fence pickets to catch the curved silhouette lines during night photography. Scatter dried leaves and artificial creeping moss around the pillar bases to ground the historic cemetery illusion.
3. Tarnished Antique Mirror Photo Booth
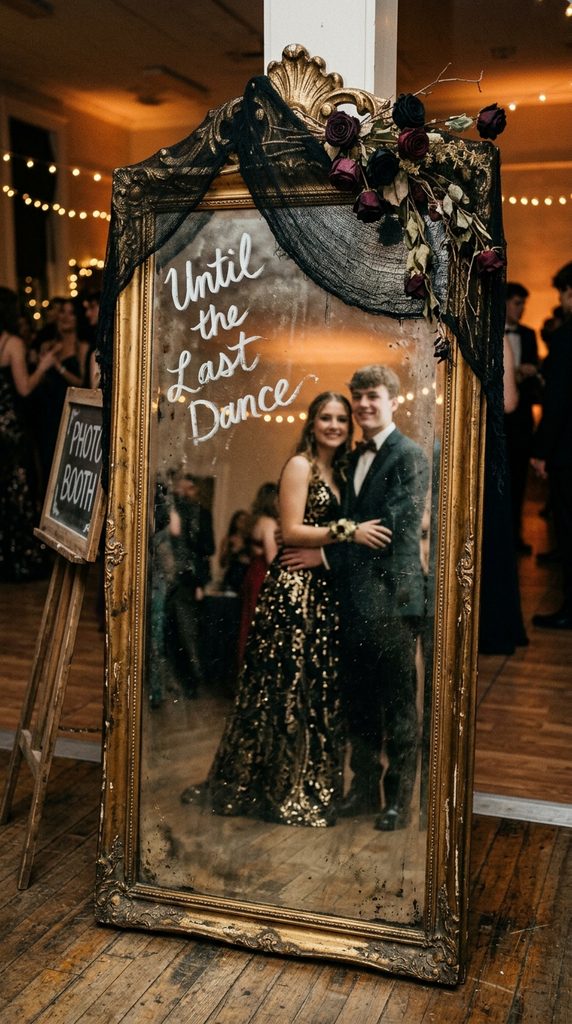
Phantom Reflections and Secret Messages
Transform a worn-out thrift-store floor mirror into an eerie, haunted vanity dripping with faded ballroom romance. Mirrored surfaces amplify dim ambient dance floor lighting while creating mesmerizing visual depth across crowded venue corners. A faint handwritten Victorian love letter or cryptic poem scrawled across the glass heightens the prom ghost story.
Students flock to gilded mirrors for prom night vanity check-ups, outfit adjustments, and aesthetic group selfies. Draping tattered dark lace and dried florals around the frame turns an ordinary reflective glass into an interactive art installation. It provides a sophisticated, boutique-hotel photo experience for just a few dollars in secondhand materials.
Materials You Will Need
- Secondhand floor-length or ornate framed wall mirror from a thrift store
- White liquid chalk glass marker or washable white wax crayon
- 2 packs of dollar-store black cheesecloth drapery
- 1 bundle of dried eucalyptus branches or faux black roses
- Metallic gold and black acrylic paint for dry-brushing
How to Style It
Thrift an inexpensive large mirror with a decorative molded plastic or wooden frame, cleaning the glass thoroughly. Lightly dry-brush metallic gold and matte black acrylic paint across the frame molding to simulate tarnished, aged metal. Use a white liquid chalk marker to write romantic poetry or “Until the Last Dance” across the upper glass corner.
Lightly smudge the handwriting with a dry microfiber cloth so the words look like faded, ghostly condensation writing. Drape shredded black cheesecloth loosely across the top crown of the frame, letting ends pool onto the floor. Tuck dried eucalyptus and dark faux roses into the cloth folds, illuminating the mirror base with amber spotlights.
4. Giant Hanging Mannequin Ballroom Specters
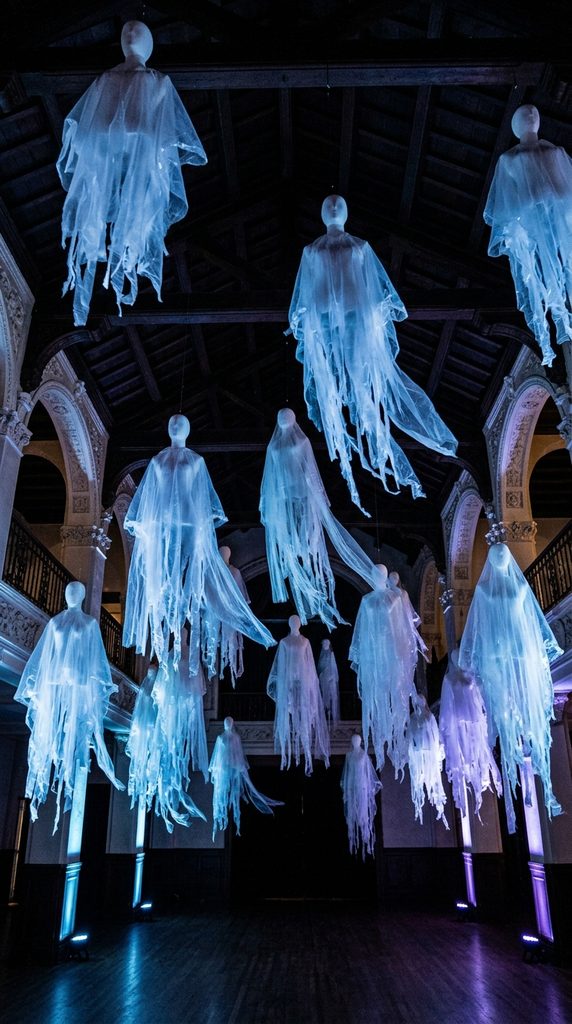
Weightless Dancing Phantom Silhouettes
Suspend ethereal, life-sized spectral figures high above the dance floor to create the illusion of lingering ghost dancers. Prom themes revolving around haunted masquerades thrive on the poetic idea of past dancers from decades ago returning to waltz. These sweeping apparitions float weightlessly in high air currents, drifting gently above the living crowd.
Constructed from sheer, featherlight packing materials, these massive specters cost virtually nothing while dominating high visual space. Uplighting the transparent floating fabrics with cool blue and violet party floodlights produces an eerie, otherworldly glow. It fills empty, cavernous gymnasium ceilings without requiring heavy structural hanging rigging or expensive balloon arches.
Materials You Will Need
- 2 lightweight styrofoam craft mannequin heads or plastic skulls
- 1 roll of ultra-thin 0.5 mil plastic drop cloth or white tulle fabric
- 1 spool of invisible clear nylon fishing line
- Glow-in-the-dark acrylic paint or blue neon fabric spray
- Hot glue gun and ceiling hanging clips
How to Style It
Mount the styrofoam mannequin heads onto lightweight wooden dowel cross-arms to form basic floating shoulder armatures. Drape long sheets of thin plastic drop cloth or torn white tulle over the head forms in overlapping layers. Mist the fabric lightly with diluted glow-in-the-dark paint or neon blue spray, focusing paint along flowing hem lines.
Shred the bottom edges of the fabric with scissors into long, wispy tendrils that flutter in slight air drafts. Fasten strong clear fishing line to the top of the mannequin heads, hoisting the figures toward ceiling rafters. Aim cool blue floor spotlights upward into the hanging skirts, creating glowing phantom dancers floating over prom attendees.
5. Blood-Dipped Wax Hurricane Centerpieces
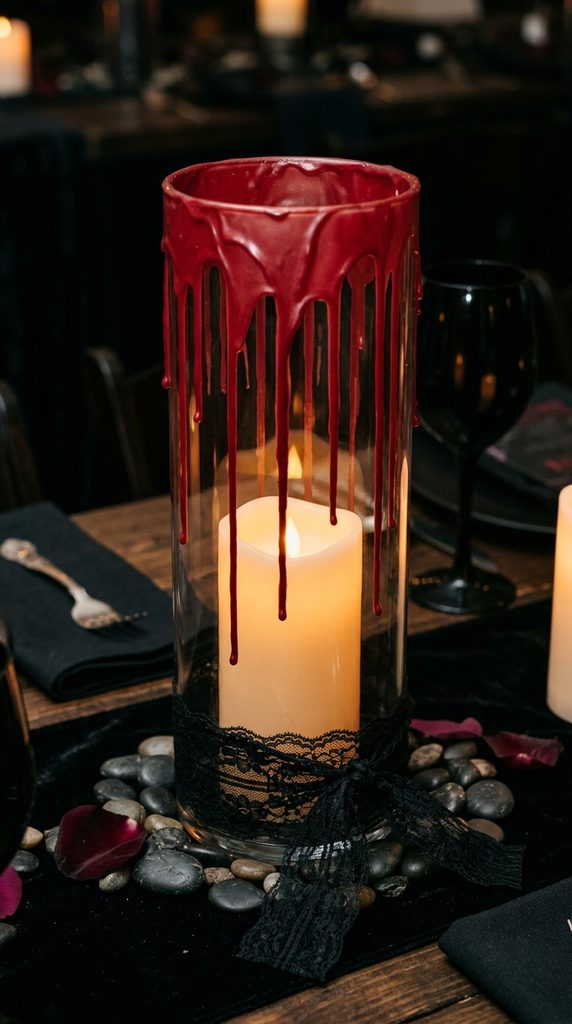
Decadent Melodramatic Dining Illumination
Dress cafeteria tables, refreshment bars, and VIP lounge tables with dramatic, wax-dripped hurricane glass centerpieces. Tablescapes often feel forgotten during prom setup, leaving flat seating areas looking bare and uninviting under dim lights. These towering glass cylinders capture flickering candle glow safely while dripping with deep, dramatic gothic romance.
The stark contrast of dark crimson wax cascading down frosted white glass evokes classic vampire ballrooms and castle banquet tables. Using battery-operated LED pillar candles ensures total fire safety compliance with strict school district venue regulations. It yields high-end wedding-quality floral centerpieces for less than two dollars per finished table arrangement.
Materials You Will Need
- 10 straight glass cylinder vases from the dollar store
- 1 stick of deep red or burgundy sealing wax or red hot-glue sticks
- 10 battery-operated flickering LED pillar candles
- 1 roll of black floral lace ribbon
- Bag of dried black river stones or glass filler beads
How to Style It
Clean the exterior of inexpensive dollar-store glass hurricane vases using rubbing alcohol to remove dust and oil. Carefully melt red sealing wax or red hot-glue sticks along the top circular rim of each glass vase. Allow the hot red wax to drip down the glass sides in dramatic, irregular vertical trails before hardening.
Wrap a strip of black floral lace ribbon around the lower base of the vase, securing ends with glue. Pour an inch of smooth black river pebbles into the cylinder base to weigh the glass down securely. Place an LED pillar candle inside atop the stones, casting glowing amber light through the red wax drips.
6. Overgrown Enchanted Forest Entrance Tunnel
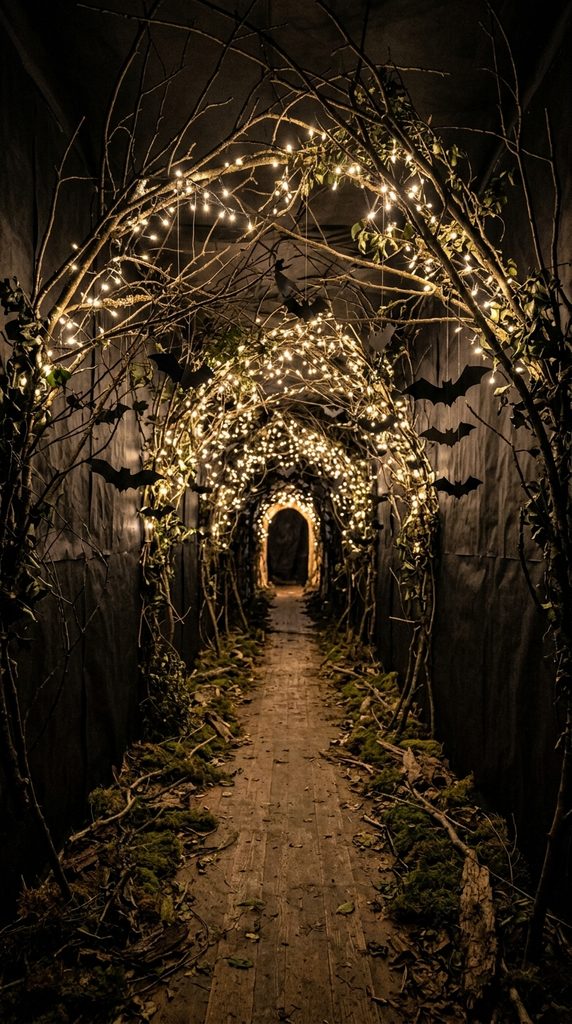
Atmospheric Walkway of Twisted Shadows
Transform the sterile school entrance hallway into an immersive, winding corridor of dark, enchanted, and creeping woods. Forcing arriving students through a shadowed, textured transition tunnel heightens excitement and leaves ordinary school reality behind. The arching natural branches create an organic canopy that rustles softly as guests brush through.
Integrating low-cost fairy lights and paper bats among bare branches turns an ugly corridor into a fairy-tale wonderland. It acts as an incredible natural photo corridor where arriving couples take candid portraits on their way inside. Sourcing fallen branches from backyard prunings keeps this sprawling, forty-foot entrance tunnel completely free to construct.
Materials You Will Need
- 20 to 30 large fallen tree branches, pruned limbs, or dried tall reeds
- 2 rolls of black construction paper or dollar-store black craft paper
- Heavy-duty black duct tape or removable painter’s tape
- 4 strings of warm white indoor LED fairy string lights
- Bag of faux preserved moss or dried autumn oak leaves
How to Style It
Cover the hallway lockers and painted concrete walls from floor to ceiling with wide black paper rolls. Stand thick tree branches vertically along both sides of the corridor, bending top twigs inward to create arches. Secure branch bases firmly against the floorboards and walls using heavy-duty black tape covered with dried moss.
Weave delicate strands of warm fairy lights through the arching overhead branches to simulate a starlit forest canopy. Cut simple silhouetted bats from black scrap paper, suspending them from upper twigs with thread. Dim the primary hallway ceiling lights completely, letting students walk through the enchanting, illuminated forest tunnel.
7. The Phantom Bookcase Secret Door
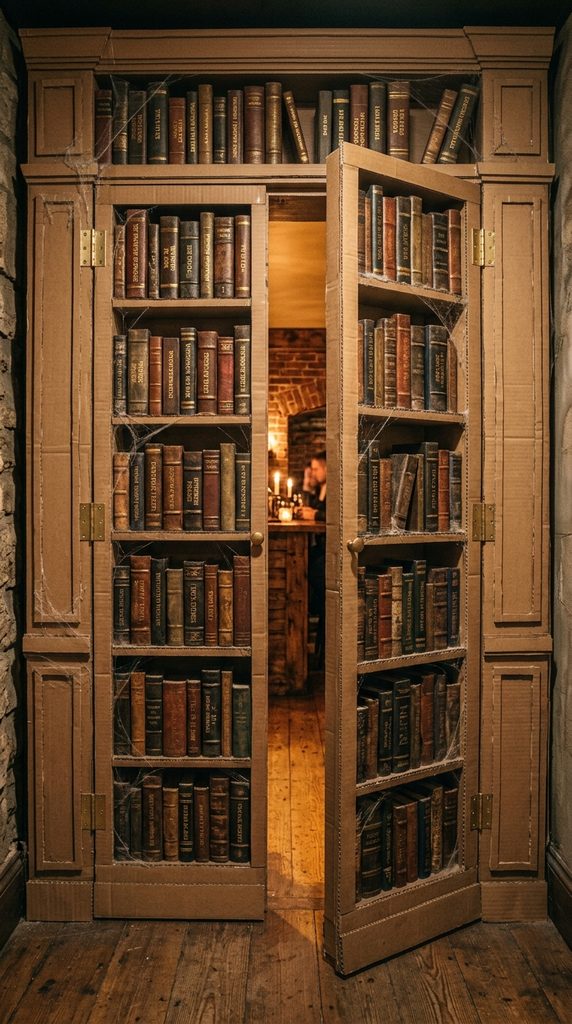
Illusory Speakeasy Ballroom Passage
Give your haunted prom the thrilling exclusivity of an underground 1920s speakeasy hidden behind an ancient library facade. A secret passage entrance immediately engages student imaginations and turns arriving at prom into an interactive adventure. This clever trompe l’oeil craft turns a standard door frame into a towering, leather-bound Victorian bookshelf.
Arriving prom couples must search for a hidden book lever or whisper a secret prom password to gain entry. The illusion of ancient, decaying spellbooks and dusty leather tomes adds profound academic gothic sophistication to your decor. Building the entire false facade from recycled cardboard boxes keeps construction costs well under ten dollars total.
Materials You Will Need
- 2 large flat refrigerator or appliance cardboard boxes
- Brown, black, and gold acrylic paint with wide painting foam brushes
- Gold metallic paint pen for decorative book spine lettering
- 1 roll of woodgrain contact paper or brown craft wrapping paper
- Heavy-duty utility knife and straight-edge ruler
How to Style It
Cut a large appliance cardboard sheet to match the exact dimensions of the entry door opening, splitting it down the center. Paint deep brown horizontal shelf dividers across the cardboard panels, shading underside edges with black paint for depth. Score and fold small cardboard scraps into three-dimensional book spine shapes, painting them in burgundy, navy, and forest green.
Detail the faux book spines with elegant gold lettering using a metallic paint pen, reading titles like “Phantom Waltzes.” Glue the dimensional book spines in tight rows along the painted shelves, adding faux cobwebs across book corners. Hang the lightweight door panels using heavy-duty hook-and-loop fasteners so students can push through the secret library passage.
8. Gothic Crest Balloon Arch Disguise
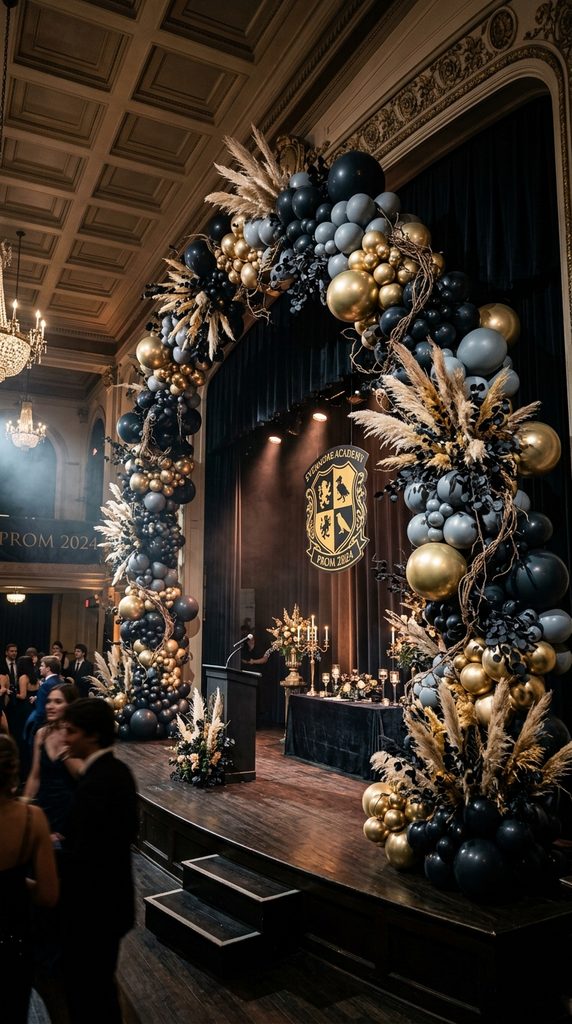
High-End Installation on a Party-Store Budget
Elevate traditional, cheap prom balloon arches into a moody, organic gothic sculpture fit for an editorial fashion magazine shoot. Standard bright balloon arches often look juvenile, reminiscent of elementary school carnivals and birthday parties. However, by using matte black, deep plum, and metallic chrome balloons clustered organically, the look transforms completely.
Intertwining dead vines, faux black eucalyptus, and dried pampas grass breaks up the balloon symmetry with organic wildness. The resulting dark, asymmetrical organic garland frames the DJ booth or royal court stage with unbelievable luxury. It provides thousands of dollars in perceived floral-and-balloon designer value for less than twenty-five dollars in raw supplies.
Materials You Will Need
- 100-pack of mixed matte black, slate gray, and chrome gold balloons
- 1 plastic balloon decorating garland tape strip
- 1 handheld dual-action balloon air pump
- 3 bunches of faux black eucalyptus stems or dried roadside weeds
- Roll of low-tack clear glue dots for balloon clustering
How to Style It
Inflate balloons to varying sizes ranging from five inches to twelve inches, avoiding uniform round shapes. Thread the knotted balloon necks through alternating holes along a flexible plastic decorating strip to form an asymmetrical base. Mount the curving garland along the edge of a stage wall or doorway using removable wall hooks.
Inflate tiny five-inch accent balloons, adhering them into empty gaps along the garland using clear glue dots. Weave dried black eucalyptus branches, wild reeds, and dead grapevine tendrils between the balloon clusters. The spiky, organic botanicals soften the round latex shapes, creating an ultra-modern, moody fine-art garland installation.
9. Bleached Skeleton Royal Court Throne

The Sovereign Seat of the Underworld
Every prom requires an iconic royal court seating area where the elected prom monarchs sit for crowning ceremonies. Transform an ordinary, discarded wooden school armchair into an imposing, high-fashion bone throne fit for dark royalty. This striking focal point commands attention from across the gymnasium and provides an unforgettable photo-op.
Flanking the throne with tarnished candelabras and deep velvet drapery elevates the staging into high-concept dark fantasy drama. Students will line up all evening just to sit upon the skeletal chair for individual royalty portraits. Using papier-mâché and dollar-store plastic skeleton parts keeps this monumental throne build incredibly cheap and lightweight.
Materials You Will Need
- 1 old wooden dining chair or thrifted armchair
- 2 plastic human skeleton props from the dollar store
- 1 roll of aluminum foil and masking tape for armatures
- 1 can of flat matte black spray paint and ivory acrylic paint
- Hot glue gun and industrial high-strength glue sticks
How to Style It
Dismantle inexpensive plastic skeletons into individual ribcages, spine columns, and limb bones using heavy shears. Fasten the plastic ribcages and spine segments securely along the backrest of your wooden chair using zip ties. Mold extra armrests and jagged bone spires extending from the chair corners using crushed aluminum foil wrapped in tape.
Coat the entire chair and assembled bone structure thoroughly with two coats of flat matte black spray paint. Once dry, lightly dry-brush ivory paint across the raised bone textures, highlighting organic anatomical contours against dark shadows. Drape a scrap piece of rich crimson velvet across the chair seat cushion to provide comfortable, luxurious royal seating.
10. Upcycled Mason Jar Poison Bar
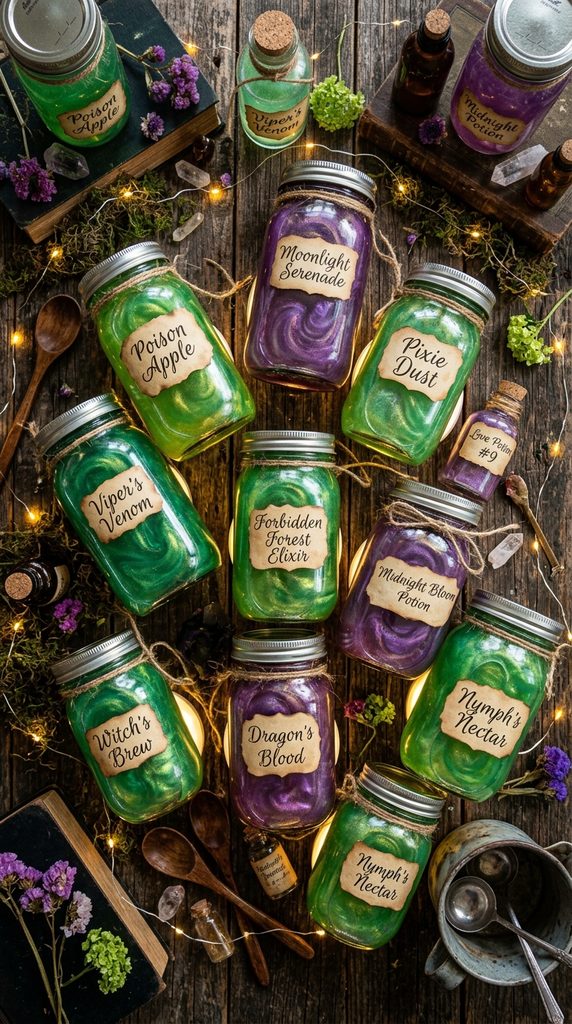
Glowing Apothecary Beverage Display
Transform the standard prom water and punch refreshment table into a bewitching Victorian alchemist’s apothecary bar. Boring paper cups and plastic juice coolers ruin immersive party themes and look uninspired in guest photos. This setup utilizes upcycled glass jars filled with glowing, eerie, potion-colored beverages and illuminated from below.
Decorated with hand-aged parchment poison labels, the drink station becomes an interactive, theatrical tasting experience for thirsty dancers. Concealed under-table puck lights make the colorful fruit punches glow radiantly through dark glass containers. It delivers massive thematic charm across refreshment zones for virtually zero cost using recycled household food jars.
Materials You Will Need
- 10 to 15 assorted clean recycled glass pickle, pasta sauce, or mason jars
- Printable parchment apothecary labels downloaded online
- Mod Podge or school glue mixed with brewed coffee for paper aging
- Food-safe edible luster glitter dust or concentrated food coloring
- Inexpensive battery-operated LED light pucks
How to Style It
Collect recycled glass jars of varying shapes and sizes, soaking off commercial food labels in hot soapy water. Print vintage Victorian poison and potion labels onto paper, tearing paper edges roughly by hand for an aged look. Brush the paper labels with dark brewed coffee, letting them dry before adhering them to glass jars with Mod Podge.
Fill the jars with colorful party drinks like emerald lime punch, violet grape elixir, and crimson fruit cider. Stir edible food-safe shimmer luster dust into the punch, creating mesmerizing, swirling potion currents inside the glass. Place battery-powered LED puck lights directly underneath the jars, making the colorful shimmering potions glow brilliantly in the dark.
11. Creepy Silhouette Window Breaches
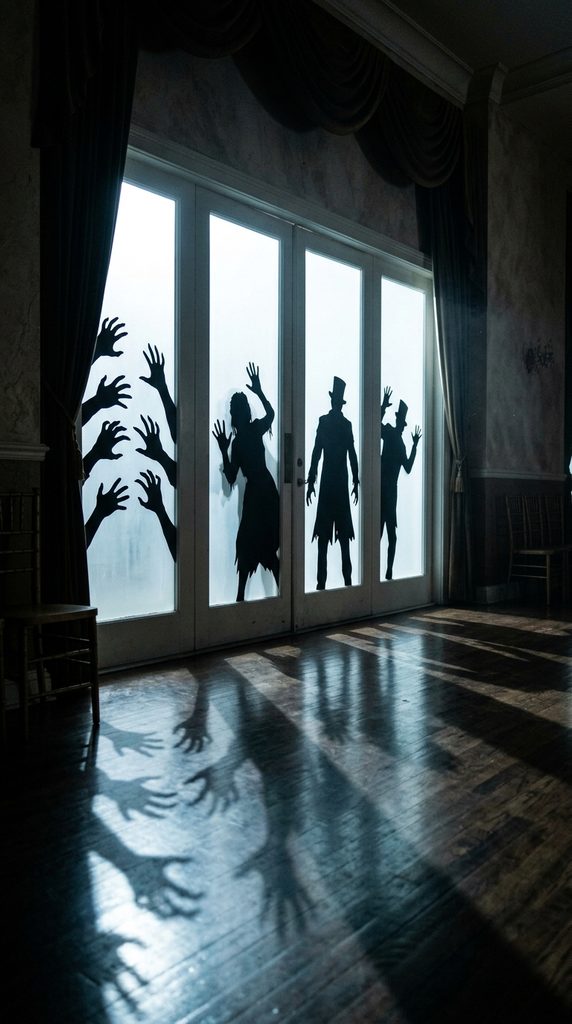
Shadowy Specters Lurking Outside
Turn towering, blank gymnasium or school cafeteria windows into thrilling narrative art using cut-paper shadow silhouettes. School windows are often awkward to cover completely, leaking unsightly parking lot light into darkened dance floors. This brilliant hack embraces window glass, transforming unwanted outside light into a dynamic, back-lit horror scene.
Life-sized paper cutouts of creeping zombies, elegant ballroom phantoms, and monstrous reaching hands press against the glass. As outdoor security lights shine through the frosted glass, terrifying, ultra-sharp silhouettes cast into the prom venue. It creates the thrilling illusion that a hoard of undead partycrashers is peering inside at the dancing students.
Materials You Will Need
- 2 rolls of inexpensive black butcher paper or heavy black poster board
- 1 roll of frosted semi-translucent contact paper or white tissue paper
- Sharp utility craft knife and cutting mat
- Removable blue painter’s tape or glue dots for glass mounting
- Downloadable vintage life-sized silhouette body templates
How to Style It
Trace life-sized human silhouettes, clawing hands, and wandering ballroom specters onto wide black butcher paper rolls. Carefully cut out the dark figures using a sharp craft knife, focusing on sharp finger shapes and facial profiles. Mount sheets of white tissue paper or frosted contact paper directly against the interior window glass to diffuse outside light.
Tape the black cut-paper silhouettes flat against the frosted glass on the interior side using removable tape. When outdoor security lights or placed exterior spotlights shine inward, crisp, terrifying black shadows appear instantly on the glass. The entire room perimeter gains an eerie narrative depth, making students feel thrillingly surrounded by creeping night spirits.
12. Floating Ghost Ship Chandelier
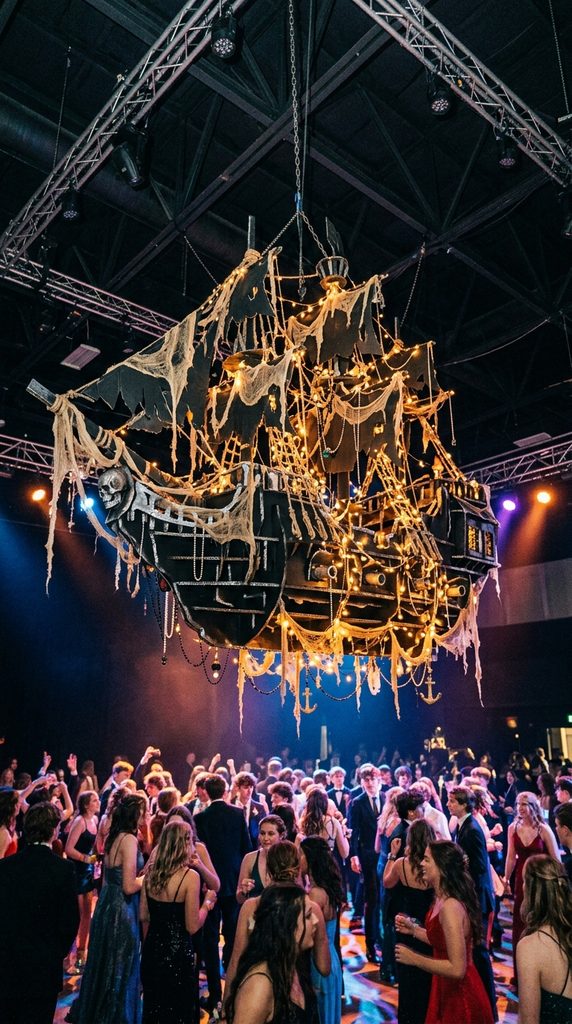
Nautical Phantom Ballroom Centerpiece
Hang a magnificent, skeletal pirate ship or gothic chandelier framework centrally over the main dance floor area. Sweeping crystal chandeliers cost a fortune to rent, but a lightweight upcycled cardboard version commands identical visual majesty. Draped in tattered cheesecloth, dripping faux pearls, and glowing fairy lights, it looks like a salvaged sunken relic.
The hanging chandelier sways gracefully with the natural air currents generated by hundreds of energetic dancing students below. It anchors high ceiling spaces, drawing the eye upward and breaking the industrial monotony of exposed gymnasium air ducts. The entire project costs less than fifteen dollars to assemble using recycled cardboard boxes and dollar-store craft supplies.
Materials You Will Need
- 2 large sheets of corrugated shipping cardboard
- 4 packs of white dollar-store craft cheesecloth
- 1 can of flat black spray paint and metallic silver paint
- 3 strings of warm white battery-operated micro-fairy lights
- 3 strands of cheap faux plastic pearl party bead necklaces
How to Style It
Draw a grand multi-tiered baroque chandelier or pirate ship hull profile onto corrugated shipping cardboard and cut it out cleanly. Interlock two identical cardboard chandelier cutouts perpendicularly along center slits to form a three-dimensional hanging mobile framework. Spray the assembled cardboard structure entirely with matte black spray paint, dry-brushing silver paint across edges for an aged metal patina.
Tear white cheesecloth into long, wispy strips, soaking them in black tea to produce a tattered, ancient cobweb texture. Drape the tattered tea-stained cloth strips across the chandelier arms, allowing long tendrils to trail downward like Spanish moss. Weave warm fairy lights and hanging plastic pearl garlands through the structure, suspending the chandelier from rafters with fishing line.
13. Distressed Velvet Lounge Vignette
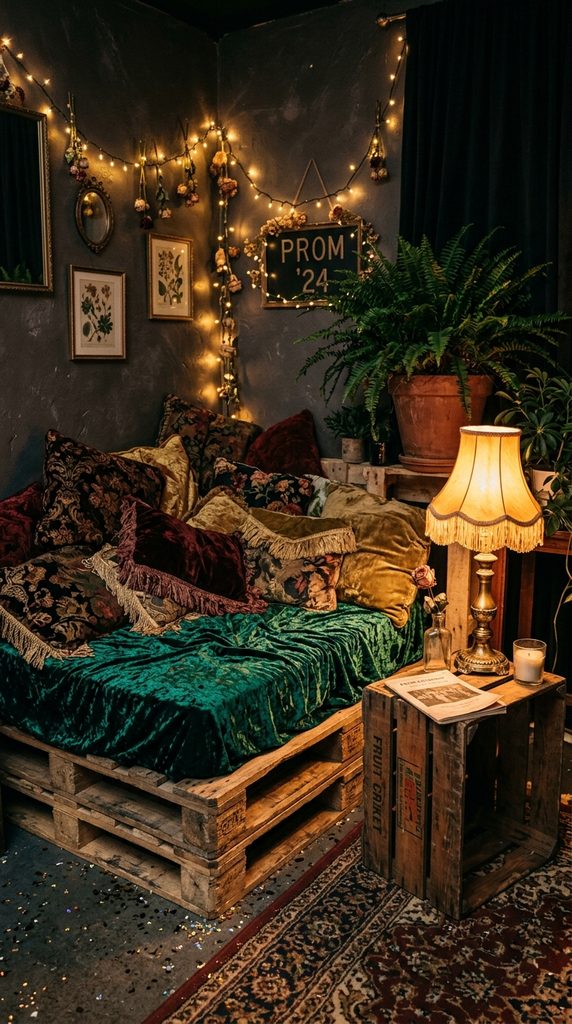
Decadent VIP Midnight Photo Corner
Build a luxurious, intimate VIP seating corner where tired dancers can rest their feet and take candid group photos. School dances often lack comfortable, attractive lounge furniture, forcing students to sit on cold bleachers or cafeteria benches. This styling hack combines thrifted velvet throws, discarded pallets, and moody lamps to create a luxury salon.
The rich textures of crushed velvet, dark brocade pillows, and soft fringed lampshades photograph with incredible editorial warmth. It provides an inclusive, relaxed space for students who prefer quiet conversation over high-energy dance floor jumping. Setting up this lavish corner costs under twenty-five dollars when leveraging community thrift stores and upcycled pallet wood.
Materials You Will Need
- 2 discarded wooden shipping pallets sourced from local stores
- 1 thrifted dark velvet blanket or faux fur bedspread
- 3 to 4 thrifted vintage patterned throw pillows
- 1 small thrifted vintage table lamp with a low-wattage warm amber bulb
- 1 small wooden crate to serve as an antique coffee table
How to Style It
Stack two clean wooden shipping pallets on top of each other in a quiet corner of the gymnasium floor. Drape a rich burgundy, emerald, or black velvet blanket smoothly over the pallet wood to create a plush low sofa. Pile textured vintage throw pillows high against the corner walls to provide comfortable, luxurious back support for seating.
Set an upturned wooden fruit crate beside the pallet daybed to function as a rustic, vintage lounge cocktail table. Place a thrifted table lamp with an ornate fringed shade atop the crate, plugging it in with an extension cord. Flank the cozy seating vignette with potted artificial ferns and tall dripping candelabras to complete the private salon aesthetic.