
14 Simple Aesthetic Wooden Covered Bridges in Minecraft Ideas
Building covered bridge is one of the most rewarding ways to elevate your Minecraft landscapes. Unlike standard flat crossings, covered bridges add protection, architectural height, and a warm, inviting atmosphere to rivers, canyons, and ravines. Furthermore, building with timber allows you to mix rich wooden textures seamlessly with natural terrain. In this comprehensive guide, you will discover fourteen simple, aesthetic, and functional wooden covered bridge ideas. These designs range from rustic starter stream crossings to fairytale blossom bridges and mountain timber structures.

1. The Classic Spruce and Cobblestone Covered Bridge
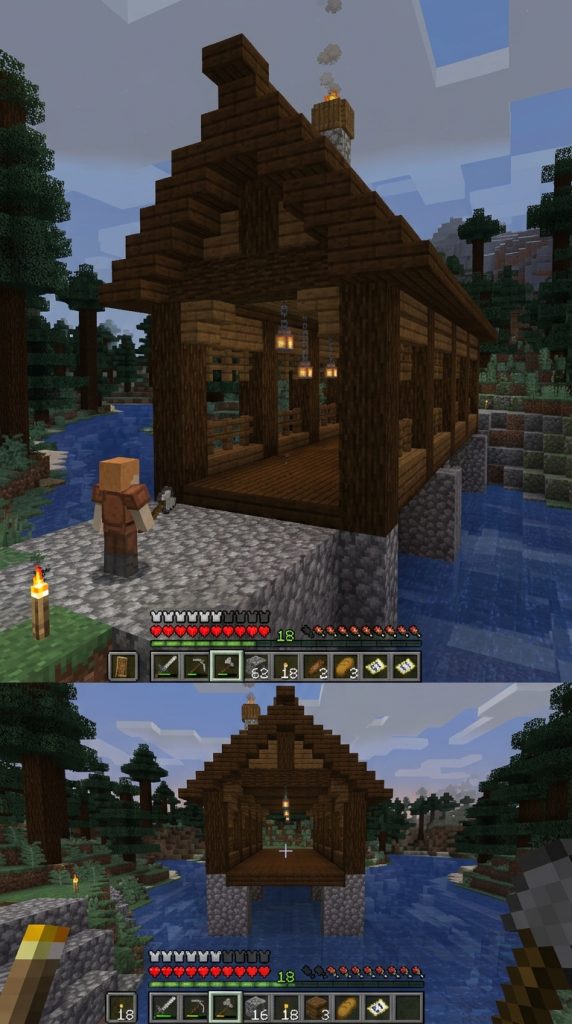
The classic spruce and cobblestone covered bridge is an iconic choice for any survival world. It features a heavy cobblestone foundation built into opposite riverbanks, supporting a warm spruce timber superstructure. Furthermore, the simple A-frame pitched roof protects travelers from rain while providing an authentic rustic aesthetic.
Combining dark spruce wood with weathered cobblestone creates immediate structural stability. The open side windows framed with fences allow panoramic views of the water while keeping hostile mobs out during nighttime travel.
Warm Bridge Lighting
Hanging iron lanterns from the central roof ridge beam casts soft, warm shadows across the wooden deck. Furthermore, placing subtle glowberry vines beneath the cobblestone arches creates gentle reflections on the water below.
Materials Needed
- Spruce Wood Planks
- Spruce Wood Stairs
- Cobblestone
- Spruce Fences
- Iron Lanterns
Step-by-Step Guide
First, construct two sturdy three-block-wide support abutments on opposite riverbanks using cobblestone. Span a flat horizontal deck between them using dark spruce planks. Consequently, you establish a solid, level crossing platform over the water.
Second, erect three-block-tall stripped spruce log pillars at every corner and middle section of the deck. Connect the tops of the pillars using horizontal log beams. Next, fill the lower side walls with spruce trapdoors, leaving two-block openings above for fence windows. Consequently, your side walls offer both privacy and ventilation.
Third, construct a sloped A-frame roof using spruce wood stairs along the outer edges, overhanging the walls by one block. Hang iron lanterns at equal intervals from the interior roof beam. Finally, place cobblestone stairs leading up to the bridge entrances on both riverbanks.
2. The Cherry Blossom Fairytale Covered Bridge
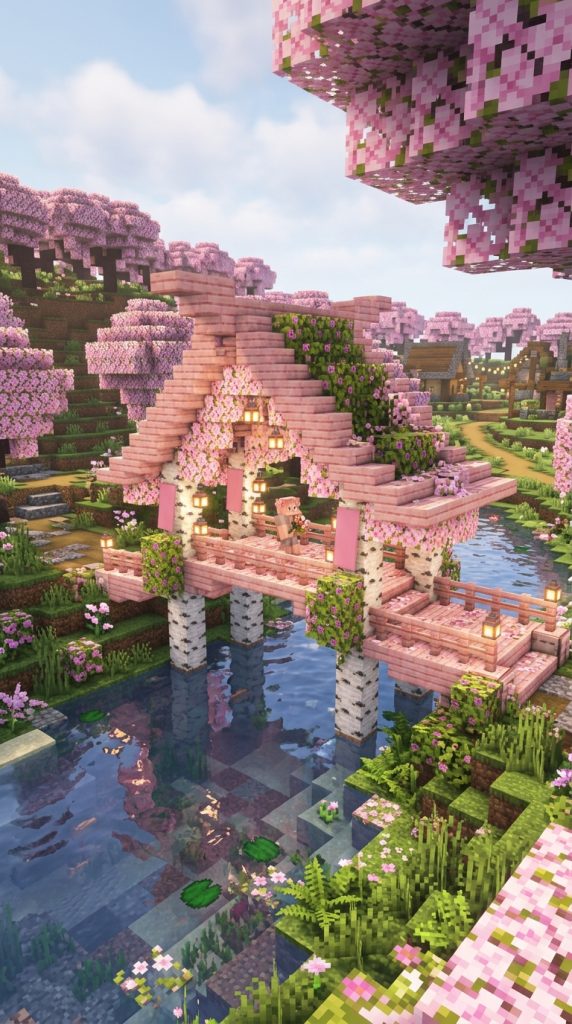
The cherry blossom fairytale covered bridge brings soft, romantic charm to cherry groves and flower forests. It features a sweeping curved roof made from pastel pink cherry wood planks and stairs, framed by clean stripped birch logs. Furthermore, flowering azalea leaves drape over the roof edges for a dreamlike botanical feel.
Pastel wood palettes soft-frame natural water biomes beautifully. The gentle pink canopy reflects off calm river waters, creating an enchanting focal point for aesthetic bases.
Botanical Detailing
Placing pink petal carpets along the wooden floor deck adds soft texture underfoot. Furthermore, wrapping the outer support posts in flowering azalea leaves seamlessly blends the bridge into surrounding cherry blossom trees.
Materials Needed
- Cherry Wood Planks
- Cherry Wood Stairs
- Stripped Birch Logs
- Flowering Azalea Leaves
- Pink Petals
Step-by-Step Guide
First, construct a gentle curved arch platform across your stream using cherry wood slabs and stairs. Ensure the center of the bridge rises one or two blocks higher than the bank landings. Consequently, your bridge gains an elegant, natural arch silhouette.
Second, erect support posts along the outer deck using smooth stripped birch logs. Connect the posts with horizontal birch log beams. Next, place cherry wood trapdoors along the lower sides to form delicate handrail walls. Consequently, the light birch wood highlights the soft pink cherry planks.
Third, build a sweeping curved roof using cherry wood stairs, letting the ends flair slightly upward. Cover the roof crest with flowering azalea leaf blocks and draped vines. Finally, scatter pink petals along the deck floor and place hidden froglights beneath the arch for night glow.
3. The Rustic Dark Oak and Brick Harvest Bridge
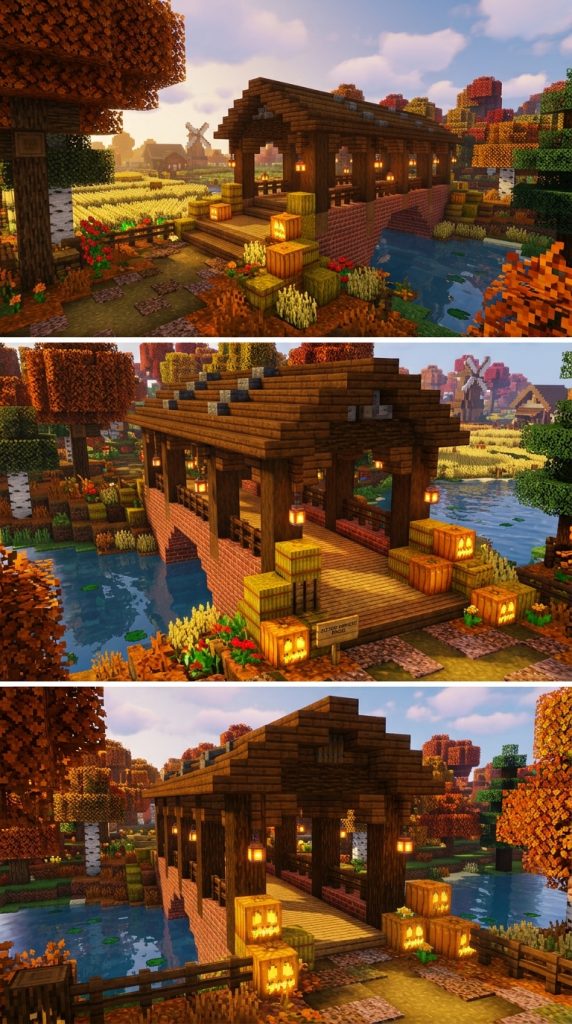
The rustic dark oak and brick covered bridge offers rich, autumn-inspired warmth. It pairs deep, chocolate-brown dark oak timber with sun-baked red brick foundations and accent walls. Furthermore, this heavy-set covered bridge features built-in hay storage and hanging lantern posts, making it perfect for agricultural districts.
Dark oak provides a dense, sturdy frame that visually grounds wide crossings. Combining red bricks with dark wood adds a traditional, historical feel reminiscent of classic country farmsteads.
Farmstead Detailing
Placing hay bales and carved pumpkins near the bridge entryways adds seasonal harvest charm. Furthermore, placing water cauldrons and hanging lanterns creates a functional, lived-in agricultural atmosphere.
Materials Needed
- Dark Oak Planks
- Dark Oak Stairs
- Brick Blocks
- Dark Oak Fences
- Hay Bales
Step-by-Step Guide
First, lay heavy foundation piers into the riverbed using a mix of red bricks and polished granite. Span the main walking deck between piers using dark oak planks. Consequently, you create a heavy, weather-resistant base for farm traffic.
Second, build sturdy brick side walls three blocks high, carving out arched window openings every three blocks. Line the interior window arches with dark oak fences. Next, place dark oak log support posts at the corners to carry roof weight. Consequently, your side walls feature rich color contrast and solid shelter.
Third, construct a steep pitched roof using dark oak stairs, adding dark oak slab overhangs. Place hay bales stacked against the interior side walls for farm detail. Finally, hang cozy iron lanterns from interior roof rafters to light the main passage.
4. The Overgrown Mossy Swamp Covered Bridge
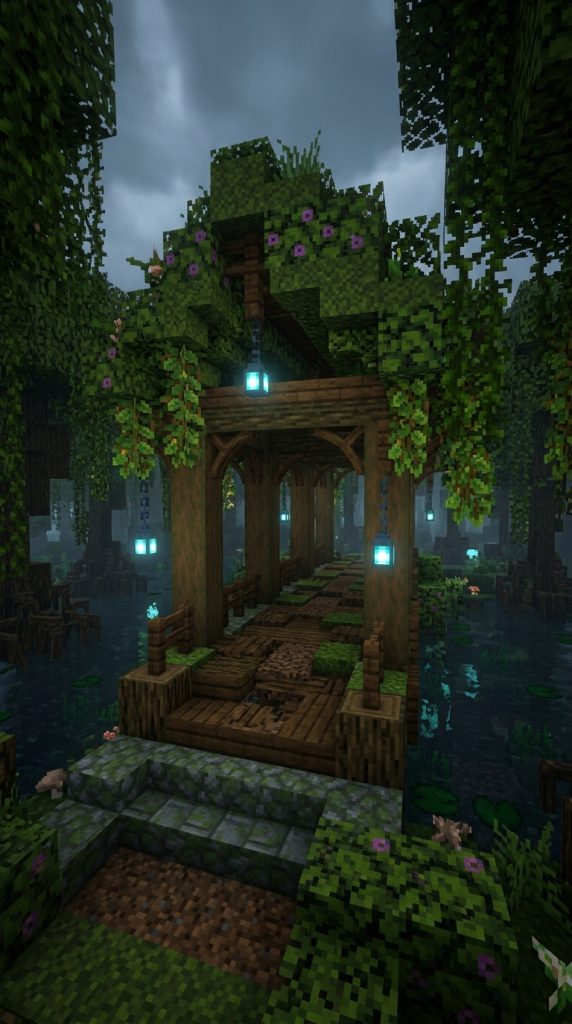
The overgrown mossy swamp covered bridge blends seamlessly into murky wetlands and dense old-growth forests. It features a weathered frame built from mangrove wood, mossy cobblestone, and packed mud. Furthermore, the roof is completely covered in green moss blocks, vines, and hanging willow-style leaves.
Using muddy, weathered textures makes the bridge appear ancient, as if it has survived decades in humid swamp waters. The organic, slightly asymmetrical roofline adds to its rustic, forgotten charm.
Swamp Ambiance
Hanging soul lanterns beneath the mossy roof eaves casts a cool, mysterious blue light over murky swamp waters. Furthermore, letting vines hang low forces players to walk through soft foliage when crossing.
Materials Needed
- Mangrove Planks
- Moss Blocks
- Mossy Cobblestone
- Packed Mud
- Vines
Step-by-Step Guide
First, sink mossy cobblestone support pillars deep into the muddy swamp bed. Lay a slightly uneven deck using a mix of mangrove planks and mud brick slabs. Consequently, your crossing feels natural, rustic, and integrated into marshland.
Second, construct low wall frames using packed mud blocks and mangrove fences. Place stripped mangrove logs at key structural points to hold the roof. Next, drape green vines along the outer wall faces. Consequently, the structure takes on an aged, overgrown appearance.
Third, build a low, rounded roof using moss blocks mixed with green wool slabs. Let vines and oak leaf blocks drape down over the side entryways. Finally, place soul lanterns on outer corner posts for atmospheric blue lighting.
5. The Minimalist Birch and Quartz Modern Bridge
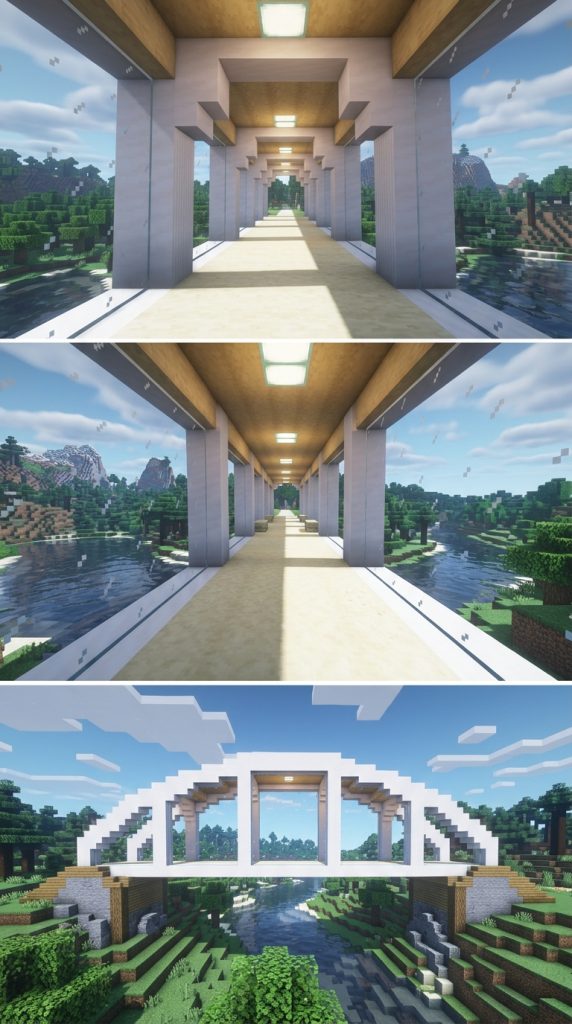
The minimalist birch and quartz covered bridge offers a crisp, clean, and modern aesthetic. It showcases smooth white quartz structural arches paired with light birch wood plank flooring and ceiling panels. Furthermore, full-length glass pane walls provide completely unobstructed views of surrounding waters.
Modern covered bridges prioritize clean geometric lines, light color palettes, and high interior visibility. Pairing white quartz with pale birch wood creates a high-fashion, airy crossing ideal for modern bases.
Modern Lighting Integration
Embedding sea lanterns directly into the quartz ceiling panels creates completely smooth, invisible overhead lighting. Furthermore, keeping the floor flush eliminates clutter, accentuating the clean architectural lines.
Materials Needed
- Birch Planks
- Smooth Quartz Blocks
- Smooth Quartz Stairs
- Clear Glass Panes
- Sea Lanterns
Step-by-Step Guide
First, construct sleek, rectangular support pillars in the water using smooth white quartz blocks. Span a flat floor deck across the gap using light birch wood planks. Consequently, you lay a bright, clean foundation for a modern bridge.
Second, erect vertical smooth quartz pillar posts along the outer deck edges. Install full-height clear glass panes between the quartz posts to seal the sides. Next, frame the top and bottom window edges with smooth quartz stairs. Consequently, your interior remains fully protected while offering crystal-clear exterior views.
Third, lay a flat roof across the top using smooth quartz slabs. Embed sea lanterns flush into the interior birch ceiling for seamless lighting. Finally, place smooth quartz stairs at both bridge approaches for an effortless, polished entry.
6. The Oriental Bamboo and Crimson Pagoda Bridge

The oriental bamboo and crimson pagoda bridge brings majestic East Asian architectural flare to your world. It features a sweeping flared roof made from deep red crimson wood stairs and turquoise warped wood accents. Furthermore, the side walls feature open bamboo fence lattice grates and red paper-style banners.
Pagoda-style covered bridges feature striking flared roof eaves that sweep gracefully upward at the corners. The contrast between bright yellow bamboo and rich nether crimson wood creates regal visual impact.
Asian Architectural Accents
Hanging red banners and ochre froglights along the flared roof tips creates an authentic temple atmosphere. Furthermore, placing potted bamboo stalks at the entryways frames the approach with natural greenery.
Materials Needed
- Bamboo Planks
- Crimson Wood Stairs
- Stripped Crimson Stems
- Bamboo Fences
- Red Banners
Step-by-Step Guide
First, construct dark stone support piers in the river using polished basalt or deepslate. Span the main walking deck using bright, yellow-toned bamboo planks. Consequently, you create a vibrant, high-contrast crossing platform over the water.
Second, erect corner support posts using stripped crimson stem logs. Construct side railings using open bamboo fences to form intricate lattice window patterns. Next, hang red banners along the interior side posts. Consequently, the side walls display authentic pagoda-style decorative detail.
Third, build a flared, tiered roof using crimson wood stairs, extending the corners outward and upward with slabs. Place glowing ochre froglights beneath the roof eaves for warm illumination. Finally, place potted bamboo plants at both bridge entrances.
7. The Mountain Spruce Timber Trestle Covered Bridge
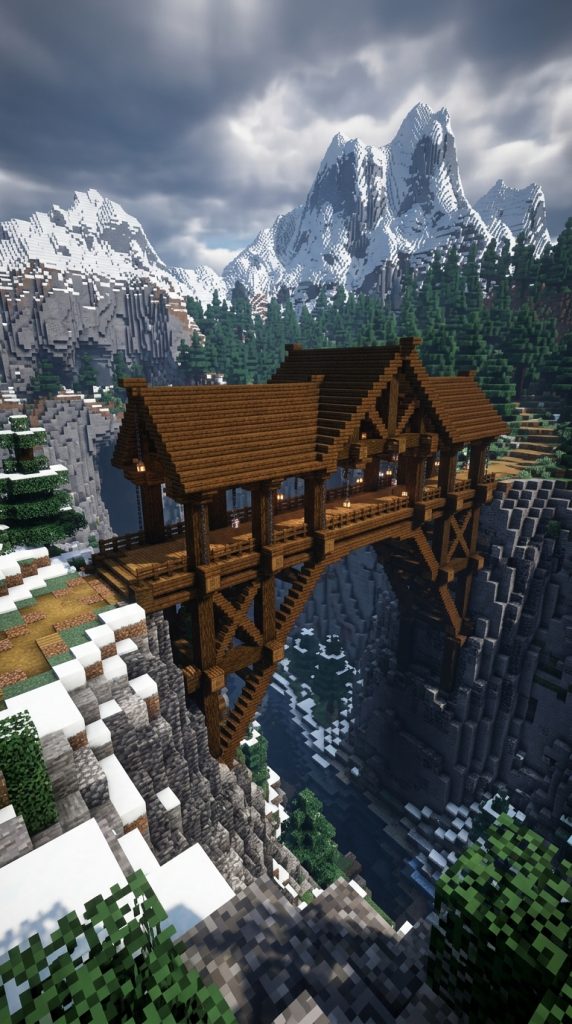
The mountain spruce timber trestle covered bridge is built to span deep, rocky mountain chasms and canyons. It features heavy timber log cross-bracing underneath the deck to simulate realistic structural support. Furthermore, a sturdy, steep spruce shingle roof protects travelers from high-altitude snowstorms.
Trestle bridges emphasize heavy structural engineering aesthetic. Using unstripped spruce logs for massive diagonal support trusses makes the bridge look capable of holding immense weight across wide ravines.
Alpine Security Features
Installing heavy spruce trapdoors along lower side walls prevents players from falling off high mountain bridge decks. Furthermore, placing campfire smoke stacks nearby simulates cozy alpine mountain living.
Materials Needed
- Spruce Logs
- Spruce Planks
- Spruce Stairs
- Spruce Fences
- Iron Chains
Step-by-Step Guide
First, anchor heavy vertical support columns made of unstripped spruce logs into the chasm cliff walls. Construct angled diagonal log trestle braces extending from the cliff faces up to the center deck point. Consequently, your bridge gains immense visual stability over the deep drop.
Second, lay a thick walking deck across the top of the trestle frame using spruce planks. Build sturdy side walls three blocks high using spruce log frames filled with spruce fences. Next, attach iron chains from the top log beams down to handrails for industrial detail. Consequently, your mountain crossing feels completely secure against high winds.
Third, construct a heavy pitched roof using dark spruce wood stairs, extending the roof overhangs two blocks out. Hang iron lanterns from interior roof rafters using chains. Finally, pave the canyon approach paths with gravel and coarse dirt.
8. The High-Haven Skyblock Cloud Bridge

The high-haven skyblock cloud bridge is designed for floating islands and high-altitude sky bases. It features a weightless aesthetic using light cherry planks, white wool, and quartz blocks. Furthermore, translucent white glass walls and glowing end rods make the covered bridge feel as if it is floating through clouds.
Sky bridges require airy, lightweight designs that do not look heavy or clunky against the open sky. Using soft pastel woods paired with fluffy white cloud blocks creates a dreamlike passage.
Cloud-Level Ambient Glow
Placing glowing end rods along the bridge roof peak creates sparkling points of light against the night sky. Furthermore, embedding sea lanterns beneath white carpet floor sections ensures safe lighting without visible blocks.
Materials Needed
- Cherry Planks
- White Wool
- Smooth Quartz Stairs
- White Stained Glass
- End Rods
Step-by-Step Guide
First, construct cloud-like anchor platforms on opposite floating islands using white wool and quartz slabs. Span a flat walkway between the islands using light pink cherry wood planks. Consequently, you establish a bright, airy sky crossing.
Second, erect thin corner posts using smooth quartz stairs and pillar blocks. Install translucent white stained glass panes along the side walls to create safe wind barriers. Next, place glowing end rods atop corner posts for sparkling vertical detail. Consequently, your sky bridge stays safe while preserving cloud views.
Third, build a soft, rounded canopy roof using white wool blocks mixed with white quartz slabs. Hide sea lanterns beneath white floor carpets along the walking path. Finally, attach decorative cloud-like wool clusters beneath the bridge base to enhance the floating look.
9. The Medieval Stone Brick and Oak Guard Bridge
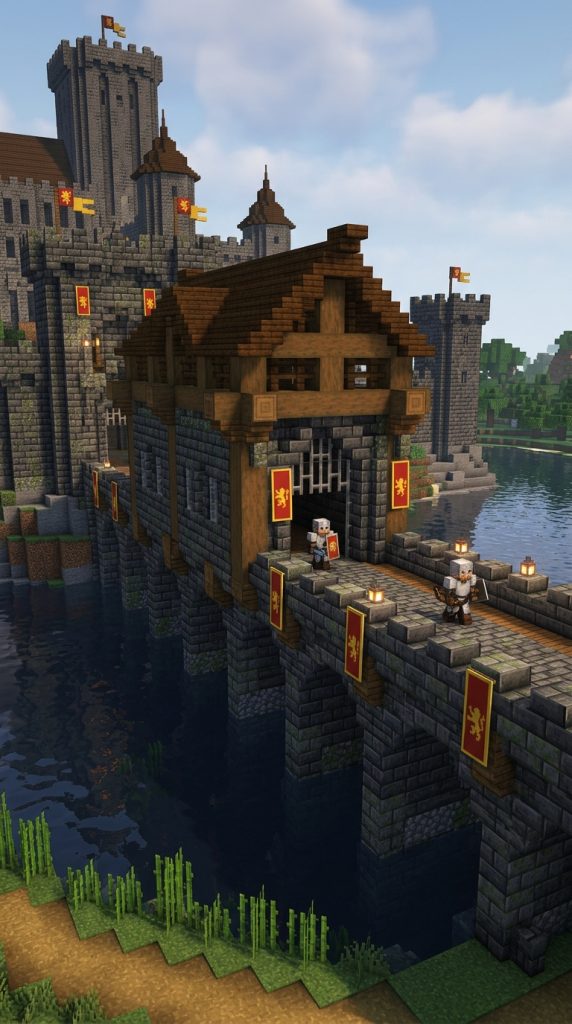
The medieval stone brick and oak guard bridge is a heavily fortified crossing designed for castle moats or kingdom borders. It features thick stone brick walls, machicolations, and a heavy oak timber roof. Furthermore, small arrow slits and iron gate portcullises at both ends turn this covered bridge into a defensive checkpoint.
Fortified guard bridges serve as protective gateways to medieval cities. Combining heavy stone masonry with dark oak timbers provides both blast resistance and military functionality.
Defensive Detailing
Installing iron bars in narrow one-block window slits simulates authentic medieval arrow loops. Furthermore, hanging banners and placing armor stands at entryways gives the bridge an active garrison feel.
Materials Needed
- Stone Bricks
- Cobblestone Walls
- Oak Planks
- Oak Stairs
- Iron Bars
Step-by-Step Guide
First, construct a thick stone brick arch spanning across the castle moat or river. Lay a wide stone brick deck across the top, leaving room for heavy side walls. Consequently, you establish an explosion-proof foundation capable of holding defensive structures.
Second, build three-block-tall stone brick side walls along the deck. Cut narrow one-block arrow slits into the walls every two blocks, filling them with iron bars. Next, place heavy oak log posts inside to support the upper roof. Consequently, your bridge transforms into a fortified defensive corridor.
Third, construct a sturdy pitched roof using dark oak stairs and slabs. Install wooden trapdoors or iron fences at both entrance arches to simulate portcullis gates. Finally, hang iron lanterns from the roof rafters and mount kingdom banners on the outer walls.
10. The Tropical Jungle Canopy Log Bridge
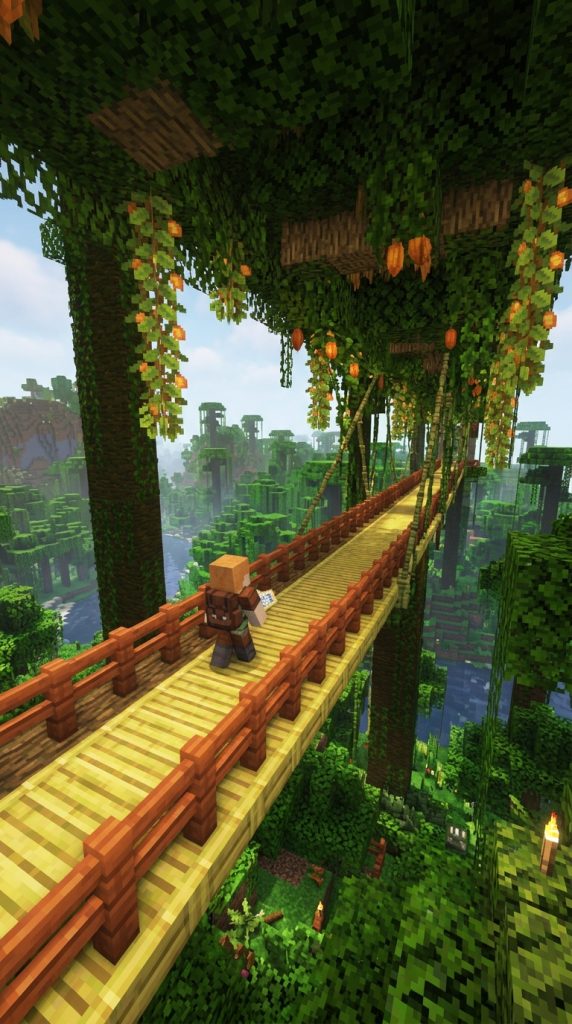
The tropical jungle canopy covered bridge is an adventurous structure built high up in dense jungle trees. Using jungle logs, bamboo, and acacia planks, this bridge features a thatched leaf roof that blends into surrounding foliage. Furthermore, hanging vines and cocoa beans drape down from the roof frame.
Canopy bridges allow players to navigate dense jungle biomes safely above hostile mobs. Building a sheltered wooden walkway through the trees protects travelers from rain while providing an immersive wilderness aesthetic.
Jungle Overgrowth
Placing cocoa beans on side log support posts adds natural tropical detail. Furthermore, letting thick jungle vines hang low over the entryways creates an authentic wilderness feel.
Materials Needed
- Jungle Logs
- Bamboo Planks
- Jungle Leaves
- Acacia Stairs
- Vines
Step-by-Step Guide
First, select two large jungle trees spanning a river or valley. Connect the tree trunks high in the canopy using horizontal jungle log support beams. Next, lay a walking deck using bright bamboo planks. Consequently, you create a elevated jungle walkway high above the ground.
Second, erect vertical jungle log posts along the deck edges to form a roof skeleton. Construct open side handrails using acacia fences and trapdoors for colorful contrast. Next, drape natural vines along the outer log frame. Consequently, your canopy bridge blends naturally into surrounding tree branches.
Third, build a thick, rounded roof over the walkway using dense jungle leaf blocks mixed with acacia stairs. Hang glowing lanterns from interior roof logs for night safety. Finally, plant cocoa beans on the main corner posts for natural tropical detail.
11. The Rustic Village Plank Footbridge
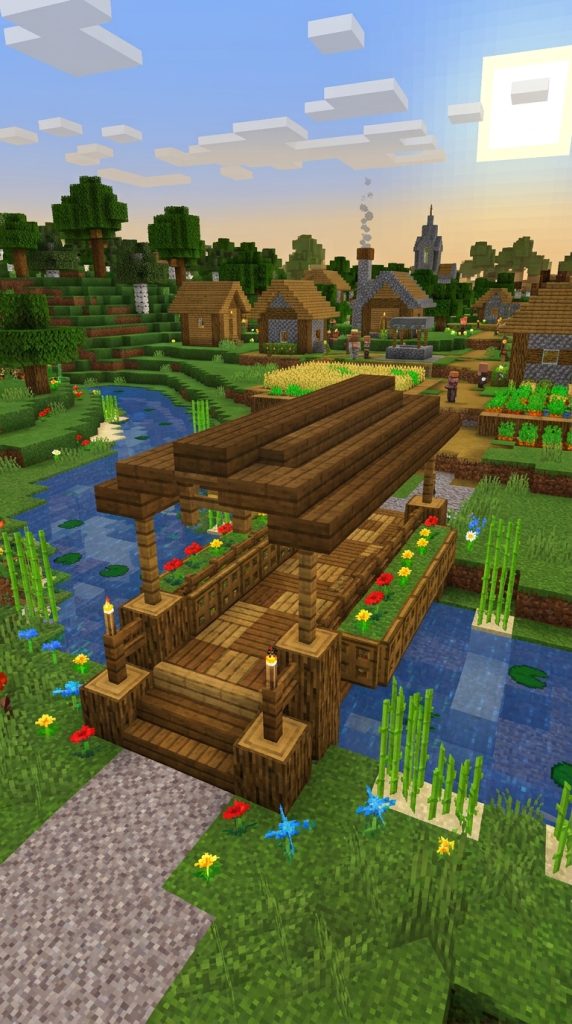
The rustic village plank footbridge is a small, charming covered bridge designed for small streams and farm ponds. It features a simple wooden deck built from mixed oak and spruce planks, topped with a cozy low-profile shingle roof. Furthermore, built-in flower boxes along the outer railings add vibrant color.
Small footbridges enhance village navigation without overwhelming surrounding starter houses. Using simple materials keeps construction quick, practical, and incredibly charming.
Planter Box Detailing
Building planter boxes directly into the bridge handrails adds colorful floral life. Placing oak trapdoors around dirt blocks creates simple, attractive flower pots for poppies or dandelions.
Materials Needed
- Spruce Planks
- Oak Planks
- Spruce Stairs
- Oak Trapdoors
- Flowers
Step-by-Step Guide
First, drive simple spruce log posts into the shallow stream bed. Lay a short three-block-wide deck across the stream using alternating oak and spruce planks. Consequently, you create a cozy, humble village crossing.
Second, build low handrails along both sides using oak fences. Attach oak trapdoors to the outer fence sides to create small planter boxes filled with dirt. Next, plant bright red poppies and yellow dandelions inside the boxes. Consequently, your footbridge gains colorful botanical charm.
Third, construct a low-profile A-frame roof over the short deck using spruce stairs. Hang a single iron lantern from the central roof rafter. Finally, smooth out the stream approach paths using gravel and path blocks.
12. The Desert Rose Terracotta Covered Bridge
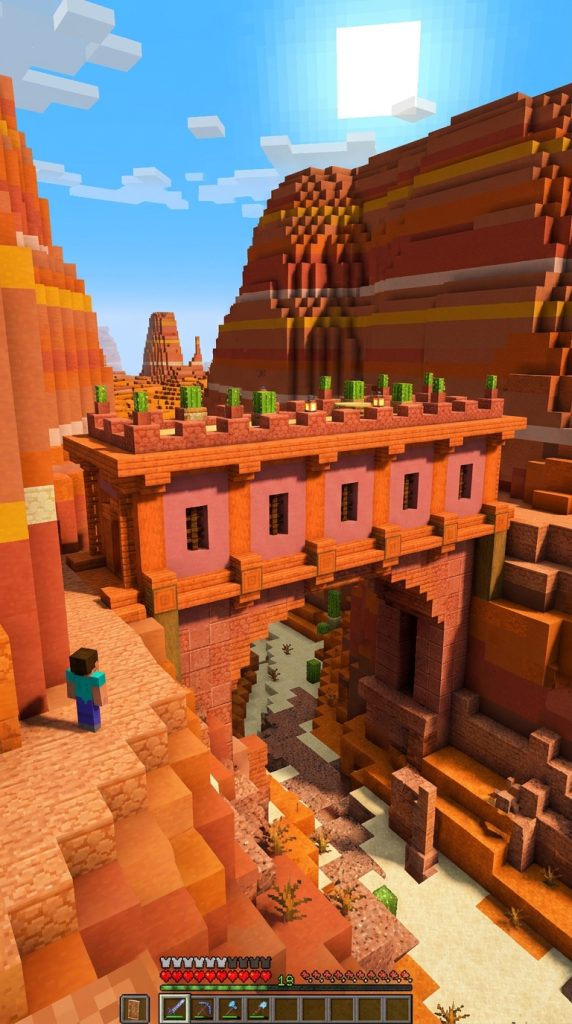
The desert rose terracotta covered bridge is a sun-baked crossing designed for desert canyons and mesa biomes. It features warm pink terracotta and cut red sandstone walls paired with smooth acacia wood timbers. Furthermore, flat roof battlements and narrow window grates protect against harsh desert sun.
Desert architecture relies on warm, sun-baked earth tones and flat geometric silhouettes. Combining dusty pink terracotta with bright orange acacia wood creates rich color harmony across arid landscapes.
Arid Landscape Detailing
Placing potted cacti and dead bushes along the bridge approach paths enhances the desert environment. Furthermore, placing lanterns inside sandstone wall niches creates warm evening light without cluttering paths.
Materials Needed
- Pink Terracotta
- Cut Red Sandstone
- Acacia Planks
- Acacia Stairs
- Smooth Sandstone
Step-by-Step Guide
First, construct sturdy support arches across the canyon using cut red sandstone. Span the main deck using rich, orange-toned acacia wood planks. Consequently, you establish a warm, sun-baked foundation over the canyon floor.
Second, build three-block-tall side walls using dusty pink terracotta blocks. Cut narrow vertical window slots every two blocks, framing them with cut sandstone stairs. Next, place stripped acacia log posts at the corners for structural framing. Consequently, your desert bridge features rich color contrast and cool shade.
Third, build a flat roof deck using smooth sandstone slabs, adding decorative battlements along top edges. Place potted cacti on outer roof ledges for desert detail. Finally, install warm iron lanterns inside sandstone wall niches to light the passage.
13. The Fairytale Mushroom Forest Bridge
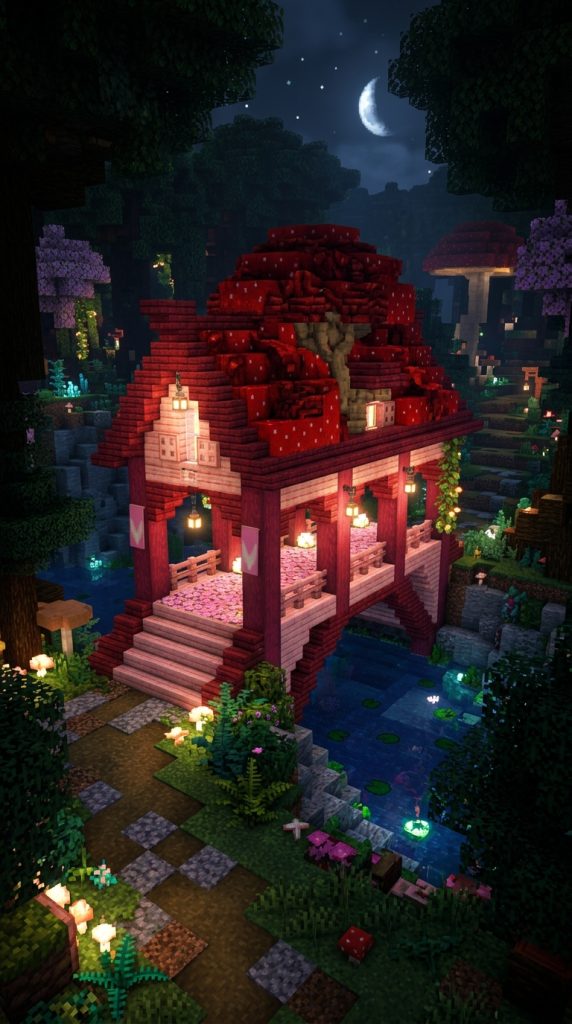
The fairytale mushroom forest covered bridge is a whimsical structure built inside dark oak forests or mushroom biomes. It features a sweeping wooden deck framed by crimson wood, cherry planks, and giant red mushroom cap roofs. Furthermore, glowing froglights and hanging vines make the bridge feel enchanted.
Fairytale builds thrive on playful, exaggerated shapes and vibrant block choices. Using giant red mushroom blocks for roof canopies creates an unforgettable fairytale silhouette across forest rivers.
Whimsical Lighting
Hiding pearlescent froglights beneath giant mushroom roof caps casts a soft, magical ambient glow over the river. Furthermore, scattering pink petals and red mushrooms along the deck floor adds fairytale texture.
Materials Needed
- Red Mushroom Blocks
- Cherry Planks
- Crimson Stairs
- Pearlescent Froglights
- Pink Petals
Step-by-Step Guide
First, build organic support pillars in the water using white mushroom stem blocks. Span a gentle arched deck over the river using soft pink cherry wood planks. Consequently, you create a whimsical, light-toned crossing platform.
Second, erect side wall frames using deep red crimson wood stairs and posts. Place cherry wood trapdoors along the lower handrails for cute detailing. Next, drape green vines along the side frame. Consequently, your fairytale bridge gains vibrant color contrast.
Third, construct a sweeping, rounded roof using bright red mushroom cap blocks. Hide glowing pearlescent froglights inside the mushroom ceiling for soft lighting. Finally, scatter pink petals along the floor deck and plant red mushrooms near approaches.
14. The Nether Warp Light-Bridge
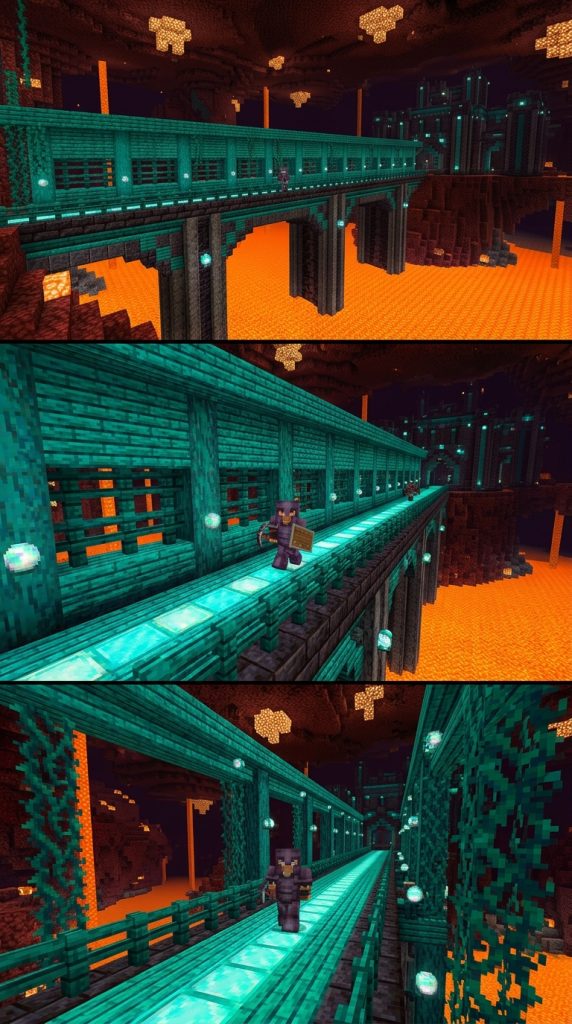
The nether warp light-bridge is a fireproof covered crossing designed for nether lava oceans or dark end biomes. It features a heavy frame built from black basalt, warped cyan planks, and glowing magenta froglights. Furthermore, this fully enclosed bridge keeps travelers completely safe from ghast fireballs and fell voids.
Nether bridges must prioritize fireproof construction materials and mob security. Using dark basalt stone paired with vibrant cyan warped wood ensures total fire immunity while looking high-fashion and futuristic.
Lava-Proof Detailing
Draping glowing cyan twisted vines down from the outer basalt base adds dynamic nether plant life. Furthermore, embedding froglights directly into floor centerlines ensures max light levels that block mob spawns.
Materials Needed
- Warped Planks
- Polished Basalt
- Warped Fences
- Pearlescent Froglights
- Twisted Vines
Step-by-Step Guide
First, drive massive fireproof support pillars deep into the lava sea using polished basalt blocks. Span a flat walking deck using bright cyan warped planks. Consequently, you lay a completely fireproof foundation over hazardous lava.
Second, build solid side walls three blocks high using alternating polished basalt and warped planks. Install narrow window slits using warped fences to allow exterior views while blocking ghast fireballs. Next, embed glowing pearlescent froglights into the walls. Consequently, your nether bridge stays completely safe, bright, and secure.
Third, construct a flat, fully enclosed roof using polished basalt slabs. Drape cyan twisted vines along the outer lower arch supports above the lava. Finally, build safe, enclosed stone airlock entryways at both ends of the bridge.