11 Aesthetic Rustic Medieval Village Houses In Minecraft
Building a medieval village House in Minecraft is one of the most classic and satisfying projects you can undertake. Nothing brings a world to life quite like a cluster of charming, rustic houses tucked into a rolling hillside, surrounded by dirt paths, stone lanterns, and farmland. While simple square wooden huts serve well for your first night in survival, designing authentic medieval architecture requires an eye for texture, structural depth, and historic storytelling. Combining natural timber frames, weathered stone foundations, and textured roofing materials turns a basic settlement into a living, breathing kingdom. In this comprehensive guide, you will discover eleven aesthetic rustic medieval village house concepts. These designs cater to starter survival huts, specialized village artisan shops, and sprawling timber-framed manors.
Understanding historical architectural framing will completely transform your Minecraft building skills today. Medieval rustic builds rely heavily on the contrast between heavy, load-bearing stone bases and lighter, overhanging wooden upper floors. By combining cobblestone, deepslate, spruce, and dark oak, you can craft aged structures that feel sturdy, functional, and lived-in. Furthermore, integrating subtle details like window shutters, chimney smoke, flower boxes, and storage alcoves adds rich visual storytelling without overwhelming the build. You can design tiny peasant cottages or grand village elder estates. Therefore, experimenting with rustic medieval village house layouts expands both your architectural creativity and world-building skills.
In this guide, we will explore eleven unique rustic medieval village house ideas. Each concept includes a full overview, detailed materials list, and step-by-step tutorial instructions. You will learn how to mix weathered stone textures, construct overhanging timber frames, and detail cozy interiors effectively. Additionally, these designs suit both early-game survival mode players and creative kingdom builders. So, grab your iron axe, gather your cobblestone, and let us dive directly into these aesthetic rustic medieval Minecraft houses.
1. The Timber-Framed Peasant Starter Cottage
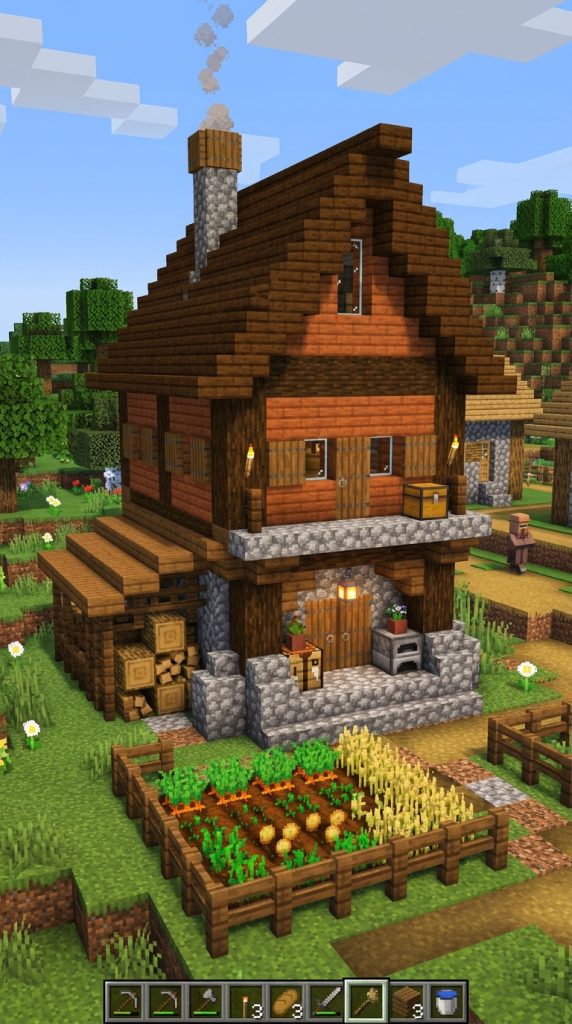
The timber-framed peasant starter cottage is an iconic, resource-friendly build for any new survival world. It features a rugged cobblestone foundation supporting a warm spruce plank upper floor, complete with an overhanging pitched dark oak roof. Furthermore, an attached firewood shed and a small vegetable garden frame the entrance, providing immediate agricultural atmosphere and starter survival utility.
This starter house focuses on practical simplicity and historic accuracy. The heavy stone base protects the lower living area, while the wooden upper floor extends one block outward to create classic medieval overhang shadows. Placing spruce trapdoors around glass pane windows forms functional shutters that keep the cottage looking detailed and cozy. Consequently, your first permanent village home looks authentic, secure, and deeply charming.
Overhanging Frame Physics
Creating a one-block exterior overhang between the ground floor stone and upper timber walls introduces crucial shadow lines. Inverted cobblestone stairs placed beneath the overhanging spruce logs simulate realistic wooden support brackets. Furthermore, this subtle depth trick breaks up flat vertical walls, making small starter houses appear larger and structurally sound.
Materials Needed
- Cobblestone
- Stripped Spruce Logs
- Spruce Wood Planks
- Dark Oak Stairs
- Spruce Trapdoors
Step-by-Step Guide
First, mark out a five-by-seven block rectangular footprint on flat ground using cobblestone. Build the lower foundation walls three blocks tall, leaving a two-block gap in the front for a sturdy wooden door. Consequently, you create a solid, fireproof stone base for your starter home.
Second, place horizontal stripped spruce log beams across the top edge of the stone foundation, extending them one block outward on all sides. Build the upper floor walls three blocks high using warm spruce planks framed by vertical stripped log corner posts. Consequently, your cottage achieves a traditional overhanging medieval profile.
Third, construct a steep pitched roof using dark oak stairs, overhanging the front and back gables by one block. Attach an outdoor firewood shed to the side wall using spruce fences and slabs, stocking it with oak logs and hay bales. Finally, hang an iron lantern over the front door to light the entrance.
2. The Blacksmith’s Stone & Iron Forge House
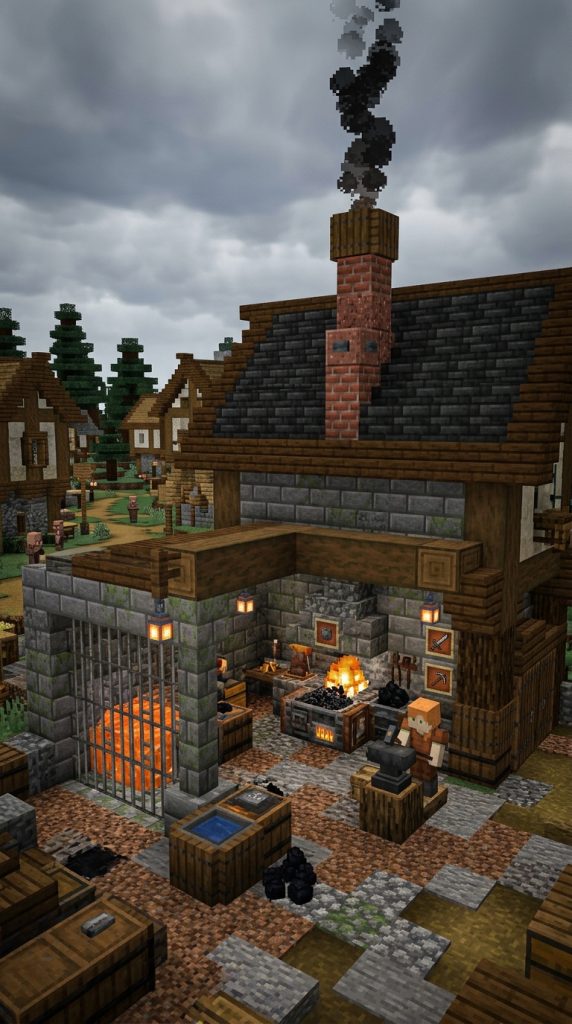
The blacksmith’s forge house combines a heavy stone masonry workshop with a cozy secondary living quarter overhead. It showcases an open-air lower forge featuring lava cauldrons, blast furnaces, anvils, and stone brick arches. Furthermore, a smoking brick chimney extends past the dark oak roofline, signaling an active village artisan at work.
Industrial medieval buildings bring fantastic functional value to survival villages. Placing blast furnaces, anvils, and grindstones on the open lower porch creates an active crafting hub for repairing gear. The dark, soot-stained aesthetic of deepslate and cobblestone reflects the heat of the forge, creating dramatic color contrast against warm wooden upper living quarters. As a result, your village blacksmith stands out as a powerful visual anchor.
Fireproof Industrial Framing
Using non-flammable blocks like stone bricks, deepslate, and iron bars around the lower forge prevents accidental fires in survival mode. Enclosing open lava or campfire heat sources inside stone cauldrons ensures total safety for surrounding wooden roof eaves. Furthermore, placing web blocks or campfire smoke at the chimney top simulates rising smoke effects.
Materials Needed
- Cobblestone & Stone Bricks
- Deepslate Tiles
- Blast Furnace & Anvil
- Cauldron with Lava
- Iron Bars
Step-by-Step Guide
First, construct a wide seven-by-nine block lower foundation using a mix of cobblestone and stone bricks. Leave the front four-block section open as an outdoor forge workspace covered by a heavy stone arch. Consequently, you lay out a durable, fireproof industrial workshop floor.
Second, place a blast furnace, an anvil, a grindstone, and a lava-filled cauldron inside the open forge archway. Enclose the heat source behind iron bars for safety and build a thick brick chimney column up the side wall. Consequently, your lower forge becomes fully functional and atmospheric.
Third, build the second-story living quarters over the back half of the stone base using dark oak logs and spruce planks. Cover the entire house with a heavy dark oak and deepslate tile roof, extending the brick chimney through the roof peak. Finally, place iron chains and lanterns around the forge for industrial lighting.
3. The Overgrown Herbalist’s Thatch-Roof Cottage
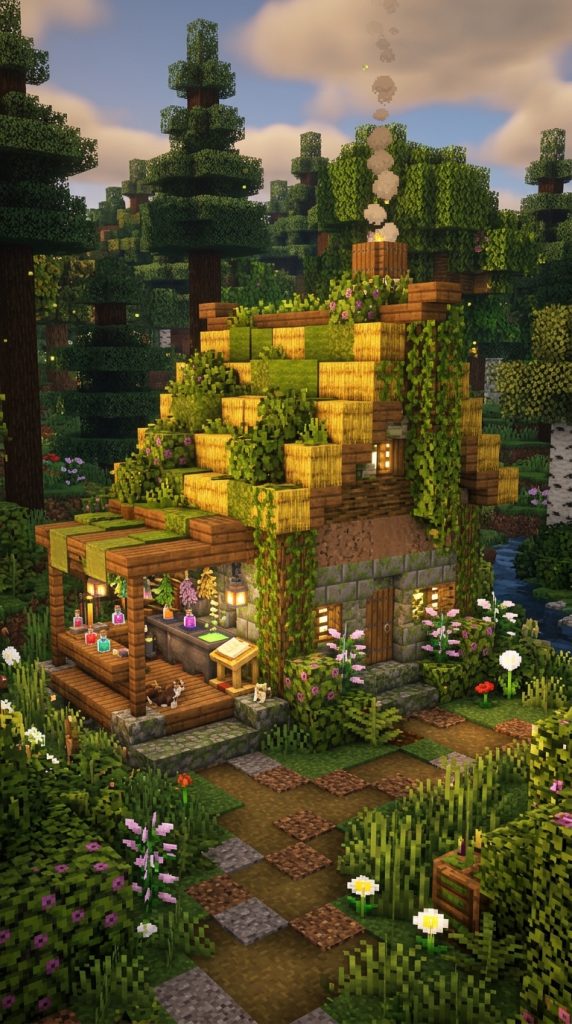
The herbalist’s thatch-roof cottage brings whimsical, natural charm to the edge of your medieval village. It features weathered packed mud and mossy stone brick walls covered in climbing vines, leaf bushes, and sweet berry patches. Furthermore, a golden hay bale roof accented with moss carpets gives the cottage an organic, hand-crafted appearance that blends seamlessly into forests.
Herbalist cottages emphasize natural harmony, soft color palettes, and agricultural greenery. Stacking hay bales for the roof simulates traditional straw thatched roofing used in historic rural villages. Furthermore, placing potted wildflowers, azalea leaves, and water cauldrons around the porch creates a busy potion-brewing atmosphere. Consequently, your herbalist cottage feels hidden, ancient, and deeply cozy.
Organic Roof Layering
Mixing hay bales with yellow carpets, moss blocks, and spruce slabs creates a soft, textured roof surface that looks naturally aged. Allowing leaf blocks and vines to spill over the roof edges softens hard block corners. Furthermore, placing a spore blossom inside the ceiling drops gentle green particles across the interior floor.
Materials Needed
- Packed Mud
- Mossy Cobblestone
- Hay Bales
- Flowering Azalea Leaves
- Brewing Stand
Step-by-Step Guide
First, lay out an irregular six-by-six block circular foundation using packed mud and mossy cobblestone. Build the walls four blocks high, cutting out small, asymmetrical window openings framed with oak fences. Consequently, you establish an organic, rustic masonry base.
Second, construct a high, rounded pitched roof using stacked hay bales, sloping the sides down steeply. Cover patches of the golden hay roof with green moss blocks, yellow carpets, and hanging vines. Consequently, your cottage receives a cozy, fairytale-style thatched roof.
Third, build a outdoor garden bed around the cottage base filled with sweet berry bushes, mushrooms, and wildflowers. Set up a potion-brewing workstation on the front porch using a brewing stand, cauldrons, and barrels. Finally, hang a soul lantern from the front roof overhang for soft blue light.
4. The Riverside Fishery & Drying Dock House
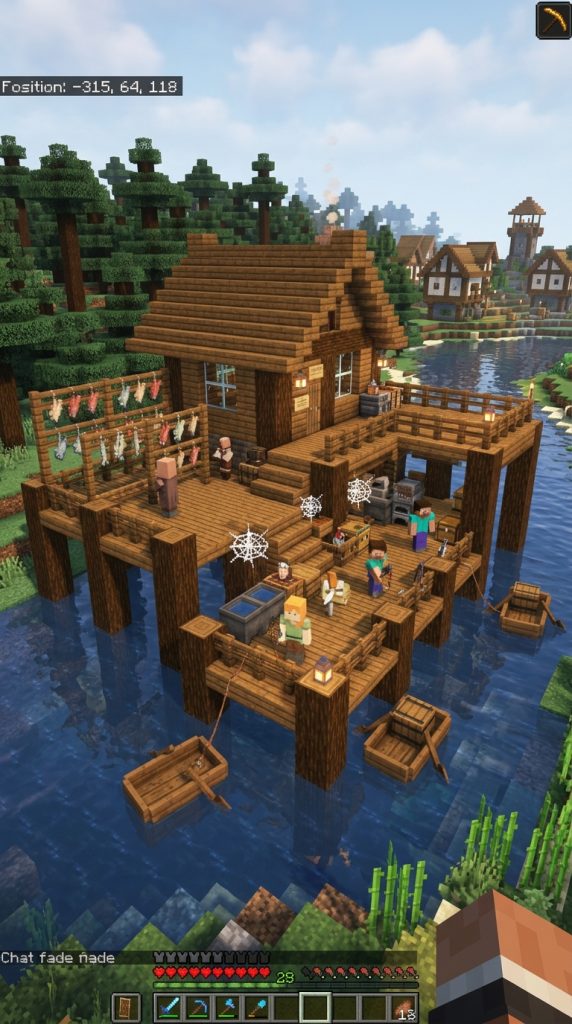
Built along a riverbank or lake shore, the riverside fishery house serves as the primary food-gathering hub for your village. It features an elevated timber frame supported by heavy log stilts set directly into the water, complete with a lower fishing dock. Furthermore, outdoor drying racks made of fences and trapdoors display raw fish and kelp, bringing bustling coastal realism to your shores.
Waterfront medieval builds introduce dynamic height variations and aquatic reflection details to your world. Extending a wooden pier out over open water provides immediate boat access and fishing spots for survival players. Furthermore, combining dark spruce wood with mossy stone piers simulates water-soaked timber that withstands damp river environments. Consequently, your fishery house looks functional, adventurous, and authentic.
Aquatic Timber Stilts
Driving unstripped spruce or dark oak log pillars deep into riverbeds simulates realistic dock engineering. Adding diagonal fence braces between the stilt posts strengthens the visual support of the house overhead. Furthermore, placing sea pickles or glowing lichen underwater near the stilts creates soft, shimmering water reflections at night.
Materials Needed
- Spruce Logs
- Spruce Wood Planks
- Oak Fences
- Barrels
- Water Buckets
Step-by-Step Guide
First, drive six heavy spruce log pillars four blocks deep into your riverbed, extending them two blocks above the water surface. Connect the top of the log stilts with horizontal spruce log crossbeams to form a wide pier platform. Consequently, you build a sturdy water-resistant foundation over the river.
Second, construct the fishery house on top of the wooden pier platform using spruce planks and stripped oak logs. Build a side doorway leading out onto an open fishing dock equipped with barrels, fishing rods, and water cauldrons. Consequently, your house gains direct access to water resources.
Third, erect a pitched dark oak stair roof over the house, extending the front overhang over the dock. Attach fence posts between dock pillars to create drying racks, placing item frames with raw fish inside. Finally, tie a wooden boat to the pier using a lead anchored to a fence post.
5. The Village Elder’s Stately Manor
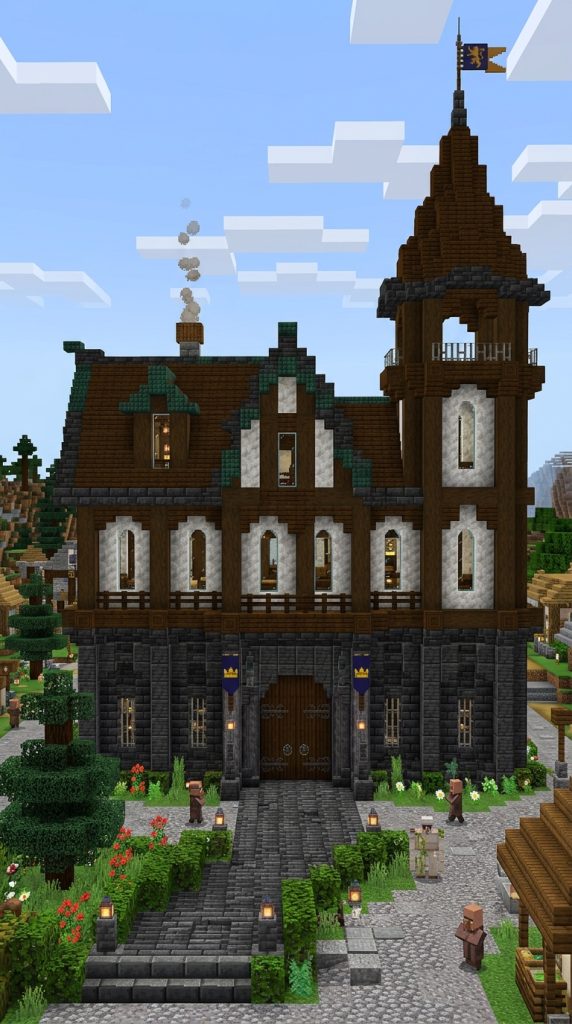
The village elder’s stately manor is a grand, multi-story structure that commands authority over your settlement. It features a sweeping stone brick first floor, intricate oak timber framing, high glass windows, and a grand double-door entrance. Furthermore, an attached clock tower or lookout spire reaches high into the sky, offering a majestic silhouette above surrounding cottages.
Manor houses represent wealth, governance, and historical importance within a medieval community. Incorporating tall arched windows, gold accents, and grand chimneys distinguishes the elder’s manor from humble peasant huts. Furthermore, the spacious interior provides ample room for a village council hall, library, map room, and primary sleeping quarters. Consequently, your village manor serves as an impressive architectural centerpiece.
Multi-Tiered Wall Framing
Designing a three-story manor requires dividing vertical walls into distinct visual tiers. Using stone bricks for the ground floor, dark oak logs for the second floor, and white calcite or diorite panels for the top floor creates striking color contrast. Furthermore, adding small balconies with iron railings breaks up massive wall surfaces gracefully.
Materials Needed
- Stone Bricks & Polished Deepslate
- Dark Oak Logs
- Calcite or White Terracotta
- Dark Oak Stairs
- Banners & Gold Trims
Step-by-Step Guide
First, construct a spacious ten-by-twelve block ground floor foundation using polished deepslate and stone bricks. Build the lower stone walls four blocks tall, framing a grand central double-door entrance with stone stairs. Consequently, you establish a massive, secure foundation for a manor estate.
Second, construct a second floor extending one block outward using dark oak log frames filled with clean white calcite or diorite blocks. Install tall, two-block window openings framed with dark oak stairs and glass panes. Consequently, the upper living quarters gain rich medieval timber-frame contrast.
Third, build a tall, four-story lookout tower attached to the side corner of the manor, topped with a steep pointed spire roof. Cover the main manor with a grand gabled dark oak roof featuring decorative dormer windows. Finally, hang royal banners beside the front entrance doors for noble grandeur.
6. The Forest Watchtower & Guard House
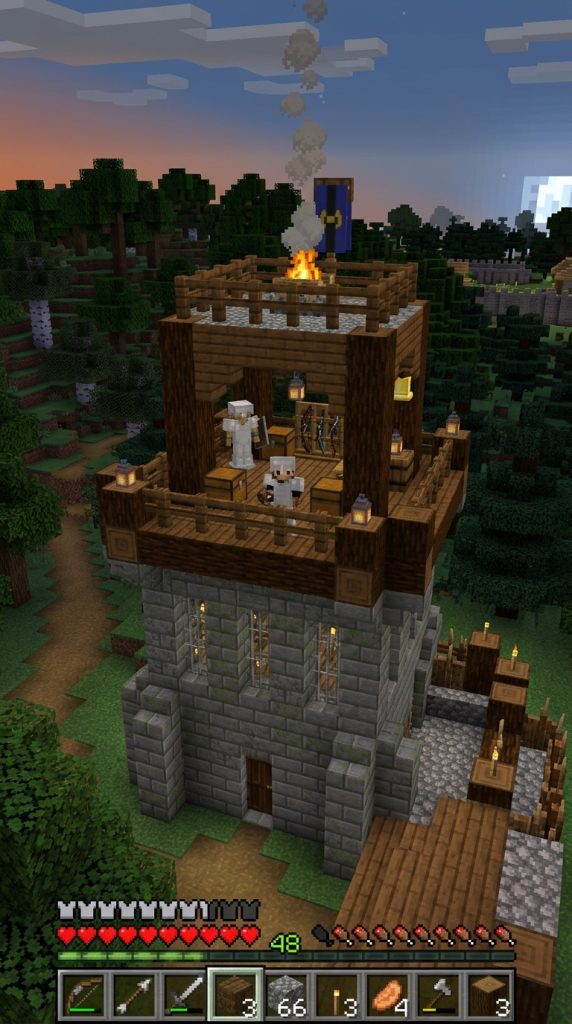
Positioned along the perimeter of your village, the forest watchtower and guard house serves as a defensive security checkpoint. It features a heavily fortified stone brick base equipped with iron bar arrow slits, supporting an elevated wooden guard station and open battlements. Furthermore, a high signal brazier or bell tower warns villagers of approaching hostile mobs.
Defensive village structures add purpose, safety, and military realism to your medieval settlement. Building watchtowers along surrounding forest edges gives players high observation decks to snipe creepers and skeletons safely. Furthermore, combining heavy stone walls with weapon racks, armor stands, and crossbow storage prepares your village for raids. As a result, your settlement feels secure and well-defended.
Defensive Arrow Slit Detailing
Replacing full glass windows with single iron bars or stone brick stairs creates narrow, realistic arrow loops on stone walls. These narrow slits allow players to shoot arrows out while staying completely protected from incoming projectile attacks. Furthermore, overhang machicolations built beneath battlements add historic military authenticity.
Materials Needed
- Stone Bricks & Cobblestone
- Spruce Logs & Planks
- Iron Bars
- Armor Stands & Crossbows
- Campfire (for Signal Brazier)
Step-by-Step Guide
First, build a thick five-by-five block square tower foundation six blocks high using solid stone bricks. Cut narrow vertical arrow slits using iron bars on all four walls to allow archers clear firing angles. Consequently, you build an explosion-resistant, fortified stone bunker base.
Second, construct an overhanging wooden guard house on top of the stone tower using spruce logs and fences. Extend an open-air balcony battlement around the perimeter using spruce slabs and trapdoors for guard patrols. Consequently, your watchtower gains 360-degree observation views over surrounding terrain.
Third, top the watchtower roof with an open brazier housing a campfire to serve as a warning beacon. Equip the interior guard house with armor stands, weapon racks, and a village warning bell. Finally, pave a cobblestone patrol path connecting the watchtower back to the main village square.
7. The Rustic Windmill & Miller’s Cottage
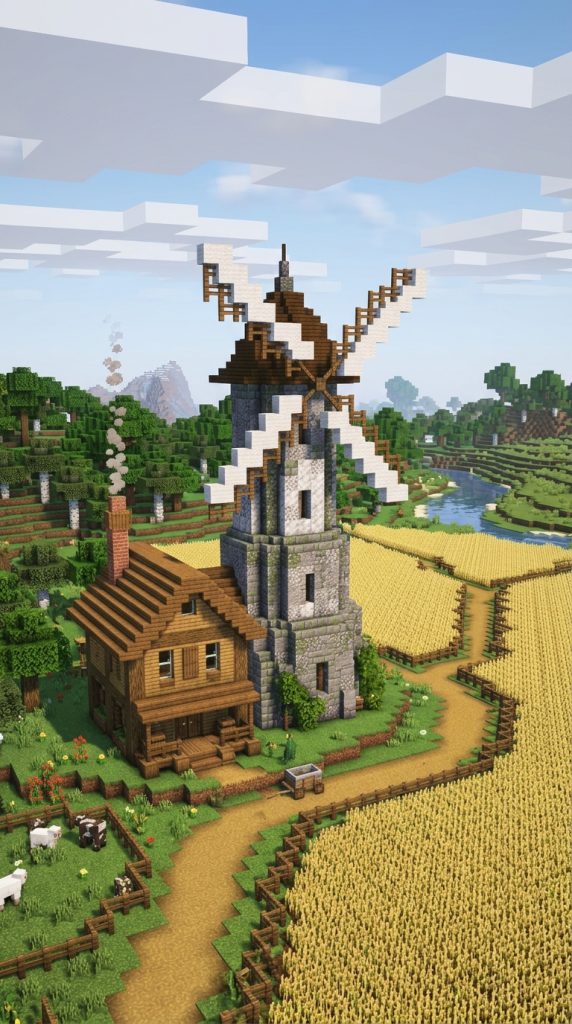
The rustic windmill and miller’s cottage is an iconic agricultural landmark that brings sweeping motion and rural charm to farm fields. It features a tall, tapered stone and timber tower housing a functional wheat-grinding mechanism, attached to a cozy two-story miller’s house. Furthermore, four massive rotating sail arms made of wool and fences catch the wind high above surrounding wheat crops.
Windmills provide immediate scale, height, and agricultural storytelling to rural farm districts. Pairing the tall white or stone windmill tower with a low, warm wooden cottage creates balanced visual weight across your landscape. Furthermore, filling the interior with hay bales, composters, and flour barrels connects the build directly to your wheat harvesting operations. Consequently, your farm fields feel complete and industrious.
Angled Sail Construction
Building realistic windmill sails requires constructing four symmetrical, angled blades that mimic wind rotation. Using white wool blocks attached to oak fence arms creates light, cloth-like sail panels. Furthermore, setting the sail blades at a slight diagonal angle rather than flat cross shapes creates dynamic visual motion.
Materials Needed
- Cobblestone & Diorite
- Oak Logs & Planks
- White Wool
- Hay Bales
- Composters
Step-by-Step Guide
First, lay out a circular six-by-six block stone foundation for the windmill tower, tapering the walls inward as they rise eight blocks high. Attach a rectangular five-by-seven block wooden miller’s cottage directly to the side of the stone tower base. Consequently, you lay out a connected industrial and living foundation.
Second, complete the upper windmill tower using white diorite or calcite blocks to give the structure a classic whitewashed look. Construct a wooden gear housing hub at the top of the tower extending forward over the farm fields. Consequently, your windmill tower achieves proper height and proportion.
Third, construct four diagonal sail arms five blocks long using oak fences, attaching white wool panels along one edge of each arm. Cover the attached miller’s cottage with a cozy spruce stair roof and place hay bales around the porch. Finally, place composters and flour barrels inside the lower tower floor.
8. The Village Baker’s Brick Oven House
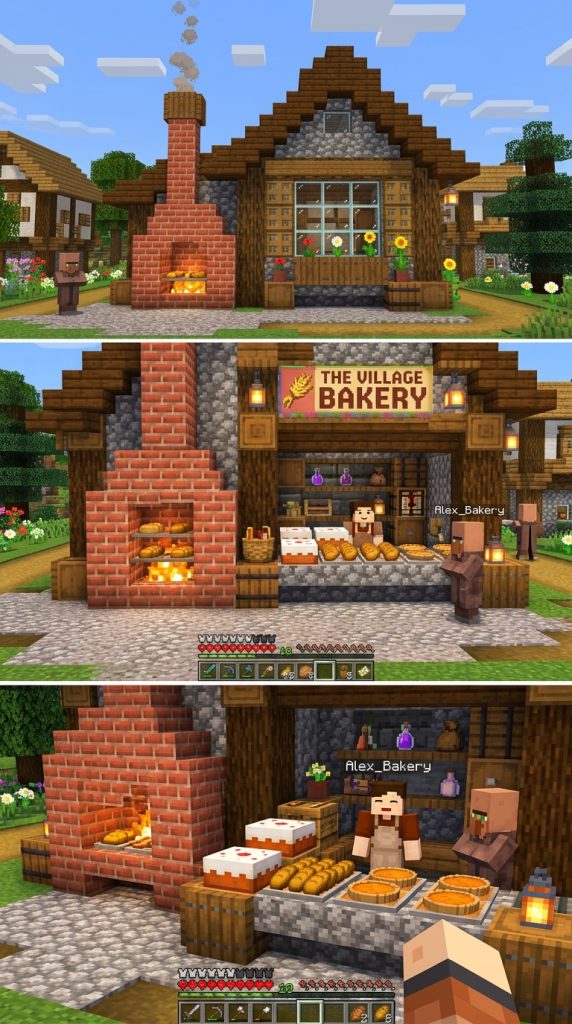
The village baker’s house fills your settlement with warm, comforting hearth details and sweet agricultural charm. It features a prominent red brick bread oven built directly into the front wall, venting sweet smoke through a cozy stone chimney. Furthermore, an open front display counter lined with cake, bread, and pumpkin pies invites passing villagers to shop.
Bakeries serve as joyful social gather points in medieval village centers. The rich orange-red color of brick blocks provides a warm, inviting contrast against dark spruce wood and grey cobblestone. Furthermore, organizing wheat storage barrels, water cauldrons, and dough-mixing tables on the front porch creates an active, bustling business. Consequently, your village shopping street gains a delightful, delicious highlight.
Display Counter Shopfronts
Using wooden trapdoors and slabs to build open storefront counters creates an interactive shopping space for village trading. Placing item frames or actual food items like cakes and bread on top of the counter adds vibrant color and detail. Furthermore, placing a loom block sideways mimics realistic woven flour sacks sitting on the floor.
Materials Needed
- Bricks & Brick Stairs
- Spruce Planks & Logs
- Cobblestone
- Smooth Stone Slabs
- Cake, Bread & Pumpkin Pie
Step-by-Step Guide
First, mark out a six-by-eight block room footprint using cobblestone for the lower walls. Build a large three-block-wide red brick oven protrusion on the front wall face, featuring an enclosed campfire arch. Consequently, you construct a high-visibility commercial bread oven facade.
Second, build the upper house walls using warm spruce planks framed by dark oak logs. Cut out a wide front window opening and install a smooth stone slab counter across the sill for serving customers. Consequently, your bakery transforms into an active village storefront shop.
Third, cover the house with a sloped spruce stair roof featuring a brick chimney extending above the peak. Place cakes, bread loaves, and pies on the stone counter and stock the interior with wheat barrels and smokers. Finally, hang a wooden sign above the counter displaying a bread item.
9. The Overgrown Stone Miner’s Cabin
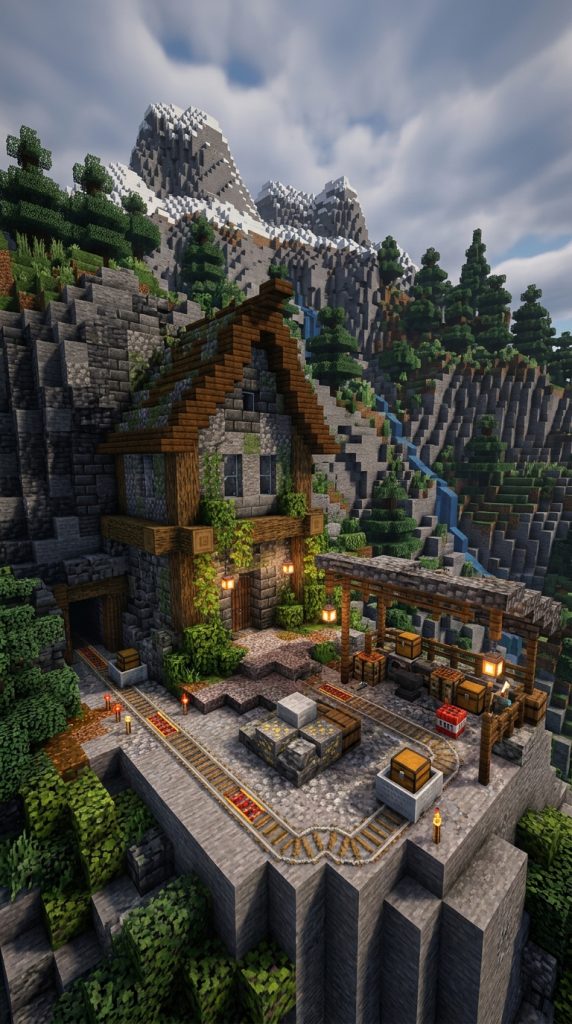
Tucked into a rocky mountain cliff or ravine edge, the overgrown stone miner’s cabin is a rugged, weather-beaten shelter built for hard work. It features heavy cobblestone and deepslate walls embedded directly into natural stone terrain, reinforced with thick timber support beams. Furthermore, an attached ore-sorting shed filled with iron chains, minecarts, and raw mineral blocks showcases a life of deep cavern exploration.
Mountain miner cabins bring rugged, industrial survival energy to rocky village outskirts. Integrating structural walls directly into natural cliff faces makes the house feel built into the landscape rather than placed on top of it. Furthermore, placing lanterns, minecart tracks, and ore storage crates around the entrance prepares your base for long mining runs. As a result, your mountain village gains a tough, resourceful shelter.
Cliffside Terrain Integration
Carving out natural cliff faces to form back walls creates a realistic, subterranean shelter profile. Blending natural stone blocks like granite, andesite, and deepslate into constructed walls makes the cabin feel ancient and weathered. Furthermore, placing hanging roots and moss carpet along roof edges blends wood into stone terrain seamlessly.
Materials Needed
- Cobblestone & Deepslate Bricks
- Raw Iron / Copper Blocks
- Minecart & Rails
- Spruce Logs
- Iron Chains
Step-by-Step Guide
First, carve a six-by-six block alcove into a natural mountain cliff face. Build the front and side walls using a rugged mix of cobblestone, deepslate bricks, and andesite blocks three blocks high. Consequently, you integrate a sturdy stone cabin shell directly into mountain terrain.
Second, reinforce the ceiling and entrance doorway using heavy, unstripped spruce log support frames. Attach a small outdoor ore-sorting shed to the side wall, laying down minecart rails and storage barrels. Consequently, your cabin gains functional mining utility and industrial detailing out front.
Third, construct a low, sloped dark oak roof over the wooden frame, covering parts with moss blocks and gravel. Decorate the outdoor shed with iron chains, raw iron blocks, and minecarts filled with coal. Finally, hang an iron lantern over the doorway to light the dark mountain path.
10. The Village Merchant’s Covered Market House
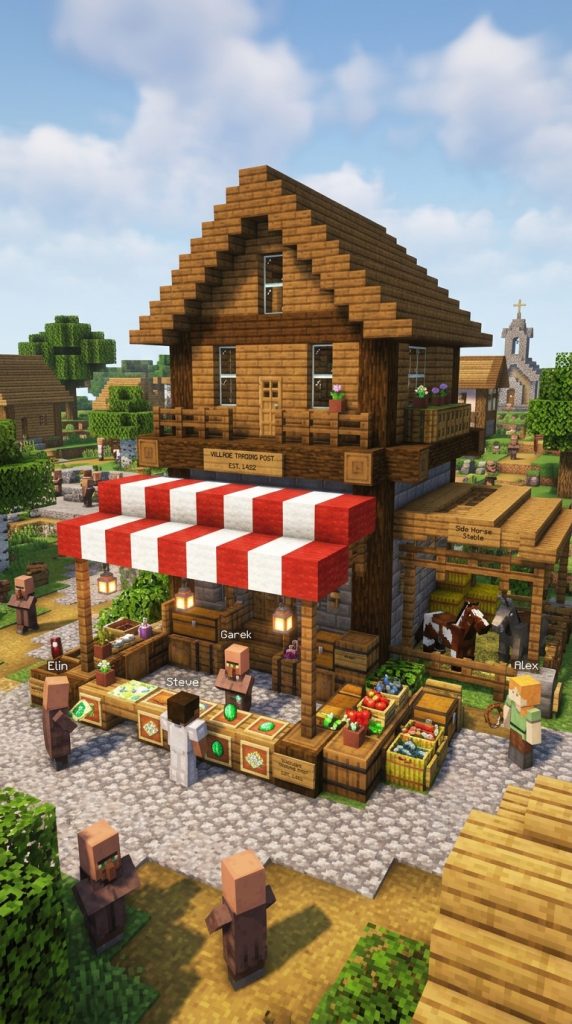
The village merchant’s house combines a cozy second-story residence with a sprawling, vibrant ground-floor market stall. It features colorful wool awnings extending over wooden display tables packed with rare goods, emeralds, and potion bottles. Furthermore, an attached horse stable and cargo wagon park in the side yard, highlighting a traveling trader’s lifestyle.
Merchant houses bring bustling commercial energy and bright, joyful colors to central village squares. Using striped wool awnings—such as red and white or blue and yellow—breaks up traditional brown and grey medieval color palettes. Furthermore, setting up trading counters with villager workstations like looms and cartography tables makes the build functionally useful. Consequently, your village square transforms into a vibrant trade hub.
Striped Market Awning Framing
Constructing sloped market awnings using alternating wool colors and carpet blocks creates a light, fabric-like canopy. Supporting the outer awning edges with thin fences or iron bars makes the stall feel open and welcoming to shoppers. Furthermore, placing lanterns beneath the fabric canopy casts warm light over goods on display.
Materials Needed
- Spruce Planks & Stripped Logs
- Red & White Wool
- Barrels & Chests
- Emerald Blocks & Item Frames
- Fences & Lead (for Stable)
Step-by-Step Guide
First, build a wide six-by-ten block ground floor frame using stripped spruce logs. Leave the front three-block deep section completely open as a covered outdoor market trading floor. Consequently, you establish a spacious, accessible commercial layout for village trading.
Second, construct a vibrant, sloped market awning over the front trading floor using alternating red and white wool blocks. Set up wooden display tables underneath equipped with barrels, chests, and item frames displaying emeralds and maps. Consequently, your front porch becomes a colorful, active market stall.
Third, build the merchant’s living quarters on the second floor using spruce planks and a dark oak stair roof. Attach a small horse stable to the side yard using fences, stocking it with hay bales and a saddled horse. Finally, place lanterns around the market stall to illuminate trade goods at night.
Nighttime Village Security
Securing your aesthetic medieval village at night is essential for keeping villagers and structures safe. Hostile mobs like zombies, skeletons, and creepers spawn in dark, unlit corners of your settlement. Placing iron lanterns on fence posts every six blocks along cobblestone pathways prevents unwanted mob spawns effectively. Furthermore, enclosing your village perimeter with a heavy wooden palisade wall or stone brick embankment keeps wandering monsters out. Installing double-door airlocks or fence gates on all house entrances ensures quick, safe retreats during night raids. Consequently, your cozy, rustic medieval village remains a completely secure, peaceful sanctuary through every night cycle.
11. The Grand Timber Tavern & Community Hall
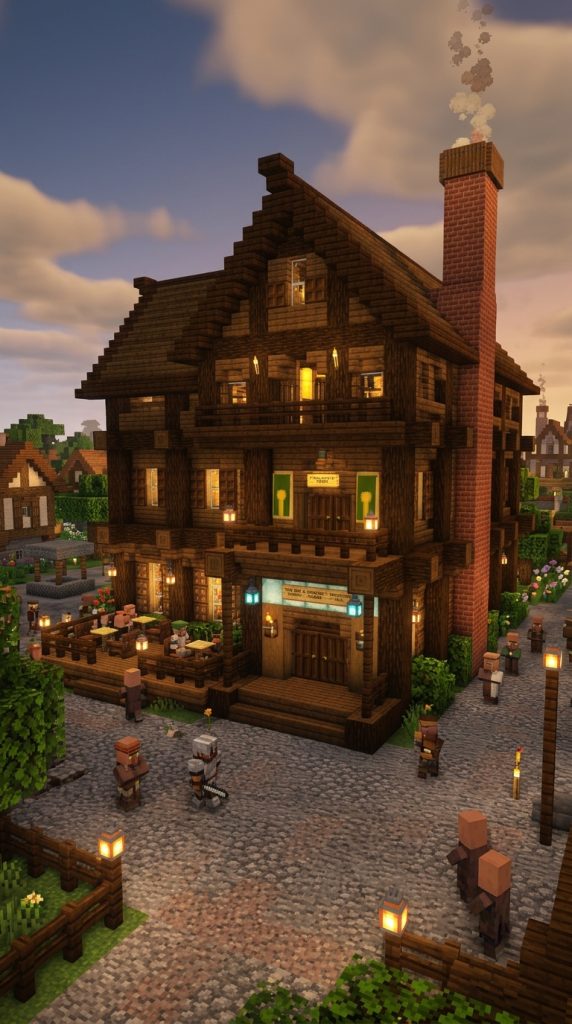
The grand timber tavern and community hall is the ultimate social hub for your medieval village. It features a massive two-story timber-framed structure built with heavy dark oak beams, polished granite hearths, and warm spruce walls. Furthermore, the ground floor houses a sprawling dining hall with wooden longtables, barrels, and a crackling fireplace, while the upper floor provides cozy inn rooms for travelers.
Taverns serve as the warm, beating heart of any medieval fantasy community. The large, imposing scale of the building provides a dramatic focal point along central village roads. Furthermore, detailing the interior with jukeboxes, brewing stands, cake tables, and glowing chandeliers creates an incredibly inviting atmosphere for multiplayer servers. Consequently, your medieval village offers a cozy, celebratory sanctuary for every tired traveler returning home.
Spacious Dining Hall Architecture
Designing wide, open interior dining halls requires high ceilings supported by heavy timber roof trusses. Using stripped dark oak logs for vaulted interior arches creates a majestic, beer-hall atmosphere. Furthermore, placing longtables made of spruce stairs and slabs flanked by benches accommodates large groups of players and villagers comfortably.
Materials Needed
- Dark Oak Logs & Stairs
- Spruce Wood Planks & Slabs
- Brick Blocks & Campfire
- Barrels & Juices/Potions
- Candles & Iron Chandeliers
Step-by-Step Guide
First, lay out a massive twelve-by-sixteen block foundation using polished granite and stone bricks. Build the lower perimeter walls four blocks high, featuring a grand double-door entrance framed by heavy dark oak log pillars. Consequently, you construct a wide, durable foundation for a community hall.
Second, construct a spacious second story using warm spruce planks and dramatic dark oak timber cross-framing. Cut out wide window openings along both floors, fitting them with glass panes and spruce trapdoor shutters. Consequently, the tavern facade achieves an authentic, high-end medieval inn aesthetic.
Third, cover the entire structure with a massive, sweeping dark oak pitched roof featuring a large brick chimney. Build a large brick fireplace inside the ground floor dining hall, equipping the room with longtables, barrels, and candle chandeliers. Finally, place sleeping beds in the upper inn rooms to complete your grand village tavern.