
12 luxury Garage Aesthetic Ideas
Designing a luxury garage requires a balance of aesthetics, clean lines, and peak functionality. A common mistake is treating the garage as an afterthought. This space should serve as a true gallery for your vehicles. Therefore, strategic layout planning is highly essential. Every design element must enhance the overall architectural flow. As a result, your garage will feel like a high-end showroom.

Always vary your lighting sources. This method creates dynamic visual depth. Next, select premium, durable materials. You will achieve flawless results.
1. The Carbon Fiber Minimalist Gallery
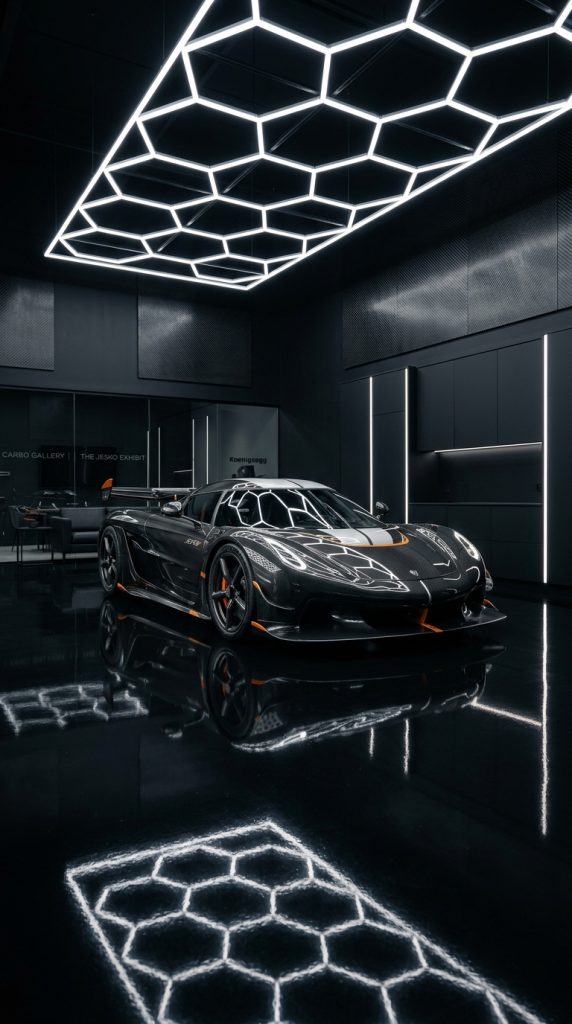
This aesthetic embraces hypercar culture with sleek, dark surfaces and ultra-modern materials. It turns your garage into a high-tech sanctuary.
Defining the Carbon Tech Aesthetic
This style focuses heavily on lightweight textures and monochromatic color schemes. It utilizes stark contrasts between matte black walls and glossy finishes.
Mapping the Sleek Floor Plan
The layout prioritizes wide-open spaces around a central vehicle display pad. Furthermore, it features hidden, handleless wall storage units.
Step-by-Step Gallery Installation Guide
First, apply a premium carbon-fiber weave vinyl wrap to accent walls. Then, install high-gloss black epoxy flooring across the entire area.
Next, mount flush LED strip lights vertically along the main wall panels. Space them exactly four feet apart.
Consequently, position your vehicle directly beneath a custom overhead hexagonal light grid. This highlights the body lines perfectly.
Afterward, install matte black aluminum cabinets along the back wall perimeter. Keep all hardware completely concealed.
Ensure the temperature controls maintain a constant, optimal moisture level. Thus, you protect your automotive investment completely.
Finally, place a minimalist leather bench opposite the vehicle display area. Add subtle branding details for completion.
Essential Materials and Styling Checklist
- Matte black architectural wall paint
- High-gloss black epoxy resin flooring kits
- Carbon-fiber textured wall panel sheets
- Hexagonal overhead LED smart lighting grids
- Handleless matte black aluminum storage cabinets
- Recessed vertical linear LED wall strips
- Minimalist black leather gallery viewing bench
- Digital climate control thermostat systems
2. The Mid-Century Modern Automotive Lounge
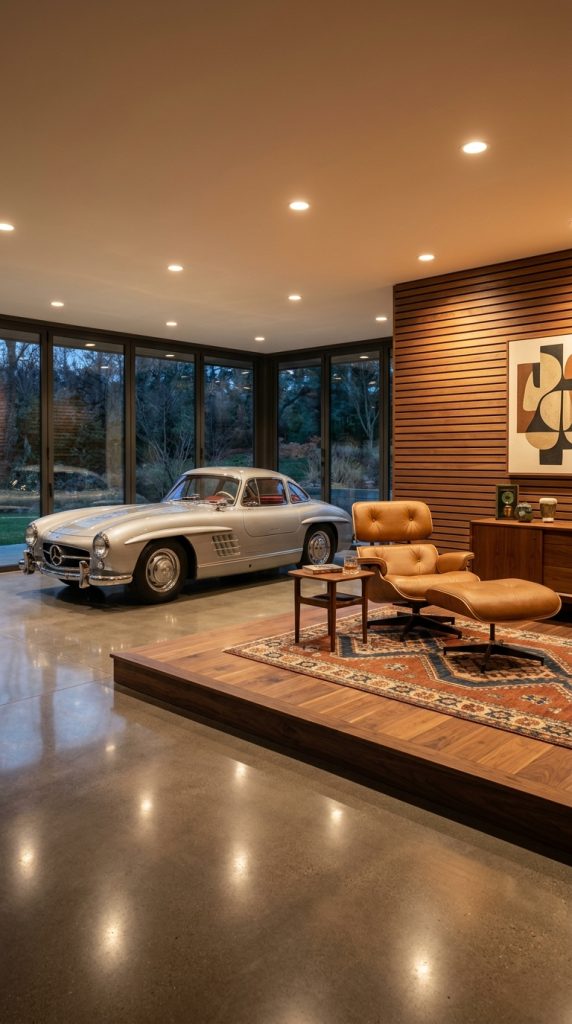
This layout transitions your garage into an elegant extension of your home living space. It blends classic wood tones with automotive display.
Defining Warm Retro Luxury Style
This architecture relies on rich walnut wood paneling and warm ambient illumination. It incorporates mid-century furniture for ultimate comfort.
Mapping the Dual-Purpose Footprint
The layout features two distinct, interconnected functional zones. Specifically, a polished concrete parking bay adjoins a raised carpeted lounge.
Step-by-Step Lounge Construction Guide
First, clear the designated lounge floor area completely. Remove all traditional garage utility items systematically.
Next, outline the accent walls using premium slatted walnut wood panels. This establishes a warm, inviting backdrop.
Subsequently, pour a self-leveling polished concrete floor for the vehicle bay. Ensure the surface is completely flawless.
After that, install a low-profile tan leather Eames-style lounge chair. Position it facing the primary vehicle parking spot.
Furthermore, mount warm-toned architectural pot lights directly into the ceiling grid. These provide soft, non-glare illumination.
Finally, detail the lounge space with a low-profile media console. Lay down a vintage geometric area rug.
Essential Materials and Styling Checklist
- Slatted walnut wood wall paneling boards
- Self-leveling polished concrete floor finish agents
- Low-profile tan leather mid-century lounge chairs
- Warm-toned recessed LED ceiling pot lights
- Low-profile walnut media presentation consoles
- Vintage geometric woven textile area rugs
- Matte black architectural track lighting rails
- Brushed brass retro-styled beverage refrigerator units
3. The Industrial Monochrome Iron Forge
This design theme celebrates raw mechanical strength and bold, dark industrial architectural elements. It highlights durability and heavy metal luxury.

Defining Industrial Grid Style
This aesthetic combines exposed steel beams with dark charcoal brickwork textures. It highlights structural integrity and raw luxury.
Mapping the High-Clearance Footprint
The fortress features a lofty, open-ceiling layout grid structure. It accommodates heavy-duty vehicle lifts easily.
Step-by-Step Forge Construction Guide
First, paint exposed ceiling trusses with matte charcoal protective iron paint. Anchor them visually into the design.
Next, construct the primary accent walls using dark grey faux brick panels. This creates an authentic warehouse texture.
Subsequently, install a professional-grade dual-post matte black vehicle lift system. Ensure structural bolts anchor deeply.
Afterward, frame the heavy-duty workbench station using solid iron supports. Use thick reclaimed oak planks for tops.
Furthermore, place industrial metal cage pendant lights along the ceiling track. This creates a focused, dramatic workspace atmosphere.
Finally, coat the floor with a slip-resistant dark grey quartz broadcast epoxy. Add iron tool chests for storage.
Essential Materials and Styling Checklist
- Matte charcoal grey protective metal paint
- Faux charcoal brick interior wall panels
- Dual-post matte black hydraulic vehicle lifts
- Reclaimed oak wood planks for heavy workbenches
- Industrial iron-caged LED pendant light fixtures
- Slip-resistant dark grey quartz broadcast epoxy floor
- Heavy-duty matte black rolling tool chests
- Exposed galvanized steel electrical conduit pipes
4. The Cleanroom Nordic Sanctuary
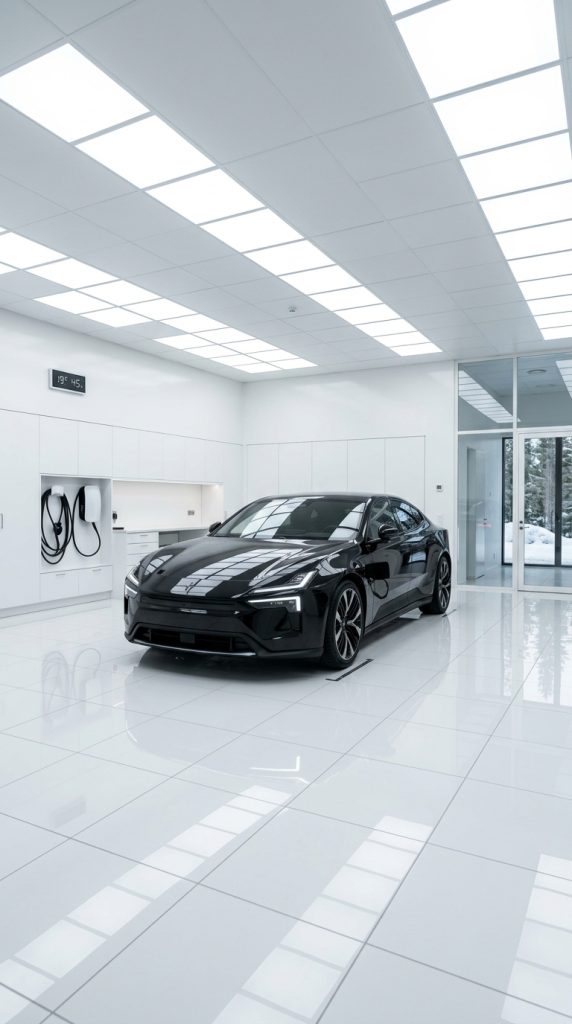
This pristine aesthetic prioritizes absolute cleanliness, bright white surfaces, and refreshing Scandinavian design elements. It creates a tranquil environment.
Defining Bright Scandinavian Style
This style relies exclusively on pure white surfaces and light ash wood accents. It creates a clinical yet inviting atmosphere.
Mapping the Hidden Utility Layout
The layout features a completely seamless, hidden storage wall system. It masks all tools behind pristine white lacquered panels.
Step-by-Step Sanctuary Installation Guide
First, coat all interior wall surfaces with a bright, reflective white paint. Choose a washable satin finish.
Next, install premium white porcelain floor tiles with light grey epoxy grout lines. Ensure tiles endure vehicle weight.
Subsequently, mount flush-to-wall seamless white lacquered storage cabinetry systems along the entire length of the garage.
After that, integrate diffuse LED panel lighting seamlessly into the ceiling structure. This eliminates all harsh shadows completely.
Furthermore, install an advanced commercial-grade central vacuum system behind a hidden cabinet panel. This maintains spotless floors easily.
Finally, place a single light ash wood stool near the entranceway door. Add minimal green foliage plants.
Essential Materials and Styling Checklist
- Reflective pure white washable satin wall paint
- Heavy-duty white porcelain garage floor tiles
- Seamless white lacquered soft-close cabinetry systems
- Diffuse shadowless LED ceiling light panels
- Commercial-grade hidden central garage vacuum systems
- Light ash wood minimalist seating stools
- Light grey stain-resistant epoxy tile grout
- Minimalist ceramic indoor green foliage planters
5. The Neon Cyberpunk Underground
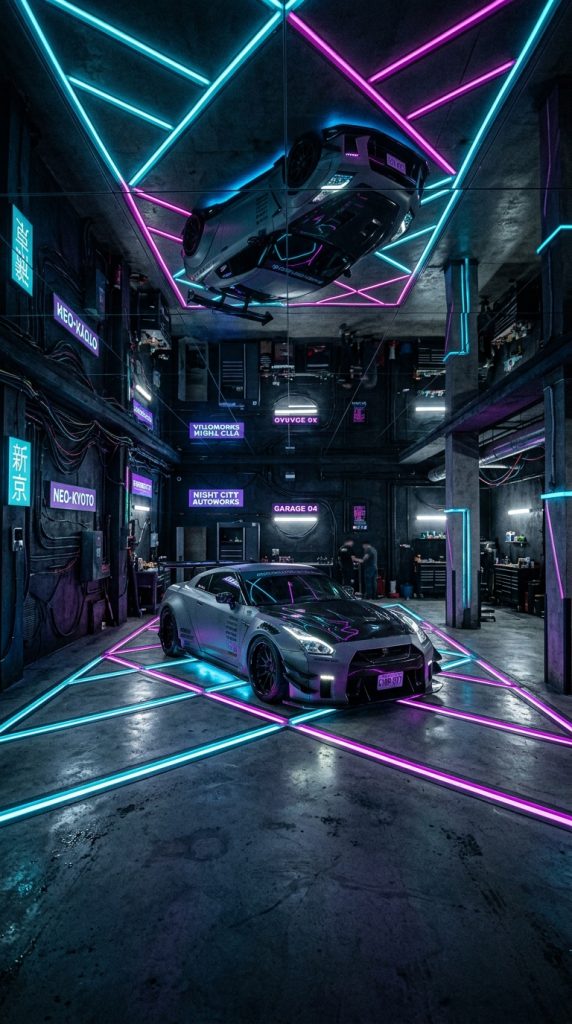
This layout turns your garage into a futuristic, neon-soaked nighttime landscape inspired by sci-fi aesthetics. It emphasizes vibrant accent color lighting.
Defining Futuristic Cyberpunk Style
This design philosophy relies on dark concrete surfaces contrasted with vibrant neon light paths. It creates a cinematic evening atmosphere.
Mapping the Geometric Lighting Grid
The layout uses a dark, asymmetrical grid footprint configuration. Custom light channels cut across the floors and walls diagonally.
Step-by-Step Cyberpunk Construction Guide
First, apply a dark charcoal micro-cement finish to all wall surfaces. This provides a raw, textured base.
Next, cut shallow geometric channels directly into the existing concrete floor slab using a specialized diamond blade saw.
Subsequently, embed waterproof RGBIC flexible LED neon strip lights inside the cut floor and wall channels.
After that, program the lighting controllers to emit a static deep cyan and magenta hue combination.
Furthermore, mount dark tinted mirror panels to the ceiling structure. This creates an optical illusion of endless vertical space.
Finally, install a glossy black acrylic floating key-drop shelf near the entry door. Use laser-etched accents.
Essential Materials and Styling Checklist
- Dark charcoal interior wall micro-cement finish
- Waterproof RGBIC flexible smart LED neon strips
- Programmable digital smart lighting zone controllers
- Dark tinted glass mirror ceiling reflection panels
- Glossy black acrylic floating key-drop shelving
- Diamond-blade concrete cutting saw rental gear
- Matte black electrical switch plate hardware covers
- Laser-etched futuristic acrylic wall art pieces
6. The Monaco Yacht Club Pavilion
This ultra-luxury aesthetic brings the sophisticated feel of elite Mediterranean marinas into your personal vehicle garage space.
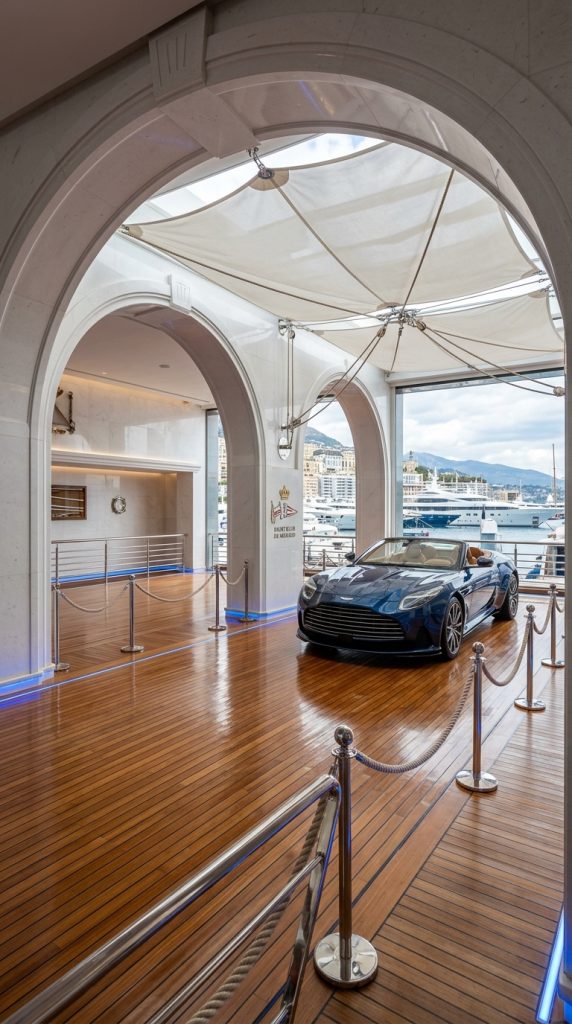
Defining Coastal Maritime Luxury
This style utilizes marine-grade high-gloss teak wood finishes and bright white polished stone. It emphasizes wealthy nautical design traditions.
Mapping the Pavilion Floor Plan
The footprint features a wide, double-bay layout framed by grand architectural arches. It mimics luxury yacht storage bays perfectly.
Step-by-Step Pavilion Construction Guide
First, install high-gloss marine-grade teak wood plank flooring across the main viewing platforms. Seal it against oil stains.
Next, frame the structural wall openings with grand white quartz stone archways. This creates an opulent entryway feeling.
Subsequently, hang polished chrome accent bars horizontally along the upper wall trim boundaries to mimic ship railings.
After that, install recessed marine blue LED accent lights along the floor baseboards. This provides a subtle oceanic glow.
Furthermore, mount custom white canvas sailcloth sunshades neatly across the ceiling structure to soften overhead ambient light.
Finally, add polished stainless steel cabinet units for tool storage. Keep surfaces polished to a mirror finish.
Essential Materials and Styling Checklist
- High-gloss marine-grade teak wood floor planks
- Polished white quartz stone structural wall arches
- Polished chrome decorative horizontal wall bars
- Marine blue low-voltage LED baseboard strip lights
- Custom white canvas sailcloth ceiling drapery systems
- Mirror-polished stainless steel tool storage cabinetry
- Polyurethane oil-resistant clear wood coat sealants
- Nautical-grade braided accent rope wall borders
7. The Vintage Le Mans Heritage Vault
This historic design theme transforms your garage into a classic European racing pit lane from the golden era of motorsport.
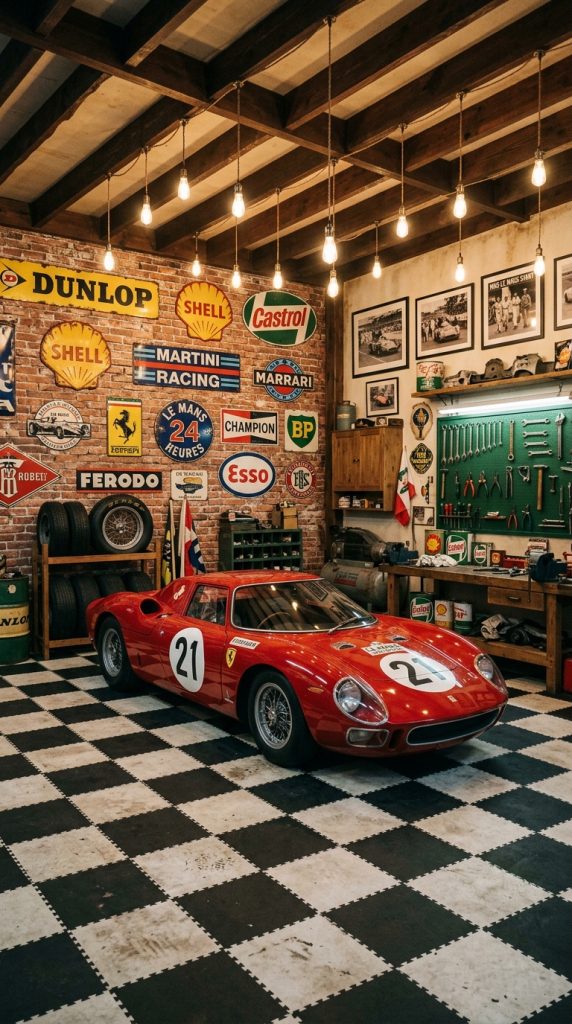
Defining Classic Racing Style
This aesthetic utilizes distressed red brick accents and vintage enamel signage displays. It evokes nostalgia and mechanical heritage.
Mapping the Nostalgic Workshop Grid
The layout incorporates an open workshop area centered around an authentic iron tool board wall display system.
Step-by-Step Heritage Construction Guide
First, install distressed red brick veneer panels across the primary rear focal wall surface. Age them with soot washes.
Next, lay down classic checkered black and white interlocking floor tiles in a precise diagonal grid pattern layout.
Subsequently, mount an authentic, heavy-duty pegboard system painted in a traditional British racing green color scheme.
After that, arrange vintage porcelain enamel oil and fuel brand signs across the brick walls systematically for decoration.
Furthermore, install classic warm-white Edison bulb light strands across the exposed dark wooden ceiling beam grid structures.
Finally, place an antique oil drum converted into a functional waste bin in the far corner spot.
Essential Materials and Styling Checklist
- Distressed red brick interior wall veneer panels
- Checkered black and white interlocking garage floor tiles
- Heavy-duty garage pegboard storage wall panels
- British racing green oil-resistant metal paint
- Vintage reproduction porcelain enamel automotive signs
- Warm-white LED Edison bulb decorative light strands
- Exposed dark stained structural Douglas fir beams
- Restored vintage oil drum metal waste containers
8. The Glass-Enclosed Jewel Box Pavilion
This architectural layout treats your vehicle as a priceless work of art, visible directly from your home interior living spaces.
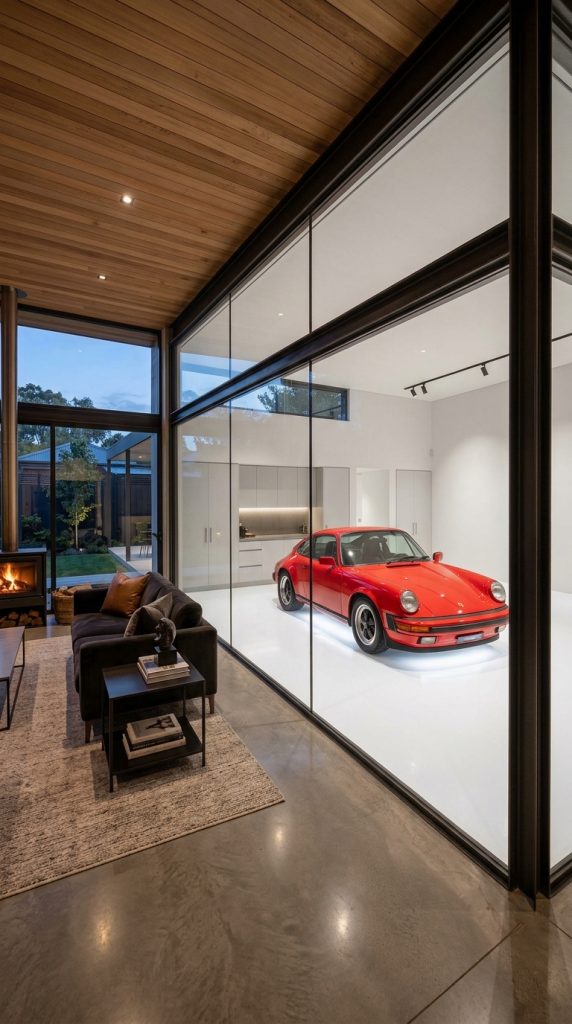
Defining the Exhibition Aesthetic
This style relies entirely on seamless structural glass walls and floor-mounted uplighting systems. It merges home and garage seamlessly.
Mapping the Integrated Home Footprint
The layout places the garage directly adjacent to the main living room or private home study lounge area.
Step-by-Step Jewel Box Construction Guide
First, remove the traditional solid drywall barrier separating the home interior living space from the main garage bay.
Next, install a massive structural steel frame to support a large pane of laminated security glass window walls.
Subsequently, apply a seamless, self-leveling white resin floor coating across the entire vehicle exhibition display surface area.
After that, install flush, floor-mounted LED uplight fixtures directly beneath the designated vehicle parking tires coordinates.
Furthermore, equip the garage space with an independent, ultra-quiet hospital-grade HEPA air filtration ventilation system.
Finally, install automated motorized blackout roller shades above the glass partition frame for privacy options when required.
Essential Materials and Styling Checklist
- Laminated structural security glass viewing panels
- Heavy-duty structural steel frame window support channels
- Seamless white self-leveling resin floor coating kits
- Flush floor-mounted LED vehicle automotive uplight fixtures
- Independent HEPA air filtration ventilation system units
- Automated motorized interior window blackout roller shades
- Matte white acoustic ceiling tiles for sound dampening
- Wireless remote-controlled electronic window shade switches
9. The Tuscan Vineyard Stone Carriage House
This warm, rustic aesthetic brings the timeless charm of old-world Italian country estates directly to your modern vehicle garage.
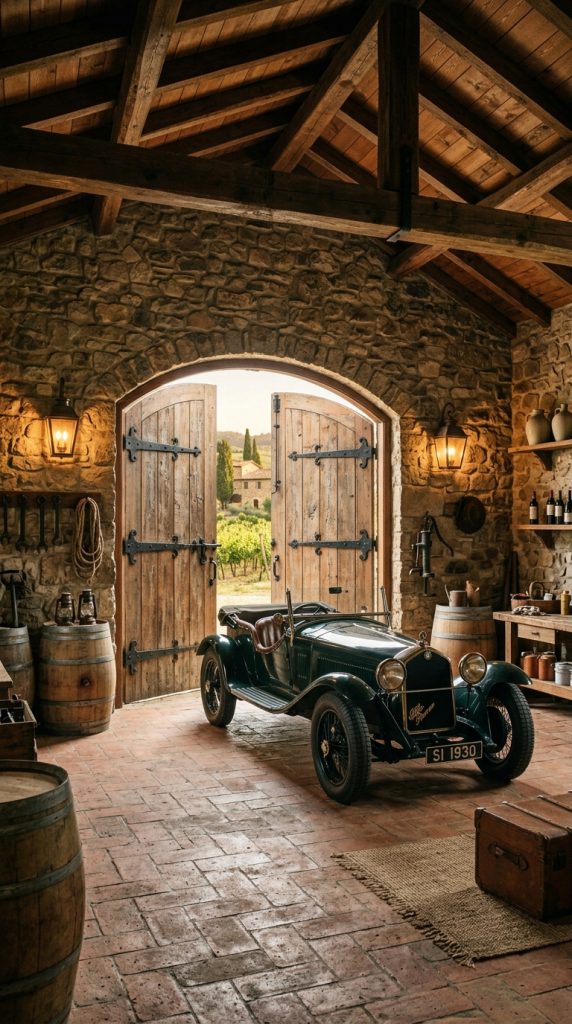
Defining Old-World Rustic Luxury
This style leverages rough-hewn natural fieldstone walls and heavy wrought iron hardware details. It emphasizes organic textures and history.
Mapping the Traditional Carriage Layout
The footprint utilizes individual arched timber garage doors for each vehicle parking bay, creating a classic estate appearance.
Step-by-Step Carriage House Construction Guide
First, clad all interior and exterior walls with natural, rough-hewn Tuscan fieldstone veneer materials systematically.
Next, install a durable rustic terracotta tile floor surface. Ensure tiles seal completely against automotive fluids.
Subsequently, mount heavy, custom-built distressed cedar garage doors fitted with large, decorative black wrought iron hinges.
After that, install antiqued bronze outdoor lanterns both inside and outside the main vehicle parking entrance arches.
Furthermore, install exposed rough-sawn cedar ceiling joists across the upper structural layout to enhance the rustic theme.
Finally, detail the interior walls with decorative wrought iron storage hooks for holding detailing cloths and gear.
Essential Materials and Styling Checklist
- Natural Tuscan fieldstone interior wall veneer bricks
- Durable rustic terracotta clay garage floor tiles
- Custom distressed cedar wood arched garage doors
- Decorative black wrought iron strap accent hinges
- Antiqued bronze outdoor exterior LED wall lanterns
- Exposed rough-sawn cedar wood ceiling structural joists
- Oil-resistant penetrating tile sealant clear liquid coatings
- Wrought iron wall-mounted utility organizing storage hooks
10. The High-Gloss Tokyo Drift Hub
This vibrant layout draws heavy inspiration from modern Japanese underground tuning culture and high-contrast night racing visuals.
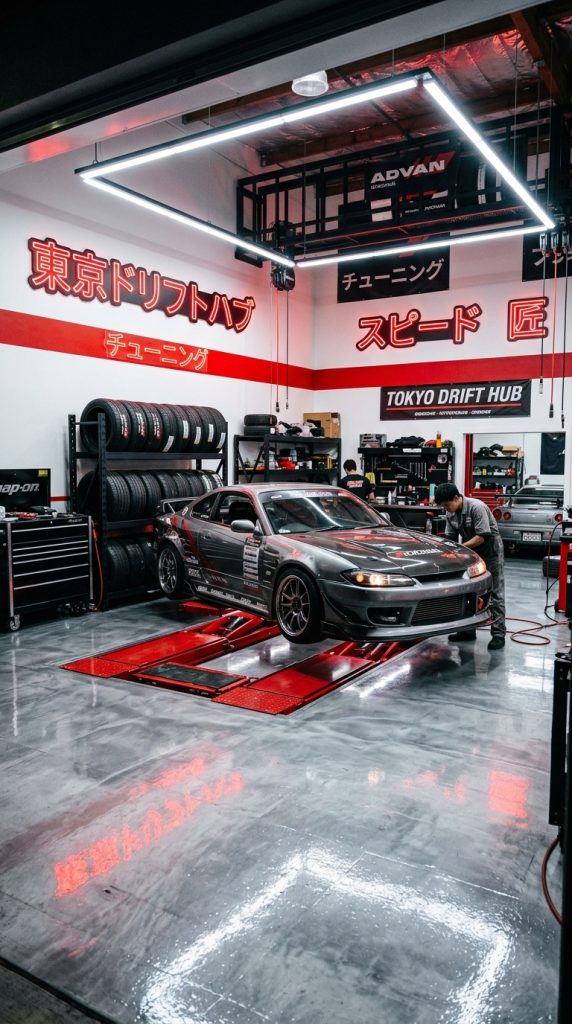
Defining Modern Japanese Tuning Style
This aesthetic utilizes high-contrast white walls mixed with bold red accents and bright under-car illumination tracks.
Mapping the Urban Tuning Footprint
The layout features a compact, highly optimized workspace grid centered around a low-profile scissor vehicle lift system.
Step-by-Step Tuning Hub Construction Guide
First, paint the main walls a crisp, bright white tone. Add a bold horizontal crimson racing stripe layer.
Next, lay down high-gloss metallic silver epoxy floor coatings to reflect maximum light onto vehicle undersides.
Subsequently, install a flush-mount in-ground scissor lift system directly into the center floor drop zone area.
After that, mount ultra-bright daylight-calibrated white LED light bars directly over the primary engine bay workshop space.
Furthermore, install customized Japanese Kanji characters backlit with red neon LEDs onto the main focal wall panel.
Finally, arrange rows of specialized tire storage racks high along the upper wall perimeter sectors.
Essential Materials and Styling Checklist
- Crisp bright white high-gloss interior wall paint
- Crimson red heavy-duty accent striping wall paint
- High-gloss metallic silver epoxy garage floor resins
- Flush-mount in-ground hydraulic vehicle scissor lifts
- Daylight-calibrated ultra-bright LED workshop light bars
- Custom red backlit neon Japanese Kanji signage panels
- Wall-mounted heavy-duty black steel tire storage racks
- Matte black modular plastic pegboard tool organizers
11. The Brushed Aviator Hangar Base
This spacious aesthetic mimics the grand, functional feel of private luxury aircraft hangars, utilizing metallic finishes and vast space.
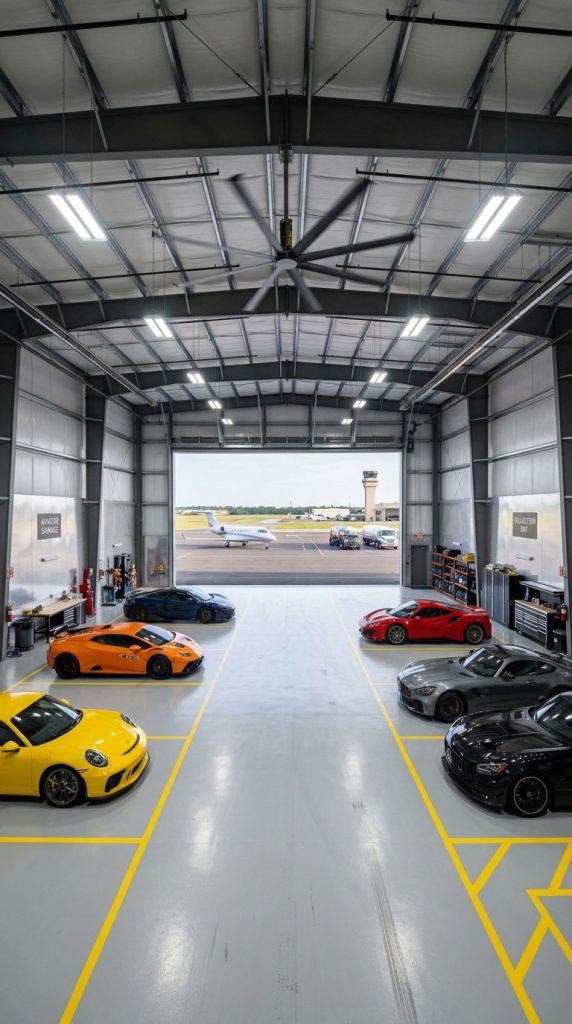
Defining Polished Hangar Architecture
This style focuses on expansive aluminum wall panels and bright, reflective industrial surfaces. It prioritizes scale and metallic luxury.
Mapping the Wide-Span Footprint
The layout features a massive, open double-height ceiling grid completely free of middle vertical support columns.
Step-by-Step Hangar Construction Guide
First, line the lower half of the walls with real brushed aluminum diamond plate sheet panels securely.
Next, apply a bright light-grey polyaspartic floor coating across the expansive floor plane for extreme durability.
Subsequently, install large industrial yellow caution striping graphics along the designated main vehicle entrance parking pathways.
After that, mount giant commercial-grade high-volume low-speed ceiling fans to optimize internal garage airflow currents efficiently.
Furthermore, install extensive arrays of bright white metal halide style LED high-bay light fixtures across the ceiling grid.
Finally, add rolling stainless steel flight-case styled tool cabinets along the workshop perimeter boundaries for mobile storage.
Essential Materials and Styling Checklist
- Brushed aluminum diamond plate wall panel sheets
- Light-grey industrial polyaspartic garage floor coating kits
- Bright yellow reflective floor safety paint markers
- High-volume low-speed industrial ceiling cooling fans
- Bright white LED high-bay commercial light fixtures
- Rolling stainless steel flight-case styled tool cabinets
- Heavy-duty rubber threshold garage door floor seals
- Stainless steel pop-rivet architectural wall accent hardware
12. The Zenith Stealth Stealth-Wealth Pavilion
This final layout focuses on understated, quiet luxury through the use of ultra-premium textures, dark hues, and hidden technology.
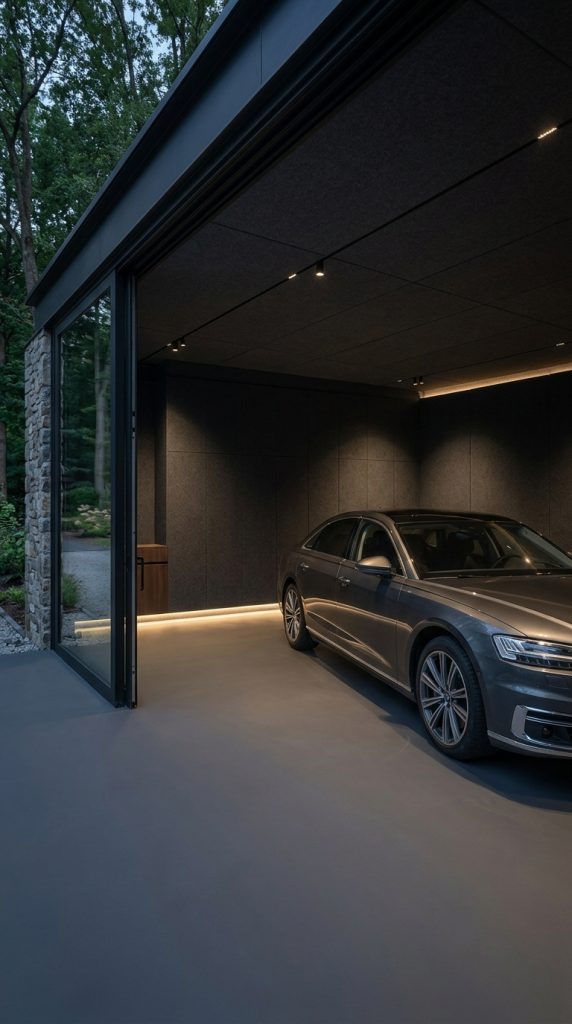
Defining Quiet Automotive Luxury Style
This design philosophy rejects loud branding in favor of premium matte textures, hidden storage, and flawless integrated smart tech.
Mapping the Integrated Tech Footprint
The layout features an ultra-clean, museum-like space where all tools and chargers hide completely flush within walls.
Step-by-Step Stealth Pavilion Construction Guide
First, coat all wall surfaces with an advanced, light-absorbing matte charcoal acoustic felt panel system neatly.
Next, install a seamless matte dark-grey polyurethane floor system that completely absorbs harsh overhead lighting glare reflections.
Subsequently, integrate hidden magnetic tool retention strips behind seamless touch-latch matte charcoal wall cabinet doors system.
After that, install an automated flush-to-ceiling retractable power cord and EV charging cable reel system layout.
Furthermore, position hidden linear night-light LED channels along the floor baseboards to outline parking bay boundaries softly.
Finally, connect all lighting and climate systems to a centralized invisible smart-home voice assistant control hub.
Essential Materials and Styling Checklist
- Matte charcoal acoustic felt interior wall panels
- Matte dark-grey non-reflective polyurethane floor systems
- Hidden magnetic tool retention backing metal strips
- Touch-latch seamless matte charcoal utility cabinet doors
- Flush-to-ceiling retractable smart EV charging cable reels
- Low-voltage linear night-light LED baseboard accent strips
- Invisible smart-home integrated automation controller hubs
- Recessed flush-mount matte black electrical wall sockets