
15 Elegant DIY Halloween Home Accents to Try
Halloween decorating for adults has experienced a magnificent, sophisticated design evolution. Gone are the days of bright plastic orange novelties, paper ghosts, and cheap synthetic spiderwebs. Instead, contemporary interior styling embraces sophisticated textures, moody color palettes, and handmade luxury. When October arrives, your living spaces deserve to reflect a refined gothic-boho aesthetic.

These fifteen elegant DIY Halloween home accents bridge the gap between spooky seasonal fun and high-end home decor. By curating rich velvets, matte stone finishes, and tarnished metals, you create an atmosphere of mysterious elegance. Consequently, your home transforms into an enchanted autumn sanctuary that feels curated, intentional, and undeniably chic.
The Power of Sophisticated Palettes and Textures
Commercial holiday decorations often fail because they rely on harsh, glossy primary colors. In contrast, elevating your fall decor requires a sophisticated, muted color story. Focus heavily on charcoal grays, rich obsidians, deep burgundies, and antique brass.
Furthermore, tactile contrast breathes life into moody design themes. Pairing rough terracotta with soft, flowing unbleached cheesecloth creates stunning visual depth. Therefore, your handmade decor looks expensive and authentic, seamlessly elevating your permanent interior style.
Sustainable Upcycling for Designer-Inspired Fall Decor
Achieving a high-end designer look does not require expensive boutique spending. In fact, many of the chicest moody crafts rely on clever upcycling. Transform thrifted glassware, discarded cardboard boxes, and scrap fabrics into bespoke statement art. In addition, foraged natural branches and dried foliage cost nothing at all.
Consequently, you save significant money while crafting eco-friendly designer dupes. Upcycling imbues every single decor piece with genuine vintage character and soul. Your living room feels uniquely collected rather than stamped out by mass-market factories.
Transforming Atmosphere with Thoughtful Ambient Illumination
Illumination remains the single most critical element in moody seasonal styling. Harsh overhead lights instantly destroy the intimate, spectral atmosphere of dark decor. Instead, rely entirely on tiers of real, flickering taper and pillar candles.
Moreover, dark glass votives and smoked crystal holders catch dancing flames gorgeously. This dynamic movement casts long, romantic shadows across your handmade centerpieces all evening. The warm glow makes rich black and burgundy fabrics look exceptionally luminous.
Essential Supplies for Chic and Moody Crafting
Building a versatile crafting kit ensures smooth execution and breathtaking results. First, gather textured stone-finish spray paints, baking soda, and matte black chalk paint. Also, collect antique gold leaf sheets, clear adhesive gilding size, and linen.
Additionally, dried florals like preserved eucalyptus and black bunny tails add instant elegance. Keep heavy-duty craft adhesives, jute twine, and floral wire nearby always. With these dependable supplies organized, high-end seasonal crafting becomes wonderfully relaxing and inspiring.
1. Textured Matte Faux-Stone Skull Centerpiece

Classical Sculpture Aesthetics with Weathered Mineral Depth
Standard plastic craft skulls often look glossy, juvenile, and distinctly artificial indoors. However, applying a gritty limestone texture transforms hollow plastic into fine pottery. The porous ceramic finish mimics hand-carved stone salvaged from ancient historic ruins.
Furthermore, overflowing the skull cavity with dried pampas grass creates dramatic height. It anchors bookshelves, coffee tables, or entryway consoles with dark elegance. This centerpiece delivers a high-end designer statement piece on an ultra-modest budget.
How to Craft the Stone Skull Centerpiece Step-by-Step
First, wipe a plastic anatomical craft skull clean with alcohol. Next, mix matte charcoal acrylic paint with equal parts baking soda in bowls. Stir thoroughly until the mixture forms a thick plaster paste.
Then, brush the textured paint heavily across all skull surfaces. Use a sea sponge to stipple extra texture into eye sockets. Allow the first coat to dry fully before applying a second layer. Afterward, dry-brush pale linen chalk paint lightly across raised bone contours. Insert dry floral foam inside the top opening and arrange pampas grass. Finally, display your finished sculpture atop a dark wooden tray.
Required Materials for Stone Skull
- Inexpensive hollow plastic craft anatomical skull
- Matte charcoal gray and linen white acrylic craft paints
- Standard household baking soda for gritty ceramic texture
- Natural sea sponge and wide synthetic flat paintbrushes
- Dry floral foam block and natural dried pampas grass stems
- Wooden tray or slate coaster for base placement
2. Gilded Gold Leaf Apothecary Vials
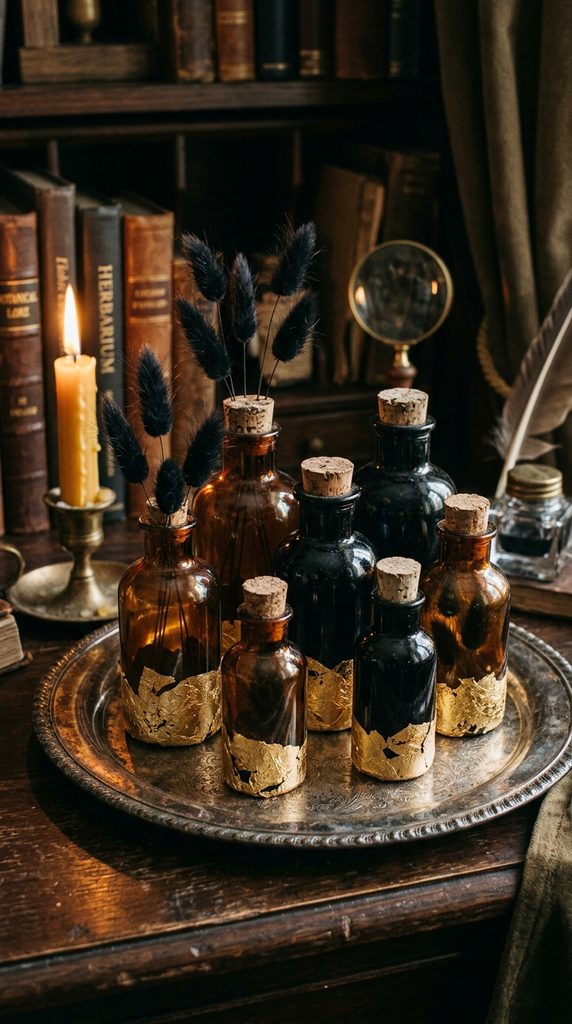
Old-World Botanical Alchemy Dipped in Molten Metallics
Standard glass bottles and spice jars look ordinary on open kitchen shelving. However, applying delicate gold leaf transforms them into antique alchemical vessels. The crinkled metallic flakes reflect low flickering candlelight with radiant warmth.
Moreover, pairing distressed gold foil with deep amber and obsidian glass looks luxurious. It mimics the look of rare nineteenth-century apothecary bottles sold in specialty boutiques. You can style them in varied height clusters across coffee tables and mantles.
How to Apply Gold Leaf to Glass Vials Step-by-Step
Start by cleaning vintage corked glass vials thoroughly with warm soapy water. Next, paint thin dabs of liquid adhesive gilding size along lower bottle bases. Let the adhesive size rest for fifteen minutes until it becomes tacky.
Then, use dry tweezers to lay sheets of gold leaf over glue. Gently press the delicate metallic foil onto glass using a soft brush. Swirl the dry brush in circular motions to tear organic foil edges. Afterward, apply a thin coat of matte decoupage sealant over the gold. Insert tall dried black rabbit-tail grasses directly into the bottle necks. Finally, place the finished gilded bottles onto a tarnished silver tray.
Required Materials for Gilded Vials
- Assorted clear, amber, and black glass corked bottles
- Imitation gold leaf sheets or loose metallic foil flakes
- Water-based leaf adhesive gilding size
- Ultra-soft synthetic gilding mop brush and tweezers
- Clear matte water-based protective decoupage sealer
- Dried black bunny tails and preserved botanical sprigs
3. Smoked Charcoal Terracotta Pumpkin Collection

Minimalist Modern Pottery Finish Replacing Cheap Plastic Sheens
Bright orange plastic craft pumpkins can instantly cheapen an aesthetic interior room. In contrast, modern organic home decor heavily favors matte, earthy pottery textures. Transforming inexpensive foam pumpkins with terracotta baking-soda washes yields breathtaking results.
Additionally, painting them in muted obsidian, charcoal, and warm taupe looks editorial. The porous, chalky finish mimics high-end pottery imported from European artisan studios. You eliminate glossy commercial seams entirely, leaving behind pure architectural form.
How to Paint Terracotta Pumpkins Step-by-Step
Begin by wiping smooth foam craft pumpkins clean with a dry cloth. Next, mix dark charcoal matte acrylic paint with baking soda in cups. Stir until the mixture achieves the thick consistency of pancake batter.
Then, brush the gritty paint across the foam pumpkin in vertical strokes. Ensure you coat the deep pumpkin ridges and bottom base thoroughly. Allow the thick coat to dry completely for roughly two hours. Afterward, mix a lighter gray wash and stipple over raised surfaces. Replace cheap plastic stems with real dried wood twigs using hot glue. Finally, cluster varied pumpkin sizes along your fireplace hearth.
Required Materials for Terracotta Pumpkins
- Assorted sizes of smooth foam craft pumpkins
- Ultra-matte charcoal, obsidian, and taupe acrylic paints
- Baking soda for creating thick ceramic-like texture
- Real foraged dried tree branches for replacement stems
- Heavy-duty hot glue gun and glue sticks
- Wide flat synthetic paintbrushes for smooth coverage
4. Oversized Dripping Wax Victorian Candelabra

Decadent Gothic Drama Featuring Dramatic Tonal Wax Cascades
Nothing commands a dining table quite like a towering, wax-drenched candelabra. Traditional shiny brass holders often look modern, but aged iron creates drama. Allowing layers of black and oxblood wax to pool over metal builds history.
Furthermore, the tall flickering flames cast mesmerizing, elongated shadows across walls. It feels regal, romantic, and reminiscent of historic European ghost manors. This centerpiece immediately anchors your long dining table with majestic presence.
How to Style the Dripping Candelabra Step-by-Step
First, spray an inexpensive multi-arm metal candelabra with matte black paint. Next, insert five tall, solid-wax black taper candles into the cups. Light the wicks fifteen minutes before guests arrive to start dripping.
Then, tilt a separate burning black wax utility candle directly over arms. Allow the hot liquid wax streams to coat the candelabra base organically. Build up varied drip lengths and thick pools around the central stem. Afterward, tuck dark dried eucalyptus and preserved burgundy roses around feet. Finally, surround the candelabra base with low glass votives for extra sparkle.
Required Materials for Dripping Candelabra
- Multi-arm cast iron or metal dining table candelabra
- Ultra-matte black multi-surface spray paint
- Solid black or deep oxblood drip-style wax taper candles
- Extra black wax utility candle for manual wax dripping
- Preserved dark eucalyptus branches and dried black roses
- Clear glass votive candle holders with tea lights
5. Antiqued Gilded Mirror with Translucent Apparition

Spooky Victorian Specters Floating Behind Distressed Mercury Glass
Antique gilded mirrors bring timeless vintage elegance to living room walls. However, adding a faint, translucent ghostly figure behind the glass adds intrigue. The spectral portrait appears only under certain angles of ambient room lighting.
Moreover, this subtle design creates an unsettling, poetic optical illusion for guests. It looks like an authentic centuries-old haunted heirloom hanging in a manor. You can assemble this high-concept art piece using a thrifted picture frame.
How to Create the Ghostly Mirror Step-by-Step
Start by removing the glass pane from an ornate thrifted picture frame. Next, spray the back of the glass with mirror-effect spray paint. While still wet, spritz water and vinegar to create distressed mercury spots.
Then, print a vintage black-and-white portrait onto translucent vellum paper. Place the vellum portrait directly behind the distressed mirror glass pane. Secure the backing board into the ornate frame to seal layers. Afterward, spray the outer ornate frame with rich antique gold paint. Dry-brush dark brown wax along ornate carvings for an aged patina. Finally, hang your completed haunted mirror over your fireplace mantle.
Required Materials for Ghostly Mirror
- Ornate thrifted picture frame with glass pane
- Mirror-effect reflective spray paint can
- White vinegar and water in a fine-mist spray bottle
- Vintage portrait printed on translucent drafting vellum paper
- Antique gold metallic spray paint and dark brown antiquing wax
- Heavy-duty picture hanging wire and wall anchors
6. Hand-Torn Botanical Parchment Spell Cards

Literary Dark Academia with Authentic Deckle-Edge Crafting
Framed vintage spell pages and botanical herbology cards bring intellectual mystery. Inexpensive printable graphics often look flat when printed on modern smooth paper. However, hand-tearing thick cotton paper and staining with coffee adds age.
Additionally, sealing each card with crimson wax and dried botanicals adds luxury. These bespoke prints look like genuine pages torn from an ancient grimoire. You can display them in brass floating glass frames across gallery walls.
How to Age Botanical Spell Cards Step-by-Step
Begin by tearing the outer edges of thick cotton paper for deckles. Next, submerge the wet paper sheets into a tray of strong coffee. Let the paper soak for twenty minutes to absorb rich sepia tones.
Then, remove the wet paper and bake on baking sheets until dry. Print vintage botanical skull or herb illustrations onto the stained paper. Afterward, melt flexible crimson sealing wax over the top corner margin. Press a metal brass seal stamp firmly into the hot red wax. Tuck a tiny sprig of dried lavender beneath the wax before stamping. Finally, slip the completed spell prints into double-glass brass hanging frames.
Required Materials for Spell Cards
- Heavyweight cotton rag watercolor paper sheets
- Strong brewed black coffee or black tea for staining
- Vintage botanical and anatomical printable PDF designs
- Flexible crimson red sealing wax sticks and metal seal stamp
- Miniature dried lavender and pressed fern sprigs
- Double-glass floating frames with antique brass borders
7. Velvet-Wrapped Luxe Heirloom Pumpkins
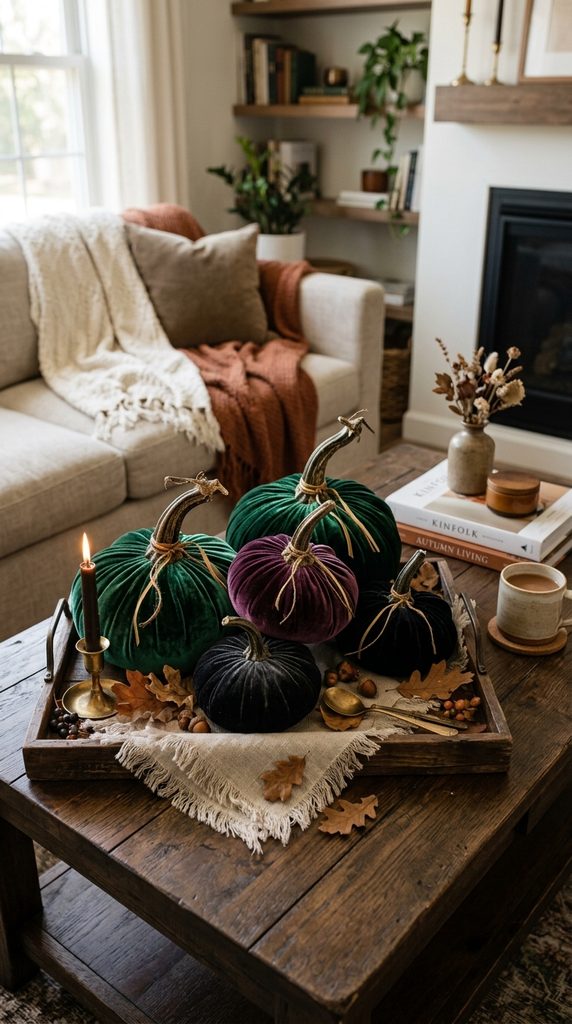
Tactile Decadence in Muted Emerald and Obsidian Hues
Foam pumpkins wrapped in plush crushed velvet offer ultimate tactile luxury. The soft, luminous fabric catches ambient room lighting with multidimensional depth. Pairing deep emerald green, plum, and charcoal velvet creates royal harmony.
Furthermore, topping each pumpkin with a real, preserved gourd stem elevates realism. These plush accents look like luxury designer boutique decor pieces selling for high prices. They add instant warmth and cozy sophistication to velvet sofas and trays.
How to Craft Velvet Pumpkins Step-by-Step
First, carve out the fake plastic stem from a foam craft pumpkin. Next, cut a circular piece of rich crushed velvet fabric. Ensure the fabric circle is roughly twice the width of pumpkins.
Then, place the foam pumpkin directly in the velvet fabric center. Gather the outer fabric edges upward, pulling tightly toward the top cavity. Stuff the gathered fabric ends deep into the carved central hole. Secure the fabric inside using a generous squirt of hot glue. Afterward, glue a real, dried organic pumpkin stem over the center hole. Finally, arrange varied velvet pumpkin sizes across your living room coffee table.
Required Materials for Velvet Pumpkins
- Round foam craft pumpkins of various sizes
- Crushed stretch velvet fabric in emerald, plum, and charcoal
- Real dried pumpkin or squash stems (harvested from real gourds)
- Sharp utility craft razor knife for carving top cavities
- Heavy-duty hot glue gun and all-temperature glue sticks
- Fabric scissors for cutting clean circular patterns
8. Preserved Black Eucalyptus and Bleached Pod Wreath

Monochromatic Botanical Textures Framing Front Entrances
Traditional plastic orange leaf wreaths can fade and look cheap outdoors. In contrast, a minimalist monochromatic botanical wreath radiates modern luxury. Preserved black eucalyptus leaves paired with bleached white seed pods look striking.
Moreover, this organic, high-contrast palette bridges high-fashion design with natural harvest beauty. It looks incredibly chic on modern front doors or above interior fireplaces. The preserved foliage stays pristine for years without crumbling or shedding messily.
How to Assemble the Botanical Wreath Step-by-Step
Start with a natural dark brown grapevine wreath base on tables. Next, use floral shears to cut preserved black eucalyptus into sprigs. Insert the eucalyptus stems into the grapevine branches at slight angles.
Then, secure the stems firmly using thin dark green floral wire. Continue layering foliage around the circle to create dense volume. Afterward, hot-glue bleached white lotus pods and dried bellani nuts throughout. Cluster the white dried botanicals along the bottom left curve for balance. Tie a long, trailing black raw-edge silk ribbon at the top. Finally, hang your completed wreath using a secure matte black door hook.
Required Materials for Botanical Wreath
- Natural dark brown grapevine wreath form (18-inch diameter)
- Bundles of real preserved black eucalyptus branches
- Bleached white dried lotus seed pods and bellani nuts
- 22-gauge dark green flexible floral paddle wire
- Frayed raw-edge black silk or chiffon hanging ribbon
- Heavy-duty wire cutters and hot glue gun
9. Plaster-Dipped Gauze Spectral Figures

Floating Architectural Phantoms Sculpted with Fine Plaster
Plastic tabletop ghosts often look juvenile, bright, and distinctly cartoonish. However, dipping open-weave cotton gauze into wet plaster creates sculptural art. The hardened fabric holds dramatic, sweeping folds permanently without supports.
Additionally, the matte white plaster finish looks like fine European stoneware. Placing battery-operated micro fairy lights beneath makes the hollow specters glow. It brings an ethereal, peaceful, and poetic presence to mantles and shelves.
How to Mold Plaster Specters Step-by-Step
Begin by creating a temporary armature using balloons atop glass bottles. Next, mix dry plaster of Paris with water in large bowls. Cut open-weave cheesecloth or medical gauze into twelve-inch square sheets.
Then, submerge the gauze squares into the liquid plaster mixture. Squeeze out excess wet plaster gently between your fingers. Drape the plaster-soaked cloth over the balloon armature, forming flowing drapes. Layer two additional gauze sheets over top for structural strength. Allow the plaster to cure and harden completely for twenty-four hours. Afterward, pop and remove the inner balloon armature from underneath. Finally, place a warm LED tea light inside to illuminate the sculpture.
Required Materials for Plaster Specters
- Plaster of Paris dry powder mix and mixing bowl
- Unbleached cotton cheesecloth or medical gauze rolls
- Small party balloons and empty glass bottles for armatures
- Disposable latex gloves and protective plastic table drop cloths
- Battery-operated flickering warm LED tea light candles
- Scissors for trimming cloth panels
10. Cloche Terrarium with Gilded Insect Curios

Victorian Naturalist Wonder Under Flawless Glass Domes
Glass display cloches instantly elevate any small decorative item into fine art. Creating a miniature naturalist curio display brings vintage European museum elegance indoors. By combining metallic gold beetles with preserved black moss, you spark wonder.
Furthermore, the transparent glass dome catches ambient room lighting with brilliant clarity. It feels intellectual, artistic, and deeply rooted in historical curiosity cabinets. This compact display fits effortlessly onto small desks, bedside tables, or bookshelves.
How to Style a Curio Cloche Step-by-Step
First, wipe a glass display cloche dome and wooden base clean. Next, spray faux-plastic beetle or cicada insect models with bright gold paint. Let the metallic gold paint dry completely for roughly thirty minutes.
Then, hot-glue preserved black and forest green sheet moss onto bases. Position a piece of weathered driftwood securely into the glued moss. Mount the gilded metallic insects climbing realistically up the wood branch. Afterward, tuck miniature dried mushrooms and raw crystal points into moss. Place a tiny warm battery micro fairy light string inside bases. Finally, lower the glass cloche dome over the completed curio display.
Required Materials for Curio Cloche
- Clear glass display cloche dome with stained dark wooden base
- Inexpensive plastic craft beetle, cicada, or butterfly specimens
- Metallic bright gold or bronze spray paint can
- Preserved dark sheet moss and miniature dried shelf mushrooms
- Small piece of natural weathered driftwood or tree bark
- Hot glue gun and all-temperature craft glue sticks
11. Distressed Black Iron Pedestal Risers

Architectural Elevation for Sculptures and Pillar Candles
Decorating flat surfaces without varied heights often looks cluttered and uninspired. Inexpensive wooden candle plates and thrifted metal bowls make fantastic pedestal risers. Spraying them with textured iron spray paint provides authentic metallic weight.
Moreover, elevating skulls, pumpkins, and candles creates dynamic visual layers across mantles. The textured black iron finish pairs gorgeously with warm wood and marble. It gives your home the curated, multi-dimensional look of high-end design showrooms.
How to Build Textured Iron Risers Step-by-Step
Start by pairing thrifted wooden candle plates with upside-down glass bowls. Next, bond the two pieces together firmly using heavy-duty construction adhesive. Allow the strong adhesive glue to cure fully for twenty-four hours.
Then, coat the entire assembled pedestal with textured cast-iron spray paint. Spray two light, even coats to prevent dripping along vertical columns. Afterward, dry-brush a tiny touch of metallic bronze paint on rims. This subtle metallic highlight simulates authentic aged metal wear along edges. Finally, place a large velvet pumpkin or skull atop the riser.
Required Materials for Iron Risers
- Thrifted wooden plates, candle holders, or glass bowls
- Heavy-duty multi-surface construction adhesive (E6000)
- Textured black cast-iron multi-surface spray paint
- Metallic bronze or copper acrylic craft paint
- Stiff-bristle dry brush for edge highlighting
- Drop cloth for outdoor spray painting
12. Floating Taper Candle Ceiling Installation
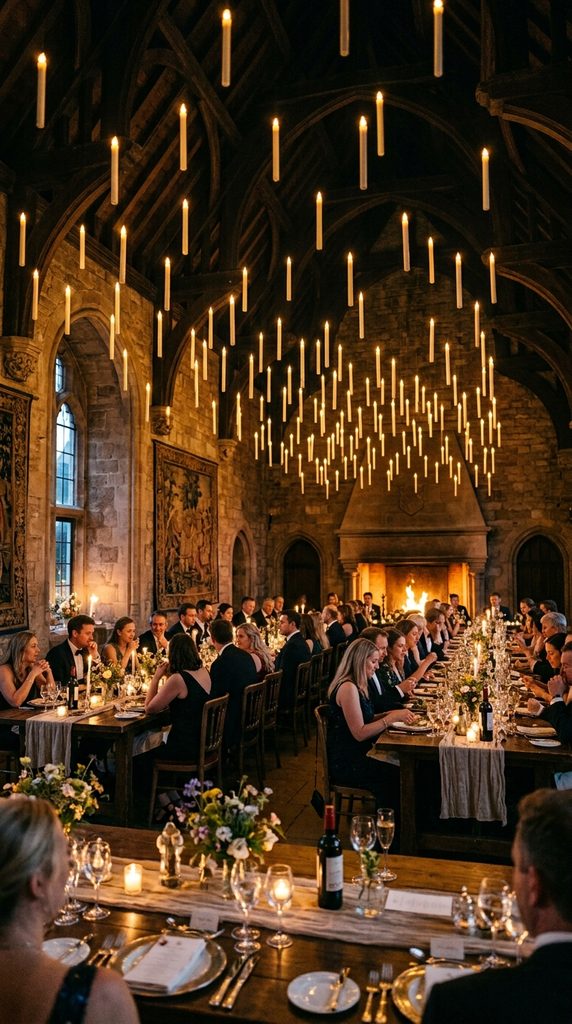
Magical Great Hall Illumination Suspended in Mid-Air
Suspending battery-operated taper candles from ceilings creates an unforgettable optical illusion. The flickering warm flames appear to float weightlessly in mid-air like magic. It transforms ordinary dining rooms or hallways into enchanting castle banquet halls.
Additionally, using clear monofilament line makes the hanging supports completely invisible. When guests walk underneath, they are instantly mesmerized by the floating glow. It provides breathtaking visual drama without taking up any precious table surface space.
How to Hang Floating Candles Step-by-Step
Begin by purchasing lightweight battery-operated LED wax taper candles with remotes. Next, tie a length of thin clear nylon monofilament line around wicks. Secure the knot firmly with a microscopic drop of clear superglue.
Then, press clear damage-free mini adhesive hooks onto your ceiling. Space the ceiling hooks irregularly across the room for an organic float. Hang the clear lines from hooks, varying the hanging candle drop heights. Insert fresh AAA batteries into each floating taper candle housing. Afterward, test the universal wireless remote to activate all candles simultaneously. Finally, dim your main overhead room lights to enjoy the magical glow.
Required Materials for Floating Candles
- Pack of lightweight battery-operated LED taper candles with remote
- Clear nylon monofilament fishing line (4lb or 6lb test)
- Clear damage-free mini ceiling adhesive hooks
- Precision craft scissors and clear superglue
- Fresh AAA or AA batteries for candle power
- Step ladder for safe ceiling hook installation
13. Weathered Stone Serpent Bookends
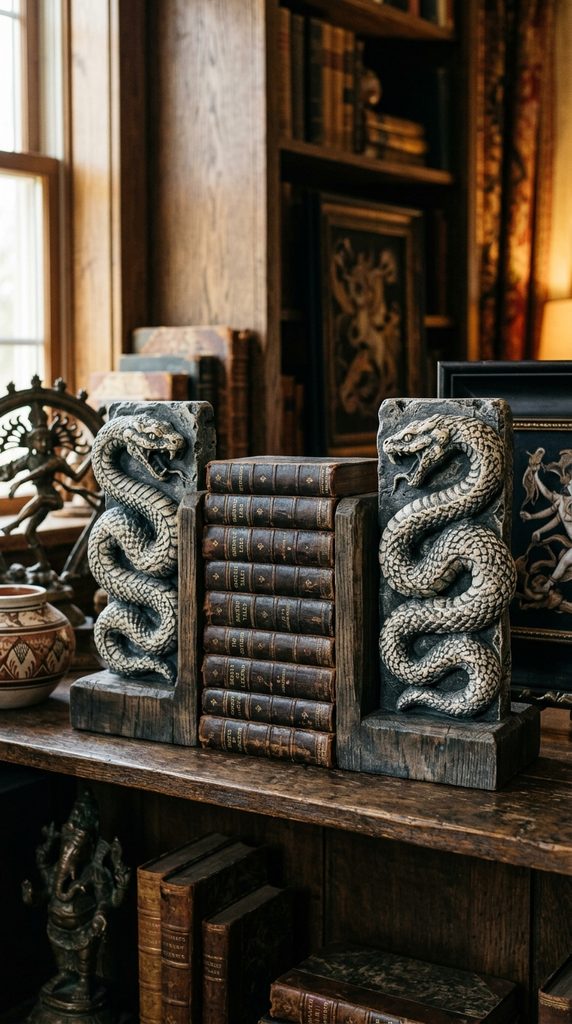
Mythological High-Fashion Heavyweights for Dark Bookshelves
Serpents represent ancient wisdom, mystery, and sleek high-fashion elegance. Inexpensive plastic toy snakes often look juvenile and flimsy on their own. However, mounting them onto heavy wooden blocks and texturing transforms them completely.
Furthermore, a textured limestone paint finish gives them the presence of heavy stone. They look like expensive vintage European architectural bookends found in antique galleries. Styling them flanking your dark academia book collection looks extraordinary.
How to Craft Stone Snake Bookends Step-by-Step
First, cut two heavy wooden square blocks for sturdy bookend bases. Next, use heavy-duty glue to secure large coiled plastic snakes onto blocks. Position the snake heads rearing upward in dynamic striking poses.
Then, coat the entire snake and wood assembly with textured stone paint. Spray three thin coats, ensuring all scales and crevices are covered. Afterward, brush a wash of dark gray acrylic into scale crevices. Dry-brush pale limestone chalk paint across raised snake ridges for depth. Finally, place heavy felt pads beneath the wooden blocks to protect furniture.
Required Materials for Stone Bookends
- Two heavy unfinished solid wood craft blocks
- Large coiled plastic toy snakes with textured scales
- Heavy-duty structural craft adhesive or epoxy glue
- Textured limestone or granite spray paint can
- Dark gray acrylic wash and pale ivory chalk paint
- Self-adhesive protective felt pads for bottom bases
14. Antique Framed Moth and Butterfly Specimens
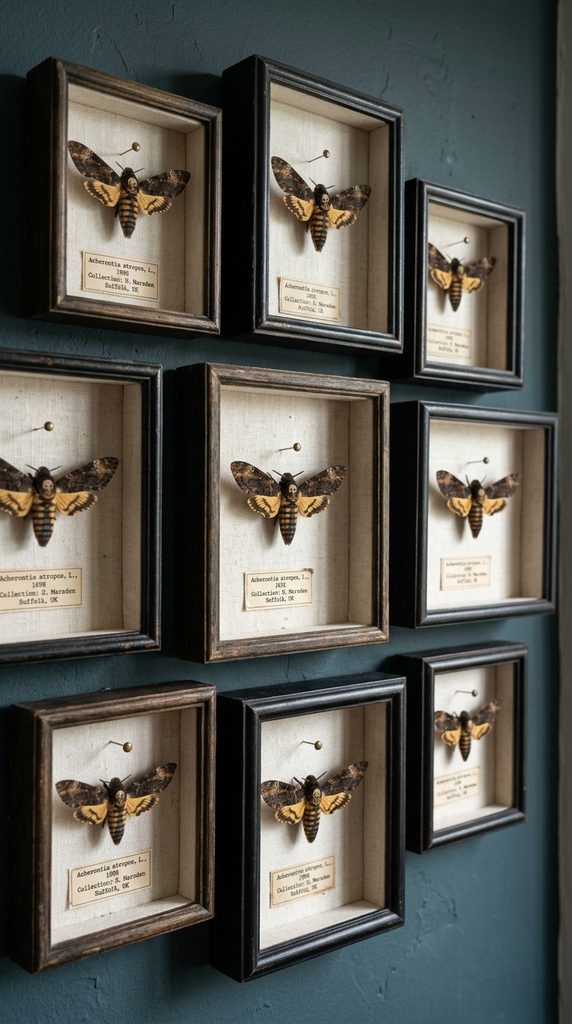
Vintage Entomology Displays in Ornate Shadowboxes
Framed entomology specimens exude timeless Victorian natural history charm. Real preserved specimens cost significant money and require delicate handling. Fortunately, high-resolution vintage printable moths mounted in shadowboxes look identical.
Moreover, curling paper wings slightly creates hyper-realistic three-dimensional depth. Adding gilded brass identification pins gives authentic scientific collector detail. Grouping several framed specimens creates a breathtaking seasonal gallery wall.
How to Assemble Framed Specimens Step-by-Step
Start with small deep shadowbox frames with antique brass or wood finishes. Next, cut pieces of off-white linen fabric to fit frame backings. Glue the textured linen flat onto the shadowbox backing board.
Then, print detailed vintage death’s-head hawk moth illustrations on cardstock. Cut the moth shapes out cleanly using precision curved craft scissors. Gently bend the printed paper wings upward along body folds for dimension. Push a real metal dressmaker pin directly through the paper thorax. Glue the pinned moth firmly into the center of the linen board. Finally, reassemble the shadowbox frame and hang it as a collection.
Required Materials for Moth Displays
- Small glass-front shadowbox picture frames
- Off-white natural linen or raw burlap fabric remnants
- High-resolution printed vintage moth and butterfly graphics
- Sharp precision curved-blade paper craft scissors
- Antique brass or steel dressmaker straight sewing pins
- Craft fabric glue and picture hanging hardware
15. Tarnished Silver Goblet Succulent Planters
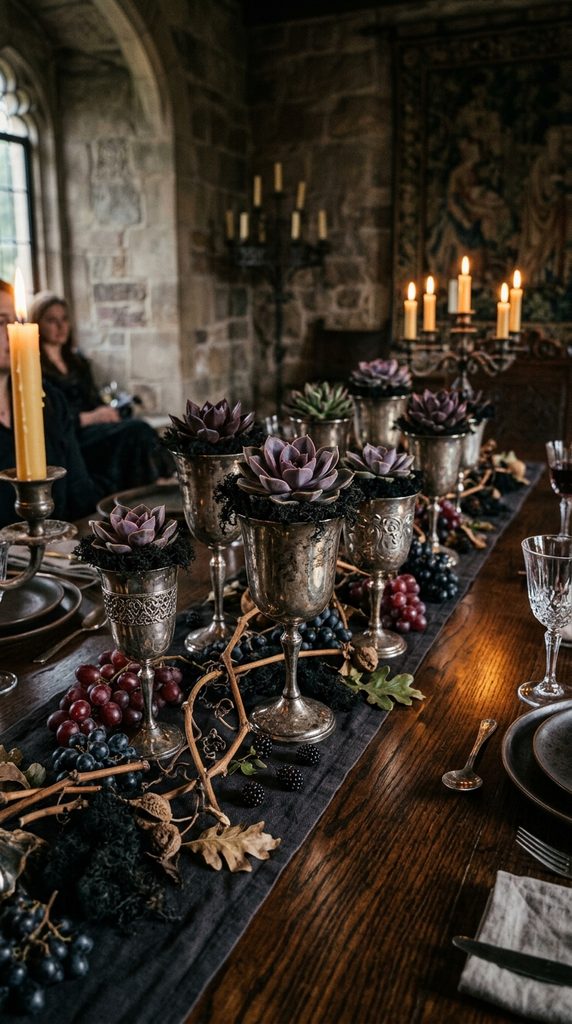
Gothic Harvest Gardening Inside Repurposed Antique Metalware
Transforming thrifted silver-plated chalices into dark planters looks extraordinarily chic. The tarnished, blackened patina of vintage silver contrasts gorgeously with greenery. Planting dark purple echeveria succulents and black moss brings organic life indoors.
Additionally, this compact DIY looks stunning grouped down dining tables or mantles. It feels like an ancient, overgrown heirloom discovered in an abandoned castle. You can source inexpensive silver-plated cups easily at thrift stores and yard sales.
How to Plant Silver Goblets Step-by-Step
Begin by collecting assorted vintage silver-plated wine goblets and chalices. Do not polish the metal; preserve the dark, natural tarnished patina. Next, fill the bottom third of each goblet with small drainage pebbles.
Then, add a layer of well-draining cactus and succulent potting soil. Plant a dark purple or black echeveria succulent into each goblet. Press preserved black sheet moss firmly around soil surfaces to conceal dirt. Afterward, mist the succulent soil lightly with a water spray bottle. Finally, arrange the silver goblet planters down your dining table center.
Required Materials for Silver Planters
- Mismatched vintage silver-plated wine chalices and goblets
- Small river pea gravel or decorative drainage stones
- Well-draining cactus and succulent organic potting soil
- Live dark purple echeveria or black prince succulent plants
- Preserved black or deep forest green craft sheet moss
- Fine-mist plant water spray bottle for hydration