
15 Aesthetic Japanese Kumamoto Castle Build Inspo | Minecraft
Step inside the breathtaking world of feudal Japanese castle design. Kumamoto Castle stands as one of Japan’s most majestic historical strongholds. Building a massive castle complex brings incredible ancient realism to your world. It connects vast stone ramparts with delicate wooden roofs and grand courtyards. Every wall tells a story of feudal warfare, defense, and timeless craftsmanship.

Unlocking the Full Potential of Japanese Block Palettes
Traditional Japanese architecture relies on striking color contrast and distinct structural shapes. You can blend deep slate foundations with white plaster walls and dark roof tiles. Combining dark oak, spruce, and mangrove creates an authentic timber framework. Every single tower tier offers endless creative design possibilities for your survival world.
Setting the Proper Tone for Feudal Castle Structures
Creating an authentic feudal atmosphere requires careful material choices and precise layout planning. You can blend stone bricks with polished basalt or blackstone anchors. Adding hanging paper lanterns creates a warm night ambiance very fast. Lighting plays a huge role in highlighting dramatic curved roofs. Soul lanterns and fire braziers work best along dark stone sea walls.
Mastering the Art of Curved Roof Lines and Stone Walls
A proper Japanese roofline uses stepped stairs and slabs to form graceful sweeping curves. Dark deepslate or warped wooden tiles contrast sharply with clean white walls. Mixing cobblestone with mossy variants builds authentic weathered wall bases fast. Every block choice adds extra structural detail to your fortress grounds. Think about how massive stone slopes hold up multi-story wooden towers.
Enhancing Textures with Rich Feudal Landscaping
Realistic natural details bring your ancient castle grounds to life instantly. Cherry blossom trees add vibrant pink foliage along stone walkways. Stacked bamboo fences create delicate garden screens effortlessly. You can build incredible serene garden landscapes using simple natural elements. Water features and gravel paths break up flat courtyard areas with realistic charm.
Crafting Deep Stories Through Fortified Ramparts and Keep Towers
Feudal warfare demands that castle structures look heavy, defended, and visually imposing. Break a few lower wall blocks to show ancient stone wear over time. Let azalea leaves and vines cover lower stone support columns naturally. Your builds will instantly look centuries old and historically significant. Scatter weapon racks and banners along timber walkways for active guard patrols.
Idea 1: The Main Keep Tenshu Tower
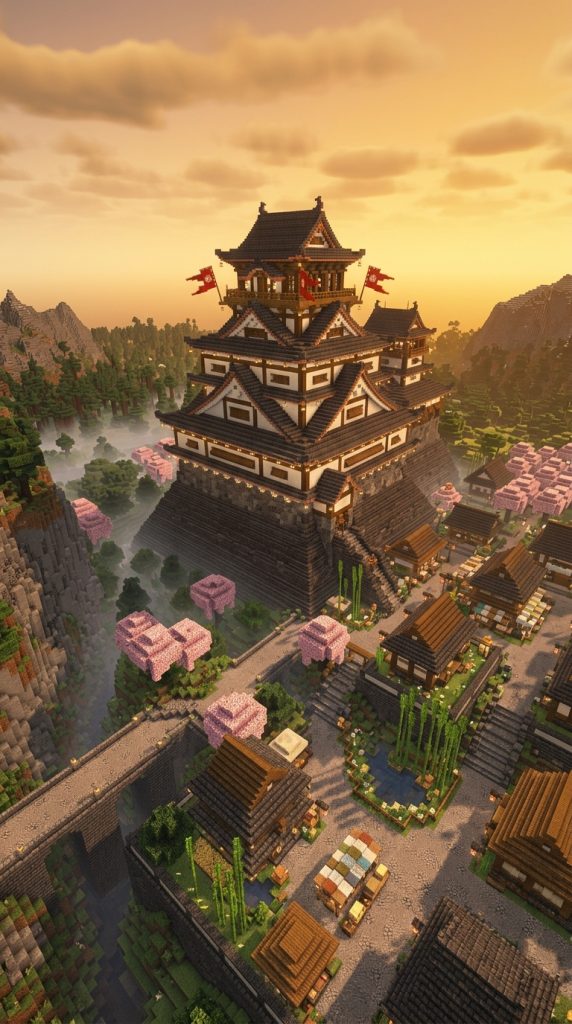
A Soaring Multi-Tiered Command Seat Overlooking the Realm
Imagine a massive multi-tiered main keep rising high above stone walls. Its heavy foundation is built using sloped deepslate brick walls. White plaster covers the upper walls, framed by dark oak timber beams. It looks completely designed to withstand siege warfare while displaying massive power. Ocean winds blow through its high wooden balconies every day. Morning fog rolls gently over its sweeping dark tile roofs.
How to Build the Sloped Stone Foundation Rampart
Start by laying a wide, sloped stone brick base on a high hill. Angle the stone foundation inward slightly as it rises higher. Frame the outer corners using dark polished deepslate wall blocks. Fill the central foundation core using solid stone and cobble blocks. Keep the total base height around ten to twelve blocks tall. This creates a massive, authentic sloped base for your main keep.
Crafting the Curved Dark Roof Tiers and White Walls
Erect upper wall frames using light quartz and stripped birch logs. Place white concrete powder panels between dark oak support beams. Construct sweeping roof eaves using deepslate tile stairs and slabs. Extend roof corners outward using flared stair patterns to create traditional curves. Repeat this process across three or four shrinking upper tiers. The keep will look remarkably balanced, imposing, and visually graceful.
Final Touches for an Authentic Imperial Atmosphere
Place glowing paper lanterns under every sweeping roof corner eave. Position red banners displaying custom clan crests along top balconies. Place dark oak trapdoors along window openings for protective wooden shutters. Your main keep is now finished and ready for royal leadership. Add iron bars along lower arrow slits for realistic castle defense. Archers can easily defend the perimeter from high window posts.
Detailed Steps for Interior Main Hall and Courtyard
Step inside the main keep to build a grand shogun throne room. Place polished blackstone slabs forming a raised central throne platform. Add red wool carpets stretching from the heavy front entry doors. Frame the room using dark oak logs and spruce trapdoor screens. Build a large decorative map table using item frames and maps.
Fill the surrounding courtyard space with raked gravel and stone paths. Place cherry blossom trees along the stone foundation outer edges. Position bamboo fences along entry walkways to frame private gardens. Add coarse dirt patches along guard patrol paths to show heavy use. Scatter spruce buttons across wooden floorboards for loose floor nails. Your main keep tenshu tower now looks completely functional and grand.
Required Materials and Block List
- Deepslate Bricks: 10 Stacks
- Polished Deepslate Walls: 6 Stacks
- White Concrete Powder: 8 Stacks
- Dark Oak Logs: 8 Stacks
- Deepslate Tile Stairs: 12 Stacks
- Deepslate Tile Slabs: 8 Stacks
- Stripped Birch Logs: 6 Stacks
- Red Wool: 4 Stacks
- Lanterns: 3 Stacks
- Cherry Leaves: 5 Stacks
Idea 2: The Musha-Gaeshi Curved Stone Wall

Impenetrable Curved Ramparts Designed to Repel Enemy Climbers
A dramatic curved stone wall brings authentic Japanese defense to your outer perimeter. Combining stone bricks with deepslate creates a steep, parabolic slope. The unique curve prevents enemy samurai from scaling the outer fortress walls. It creates a terrifying stone barrier protecting the inner castle courtyards. Cherry petals drift down softly over the cold stone ramparts daily.
Building the Parabolic Stone Curve Profile
Mark out a long foundation line using rough cobblestone blocks. Build the lowest three wall layers straight up from the ground. Curve the next four layers inward gradually using stone brick stairs. Finish the top three layers using vertical deepslate brick blocks. Make the entire wall structure at least eight to ten blocks high. This curved profile creates the iconic anti-climber wall shape.
Adding Timber Watch Posts and Upper Walkways
Place dark oak log beams protruding from the top stone edge. Lay spruce wood slabs across the beams to form an upper walkway. Add white concrete wall panels along the outer walkway edge. Cut narrow arrow slits into the white walls using iron bars. Cover the walkway using a continuous dark deepslate stair roofline. The upper walkway gives guards a protected line of archer defense.
Decorating the Wall Base with Serene Natural Features
Position glowing redstone lanterns along the upper timber walkway ceiling. Place mossy cobblestone blocks randomly into the damp lower wall base. Surround the outer wall foundation with a shallow water moat. Scatter bone block fragments near outer gate approaches for battle history. Add hanging vines climbing up lower stone sections for natural wear. Defensive power will radiate across every single stone block.
Expanding the Outer Moat and Stone Barbican
Build small wooden drawbridges crossing over the wide water moat. Use spruce stairs to form sturdy bridge entry ramps onto stone. Wrap lily pads across the calm moat water surface naturally. Place sea lanterns under water for subtle glowing moat lighting. Add pointed dripstone along underwater wall bases to deter swimming enemies.
Surround the moat banks with weeping wild cherry trees and bamboo. Place dark oak fence posts as warning markers along the road. Scatter gravel and buttons along the outer road leading to gate. Use spruce pressure plates on top of wooden fence posts. Add cobwebs inside arrow slits for realistic unused storage corners. Your curved stone wall ramparts are now completely detailed today.
Required Materials and Block List
- Stone Bricks: 12 Stacks
- Cobblestone: 8 Stacks
- Deepslate Bricks: 10 Stacks
- Stone Brick Stairs: 8 Stacks
- White Concrete: 6 Stacks
- Spruce Slabs: 6 Stacks
- Dark Oak Logs: 6 Stacks
- Lanterns: 3 Stacks
- Lily Pads: 4 Stacks
- Cherry Saplings: 4 Items
Idea 3: The Grand Yagura Corner Watchtower
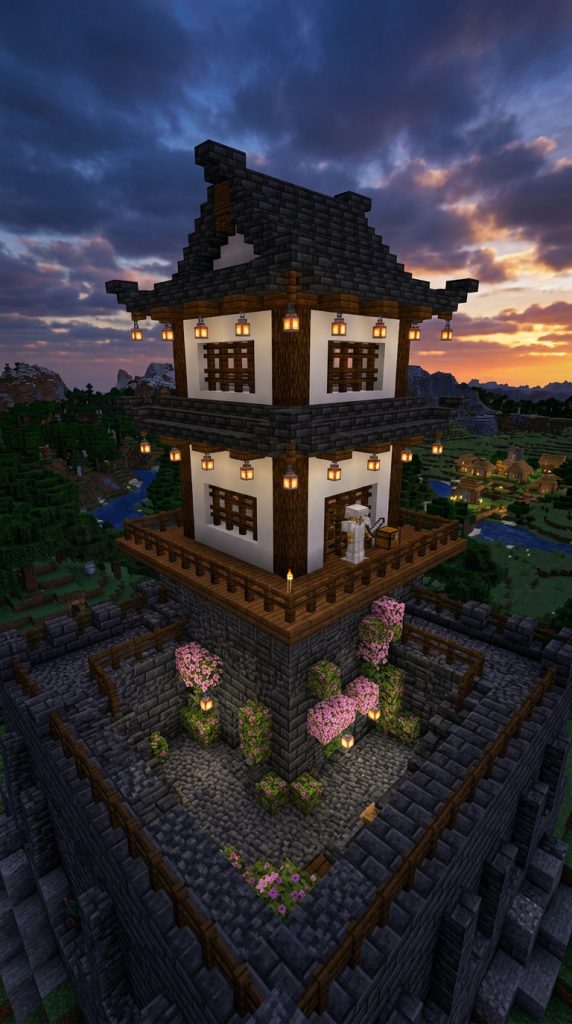
Multi-Story Timber Sentinels Guarding Fortress Corner Positions
Guarding strategic castle corners requires a heavily fortified wooden watchtower. A heavy two-story yagura tower provides excellent views across surrounding lands. Dark deepslate tile roofs give the white structure an iconic silhouette. Heavy wooden gates seal the tower off from outer courtyard breaches. Fog settles over the dark roof tiles late at night. Enemy troops will approach this heavily guarded tower with extreme caution.
Constructing the Heavy Stone Corner Platform
Build a massive square stone platform on the castle wall corner. Use polished deepslate blocks for strong outer water breakwater columns. Space the main corner posts evenly to support heavy upper timber floors. Connect the tower base directly to surrounding castle wall walkways. Make sure the stone foundation extends deep into the hillside terrain. Solid stone foundations make the watchtower feel visually grounded and sturdy.
Laying the White Plaster and Dark Timber Upper Frame
Span the tower floor using dark oak wood slabs and beams. Build white concrete walls accented with stripped spruce log posts. Use deepslate tile stairs for the broad lower roof overhang. Place dark oak fence blocks for window protective grates and frames. Mix cracked stone bricks into the lower stone corner foundation. The contrasting white and dark materials add intense feudal elegance.
Weathering the Tower with Moss and Decorative Lanterns
Attach iron lanterns under sweeping roof corners for warm lighting. Place mossy stone brick slabs along wet lower stone bases. Drape azalea leaves over inner courtyard stone walls carefully. Add dark oak trapdoors along window openings for heavy shutters. The dark roof tiles contrast sharply with surrounding pink foliage. Defending your castle corner becomes an enjoyable architectural project today.
Adding Guard Arsenal and Alarm Signal Bell
Remove a few white wall blocks to install defensive arrow slits. Place weapon racks holding bows and swords inside inner tower rooms. Frame inner wall corners using spruce trapdoors as decorative wood paneling. Wrap iron chains around central roof beams to hang an alarm bell. Place blackstone pressure plates on top of wooden storage chests.
Place armor stands holding iron and gold armor along guard walkways. Attach iron chains holding heavy swinging lanterns from roof arches. Build a wooden ladder leading up to the top lookout room. Use spruce slabs and deepslate tiles for its high roof. Light the tower top with a glowing soul lantern post. Your grand yagura corner watchtower is now fully armed.
Required Materials and Block List
- Deepslate Bricks: 8 Stacks
- White Concrete: 8 Stacks
- Stripped Spruce Logs: 6 Stacks
- Dark Oak Slabs: 6 Stacks
- Deepslate Tile Stairs: 8 Stacks
- Dark Oak Trapdoors: 5 Stacks
- Iron Chains: 3 Stacks
- Lanterns: 4 Stacks
- Armor Stands: 4 Items
- Iron Bars: 2 Stacks
Idea 4: The Imperial Gatehouse and Drawbridge
A Massive Double-Door Portal Controlling Castle Entry
A tall fortified gatehouse can control all entry into inner courtyards. It stands high above the outer stone moat and bridge approach. Built with heavy dark timbers and white walls, it looms. It looks like an impenetrable gateway for grand imperial processions. Guard footsteps echo softly along upper wooden catwalks every hour. The massive wooden gate structure cuts dramatically across the front landscape.
Framing the High Stone Gatehouse Foundations
Create a wide rectangular gate opening using tough stone brick blocks. Raise four main corner pillars using thick dark oak logs. Fill the upper wall gaps using clean white concrete panels. Leave narrow window slits for archers guarding the outer bridge entry. Build the stone base at least seven blocks tall before adding wood. Strength in design keeps the gatehouse looking heavy and secure.
Building the Massive Double Door and Roof Above
Extend the main upper gate structure outward using dark oak logs. Construct massive wooden double doors using spruce planks and dark trapdoors. Frame a sweeping, curved roof using dark deepslate tile stairs. Place a central clan symbol banner above the main entrance arch. The high curved roof gives the entrance an imposing height. It can be seen from far down the main castle approach road.
Adding Decorative Paper Lanterns and Garden Pathways
Cover lower stone walls with climbing green azalea leaves. Replace lower stone blocks with dark mossy cobblestone for moisture. Scatter gravel and path blocks along the outer entry road. Hang glowing paper lanterns using iron chains over the gate doors. The warm light casts long shadows across the wooden bridge deck below. Your imperial gatehouse stands ready to welcome the shogun.
Constructing Interior Guard Rooms and Portcullis Controls
Build internal guard floor levels using smooth spruce wood slabs. Connect each floor level using simple wooden ladders leading up. Place weapon racks and storage chests inside guard duty rooms. Add a winch mechanism room holding chains for the front gate. Place iron trapdoors over floor murder holes above the main entry.
Decorate external stone walls with hanging iron lantern brackets. Attach red wool banners along upper white wall faces. Place clan banners on the high gatehouse roof peak. The banners will flutter proudly in strong mountain breezes today. Surround the building base with stone brick retaining walls safely. Your imperial gatehouse and drawbridge is fully operational now.
Required Materials and Block List
- Stone Bricks: 10 Stacks
- Dark Oak Logs: 8 Stacks
- White Concrete: 8 Stacks
- Spruce Planks: 6 Stacks
- Deepslate Tile Stairs: 8 Stacks
- Iron Chains: 4 Stacks
- Red Wool: 4 Stacks
- Spruce Trapdoors: 6 Stacks
- Chests: 4 Stacks
- Lanterns: 4 Stacks
Idea 5: The Cherry Blossom Garden Pavilion

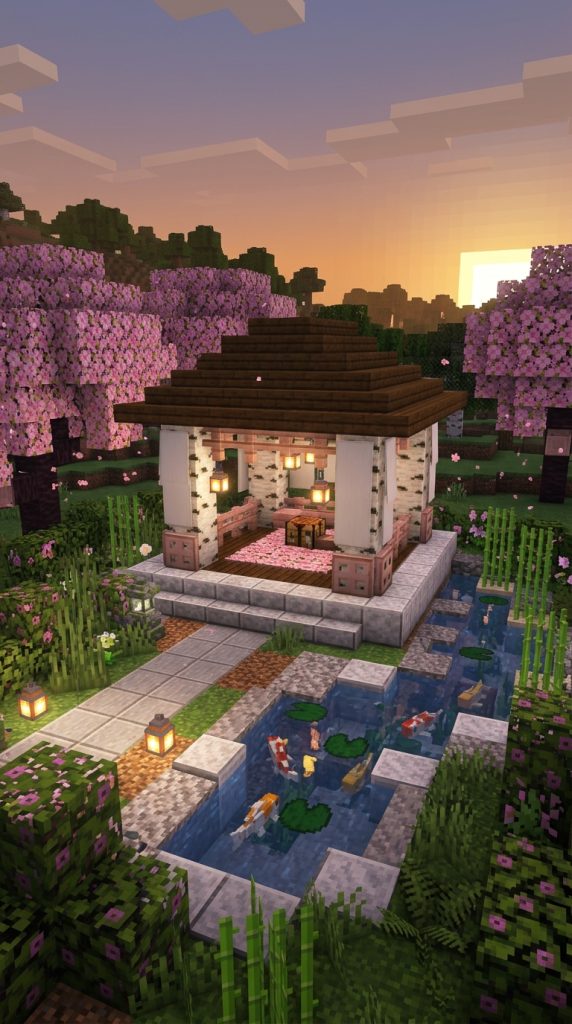
A Peaceful Teahouse Set Amidst Falling Pink Petals
Peaceful tea pavilions offer quiet rest within busy castle grounds. Light birch wood mixed with cherry timber creates soft warmth. Surrounding cherry trees drop pink petals across smooth stone paths. It offers a relaxing retreat for nobles away from military duties. Cool mountain air breezes through open sliding paper screen doors. Serenity invites weary lords to rest and sip warm tea.
Carving out the Open Pavilion Foundation Deck
Build a wide, low platform into a cherry tree garden hill. Frame the outer platform edges using polished diorite and stone slabs. Use smooth quartz blocks to shape clean, light floor panels. Line the inner garden path with mossy cobblestone and dirt. The light stone platform creates a clean, peaceful floor. Natural light fills every open corner of the wooden tea shelter.
Detailing Open Walls with Paper Screen Accents
Build open pavilion walls using birch fences and white banners. Place birch trapdoors along top wall edges for delicate wooden detail. Surround the stone platform with pink petal carpet blocks. Hang small red lanterns across open wooden roof rafters. The white banners mimic traditional Shoji paper screen walls effortlessly. The pavilion looks light, open, and integrated with nature.
Illuminating the Zen Garden and Koi Pond Path
Lay a garden path using smooth stone and grey carpet. Place stone lantern posts along the outer gravel walkway path. Scatter pink cherry petals near water edges for peaceful ambiance. Add azalea leaf hedges climbing along low garden stone walls. The pink foliage softens the clean white pavilion structure edges. Your teahouse pavilion invites visitors into quiet garden peace.
Building Zen Rock Gardens and Stepping Stone Ponds
Place large mossy granite boulders around the outer garden space. Use raked birch button details on grey concrete as sand. Wrap green lily pads over calm garden koi pond surfaces. Scatter pink petals into surrounding water patches for detail. Add small bamboo stalks growing along water edge rocks.
Construct low wooden seating benches using smooth birch wood slabs. Use birch trapdoors to form low tea drinking tables inside. Hang dim paper lanterns from iron chains on timber posts. Place potted bonsai saplings on low wooden tea tables. Add cobwebs high in roof peaks for subtle natural detail. Your serene cherry blossom garden pavilion is completely detailed now.
Required Materials and Block List
- Polished Diorite: 6 Stacks
- Smooth Quartz: 5 Stacks
- Birch Planks: 6 Stacks
- Birch Fences: 4 Stacks
- Birch Trapdoors: 4 Stacks
- White Banners: 6 Items
- Pink Petals: 6 Stacks
- Lanterns: 3 Stacks
- Bamboo: 2 Stacks
- Lily Pads: 3 Stacks
Idea 6: The Subterranean Escape Tunnel Gate

A Hidden Emergency Exit Hidden Beneath Stone Foundation Walls
A secret escape tunnel provides safe exit during desperate castle sieges. Heavy dark stone arches hold up massive sloped wall foundations. The dark water tunnel is hidden behind hanging weeping vines. Wooden emergency supplies lie hidden inside secret stone alcoves. Ghostly silence fills every dark, damp corner inside this tunnel. Forgotten escape routes offer final hope when inner keeps fall.
Constructing the Hidden Stone River Tunnel Vault
Outline the deep tunnel mouth footprint using smooth basalt blocks. Raise tall water arch posts using dark deepslate brick columns. Connect the tunnel entrance at the water line using iron bars. Create a hidden stone floor frame using dark cobble deepslate slabs. The dark stone adds centuries of secrecy to the palette. It matches the heavy sloped castle foundation walls above perfectly.
Installing Secret Wooden Trapdoor Hatches Inside
Fill the tunnel entrance using dark oak log support framing. Shape the hidden water channel running straight into the castle hill. Place dark oak trapdoor hatches hiding secret ladder shafts above. Let green weeping vines trail down through open stone arches. The dark tunnel opening blends seamlessly into surrounding cliff stone. Nature slowly hides secret human escape routes over long years.
Decorating the Secret Escape Corridor and Supply Cache
Cover stone tunnel floors with damp moss and lichen blocks. Plant glowing cave vines along dark underground rock walls. Add chest blocks containing food, bows, and spare torches. Place soul lanterns along low stone ledges for blue light. The interior stays filled with emergency survival supplies and weapons. Secret escape plans stay safe inside this hidden stone water tunnel.
Detailing Underground Dock Ramps and Boat Slips
Build small wooden boat ramps using dark oak stairs. Place small wooden rowboats floating inside secret water channels. Add anvil benches along walls for quick weapon repair work. Scatter iron ingot items across hidden wooden workbench spaces. Hang dark oak log beams directly from upper stone tunnel arches.
Construct central stone supply rooms using deepslate brick walls. Place sea pickles under shallow tunnel water for glowing paths. Wrap green vines heavily around all stone tunnel supports. Add soul lanterns hidden behind dense hanging weeping vines. Place armor stands holding iron armor near escape boats. Your subterranean escape tunnel gate is now fully realized today.
Required Materials and Block List
- Smooth Basalt: 8 Stacks
- Deepslate Bricks: 10 Stacks
- Dark Oak Logs: 8 Stacks
- Dark Oak Trapdoors: 6 Stacks
- Cave Vines: 4 Stacks
- Glow Lichen: 3 Stacks
- Chests: 6 Stacks
- Soul Lanterns: 4 Stacks
- Iron Bars: 3 Stacks
- Anvils: 2 Blocks
Idea 7: The Armor Garrison and Weapons Storehouse

A Secure Multi-Story Storehouse Holding Samurai Battle Gear
A massive weapons storehouse holds hundreds of suits of samurai armor. Polished dark wood and white plaster give it a clean military look. A heavy tiled roof tops the soaring timber storehouse far above. It looks organized, secure, and deeply practical for castle defense. Sharp katana blades gleam softly under ceiling lantern light tonight. Guards patrol its wide wooden halls to protect royal weapons.
Setting Up the Massive Storehouse Base Platform
Build a wide rectangular platform using smooth stone brick blocks. Place ten tall foundation posts using dark stripped oak logs. Connect upper pillar tops with decorative dark oak stairs. Add dark oak fence railings around base platform edges. Leave two main double doors for entering the large building. Clean structural framing makes this storehouse look heavy and fireproof.
Building the Soaring White Storehouse Walls
Construct a multi-story building using white concrete powder walls. Frame each wall section using dark oak log timber beams. Place dark oak trapdoors as protective window shutters along upper floors. Hang a central iron chain holding a lantern down the hall. The contrasting white walls and dark beams give high visibility. The soaring storehouse stands proud inside the inner courtyard.
Adding Detailed Armor Stands and Weapon Racks
Wrap iron fence railings around upper interior storage balconies. Place armor stands dressed in iron and gold armor along walls. Scatter chest blocks filled with arrows, bows, and swords inside. Add dark oak trapdoors along outer balcony edges for security. The interior holds complete military gear for castle defenders. Your armor garrison stands ready to supply hundreds of samurai.
Crafting Blacksmith Workbenches and Repair Courtyards
Build a blacksmith repair shop against the storehouse outer wall. Place a warm smoking chimney using brick blocks and campfires. Top the small repair shed using dark spruce wood stairs. Hang small iron lanterns near the blacksmith furnace door. Add campfire smoke floating up into the dark night sky.
Lay a cobblestone pathway leading up to main entry doors. Use stone brick stairs and coarse dirt for rugged paths. Place azalea leaf bushes along outer path stone edges. Add bright paper lanterns attached to dark fence posts. Surround the storehouse base with organized timber supply stacks. Your armor garrison and weapons storehouse is fully stocked tonight.
Required Materials and Block List
- Stone Bricks: 10 Stacks
- Stripped Dark Oak Logs: 10 Stacks
- White Concrete Powder: 10 Stacks
- Dark Oak Stairs: 8 Stacks
- Armor Stands: 12 Items
- Chests: 8 Stacks
- Iron Bars: 4 Stacks
- Campfires: 3 Blocks
- Lanterns: 5 Stacks
- Cobblestone: 6 Stacks
Idea 8: The Bamboo Forest Moat and Bridge

A Peaceful Green Waterway Bordered by Soaring Stalks
A bamboo forest moat offers natural defense and incredible beauty. Natural water channels wind gracefully around tall stone castle ramparts. Dense bamboo stalks create a thick green wall along outer banks. A arched wooden bridge spans the water, connecting roads to gates. You can hear wind rustling softly through high green leaves. Commuters and guards cross the scenic wooden bridge every morning.
Building the Natural Water Channel and Stone Banks
Locate a winding river section bordering outer castle walls. Line the inner castle bank using sloped stone brick walls. Line the outer river bank using natural grass, dirt, and moss. Fill the channel with calm, flowing water source blocks. Make the water channel at least six to eight blocks wide. Natural river channels provide brilliant defensive water barriers for castles.
Constructing the Curved Wooden Arch Bridge
Build an arched bridge spanning across the bamboo water channel. Layer spruce wood stairs and slabs to form a smooth curve. Add dark oak fences along bridge edges for safe handrails. Ensure the bridge arch rises high enough for small boats below. Use dark oak logs to build strong support pillars in water. Curved wooden bridges add timeless Japanese elegance across water channels.
Connecting Banks with Dense Bamboo Plantings
Plant thick rows of bamboo stalks along the outer riverbank. Bone meal the bamboo to grow high, dense green walls. Wrap iron chains around bridge end posts to represent mooring ropes. Place bright paper lanterns along the wooden bridge path for safety. Crossing over to the castle gate becomes a peaceful visual experience. Look out over calm water reflections from the bridge peak.
Detailing Guard Posts and Waterway Flora
Place small guard shelter posts on the castle bank side. Add dark oak doors surrounded by spruce trapdoor walls. Hang paper lanterns directly from small guard post roof corners. Use spruce slabs for comfortable guard bench seating along paths. Add a warning notice board using oak signboards on stone walls.
Decorate the riverbank base around the bridge foundation frame. Surround stone abutments with smooth sand, gravel, and lily pads. Wrap kelp and seagrass around lower underwater bridge support logs. Add floating barrels tied with rope nearby in shallow water. Place dark oak fences along path entries for line control. Your bamboo forest moat and bridge is completely finished today.
Required Materials and Block List
- Stone Bricks: 8 Stacks
- Spruce Stairs: 6 Stacks
- Spruce Slabs: 6 Stacks
- Dark Oak Fences: 6 Stacks
- Dark Oak Logs: 6 Stacks
- Bamboo: 8 Stacks
- Lily Pads: 4 Stacks
- Lanterns: 4 Stacks
- Signboards: 1 Stack
- Barrels: 4 Stacks
Idea 9: The Noble Shogun Reception Hall
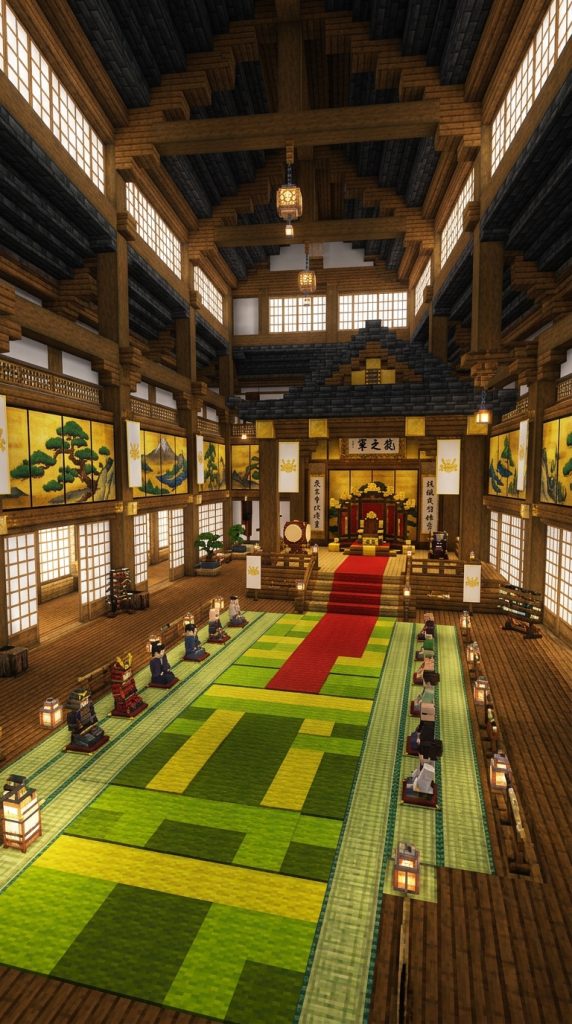
A Luxurious Assembly Hall Featuring Gold Accents and Tatami Mats
A grand assembly hall serves as the supreme political court for shoguns. The interior features polished oak floors covered in woven matting. Golden wall screens showcase painted pine trees and soaring cranes. It serves as an impressive meeting place for visiting regional lords. Foreign ambassadors bow with respect when entering this golden hall. Absolute authority radiates through every single golden architectural detail.
Building the Wide One-Story Wooden Hall Frame
Build a large rectangular hall platform using dark oak planks. Line the lower foundation walls using polished blackstone slabs. Build tall vertical wall posts using smooth stripped birch logs. Fill upper wall panels using clean white concrete powder blocks. Make the main hall floor span at least fifteen by twenty-five blocks. Wide single-story layouts mimic traditional feudal palace architecture accurately.
Constructing the Sweeping Roof and Shoji Screen Walls
Place spruce wood planks across the wide hall ceiling framing. Build sliding paper screen doors using white banners and birch trapdoors. Construct a massive sweeping roof using deepslate tile stairs. Install wide wooden verandas made of oak slabs along outer edges. The wide roof eaves shade outdoor wooden verandas from summer rain. Dark oak trapdoors frame upper wall ventilation screens beautifully.
Detailing Gold Leaf Screens and Raised Shogun Seating
Cover interior wooden floors with green and yellow carpet tatami mats. Place gold blocks framed with dark trapdoors as wall art. Position a raised wooden seating platform at the far hall end. Place a silk red cushion carpet on the shogun’s elevated throne. Warm lantern light reflects off golden wall panels across the room. Your luxurious reception hall is ready for imperial court assemblies.
Expanding Veranda Walkways and Outer Zen Gardens
Carve a peaceful inner courtyard garden outside the veranda deck. Use white concrete powder and buttons to form raked sand. Place smooth granite rocks and azalea bushes in garden sand. Add bamboo fence screens blocking private courtyard views from outside gates. Scatter pink petals across wooden veranda steps for detail.
Add dark oak roof support beams extending over outer verandas. Wrap green vines along outer wooden roof support columns. Place red banners holding clan crests inside the main hall entry. Use campfire smoke beneath floorboards for subtle incense effects. Add sculk sensors hidden in ceilings to detect approaching steps. Your shogun reception hall showcases unmatched royal wealth and power.
Required Materials and Block List
- Stripped Birch Logs: 8 Stacks
- Dark Oak Planks: 10 Stacks
- White Concrete Powder: 8 Stacks
- Deepslate Tile Stairs: 10 Stacks
- Green Carpet: 6 Stacks
- Yellow Carpet: 6 Stacks
- Gold Blocks: 3 Stacks
- White Banners: 8 Items
- Lanterns: 4 Stacks
- Red Wool: 4 Stacks
Idea 10: The Outer Castle Town Samurai Quarters

Neat Rows of Timber Homes Housing Elite Castle Defenders
An outer castle town houses loyal samurai and their military families. Weathered dark wood homes feature neat tile roofs and small yards. High stone retaining walls separate samurai quarters from peasant merchant areas. It delivers an authentic historical town atmosphere to your castle outskirts. Banners flutter proudly outside private family gate entrances daily. Life moves with discipline and order across these quiet timber streets.
Laying Out the Castle Town District and Stone Terraces
Anchor heavy stone retaining walls directly into stepped hillside dirt. Scatter stone brick blocks across terraced residential street levels. Place polished granite blocks forming smooth lower wall bases. Add wide stone stairways winding up between samurai home terraces. The terraced layout organizes residential districts cleanly along castle hills. Every house level overlooks lower town streets and river channels.
Constructing Compact Samurai Houses and Tiled Roofs
Build small residential homes using dark oak logs and white walls. Mix spruce planks into inner house walls for warm home interiors. Use dark deepslate tile stairs to build neat gabled roofs. Place spruce trapdoors as window shutters along street facing walls. Every small home looks completely functional, neat, and historically accurate. Disciplined defenders find quiet comfort inside these sturdy wooden homes.
Overgrowing Yard Walls with Azalea Bushes and Gardens
Plant azalea leaf hedges along small private front yard walls. Hang small paper lanterns from wooden front gate arches. Cover private yard floors with smooth moss and coarse dirt. Add small stone water basins near home front entrances. Bright red and white azalea flowers add charm to dark wood homes. Your samurai quarters create an authentic feudal living environment.
Detailing House Interiors and Training Courtyards
Build small interior living rooms inside wooden samurai homes. Line inner floor spaces using light birch slabs and green carpets. Place weapon racks holding iron swords along private home walls. Add sleeping futon beds made of white wool carpets inside. Hang bright paper lanterns from low wooden room ceilings.
Build an outdoor sword training courtyard near central town gates. Place armor stands and hay bales for sword practice targets. Place a weapon storage rack holding iron swords nearby. Hang red clan banners along outer training yard fences. Add cobwebs stretching over roof storage rafters in attic spaces. Your samurai quarters town district is fully inhabited now.
Required Materials and Block List
- Stone Bricks: 10 Stacks
- Dark Oak Logs: 10 Stacks
- White Concrete: 8 Stacks
- Deepslate Tile Stairs: 8 Stacks
- Spruce Planks: 8 Stacks
- Azalea Leaves: 6 Stacks
- Armor Stands: 6 Items
- Hay Bales: 4 Stacks
- Lanterns: 5 Stacks
- Green Carpet: 4 Stacks
Idea 11: The Imperial Stables and Cavalry Yard
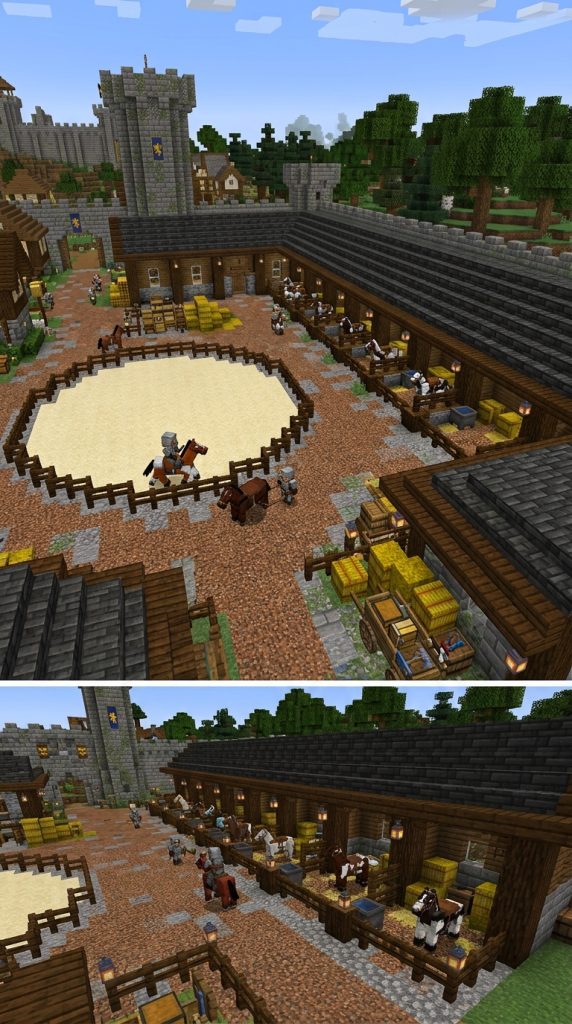
A Dedicated Military Complex Housing Royal Battle Horses
This functional military build features a wide timber horse stable. A grand training yard allows cavalry samurai to practice riding skills. Heavy oak fencing encloses spacious, clean wooden horse stalls. It forms an essential military centerpiece for any large Japanese stronghold. Heavy hay bales stack neatly under deep slate roof eaves. The cavalry yard buzzes with active training drills every afternoon.
Framing the Wide Stable Foundation and Stalls
Construct a long single-story building using dark oak support logs. Use smooth stone brick blocks to build low foundation walls. Build spacious individual horse stalls using dark oak fences and gates. Lay down coarse dirt and yellow hay bales for stable stall floors. Make the stable building at least thirty blocks long for many horses. Clean layout design creates a spacious, functional cavalry housing complex.
Constructing the Deepslate Roof and Open Training Ring
Build a high sweeping roof using dark deepslate tile stairs. Create open arched doorways along the front stable stall openings. Frame a large circular training ring outside using oak fences. Add sand and coarse dirt layers across the wide training ring floor. The dark roof matches the main castle architecture across the courtyard. Scaffolding and hay stacks sit ready for daily horse care.
Decorating with Equestrian Gear and Hay Storage
Cover side stable storage bays with stacked hay bales and barrels. Build high storage lofts using oak slabs and wooden ladders. Hang iron chains holding water buckets over every horse stall gate. Light the stable corridor using warm paper lanterns on posts. The combination creates an active, functional military horse facility scene. Your imperial cavalry yard stands ready for battle drills.
Detailed Interior Tack Rooms and Grooming Bays
Build a saddle repair tack room inside the main stable end. Frame wall shelves using spruce slabs and dark trapdoors. Place leather horse armor displays on armor stands along walls. Lay down brown carpet runners through clean tack room spaces. Use dark oak trapdoors for storage chest covers throughout rooms.
Place cauldrons filled with water inside every individual horse stall. Add wheat stacks near every feeding trough station. Build grooming bays holding cauldrons and shears in central halls. Scatter oak buttons and trapdoors across dirty stable floor boards. Wrap green vines heavily around outer stable stone foundation walls. Your imperial stables and cavalry yard stand fully operational today.
Required Materials and Block List
- Dark Oak Logs: 12 Stacks
- Stone Bricks: 8 Stacks
- Deepslate Tile Stairs: 10 Stacks
- Hay Bales: 10 Stacks
- Dark Oak Fences: 8 Stacks
- Coarse Dirt: 8 Stacks
- Cauldrons: 8 Blocks
- Armor Stands: 6 Items
- Lanterns: 5 Stacks
- Water Buckets: 4 Items
Idea 12: The Sacred Shinto Shrine and Torii Gate

A Holy Mountain Sanctuary Protecting the Castle Grounds
A sacred Shinto shrine perched on a hill brings spiritual peace. Iconic bright red torii gates mark the holy entrance path. Crimson painted wood stands out dramatically against dark green pine trees. It offers a quiet place for samurai to pray for victory in battle. Smoke rises gently from sweet incense burners into crisp mountain air. Spiritual energy protects the castle and its people from harm.
Building the Vibrant Crimson Torii Gate Approach
Erect tall vertical posts using bright mangrove logs and crimson wood. Connect the top post tops with two curved crimson wood beams. Paint beam ends dark black using dark oak trapdoor accents. Line the stone walking path leading up through multiple torii gates. Keep the red gate structures elevated along a stone hill stair path. Red torii gates mark sacred transitions from outer worlds to holy grounds.
Constructing the Holy Shrine Structure and Curved Roof
Build a compact shrine building using crimson planks and white concrete. Construct a steep sweeping roof using dark deepslate tile stairs. Place decorative golden fence caps along high roof ridge ends. Add spruce trapdoor screen doors across the front shrine entry. Simple, elegant red architecture creates a striking spiritual centerpiece on hills. Elevating the shrine creates a peaceful, sacred hill sanctuary.
Decorating Shrine Grounds with Stone Lanterns and Paper Wish Ribbons
Place carved stone brick lanterns holding soul torches along paths. Set up wooden fence frames holding white banners as sacred wish papers. Scatter red wool carpet paths across clean shrine wooden floors. Hang iron lanterns from every shrine roof eave corner. The red gates and paper banners add authentic spiritual details. The entire shrine hill feels peaceful, holy, and deeply revered.
Crafting Purification Water Basins and Mountain Paths
Build a sacred water purification basin using smooth stone stairs. Water spills smoothly into stone basins from dark oak log pipes. Scatter mossy cobblestone and azalea bushes around mountain spring rocks. Add campfire smoke rising through stone incense burners smoothly. Lay a soft gravel path winding through the sacred pine forest.
Place water cauldrons with floating lily pads on shrine steps. Add flower pots containing pink cherry saplings on shrine ledges. Hang string lines holding white paper streamers across red torii gates. Place armor stands wearing gold armor as ceremonial shrine guards. Surround the sacred hill perimeter with soaring dark spruce trees. Your sacred Shinto shrine and torii gate path are open.
Required Materials and Block List
- Mangrove Logs: 8 Stacks
- Crimson Planks: 8 Stacks
- White Concrete: 6 Stacks
- Deepslate Tile Stairs: 6 Stacks
- Dark Oak Trapdoors: 5 Stacks
- Stone Bricks: 6 Stacks
- White Banners: 6 Items
- Red Wool: 4 Stacks
- Soul Torches: 2 Stacks
- Spruce Leaves: 6 Stacks
Idea 13: The Grand Castle Kitchens and Rice Granary
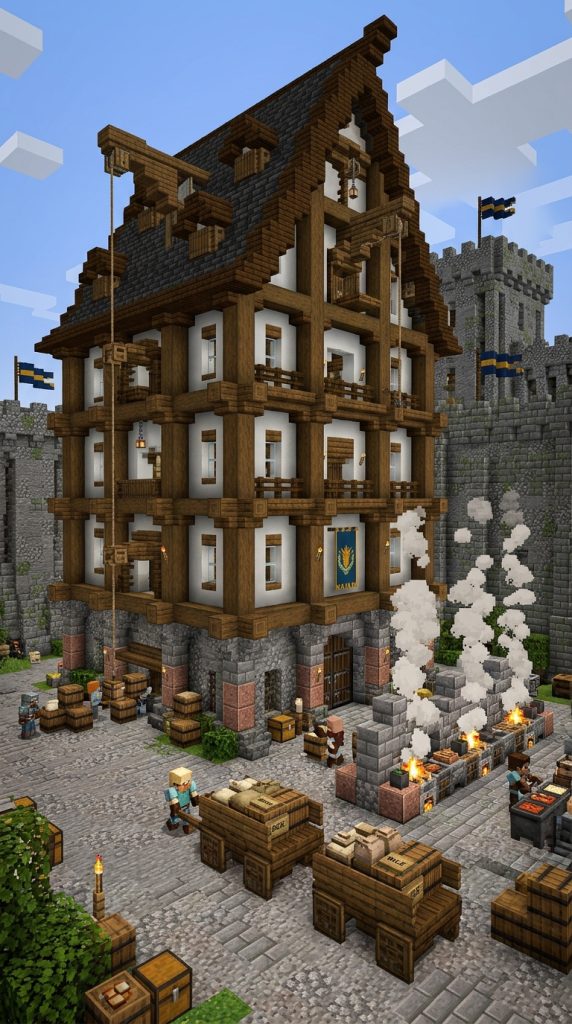
Massive Timber Storehouses Feeding Thousands of Castle Inhabitants
Enormous food granaries form the survival backbone of major castle complexes. These heavy multi-story timber buildings hold thousands of rice sacks. Loaded supply carts move constantly between lower gates and storehouse doors. Deep slate roofs protect valuable grain and dried fish from rain. Sea birds perch on high roof gables watching busy courtyard activity. Food and supplies flow continuously through these vast timber halls.
Framing Heavy Timber Granary Foundations
Build a massive rectangular foundation using tough polished granite blocks. Set huge vertical corner posts using thick stripped dark oak logs. Space structural support pillars every five blocks for floor stability. Fill lower wall sections using durable stone bricks up to window height. Make the main granary footprint span at least eighteen by thirty blocks. Solid stone and log foundations support immense weight from grain sacks.
Constructing Multi-Layered Food Storage Floors and Tiled Roofs
Build upper granary floors using thick spruce wood planks and log joists. Erect soaring outer walls using clean white concrete powder blocks. Construct a high steep gabled roof using dark deepslate tile stairs. Install massive double sliding doors made of dark oak trapdoors. Large wall loading hatches allow ropes to pull grain sacks into top floors. Multi-level storage maximizes usable space for rich castle supplies.
Decorating Interior Storage Bays with Rice Sacks and Barrels
Stack dried kelp blocks and barrels ten blocks high inside wide bays. Place hay bales, melon blocks, and dried fish chests in organized rows. Set up heavy iron scales using anvils and chains near loading gates. Hang bright paper lanterns from high open roof timber trusses. The packed interior showcases immense food reserves for long sieges. Every storage bay tells stories of abundant harvests across castle lands.
Adding Outdoor Cargo Carts and Preparation Hearths
Build heavy wooden supply carts using dark oak wood and trapdoors. Place barrel loads tied with brown carpet inside wooden cart beds. Frame outdoor cooking hearths using heavy stone bricks and campfires. Scatter loose crate buttons and pressure plates across stone courtyard floors. Add merchant signboards above main granary entry doors proudly.
Set up clerk inspection desks holding lecterns near main cargo doors. Place armor stands wearing leather aprons as granary food managers. Add iron bars over all lower floor granary windows for protection. Surround the granary exterior with cobblestone paving and water drains. Connect the granary loading bays directly to main lower gate roads. Your grand castle kitchen and rice granary is fully operational now.
Required Materials and Block List
- Polished Granite: 8 Stacks
- Stripped Dark Oak Logs: 12 Stacks
- Stone Bricks: 10 Stacks
- Spruce Planks: 12 Stacks
- Deepslate Tile Stairs: 10 Stacks
- White Concrete Powder: 10 Stacks
- Dark Oak Trapdoors: 8 Stacks
- Barrels: 12 Stacks
- Dried Kelp Blocks: 8 Stacks
- Hay Bales: 8 Stacks
Idea 14: The Lord’s Private Inner Courtyard Garden
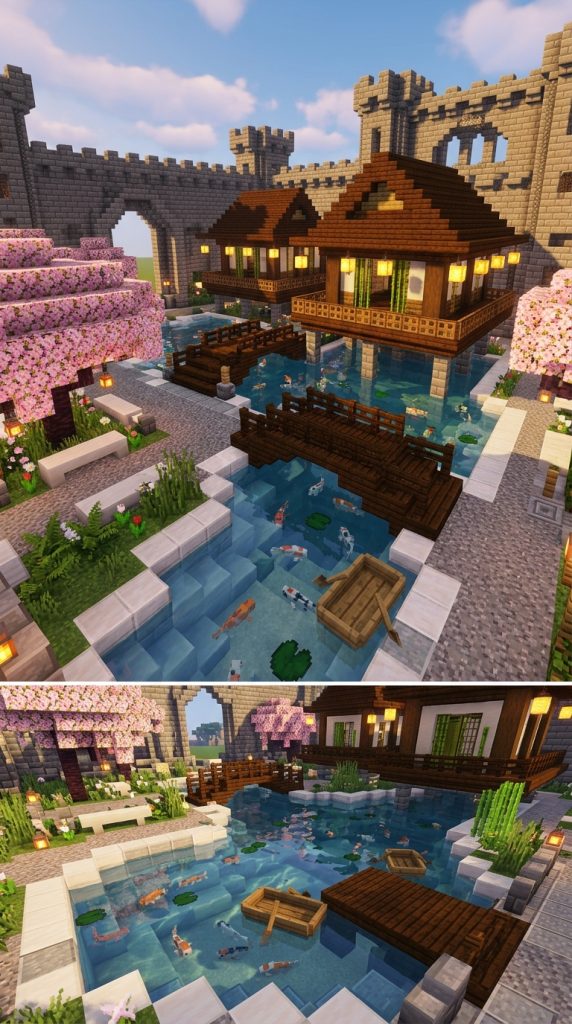
A Secluded Paradise Featuring Koi Ponds and Bonsai Trees
A private inner courtyard garden provides quiet isolation for castle rulers. Polished diorite and dark oak verandas border calm water koi ponds. Ornate stone bridges curve gracefully over sparkling water channels below. Cherry trees line garden paths with vibrant pink flower displays. Small wooden boats float on smooth water paths, carrying tea to pavilions. Nature and castle architecture blend into a breathtaking imperial masterpiece.
Constructing the Elegant Stone Pond and Waterways
Grid out wide water channels winding through private inner courtyard spaces. Line pond sides using smooth quartz and polished stone brick retaining walls. Build stone stairs down to water levels every few blocks for boat steps. Pave surrounding pedestrian walkways using light smooth stone and diorite slabs. Ensure water channels are at least three blocks deep for colorful fish. Clean stone ponds elevate castle garden architecture to supreme royal levels.
Building Ornate Curved Wooden Garden Bridges
Construct sweeping footbridges spanning over narrow garden water channels. Use dark oak stairs and slabs to shape smooth, graceful bridge arches. Add dark oak fence railings with carved detail blocks along bridge sides. Place glowing sea lantern blocks embedded beneath bridge arch centers. Bright underwater light casts magical reflections on calm pond surfaces. Elegant arch bridges seamlessly connect separated garden teahouse spaces together.
Decorating Veranda Balconies and Flowering Garden Walls
Build grand palace verandas along garden walkways using dark oak and white concrete. Add arched paper screen windows framed with smooth birch wood stairs. Construct decorative wooden railings on upper floor balconies overlooking water paths. Plant vibrant pink cherry saplings in carved stone planter boxes. The rich colorful plant life creates an opulent, peaceful courtyard environment. Every garden corner offers stunning views of refined natural beauty.
Detailing Koi Pond Features and Serene Garden Life
Drive dark oak wooden posts into pond water beds for decorative detail. Use dark oak trapdoors and fences to craft elegant water features. Tie small wooden rowboats to these decorative posts with iron chains. Place stone benches and glowing paper lanterns along pedestrian garden paths. Scatter small flower pots and tea sets near private veranda water steps.
Add small arched water gates leading to private indoor garden spaces. Install decorative wall fountains spilling fresh spring water into main ponds. Place armor stands dressed in silk robes as private court guards. Surround teahouse bases with sea lantern lighting hidden beneath water surfaces. Your lord’s private inner courtyard garden is completely finished and breathtaking.
Required Materials and Block List
- Smooth Quartz: 12 Stacks
- Polished Stone Bricks: 10 Stacks
- Smooth Stone Slabs: 10 Stacks
- Dark Oak Stairs: 8 Stacks
- White Concrete: 10 Stacks
- Sea Lanterns: 6 Stacks
- Dark Oak Fences: 6 Stacks
- Flower Pots: 4 Stacks
- Cherry Saplings: 6 Items
- Iron Chains: 4 Stacks
Idea 15: The Outer Fortress Sea Gate and Moat Harbor
Massive Stone Walls Guarding Castle Sea Approaches
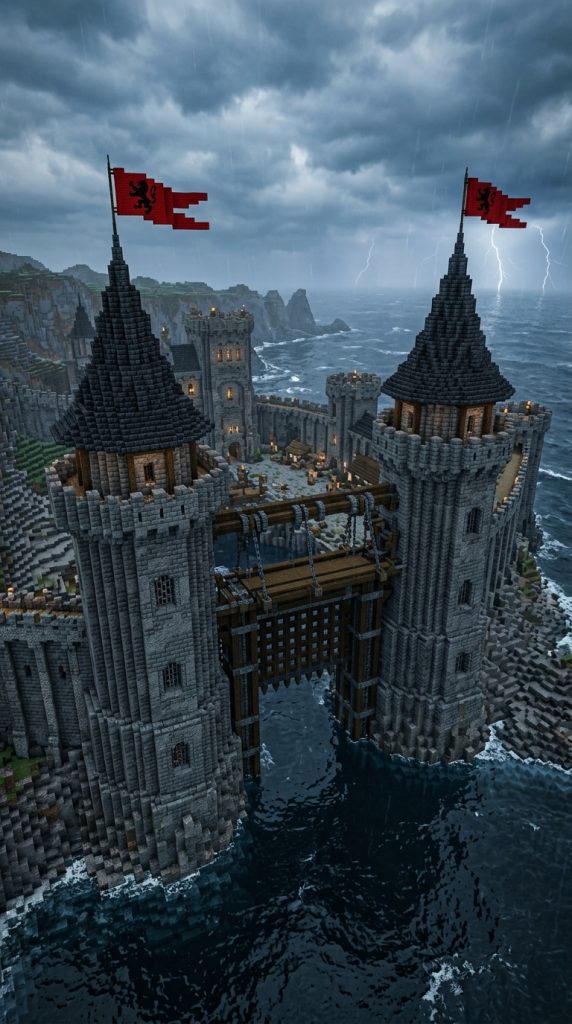
A grand sea gate controls all maritime access to coastal castle complexes. Twin multi-story stone guard towers flank a heavy timber water gate. Massive iron chains raise heavy wooden gates allowing friendly ships through. Archers stand ready along high curved stone battlements to repel pirate raiders. The sea gate stands as an intimidating symbol of naval power. Invading fleets must break these formidable towers to reach inner castle harbors.
Building Twin Stone Harbor Guard Tower Foundations
Erect two massive circular tower foundations on opposite sides of the sea entrance. Use heavy polished deepslate blocks below waterlines for maximum strength. Transition to weathered stone bricks and cracked stone blocks above water levels. Build the twin towers at least twenty-five blocks tall for commanding sea views. Leave a wide fifteen-block water channel between the stone tower bases. Strong twin towers permanently command the primary maritime entrance road.
Constructing the Heavy Timber Gate and Drawbridge Mechanism
Span the upper water channel gap between towers using a massive stone arch bridge. Construct a heavy timber gate using dark oak logs extending into water. Build winching mechanism rooms inside high bridge chambers using dark oak logs and chains. Install heavy wooden walkway ramps using spruce wood planks on both sides. Functional winch gears make the massive sea gate look mechanically believable.
Decorating High Battlements and Clan Flag Standards
Top both guard towers with sharp, sweeping dark deepslate tile roofs. Surround upper tower lookout decks with defensive stone brick battlements. Place large red clan flags fluttering from high wooden flagpoles above roofs. Hang heavy iron lanterns from stone archways casting light on water channels. Deep blue light reflects across channel water beneath the heavy timber gate. Your sea gate stands impenetrable against all naval threats.
Detailing Guard Barracks and Waterway Defense Systems
Build inner guard living quarters inside mid-level tower rooms. Place bunk beds, weapon racks, and armor stands inside circular stone spaces. Install cauldron cooking hearths with campfire smoke piping through outer wall vents. Add spiral stone staircases linking all tower floors from water to roof. Place heavy crossbow ballista mounts on high open tower roof decks.
Lay underwater iron chain nets across the sea floor between towers. Place sea lanterns under water channel surfaces for hidden intruder detection. Add warning bells inside top tower lookout decks for emergency alarms. Surround outer tower bases with sharp deepslate wall breakwater barriers. Connect the twin towers directly to main castle stone walls seamlessly. Your outer fortress sea gate and moat harbor are fully active today.
Required Materials and Block List
- Polished Deepslate: 10 Stacks
- Stone Bricks: 14 Stacks
- Cracked Stone Bricks: 6 Stacks
- Dark Oak Logs: 10 Stacks
- Spruce Planks: 8 Stacks
- Deepslate Tile Stairs: 8 Stacks
- Iron Chains: 6 Stacks
- Red Wool: 4 Stacks
- Armor Stands: 6 Items
- Sea Lanterns: 4 Stacks