14 Epic Minecraft Castle Archway Ideas to Fortify Your Base
Constructing monumental castle archways transforms vulnerable perimeter walls into impenetrable, awe-inspiring bastions. Waterways, mountain passes, and sprawling fortress courtyards naturally demand defensive choke points. Furthermore, monumental archways provide safe, illuminated travel portals for survival players and heavy supply convoys. Masterful archway architecture effortlessly combines military fortification engineering with intricate medieval stonework. Many survival builders rely on flat, monotonous rectangular openings in their fortress walls initially. However, mastering varied arch designs elevates your entire kingdom-building expertise.

Planning Strategic Castle Archway Choke Points
Every monumental archway build requires thorough terrain analysis and military layout planning before construction begins. First, survey your outer perimeter walls, mountain gaps, or moat entries carefully. Deep fortress entries require multi-layered defensive tunnel passages with murder holes above. In addition, wide kingdom roadways demand soaring parabolic arch profiles for grand visual impact. Terraforming the adjacent bedrock cliffs creates seamless, organic transitions directly into your stone buttresses. Consequently, your massive archway appears naturally anchored into the rugged landscape. Clear surrounding obstacles to ensure unobstructed archer sightlines across open approaches.
Selecting Harmonious Fortified Block Palettes
Choosing the right block palette defines your castle archway’s defensive strength and historical authenticity. For instance, deepslate bricks combined with polished basalt establish heavy, imposing gothic gate arches. Meanwhile, smooth stone bricks mixed with cracked cobblestone and andesite deliver classic medieval stronghold charm. In addition, mud bricks and textured granite provide warm, weathered rustic tones for rural river gate spans. Polished blackstone and crying obsidian create terrifying nether-fortress gateways. Therefore, blending textured stone blocks with contrasting wood accents enhances structural depth and realism.
Engineering Structural Depth, Corbels, and Keystone Spans
Flat, one-block-thick wall portals look fragile, artificial, and visually uninspiring across grand fortress facades. Instead, incorporate deep recessed arch portals measuring four to six blocks in thickness. Use upside-down stairs, slabs, and stone walls to sculpt smooth, load-bearing parabolic curves. Furthermore, build tapered support buttresses that flare outward toward the ground level. Projecting decorative stone corbels and prominent keystone blocks creates bold, dramatic shadow lines. Consequently, your finished archway looks structurally indestructible, ancient, and truly formidable.
Essential Survival Tools for Monumental Arch Construction
Building towering structural archways over deep defensive moats demands specialized survival preparations. First, craft ample iron or netherite tools enchanted with Unbreaking III and Efficiency V. In addition, brew slow falling, night vision, and swiftness potions to navigate dizzying heights safely. Scaffolding blocks allow you to scale vaulted arch ceilings and parapet machicolations smoothly. Keep multiple water buckets handy on your hotbar for rapid descents and emergency clutch saves. Therefore, organize your shulker boxes and building supplies thoroughly before placing foundation blocks.
Integrating Roadways, Portcullises, and Murder Holes
An epic castle archway must balance defensive military utility with smooth daily player transit. Design the interior roadway tunnel at least five to seven blocks wide. This spacious clearance easily accommodates armored horses, loaded donkeys, and walking patrols simultaneously. Furthermore, install recessed iron bar portcullis gates and heavy wooden blast doors along the corridor. Add overhead murder holes lined with iron trapdoors to drop arrows or lava on hostile mobs. Consequently, your fortified archway functions as an impenetrable stronghold gate.
Concealing Tactical Lighting and Mob-Proofing Long Tunnels
Preventing hostile mob spawns inside expansive archway tunnels is vital for fortress security. Hide glowing sea lanterns and froglights beneath decorative wooden trapdoors along the road deck. In addition, place glowing light blocks underneath stone brick stair borders and corbel brackets. Mount iron lanterns, soul lanterns, and fire braziers atop high parapet battlements. Furthermore, wire redstone lamps to daylight sensors for automated evening illumination along corridors. As a result, your massive archway remains bright, secure, and atmospheric throughout midnight sieges.
1. Grand Gothic Pointed Stone Archway
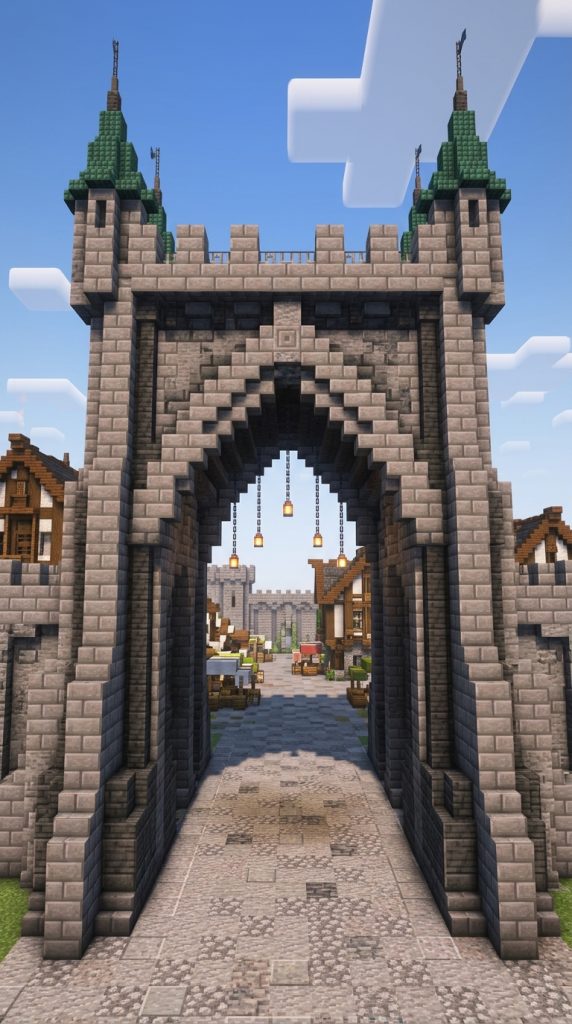
Towering stone brick buttresses, ribbed pointed arches, and deepslate spires define this gothic arch. It frames primary fortress boulevards with monumental grandeur.
Majestic Imperial Citadel Entry
Gothic pointed archways project supreme architectural power, religious authority, and military defense. A soaring lancet arch profile creates monumental vertical scale across fortress walls. Furthermore, heavily reinforced stone buttresses flare outward to absorb immense structural loads. Weathered stone bricks, cracked masonry, and polished andesite display centuries of enduring harsh weather. Consequently, this design serves as an iconic, awe-inspiring entry for survival kingdoms.
Gothic Archway Material Checklist
- Stone bricks, cracked stone bricks, and mossy stone bricks
- Deepslate bricks, polished deepslate, and deepslate walls
- Cobblestone stairs, slabs, and andesite blocks
- Dark oak planks, fences, and dark oak trapdoors
- Iron bars, heavy chains, and iron lanterns
- Campfires, chiseled stone bricks, and banners
Laying Massive Foundation Buttresses
Begin by laying two heavy rectangular stone brick foundation piers ten blocks apart. Make each pier base six blocks wide and eight blocks deep. Space the piers evenly across your main fortress boulevard approach. Next, taper the buttress piers inward gradually using stone brick stairs as they climb upward. Therefore, the foundational pillars look capable of supporting monumental vertical weight.
Turning the High Pointed Lancet Arch
Construct the sweeping arch curve using alternating stone brick stairs and slabs. Angle the arch upward sharply to create a signature gothic pointed apex fifteen blocks above the road. Next, cap the central apex with an exaggerated chiseled deepslate keystone block. Build structural ribbing along the underside of the arch barrel using deepslate walls. Consequently, the vaulted arch displays dramatic architectural depth and rhythm.
Fortifying Upper Parapets and Spired Spires
Construct a crenelated battlements walkway across the top of the archway. Add overhanging stone corbels beneath the parapet to create defensive machicolations. Next, erect two slender decorative watchtower spires on both outer arch corners. Hang heavy iron chains supporting warm lanterns beneath the vaulted arch ceiling. Your grand gothic pointed stone archway now stands fortified and majestic.
2. Fortified Double-Portcullis Barbican Arch
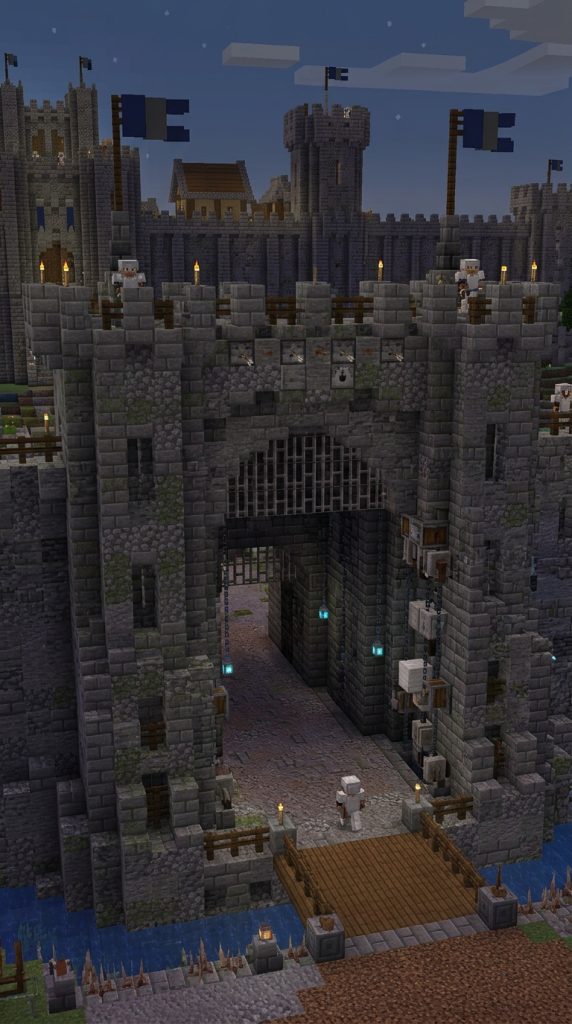
Dual iron portcullises, overhead murder holes, and arrow slits define this barbican arch. It creates a lethal kill zone for invading armies.
Defensive Military Stronghold Choke Point
Barbican archways represent the pinnacle of medieval military engineering and siege defense. A long, heavily fortified stone tunnel connects two separate iron portcullis gates. Furthermore, the intermediate ceiling features concealed murder holes for dropping lava or arrows. Flanking guard chambers allow fortress defenders to unleash crossfire upon trapped intruders. Consequently, this build provides maximum security for high-value survival vaults.
Barbican Arch Material Palette
- Stone bricks, cracked stone bricks, and cobblestone
- Iron bars, iron trapdoors, and heavy chains
- Dark oak logs, stripped spruce, and spruce slabs
- Dispensers, redstone dust, repeaters, and levers
- Lava buckets, arrow stacks, and water cauldrons
- Soul lanterns, grindstones, and anvils
Constructing the Thick Tunnel Walls
Lay two parallel stone walls twenty blocks long, spaced six blocks apart. Build the fortified walls five blocks thick using mixed stone bricks and cobblestone. Next, carve out narrow vertical arrow slits into the interior corridor using iron bars. Connect the walls overhead with a solid barrel-vaulted stone ceiling. Therefore, the long entrance tunnel completely encloses incoming travelers within a defensive channel.
Installing Dual Iron Portcullis Gates
Carve vertical recessed guide tracks into the stone walls at both tunnel entrances. Fill the gate openings with vertical grids of heavy iron bars. Next, mount grindstones, chains, and dark oak fences above the gates to simulate lifting winches. Wire redstone-powered sticky pistons to raise and lower the iron portcullises on command. Consequently, defenders can trap hostile mobs between the closed iron gates effortlessly.
Arming Overhead Murder Holes and Dispensers
Install an upper guard room directly above the central tunnel barrel ceiling. Cut open murder holes through the floor, sealed with iron trapdoors. Next, place dispensers loaded with arrows and splash potions facing downward into the corridor. Mount a master defense tripwire hook circuit along the floor to trigger traps automatically. Your fortified double-portcullis barbican arch stands ready to repel enemy sieges.
3. High-Altitude Mountain Viaduct Arch
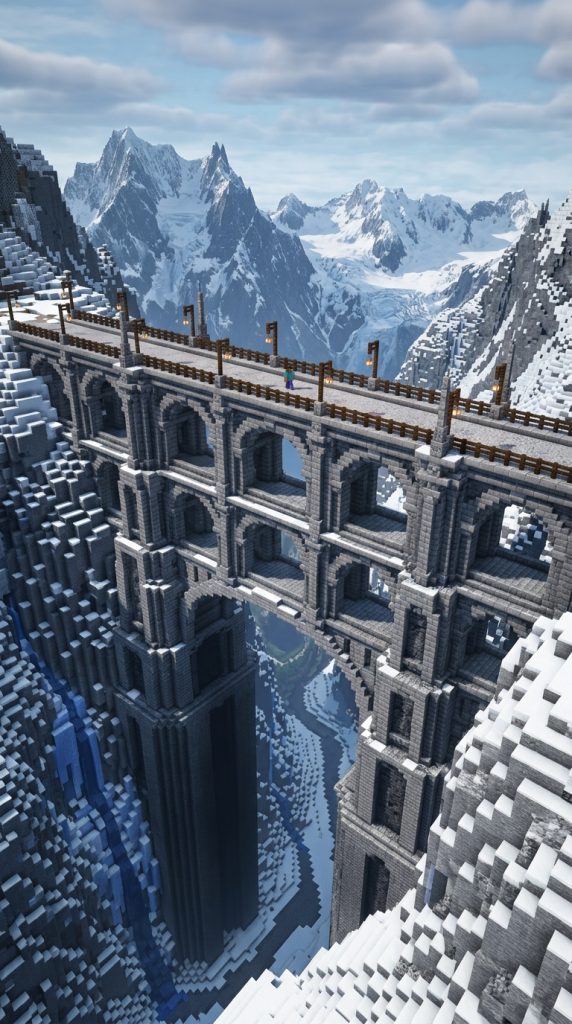
Monumental multi-tiered rounded arches, deepslate footings, and sheer cliff anchors define this viaduct. It bridges dizzying mountain chasms with timeless strength.
Alpine Chasm Engineering Marvel
High-altitude viaduct archways conquer extreme mountain terrain through multi-tiered masonry arches. Massive stone pillars anchor deep into sheer vertical mountain cliffs. Furthermore, sweeping rounded Roman-style arches support an elevated highway between mountain peaks. Weathered cobblestone and andesite textures reflect enduring alpine snowstorms. Consequently, this design turns treacherous mountain ravines into safe, majestic kingdom roadways.
Viaduct Arch Supplies
- Stone bricks, mossy stone bricks, and cobblestone
- Deepslate bricks, polished deepslate, and deepslate stairs
- Andesite, polished andesite, and stone slabs
- Dark oak fences, spruce trapdoors, and lanterns
- Scaffolding blocks, chains, and iron bars
- Snow layers, coarse dirt, and campfires
Sinking Deep Chasm Foundation Footings
Excavate stable anchor shelves directly into opposite sheer rock cliff faces. Erect thick rectangular foundation piers using polished deepslate bricks. Taper the piers inward gradually as they ascend toward the upper chasm gap. Next, cross horizontal deepslate support beams between the vertical pillars for lateral stability. Therefore, the structural framework looks capable of withstanding heavy mountain winds.
Turning Multi-Tiered Semi-Circular Arches
Connect the ascending piers using perfectly rounded semi-circular stone brick arches. Build two or three vertical tiers of arches to span the deepest chasm sections. Next, smooth the underside curves using upside-down stone brick stairs and slabs. Fill the spandrel wall sections between arches with textured cobblestone. Consequently, the multi-tiered arch framework creates breathtaking visual depth across the valley.
Paving the Elevated Alpine Roadway
Pave the upper roadway deck with polished andesite bordered by deepslate tile slabs. Erect sturdy stone brick parapet walls along both outer edges to prevent falls. Next, place recessed viewing alcoves supported by corbel brackets above each pillar. Hang warm iron lanterns from dark oak posts every six blocks along the road. Your high-altitude mountain viaduct arch now spans the chasm securely.
4. Heavy Timber & Reinforced Iron Stronghold Arch
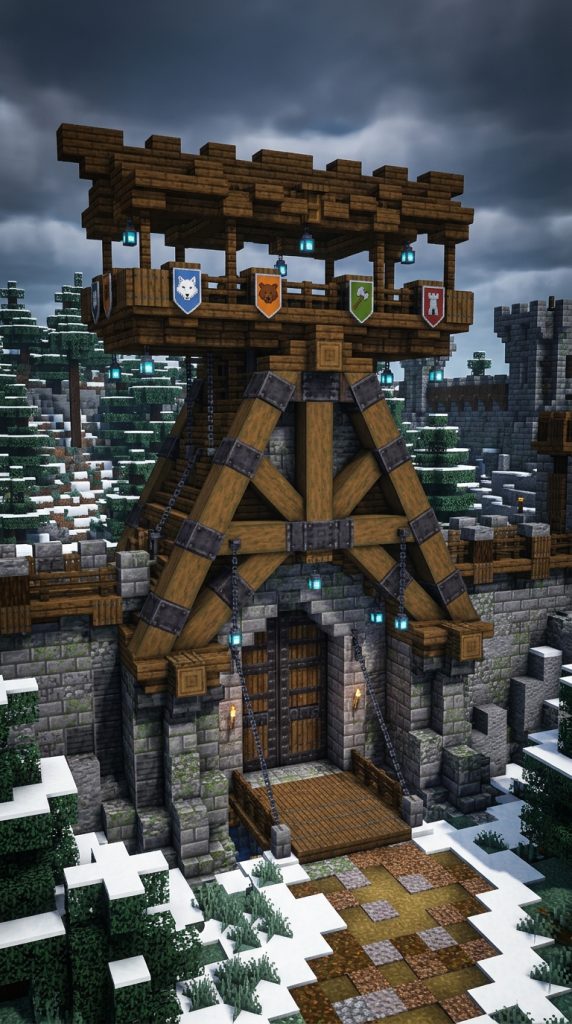
Rough spruce log trusses, riveted iron plates, and heavy stone abutments define this arch. It brings rugged frontier strength to wilderness fortresses.
Industrial Frontier Fortress Gateway
Timber and iron hybrid archways celebrate raw northern power and heavy industrial engineering. Massive stripped spruce logs form heavy diagonal cross-braces over stone footings. Furthermore, iron block plating, heavy chains, and metal brackets reinforce critical structural joints. Sturdy wooden machicolations overhang the gate to shield archers from weather. Consequently, this build fits perfectly within rugged taiga and mountain survival outposts.
Timber Stronghold Arch Palette
- Spruce logs, stripped spruce wood, and spruce planks
- Dark oak stairs, slabs, and dark oak trapdoors
- Stone bricks, cobblestone, and andesite
- Iron blocks, iron bars, and heavy chains
- Campfires, soul lanterns, and anvils
- Grindstones, item frames, and shields
Raising Heavy Stone Abutments
Construct two thick stone brick abutment towers on either side of the road. Make each abutment base six blocks square, rising eight blocks high. Next, inset rough cobblestone and andesite blocks to show weathered mountain texture. Drive heavy stripped spruce log pillars vertically into the inner abutment faces. Therefore, the gate combines stone blast resistance with heavy timber flexibility.
Framing the Timber Log Arch Truss
Span heavy horizontal stripped spruce log beams across the stone abutments. Construct diagonal timber knee braces underneath using dark oak stairs and slabs. Next, wrap the wooden structural joints with iron bars and dark oak trapdoors. Place unlit campfires beneath the arch deck to simulate heavy structural cross-ties. Consequently, the timber arch appears capable of bearing immense overhead fortress weight.
Outfitting the Defensive Timber Hoardings
Build an overhanging wooden hoarding platform across the top of the timber arch. Use dark oak planks bordered by spruce trapdoors for archer murder slits. Next, mount custom clan shields and iron lanterns along the exterior wooden railings. Install heavy iron chains hanging from the timber arch to support a raised wooden blast gate. Your heavy timber and iron stronghold arch stands strong against attacks.
5. Ancient Overgrown Ruined Castle Archway
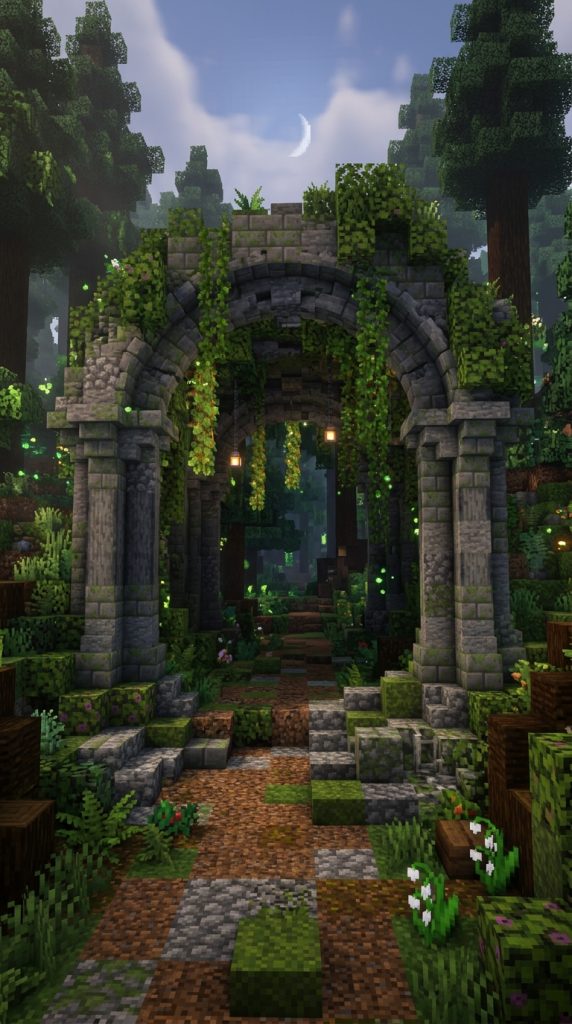
Fractured stone bricks, collapsed masonry sections, and weeping vines define this ancient arch. It brings deep history and adventure lore to survival worlds.
Atmospheric Reclaimed Wilderness Relic
Overgrown ruined castle archways tell compelling visual stories of fallen empires and forgotten wars. Fractured stone brick pillars reveal raw cobblestone rubble and creeping roots. Furthermore, a partially collapsed arch barrel allows sunlight to filter through hanging vines. Glowing spore blossoms and lush moss blocks carpet the weathered stone pavers. Consequently, this design provides an enchanting, historic gateway for forest bases.
Overgrown Arch Material Checklist
- Stone bricks, cracked stone bricks, and mossy stone bricks
- Cobblestone, mossy cobblestone, and cobblestone walls
- Moss blocks, moss carpets, and weeping vines
- Spore blossoms, glow lichen, and leaf blocks
- Rooted dirt, coarse dirt, and gravel
- Broken chains, lanterns, and flower pots
Sculpting Fractured Stone Pillars
Erect two asymmetrical stone pillars eight blocks apart using mixed stone bricks. Mix in cracked bricks, mossy cobblestone, and coarse dirt randomly throughout. Next, leave jagged gaps and structural cracks along the outer pillar edges. Carve deep structural fractures using upside-down stone stairs on pillar faces. Therefore, the pillars look authentically weathered by centuries of neglect.
Constructing the Broken Arch Barrel
Span a curved stone arch across the gap, leaving the central section partially collapsed. Use mossy stone brick stairs and slabs to shape the broken, jagged edges. Next, drop loose stone slabs and cobblestone rubble onto the ground below as debris. Drape leafy oak leaves and weeping vines downward from the fractured arch edges. Consequently, the arch appears frozen in a state of romantic ancient decay.
Weaving Living Flora and Ambient Lighting
Place rich moss blocks, moss carpets, and wild ferns across the stone road deck. Next, suspend a fragrant spore blossom centrally to release drifting green particles. Embed glowing glow lichen into dark stone crevices for subtle natural lighting. Hang a rusted iron chain holding a flickering lantern from the remaining arch stone. Your ancient overgrown ruined castle archway radiates pure woodland mystery.
6. Royal High-Fantasy Palace Archway

Gleaming white quartz, polished diorite, and soaring gold-accented spires define this palace arch. It frames kingdom capitals with regal high-fantasy elegance.
Palatial Imperial Capital Gateway
Royal high-fantasy archways turn standard castle entries into breathtaking architectural monuments. Pure white quartz pillars ascend weightlessly toward vaulted ceiling canopies. Furthermore, shimmering gold blocks, dark prismarine tiles, and ornate filigree line the parapets. Polished diorite avenues reflect bright sunshine beneath sweeping classical arches. Consequently, this regal design brings majestic fairy-tale splendor to survival empires.
Royal Palace Arch Palette
- Smooth quartz blocks, quartz stairs, and quartz pillars
- Polished diorite, diorite stairs, and white calcite
- Dark prismarine, prismarine bricks, and gold blocks
- Sea lanterns, light blue stained glass, and end rods
- Royal blue banners, cyan carpet, and flowering azalea
- Iron bars, chains, and water buckets
Raising Monumental Fluted Quartz Pillars
Construct four monumental quartz pillars five blocks wide along the entrance avenue. Use vertical fluted quartz pillars capped with smooth quartz stairs at the base. Next, raise the structural pillars twenty blocks high into the sky. Inset glowing sea lanterns behind light blue stained glass along pillar flutes. Therefore, the foundation achieves pristine classical symmetry and grand vertical scale.
Sculpting Sweeping Quartz Barrel Vaults
Connect adjacent pillars with sweeping semi-circular arches made of smooth quartz. Use inverted quartz stairs to create an ultra-smooth lower underbelly curve. Next, pave the central roadway with polished diorite tiles bordered by dark prismarine. Inset a grand central keystone block carved from solid shimmering gold. Consequently, the vaulted ceiling radiates imperial luxury and architectural perfection.
Draping Royal Banners and Spired Balustrades
Erect delicate quartz balustrades along the upper walkway, crowned with gold blocks. Next, hang long royal blue banners embroidered with gold patterns along columns. Place vertical end rods atop outer balustrade spires to emit soft celestial light. Plant manicured flowering azalea bushes in raised quartz planter boxes along the road. Your royal high-fantasy palace archway shines with majestic splendour.
7. Volcanic Nether Blackstone Bastion Archway
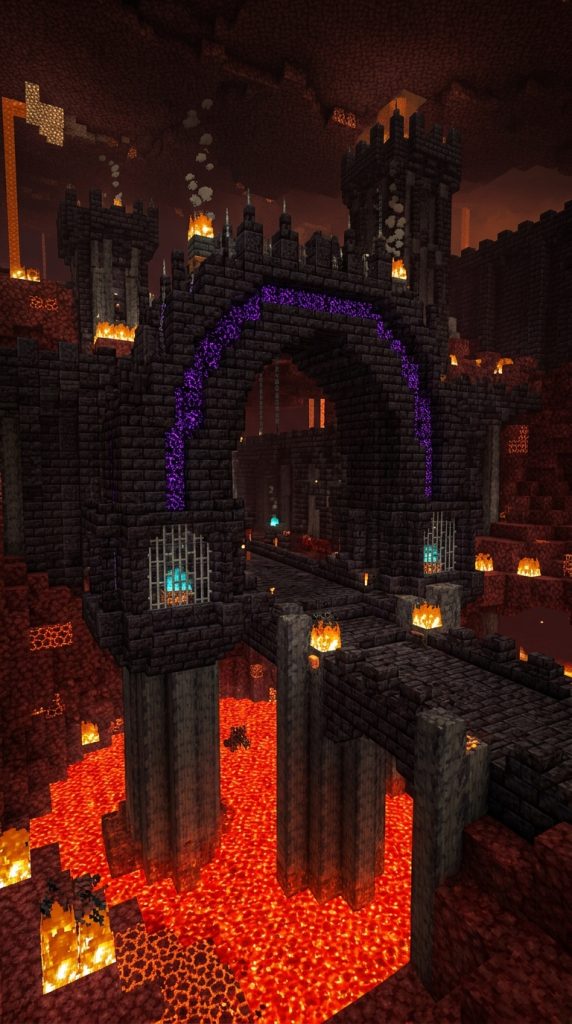
Polished basalt columns, blackstone bastions, and glowing crying obsidian define this underworld arch. It spans boiling lava oceans with fireproof strength.
Formidable Nether Fortress Gateway
Volcanic blackstone archways conquer hostile underworld dimensions through blast-resistant architecture. Massive polished basalt pillars anchor firmly into boiling red lava seas. Furthermore, blast-resistant blackstone bastions protect travelers from explosive ghast fireballs. Glowing crying obsidian veins and soul fire braziers illuminate dark underworld fog. Consequently, this bridge provides vital, secure transport across hostile dimensions.
Nether Bastion Arch Palette
- Polished basalt, smooth basalt, and basalt pillars
- Polished blackstone bricks, stairs, and slabs
- Crying obsidian, obsidian, and nether bricks
- Iron bars, heavy chains, and copper grates
- Soul lanterns, soul campfires, and magma blocks
- Tinted glass, crimson planks, and red nether bricks
Sinking Basalt Pillars into Lava Seas
Place thick columns of vertical polished basalt directly into the lava sea bed. Build wide circular footing collars around each pillar using polished blackstone bricks. Next, construct diagonal stone struts extending upward to support the arch deck. Add glowing veins of crying obsidian within pier crevices for accent. Therefore, the archway supports survive extreme heat and explosive volcanic pressures.
Framing the Blast-Resistant Portal Arch
Span a heavy parabolic arch across the basalt pillars using blackstone brick stairs. Construct enclosed side walls using polished blackstone stairs and iron bars. Next, install a protective overhead roof to shield players from falling ghast fireballs. Place copper grates along the floor to view bubbling lava safely below. Consequently, the enclosed archway ensures total travel safety in the Nether.
Installing Soul Fire Warning Beacons
Mount glowing soul lanterns on heavy iron chains every four blocks along the arch. Next, carve floor trenches filled with burning soul fire behind iron bars. Place decorative respawn anchors atop archway entrance bastions for purple lighting. Display netherite armor stands as sentries along the fortified corridor. Your volcanic nether blackstone bastion archway masters the fiery underworld completely.
8. Desert Sandstone Oasis Citadel Archway

Sun-baked cut sandstone, turquoise glazed terracotta, and palm pergolas define this desert arch. It connects bustling oasis markets with exotic grandeur.
Sun-Drenched Desert Promenade Gateway
Desert oasis citadel archways transform hot sand expanses into luxurious architectural portals. Multi-tiered cut sandstone arches rise gently above busy caravan roadways. Furthermore, shaded wooden pergolas draped with colorful fabrics shelter passing travelers. Vibrant lapis lazuli and turquoise mosaic relief bands line the high parapet walls. Consequently, this build creates a wealthy, exotic gateway for desert trading empires.
Desert Citadel Arch Checklist
- Smooth sandstone, cut sandstone, and sandstone stairs
- Red sandstone, chiseled sandstone, and mud bricks
- Lapis lazuli blocks, gold blocks, and glazed terracotta
- Jungle logs, stripped jungle wood, and jungle fences
- Colorful wool banners, carpets, and decorated pots
- Water cauldrons, sand, and cactus plants
Building Low Sandstone Arch Foundations
Construct two thick sandstone abutment towers ten blocks apart on sandy ground. Use smooth sandstone stairs and slabs to shape a gentle, wide arch curve. Next, reinforce the pier bases using sturdy mud brick and red sandstone blocks. Inset decorative chiseled sandstone blocks featuring creeper motifs along walls. Therefore, the archway blends harmoniously into the golden desert landscape.
Framing Shaded Palm Wood Pergolas
Erect slender jungle wood fence posts along the upper archway walkway. Connect the posts overhead using horizontal stripped jungle wood beams. Next, stretch vibrant orange, yellow, and cyan carpets across the beams. This colorful fabric canopy provides essential shade from intense desert heat. Consequently, defenders patrol the sun-baked battlements in cool, shaded comfort.
Insetting Lapis and Gold Mosaics
Carve decorative horizontal channels along the outer archway parapet walls. Fill these recesses with deep blue lapis lazuli and solid gold blocks. Next, place decorated terracotta pots containing flowering cacti along the road. Install warm copper lanterns atop sandstone corner pillars for evening light. Your desert sandstone oasis citadel archway stands as an exotic trading marvel.
9. Nordic Dragon-Prow Timber & Stone Archway

Rough spruce logs, carved dragon heads, and roaring soul fires define this Nordic arch. It guards snowy mountain valleys with fierce Viking strength.
Rugged Viking Stronghold Gateway
Nordic timber and stone archways celebrate raw tribal power and rugged northern survival. Giant unstripped spruce logs form massive diagonal A-frame support trestles over stone bases. Furthermore, fiercely carved dragon figureheads jut outward from the main archway gables. Roaring soul fire braziers cast dramatic blue light across snowy fortress approaches. Consequently, this build embodies the indomitable spirit of northern warrior clans.
Nordic Arch Material Palette
- Spruce logs, stripped spruce wood, and spruce planks
- Dark oak stairs, slabs, and dark oak trapdoors
- Cobblestone, mossy stone, and packed ice
- Soul campfires, regular campfires, and iron chains
- Shields, custom wolf banners, and carved pumpkins
- Snow layers, coarse dirt, and iron bars
Raising Heavy Cobblestone Gate Piers
Construct two massive stone piers using rough cobblestone and mossy stone. Make each pier base six blocks wide, rising ten blocks above the snow. Next, drive vertical unstripped spruce logs deep into the inner pier corners. Cross heavy diagonal spruce timber braces between piers for lateral strength. Therefore, the gate framework easily withstands freezing winter blizzards and ice loads.
Carving Timber Dragon Figureheads
Extend horizontal dark oak beams outward from the upper archway gables. Carve sweeping wooden dragon necks and heads using dark oak stairs and slabs. Inset glowing redstone torches inside dragon mouth cavities for fiery eyes. Next, mount painted wooden shields and clan banners along the outer archway railings. Consequently, the gateway projects formidable tribal authority across the snowy valley.
Laying the Fortified Timber Roadway
Pave the roadway beneath the arch using rough spruce planks and dark oak slabs. Allow natural snow layers to gather along deck edges and parapet roofs. Next, place soul fire braziers atop corner lookout posts for lighting. Hang heavy iron chains supporting iron lanterns beneath the wooden timber arch. Your fierce Nordic dragon-prow timber and stone archway stands proud and unyielding.
10. Witchy Botanical Overgrown Trellis Archway
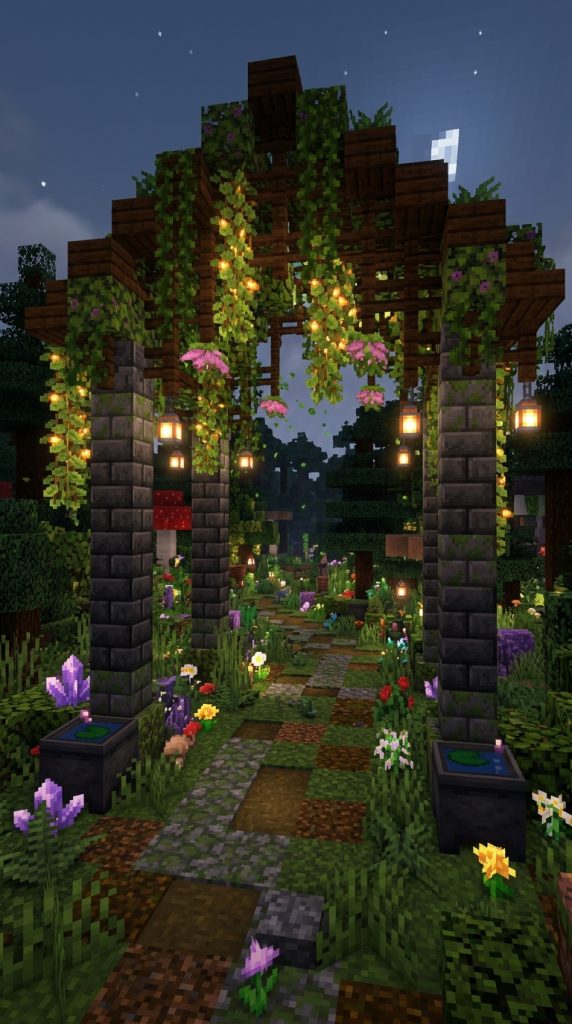
Spore blossoms, weeping vines, and polished deepslate frames define this botanical arch. It leads into magical alchemy courtyards and enchanted gardens.
Enchanted Arcane Garden Gateway
Botanical overgrown trellis archways merge heavy masonry architecture with lush living flora. Polished deepslate pillars support an open timber roof lattice draped with flowering vines. Furthermore, glowing spore blossoms and weeping glow berries illuminate the garden path. Potted rare herbs and bubbling water channels line the flagstone walkway below. Consequently, this design provides an enchanting, magical entrance for wizard courtyards.
Botanical Trellis Arch Checklist
- Polished deepslate, deepslate bricks, and deepslate stairs
- Dark oak logs, stripped dark oak, and dark oak fences
- Moss blocks, moss carpets, and weeping vines
- Spore blossoms, glow berries, and flowering azalea
- Clear glass panes, cauldrons, and water buckets
- Soul lanterns, chains, and amethyst clusters
Erecting the Deepslate Framework
Construct two slender pillars using polished deepslate bricks and walls. Space the pillars eight blocks apart at the entrance to your botanical garden. Next, connect the pillars overhead with a graceful deepslate brick arch. Inset dark oak fence posts along the arch underside to form an open climbing trellis. Therefore, the structural frame achieves an elegant, gothic-botanical architectural look.
Weaving Living Canopy Flora
Drape weeping vines and glowing glow berries across the overhead wooden trellis. Next, suspend a fragrant spore blossom centrally to release drifting green particles. Plant dense patches of flowering azalea leaves and wild ferns around the base. Dig small stone-lined water canals along the walkway to hydrate surrounding soil. Consequently, the archway feels alive, vibrant, and overflowing with magic.
Installing Arcane Alchemy Accents
Place water-filled cauldrons topped with floating lily pads beside the stone pillars. Next, inset glowing purple amethyst clusters into wall niches for magical light. Hang glowing soul lanterns from iron chains beneath the living floral canopy. Scatter soft moss carpets and stone buttons along the winding garden path. Your witchy botanical overgrown trellis archway radiates pure arcane wonder.
11. Imposing Bastion Moat Gatehouse Archway
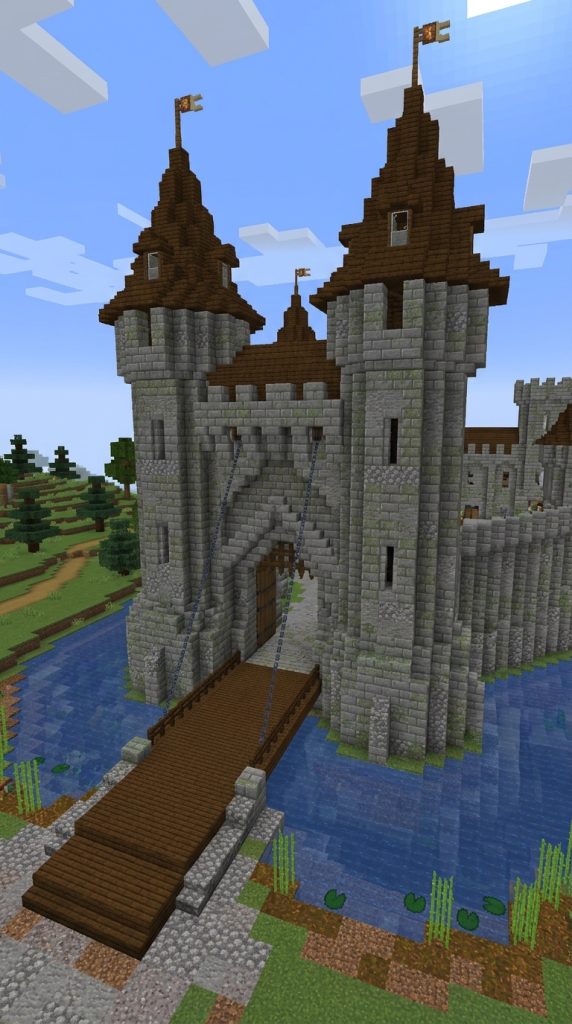
Reinforced stone bastions, machicolated battlements, and moat drawbridges define this arch. It guards survival castles against explosive mob attacks.
Heavy Defensive Fortress Gateway
Bastion moat gatehouse archways provide total military security for sprawling survival castles. Two massive circular stone towers flank a deeply recessed central archway. Furthermore, overhanging machicolations allow defenders to drop projectiles onto attackers below. A heavy wooden drawbridge spans a deep water moat to control fortress access. Consequently, this formidable build secures your survival kingdom against all threats.
Moat Gatehouse Arch Palette
- Stone bricks, cracked stone bricks, and cobblestone
- Deepslate tiles, deepslate stairs, and slabs
- Dark oak logs, stripped spruce, and spruce planks
- Iron bars, heavy chains, and iron trapdoors
- Dispensers, arrows, and redstone repeaters
- Campfires, soul lanterns, and anvils
Raising Circular Stone Bastion Towers
Construct two circular bastion towers eight blocks in diameter flanking the road. Raise the stone brick tower walls twenty blocks high above the water moat. Next, carve out narrow arrow slits into the curved walls using vertical iron bars. Top the towers with crenelated battlements and conical dark oak shingled roofs. Therefore, the gatehouse completely commands the exterior bridge approach with archers.
Turning the Deep Recessed Gate Arch
Span a thick, four-block-deep stone brick arch between the circular bastion towers. Construct heavy stone corbels beneath the upper wall to support overhanging machicolations. Next, install a heavy iron bar portcullis inside the recessed arch portal. Place dispensers loaded with arrows behind concealed wall stairs above the gate. Consequently, trapped attackers face lethal defensive fire from every angle.
Installing the Moat Drawbridge Deck
Build a horizontal wooden bridge deck spanning the water moat using dark oak logs. Inset spruce planks and slabs within the central walking platform. Next, angle the outer bridge section upward slightly using spruce stairs. Attach heavy iron chains from the bridge tips to the bastion winch room above. Your imposing bastion moat gatehouse archway stands ready for battle.
12. Sunken Dwarven Cavern Fortress Archway

Chiseled deepslate pillars, glowing magma vents, and iron grates define this subterranean arch. It guards deep underground dwarven mines and halls.
Subterranean Underworld Stronghold Gateway
Sunken dwarven cavern archways conquer massive subterranean caverns through heavy stonework. Heavy deepslate tile arches span between raw bedrock cavern walls. Furthermore, glowing magma vents and soul fire cauldrons illuminate the dark rocky hall. Giant iron-reinforced blast gates protect wealthy mineral vaults from cavern monsters. Consequently, this rugged build proves essential for underground fortress survivalists.
Dwarven Cavern Arch Supplies
- Deepslate tiles, polished deepslate, and deepslate walls
- Basalt, polished basalt, and smooth basalt
- Crimson planks, crimson stairs, and crimson slabs
- Lava cauldrons, magma blocks, and iron bars
- Soul lanterns, heavy chains, and anvils
- Crying obsidian, redstone lamps, and levers
Excavating the Vaulted Cavern Portal
Carve a wide vaulted arch opening twelve blocks wide through solid deepslate rock. Line the perimeter opening with heavy polished deepslate brick pillars. Next, construct a monumental semi-circular arch using deepslate tile stairs and slabs. Inset polished basalt columns along the corners to simulate heavy mine supports. Therefore, the underground portal feels structurally reinforced and atmospheric.
Installing Magma Vents and Iron Grates
Carve decorative wall niches along the archway pillars filled with bubbling lava cauldrons. Cover the glowing lava vents with heavy iron bars for industrial styling. Next, inset glowing veins of purple crying obsidian into structural stone joints. Pave the central roadway with smooth basalt bordered by crimson wood slabs. Consequently, the subterranean gateway radiates intense heat and raw underground power.
Hanging Heavy Iron Chains and Lighting
Hang colossal iron chains from the cavern ceiling directly above the archway apex. Next, mount glowing soul lanterns on iron brackets along the stone walkways. Place anvils, grindstones, and weapon racks in guard alcoves beside the gate. Display netherite armor stands as silent sentries guarding the underground hall. Your sunken dwarven cavern fortress archway stands impenetrable and grand.
13. Minimalist Modern Fortress Cantilever Arch

Crisp white concrete slabs, cantilevered quartz beams, and glass panels define this modern arch. It brings sleek contemporary luxury to fortress compounds.
High-End Contemporary Architectural Gateway
Modern cantilever fortress archways merge minimalist geometry with formidable defensive scale. Massive white concrete anchor walls support a dramatic floating horizontal beam. Furthermore, seamless tinted glass observation galleries look down on approaching traffic. Minimalist LED-style floor lighting illuminates smooth quartz roadways at night. Consequently, this design delivers sophisticated, world-class modern transit infrastructure.
Modern Cantilever Arch Palette
- White concrete, light gray concrete, and black concrete
- Smooth quartz blocks, quartz stairs, and quartz slabs
- Tinted glass blocks, glass panes, and iron bars
- Sea lanterns, end rods, and daylight sensors
- Cyan carpet, gray wool, and iron trapdoors
- Water source blocks and smooth stone slabs
Pouring Massive White Concrete Abutments
Construct an asymmetrical structural foundation using solid white concrete blocks. Build a thick anchor wall eight blocks wide rising fifteen blocks on one side. Next, extend a sleek cantilevered horizontal beam ten blocks outward over the road. Taper the cantilevered quartz arm gradually as it reaches across the roadway gap. Therefore, the archway demonstrates balanced, cutting-edge modern structural physics.
Installing the Glass Observation Gallery
Construct an enclosed observation bridge within the hollow cantilevered horizontal beam. Enclose the front and rear gallery walls with seamless tinted glass blocks. Next, install a floating quartz staircase inside the main anchor wall for roof access. Pave the upper observation deck with polished quartz tiles and gray carpets. Consequently, guards inspect incoming visitors through panoramic glass panels.
Wiring Minimalist Roadway Lighting
Lay horizontal end rods along the lower road barrier base for continuous sleek light. Next, paint roadway dividing lines using smooth yellow concrete and quartz. Place automated redstone lamps connected to daylight sensors at archway portals. Add a minimalist water feature beside the main anchor wall using quartz stairs. Your minimalist modern fortress cantilever arch delivers striking luxury.
14. Celestial Moon Temple Spire Archway
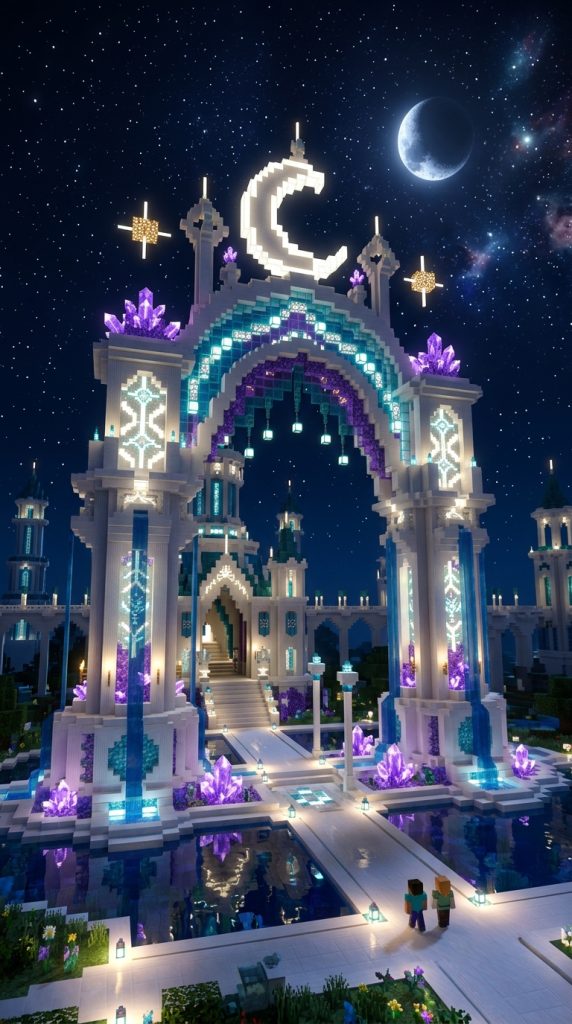
Slender white quartz arches, glowing amethyst clusters, and crescent spires define this temple arch. It connects sacred high-fantasy palace districts.
Ethereal Starlight Sanctuary Gateway
Celestial moon temple archways celebrate astronomy, magical elegance, and pristine geometry. Soaring white quartz pillars ascend into the clouds, supporting an open-air crescent moon arch. Furthermore, shimmering purple amethyst crystals and glowing end rods illuminate the avenue. Delicate blue water channels cascade down the quartz pillars into reflecting pools below. Consequently, this design provides a breathtaking, magical gateway for palace realms.
Celestial Temple Arch Checklist
- Smooth quartz blocks, quartz stairs, and quartz pillars
- Calcite, polished diorite, and white concrete
- Amethyst blocks, amethyst clusters, and tinted glass
- End rods, sea lanterns, and iron bars
- Cyan carpet, warped planks, and warped slabs
- Light blue stained glass, chains, and water buckets
Raising Monumental Quartz Pillars
Construct four fluted quartz pillars five blocks wide at the temple gateway. Raise the structural pillars eighteen blocks high to anchor the mountain avenue. Next, connect adjacent pillars with sweeping rounded arches made of smooth quartz. Pave the grand central avenue with polished diorite tiles and cyan carpet. Therefore, the foundation achieves monumental strength, pristine symmetry, and vertical scale.
Sculpting the Crescent Moon Arch Apex
Build a sweeping parabolic arch spanning the main road using smooth quartz stairs. Construct a massive crescent moon silhouette atop the arch apex using quartz slabs. Next, inset glowing sea lanterns behind cyan stained glass along the moon’s curve. Flank the celestial crescent with delicate spires crowned with purple amethyst clusters. Consequently, the luminous spire creates an iconic celestial landmark visible from afar.
Installing Cascading Starlight Waterways
Carve narrow vertical water chutes down the front faces of the four quartz pillars. Allow crystal-clear water to cascade into stone reflecting pools at the base. Next, line the perimeter balustrades with vertical end rods and delicate amethyst crystals. Suspend glowing sea lanterns from iron chains beneath the sweeping exterior archways. Your celestial moon temple spire archway stands complete, ethereal, and divine.