
15 Wonderful Minecraft Bridge Design Ideas
Building a wonderful Minecraft bridge transforms your survival world from a basic map into a beautiful, interconnected empire. Furthermore, it seamlessly links separate bases, mountain cliffs, and river biomes together. It adds immediate structure, architectural depth, and a gorgeous sense of adventure to your landscape. Many players struggle with bridge construction because they simply plop a flat line of oak planks across water. However, a truly wonderful design relies on organic curves, structural support pillars, and detailed block palettes. It provides a safe, well-lit path away from dangerous mobs while delivering an incredible visual statement.

The Power of Intimate Landscape Architecture
Choosing to build highly stylized, wonderful bridges offers several distinct gameplay and design advantages. First, it challenges your creativity by forcing you to look at standard utility blocks in purely engineering ways. You will learn to see campfires as hanging wooden ropes, grindstones as heavy pulley systems, and walls as thin bridge columns. Second, it optimizes your transportation routes, making horse riding, boat sailing, and daily sprinting completely effortless. Lastly, it creates beautiful focal points across your lakes and valleys, celebrating your construction skills right in nature.
Finding Your Signature Material Palette
The success of your wonderful bridge depends heavily on selecting a cohesive color and texture palette that matches the environment. Soft, cozy neutrals like smooth quartz, stone bricks, and spruce wood create a clean medieval or modern aesthetic. If you prefer a more rugged, nature-connected vibe, combining mossy cobblestone, dark oak logs, and mud bricks works beautifully. For a touch of vibrant fantasy charm, the pastel pinks of cherry wood paired with dark deepslate offer a stunning contrast. Always look for blocks that complement the surrounding biome to ensure your bridge feels completely integrated.
Planning Your Layout and Structural Curves
Before placing any pathway blocks, you must plan the scale, height, and structural boundaries of your river span. Will your bridge feature a grand, high-arching suspension wire system with towering pillars and custom rope networks? Or do you prefer a low, flat stone arch template that sits intimately close to the water surface? It is always best to map out your primary zones—like the path width, support pillars, and decorative handrails—using temporary dirt blocks first. This helps you balance physical spacing and guarantees that boats can sail underneath safely.
Gathering the Essential Detailing Toolkit
To achieve a professional, wonderful finish, you must move beyond basic blocks and utilize a sophisticated detailing toolkit. Stockpile plenty of trapdoors, walls, and wooden slabs to build thin structural layers around your handrails and pillars. Collect various chains, iron bars, and fences to add realistic suspension details and heavy metal wire cables. You will also need natural botanical elements like potted saplings, hanging spore blossoms, and leaf clusters to inject life. Gather sleek illumination options like lanterns, froglights, and soul fires to keep monsters away safely.
Idea 1: The Classic Spruce Arch River Bridge
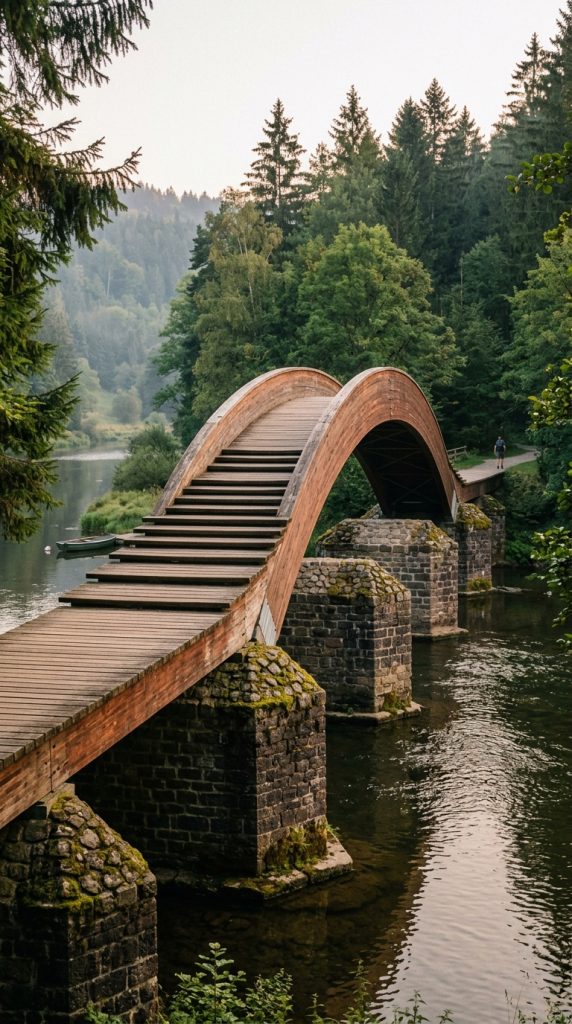
This iconic design brings the clean lines of traditional medieval architecture right across a wide river biome. It features a sweeping arch pathway made of rich spruce wood slabs, flanked by sturdy stone brick support pillars. This setup protects your boat traffic perfectly underneath while establishing an incredible visual harmony with forest trees. It serves as the ultimate statement piece for players who want a cozy, timeless, and reliable main highway bridge.
Understanding the Classic Arch Concept
The Spruce Arch focuses on achieving a natural, gradual curve upward over the center water block seamlessly. Instead of using flat rows, you utilize varying patterns of slabs and stairs to make the rise appear fluid. The contrast between heavy gray stone foundations and warm brown wooden handrails creates beautiful structural depth. It uses minimal modern blocks, focusing instead on traditional rustic texturing.
Step-by-Step How-to Guide
Erecting the Stone Foundations
First, build thick stone brick pillars inside the river bed, anchoring the bridge firmly into the water.
Curving the Spruce Pathway
Next, extend the bridge deck across the water using spruce wood slabs, stepping up gradually toward center.
Building the Guard Rails
Then, line both sides of the pathway with spruce fences and open trapdoors for safety.
Lighting the Walkway Path
After that, hang iron lanterns from fence posts along the handrails to illuminate the path cleanly.
Texturing the Stone Anchors
Finally, mix mossy cobblestone randomly into the support pillars to make the bridge look aged beautifully.
Materials List
- Spruce Wood Slabs: Used to craft the fluid, gradually arching center pathway deck smoothly.
- Stone Bricks: The core foundation material used to build heavy, sturdy water support pillars.
- Spruce Fences: Excellent for building thin, protective safety handrails along the walking path.
- Iron Lanterns: Offers a beautiful, traditional light source that keeps the walkway safe at night.
- Mossy Cobblestone: Mixed randomly into stone areas to add a realistic, moisture-aged texture effect.
Idea 2: The Steampunk Iron Suspension Wire
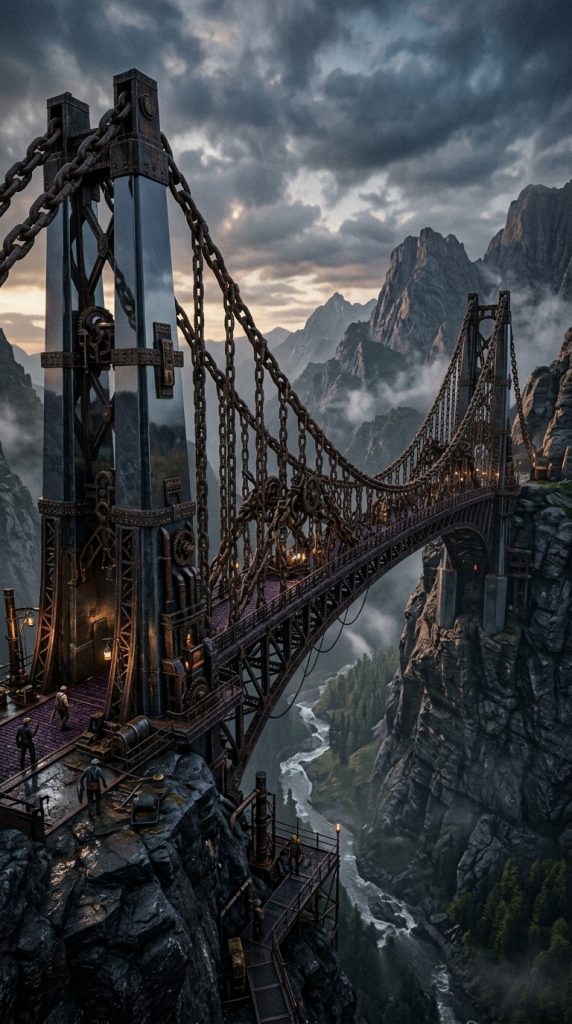
This sophisticated design utilizes heavy metal textures to build a dramatic, high-contrast suspension bridge over a mountain valley. It incorporates dark nether bricks paired with polished andesite pillars and towering networks of exposed iron chains. It looks incredibly polished, deep, and deeply intentional, making it an excellent choice for technical survival players.
The Depth of Heavy Industrial Suspension
This concept relies on creating a floating illusion by using thin metal lines to support a long bridge deck. By running vertical lines of chains from high stone pillars down to the pathway, you mimic real-world engineering. The challenge lies in ensuring the metal cables maintain a realistic, sagging catenary curve across the open valley air.
Step-by-Step How-to Guide
Building the Towering Pillars
First, erect two tall vertical towers on opposite valley cliffs using polished andesite blocks.
Laying the Nether Deck
Next, connect the cliffs horizontally with a straight, dark pathway made of nether brick slabs.
Running the Chain Cables
Then, run a continuous line of iron chains from tower peaks sagging down to the deck center.
Dropping the Vertical Links
After that, hang shorter vertical chain lines from the main cable down to individual path blocks.
Installing the Industrial Glow
Finally, place glowstone blocks inside nether brick fences along the deck for high-contrast lighting.
Materials List
- Polished Andesite Blocks: Provides a clean, smooth, and industrial gray texture for the main suspension towers.
- Iron Chains: The essential component used to build realistic sagging cable networks and vertical hangers.
- Nether Brick Slabs: Creates a dark, fireproof, and highly texturized path deck that contrasts gray metal.
- Nether Brick Fences: Used to build sharp, industrial guard rail posts that lock lights safely.
- Glowstone Blocks: Offers a bright, warm-toned hidden illumination source that fits factory styling perfectly.
Idea 3: The Cherry Blossom Whimsical Footbridge
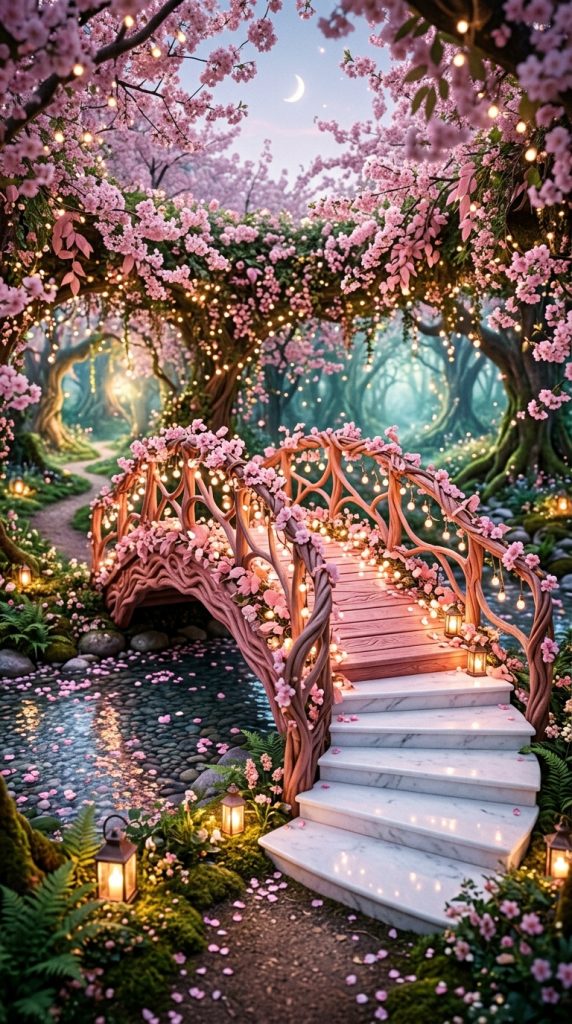
This dreamy, fairytale-inspired bridge utilizes the vibrant pink wood of the cherry blossom biome to create an elegant footbridge. It focuses heavily on soft color transitions, flowing water streams below, and delicate hanging glow berries that create magic. It is perfect for players who want a picturesque, highly aesthetic path that looks like a fairytale myth.
The Magic of Pastel Pink Footpaths
Cherry wood offers an incredibly unique pink coloration that pairs beautifully with clean stone types like polished diorite. This bridge style embraces low profiles, open air railings, and natural leaf draping that makes structure look light. It transforms a standard pond crossing into a stunning piece of colorful, artistic landscape interior design.
Step-by-Step How-to Guide
Laying the Diorite Steps
First, build short approach steps on both banks using clean, polished diorite stairs.
Connecting with Cherry Wood
Next, span the small water gap using pink cherry wood slabs, keeping the profile low.
Framing with Elegant Signs
Then, place cherry wood signs along the sides of the path to act as flush handrails.
Draping the Pink Canopy
After that, grow a cherry tree right beside the bridge, letting leaves hang over the path.
Illuminating with Glow Berries
Finally, hang glow berries from the overhanging branches to cast a magical golden light downward.
Materials List
- Cherry Wood Slabs: Provides the signature pastel pink wood texture needed for the low-profile deck path.
- Polished Diorite Stairs: Used to build bright white approach steps that contrast the pink path beautifully.
- Cherry Wood Signs: Excellent for crafting thin, flush modern side accents that hide raw block edges.
- Cherry Blossom Leaves: Adds lush, colorful volume over the path to create a magical canopy silhouette.
- Glow Berries: Offers a magical, hanging natural light source that emits a soft radiance at night.
Idea 4: The Minimalist Mangrove Root Swamp Span
This sleek, highly organic design builds a compact, low-profile bridge hidden entirely within a network of mangrove roots. It utilizes the deep crimson tones of mangrove wood paired with mud bricks to create a grounded, industrial-organic aesthetic. It is ideal for players who want a secret, stealthy crossing that feels integrated into nature.

The Sophistication of Earthy Root Arches
Mangrove wood features an incredibly rich crimson coloration that, when paired with dark gray mud bricks, creates a sophisticated palette. This style replaces traditional straight beams with rough, twisting root arches that mimic natural fallen logs across water. It maintains a very low, clean layout profile that maximizes every corner block safely.
Step-by-Step How-to Guide
Lining the Swamp Banks
First, line the swamp water edges with polished mud bricks to create clean approach walls.
Arching the Mangrove Roots
Next, weave vertical and horizontal columns of natural mangrove roots across the water gap organically.
Laying the Crimson Pathway
Then, place mangrove wood slabs on top of the roots to form a solid walking surface.
Installing the Root Guardrails
After that, use mangrove trapdoors along the sides to act as thin, adjustable organic safety walls.
Concealing the Froglight Glow
Finally, hide a pearlescent froglight underneath a floor slab to illuminate the water below softly.
Materials List
- Polished Mud Bricks: Provides a beautiful, dark gray earthy block choice for clean, texturized bank walls.
- Mangrove Roots: Brings a raw, tangled organic wood grain texture directly into support arches for depth.
- Mangrove Wood Slabs: Matches the native deep crimson wood tones of the swamp perfectly for path cohesion.
- Mangrove Trapdoors: Versatile blocks used to create thin, protective handrails that blend into roots seamlessly.
- Froglight Block: Offers a bright, warm-toned hidden illumination source that integrates beautifully under walkways.
Idea 5: The Dark Oak Fortress Drawbridge
This bold design combines heavy dark oak logs, chiseled stone bricks, and iron bars to build a fortified drawbridge. It features exposed grindstone pulley mechanics, dark iron chains, and smoking campfires that give it a defensive castle vibe. It is perfect for technical players who love complex, medieval military architecture inside their bases.

Merging Heavy Defense with Visual Detail
Fortress architecture looks incredibly striking when scaled down into a protective drawbridge crossing over a castle moat. This design makes it look like an active mechanism that can be raised or lowered to protect your mattress castle. It utilizes dark oak wood and iron blocks beautifully to introduce a heavy weight feeling.
Step-by-Step How-to Guide
Carving the Moat Castle Walls
First, construct thick castle walls facing your water moat using clean chiseled stone bricks.
Mounting the Grindstone Pulleys
Next, place two grindstones facing downward near the wall top to simulate mechanical chain rollers.
Extending the Heavy Deck
Then, build the main bridge deck extending out over the water using thick dark oak logs.
Attaching the Pulley Chains
After that, run lines of iron chains from the grindstones down to the dark oak deck corners.
Simulating Moat Flame Braziers
Finally, place campfires enclosed in stone walls on both sides to generate rising smoke defenses.
Materials List
- Chiseled Stone Bricks: Provides a dark, rich, and highly texturized material that simulates a heavy castle wall.
- Dark Oak Logs: Creates the look of heavy, reinforced wood beam plating for the main drawbridge deck.
- Grindstones: Excellent for simulating mechanical pulley rollers and gear wheels along the high walls.
- Iron Chains: Used for structural lifting cables that hold the heavy drawbridge deck corners realistically.
- Campfires: Placed inside stone slots to generate long-distance rising smoke that brings defenses to life.
Idea 6: The Unenclosed Bamboo Jungle Footpath
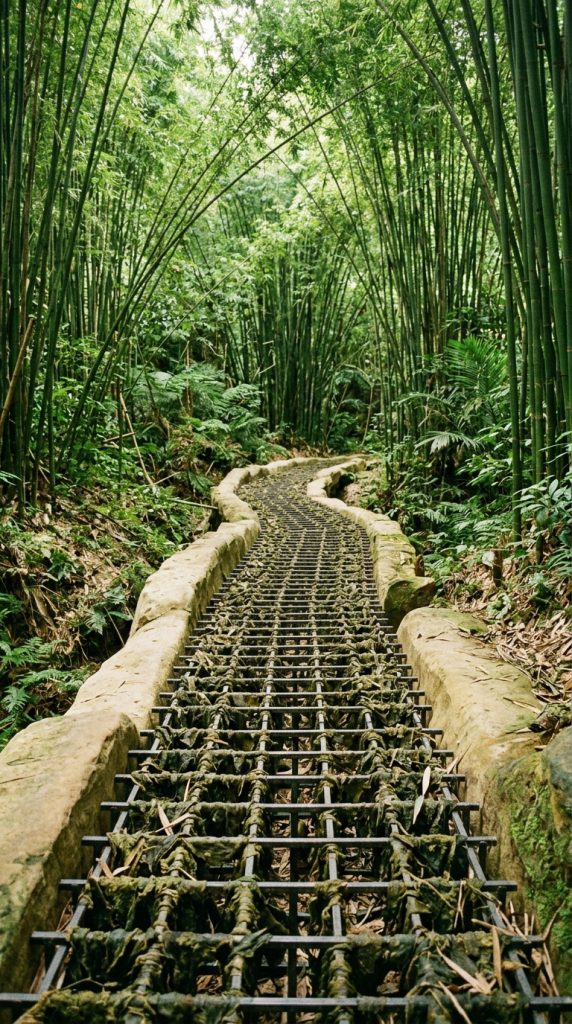
This peaceful, highly open-concept design builds a low-profile, minimalist bridge woven through a dense indoor bamboo forest. It utilizes light scaffolding frames, dried kelp block paths, and smooth sandstone columns to create a meditative space. It offers an incredible air of pure tranquility, calm, and absolute layout simplicity.
The Radiance of Zen Outdoor Simplicity
Zen landscape architecture succeeds by intentionally leaving spaces open to the air, allowing natural light and wind to pass freely. By keeping the pathway completely wall-free and introducing living bamboo stalks, the bridge transitions into an outdoor garden oasis. It clears your mind instantly during long map exploration trips.
Step-by-Step How-to Guide
Setting the Sandstone Pillars
First, place short support columns inside the river bed using smooth sandstone wall blocks cleanly.
Laying the Scaffolding Walkway
Next, rows of scaffolding blocks are placed tightly together across the columns to form a grid path.
Layering the Kelp Carpet
Then, lay down a flat line of dark green dried kelp blocks over the scaffolding center path.
Growing the Perimeter Bamboo
After that, plant bamboo stalks right along the bridge borders, topping them with string to stop height.
Hanging the Paper Lanterns
Finally, hang traditional paper lanterns from overhanging jungle branches to diffuse light into a moon glow.
Materials List
- Scaffolding Blocks: An incredibly unique, lightweight structural block choice that creates perfect grid-like floor paths.
- Smooth Sandstone Walls: Provides clean, warm cream-colored minimal pillars that support the walkway weight safely.
- Dried Kelp Blocks: Delivers a gorgeous, dark green organic thatch texture that works perfectly as a path rug.
- Bamboo Stalks: Introduces living greenery that grows vertically inside the water borders to provide lines.
- Paper Lanterns: Offers a soft, warm, and highly cultural light source that complements the calm theme.
Idea 7: The Nether Crimson Warp Viaduct
This surreal, alien-inspired design utilizes the vibrant crimson and warped stems of the Nether biomes to construct a glowing bridge. It features high-contrast red and cyan wood textures, weeping vines, and eerie blue soul lanterns that cast a mysterious shadow grid. It is perfect for players who want a truly unique, fireproof lava crossing.
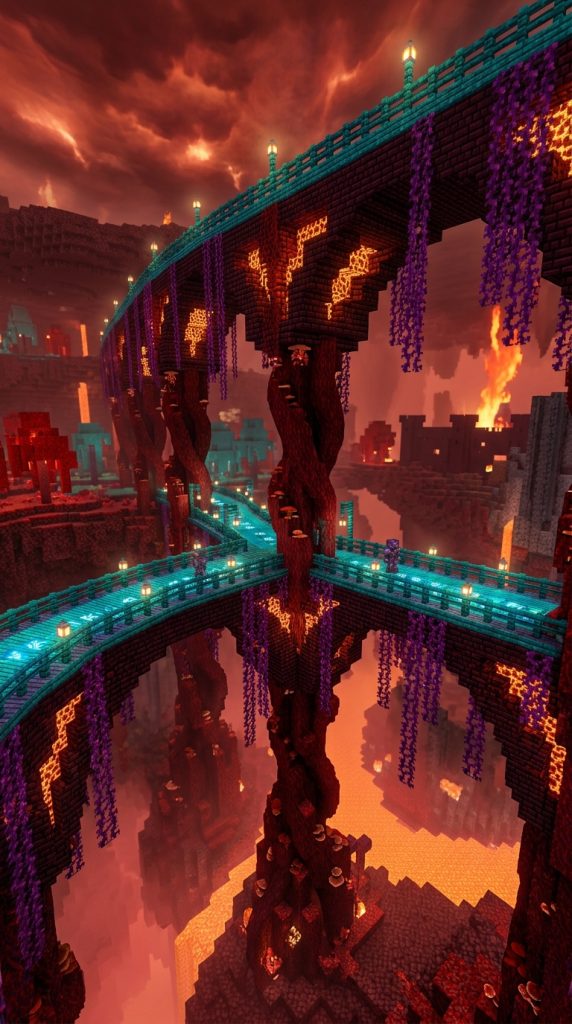
Embracing Extraterrestrial Nether Geometry
Nether woods provide an incredible, non-flammable color palette that completely defies traditional overworld architectural rules. By shaping these colorful stems into a high, multi-arched viaduct crossing a deep ravine, you create a magical sanctuary appearance. It looks especially stunning during midnight hours when blue flames reflect off cyan blocks.
Step-by-Step How-to Guide
Framing the Crimson Pillars
First, build tall vertical support columns using a texturized mix of rich red crimson hyphae blocks.
Constructing the Viaduct Arches
Next, curve nether brick stairs beneath the main platform deck to form grand structural arches.
Laying the Cyan Warp Deck
Then, fill the entire horizontal bridge deck path using vibrant, cyan-colored warped wood planks.
Hanging the Purple Weeping Vines
After that, place rows of purple weeping vines hanging down from the arch undersides for organic detail.
Igniting the Blue Soul Fire
Finally, place blue soul lanterns along the cyan guardrails to emit a beautiful, safe ambient glow.
Materials List
- Crimson Hyphae Blocks: The primary rich red wood material used to build the cozy, non-flammable support pillars.
- Warped Planks: Provides a striking, cyan-colored flooring alternative that builds high-contrast decks easily.
- Nether Brick Stairs: Used to craft the dark, fireproof architectural arch details beneath the path deck.
- Weeping Vines: Adds gorgeous, vertical purple foliage details that dangle naturally from the viaduct curves.
- Soul Lanterns: Offers a beautiful, dim blue light source that casts mysterious shadows across the ravine.
Idea 8: The Quartz Modernist Luxury Overpass
This opulent, high-fashion bridge design utilizes massive amounts of smooth quartz, polished basalt, and brilliant gold accents to build a suite. It features a grand, flat-profile highway deck topped with dark tinted glass handrails, floating gold lines, and hidden lighting. It looks incredibly rich, pristine, and clean, making it perfect for endgame players.

The Elegance of Sleek Modernist Architecture
Quartz blocks feature a smooth, blindingly white texture that, when paired with dark basalt and gold blocks, creates an ultra-luxury palette. This style focuses on absolute symmetry, sharp geometric straight lines, and clean layouts to emulate a luxury resort experience. It transforms a simple valley crossing into a breathtaking display of personal wealth.
Step-by-Step How-to Guide
Pouring the White Quartz Deck
First, connect two mountain cliffs horizontally using a wide, flat deck made of smooth quartz blocks.
Lining the Basalt Borders
Next, outline the outer floor edges of the white deck with a sharp line of dark polished basalt.
Installing the Tinted Glass Rails
Then, build sleek safety handrails along the borders using black stained glass panes exclusively for visibility.
Embedding the Luxury Gold Lines
After that, run a thin accent line of solid gold blocks down the absolute center path for contrast.
Mounting the Minimalist End Rods
Finally, place vertical end rods at regular intervals along the glass rails to provide a high-tech glow.
Materials List
- Smooth Quartz Blocks: The foundational pristine white material used to create clean, luxurious, and bright paths.
- Polished Basalt: Provides a dark, texturized stone border line that cleanly offsets the bright white quartz deck.
- Black Stained Glass Panes: Provides sleek, high-contrast windows that offer panoramic valley views cleanly.
- Solid Gold Blocks: Placed in the center floor to create an opulent, high-contrast decorative accent line statement.
- End Rods: Offers a sleek, modern, and completely minimalist light fixture that eliminates harsh bulb glares.
Idea 9: The Aztec Jungle Temple Ruins Bridge
This ancient, historic-inspired design integrates dark mossy cobblestone, chiseled stone bricks, and overgrown green vines directly into a bridge. It makes your bridge look like a forgotten, mystical jungle temple ruins discovered deep within an exotic forest river. It features flowing water channels and hidden raw gold block accents.

Storytelling Through Weathered Temple stone
Combining heavy, weathered stone blocks with lush botanical elements creates an incredible sense of history, mystery, and explorer adventure. This design frames your walking path inside ancient crumbling stone arches, making your bridge look like an archaeological treasure vault. It perfectly captures a rugged yet highly aesthetic landscape vibe.
Step-by-Step How-to Guide
Arching the Mossy stone Walls
First, construct heavy support arches spanning the river using a mix of mossy cobblestone and bricks.
Laying the Cracked Brick Deck
Next, fill the bridge walking path deck using cracked stone bricks, leaving random holes open safely.
Routing the Cascading Aqueduct
Then, route a water channel along the handrails, letting it trickle down into the river below.
Wrapping with Trailing Ivy Vines
After that, place extensive amounts of vines and spore blossoms along the side walls for greenery.
Concealing the Raw Gold Accents
Finally, hide raw gold blocks behind stone stairs, letting the yellow metallic glow peek out subtly.
Materials List
- Mossy Cobblestone: Adds an aged, moisture-damaged, and highly texturized historic look to support arches.
- Cracked Stone Bricks: Provides a decorative, ancient architectural stone block choice for the path deck surface.
- Vines: Allows for natural climbing access while draping the entire stone structure in beautiful green ivy.
- Water Bucket: Used to craft a gorgeous, trickling aqueduct channel that adds peaceful ambient sound.
- Gold Blocks: Placed secretly in wall crevices to add a subtle, rich metallic glow that hints at wealth.
Idea 10: The Post-Apocalyptic Overgrown Concrete Vault
This gritty, story-rich bridge design depicts an abandoned high-tech military concrete overpass that has been completely reclaimed by growth. It features fractured iron bars, rusted copper plates, and massive vines wrapping around a broken deck structure. It tells an incredible visual story of industrial decay.
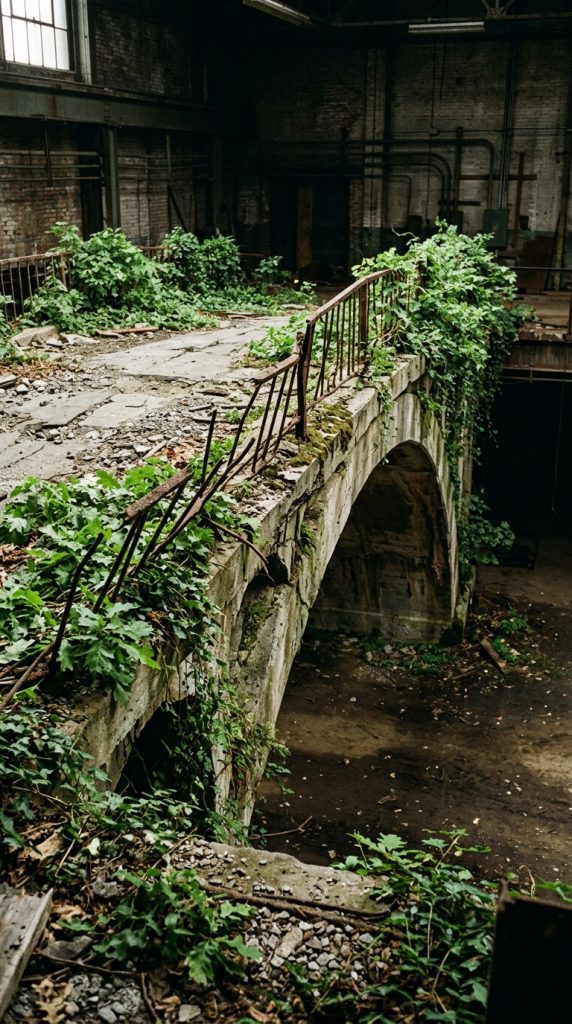
High Contrast Industrial Abandonment
Post-apocalyptic building relies heavily on distressing pristine materials to make them look old, damaged, and survived for decades. By combining cold, hard gray industrial concrete with overwhelming, aggressive green foliage blocks, you create a beautiful sense of history. It looks like a secret relic of a forgotten past.
Step-by-Step How-to Guide
Pouring the Gray Concrete Deck
First, build a wide, flat bridge deck across the canyon using solid gray concrete blocks.
Mixing the Gravel Fractures
Next, replace random concrete blocks with gravel and cobblestone to simulate heavy structural cracks.
Installing the Broken Iron Rails
Then, build safety handrails using iron bars, leaving a few sections completely broken open.
Overgrowing with Aggressive Greenery
After that, cover the concrete deck with moss blocks, oak leaves, and trailing vines aggressively.
Mounting the Flickering Redstone Torch
Finally, place a single redstone torch on a broken rail to act as a dim emergency backup light.
Materials List
- Gray Concrete Blocks: The core building material used to create cold, industrial, and heavy overpass structures.
- Gravel Blocks: Mixed randomly into concrete to simulate cracks, structural wear, and old stone damage.
- Iron Bars: Great for building broken safety railings, exposed structural rebar grids, and ruined side lines.
- Vines: Used aggressively to show nature completely reclaiming, covering, and breaking down the metal deck.
- Redstone Torch: Offers an eerie, dim, and flickering red ambient light source that fits the theme perfectly.
Idea 11: The Sleek Spruce A-Frame Covered Bridge
This clean, geometric design builds a classic alpine A-frame enclosed bridge layout high across a wide snowy valley. It features a steep, dramatic triangular roof made of deepslate tiles, warm spruce wood walls, and open panoramic side window slots. It offers the definitive cozy yet high-end mountain winter retreat vibe.
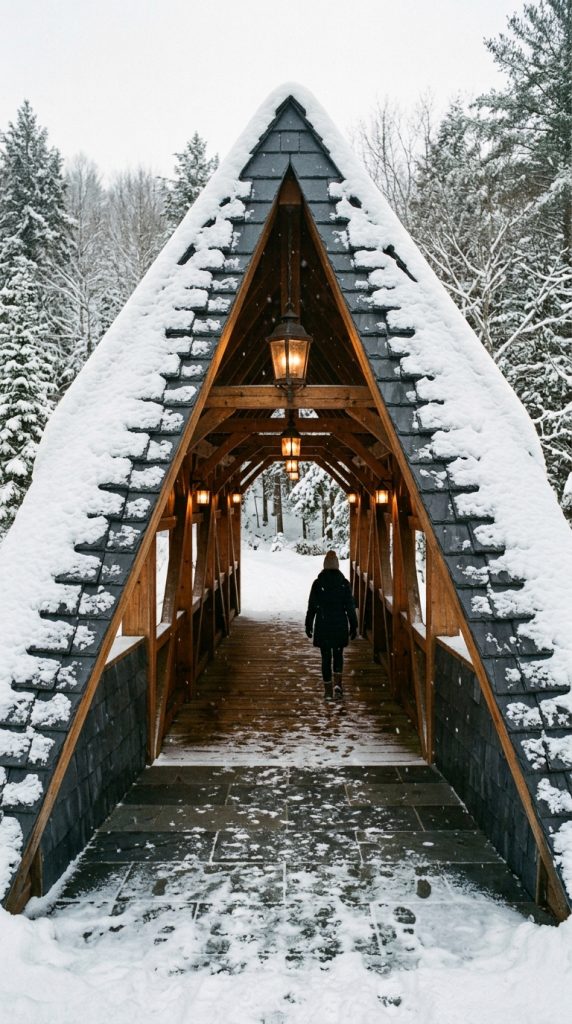
The Elegance of Triangular Bridge Enclosures
The A-frame layout is highly celebrated in modern design for its sharp symmetry, minimalist lines, and cozy volumetric space. When brought outdoors to enclose your bridge path, it creates a striking visual silhouette that looks incredibly secure and warm. It protects your horse traffic completely from phantom attacks during long winter nights.
Step-by-Step How-to Guide
Laying the Spruce Beam Floor
First, connect the valley cliffs horizontally using thick spruce log support beams and floor planks.
Framing the Steep Deepslate Roof
Next, build a steep, continuous triangular roof canopy over the path using dark deepslate stairs.
Cutting the Open Window Slots
Then, leave a horizontal two-block opening along the side walls to act as wide window slots.
Installing the Spruce Railings
After that, place spruce fences along the interior window openings to keep riders safe from falling.
Hanging the Cozy Iron Lanterns
Finally, hang iron lanterns from the center ceiling rafters to illuminate the wooden interior warmly.
Materials List
- Deepslate Stairs: Essential for crafting the sharp, dark gray, and dramatic triangular A-frame roof line profiles cleanly.
- Spruce Planks: The core structural floor material that perfectly matches the rich, dark tones of a winter lodge.
- Spruce Fences: Used to build protective interior handrails across the open side window slots seamlessly.
- Iron Lanterns: Offers a beautiful, traditional light source that illuminates the wooden interior cabin warmly.
- Spruce Logs: Heavy duty wood beams used underneath the path deck to support structural weight safely.
Idea 12: The Modern Geometric Hexagon Honeycomb Span
This hyper-modern architectural concept builds an interconnected series of interlocking six-sided modular pods to form your bridge deck. It features sharp angled borders made of smooth stone bricks filled with warm stripped jungle log paths. It looks incredibly futuristic, complex, and high-design.

The Power of Honeycomb Modular Layouts
Hexagonal geometry completely alters how you perceive landscape space by eliminating boring ninety-degree straight lines in favor of fluid angles. This modular layout allows you to snap new hexagonal pod platforms onto the sides of your bridge path organically for viewing stations. It looks highly advanced from afar.
Step-by-Step How-to Guide
Mapping the Hexagon Floor Rings
First, use an angled block template to construct a series of interlocking six-sided rings using stone bricks.
Filling the Warm Jungle Path
Next, fill the interior floor grid of each hexagon pod using smooth stripped jungle logs horizontally.
Installing Diagonal Glass Windows
Then, build the side safety walls using clear glass panes following the fluid honeycomb angled lines.
Connecting the Pod Archways
After that, cut open archways between the interlocking pods to allow a smooth, continuous walking path.
Setting the Ceiling Recessed Glow
Finally, hide a glowstone block behind a jungle wood trapdoor in each pod ceiling for modern lighting.
Materials List
- Smooth Stone Bricks: The essential structural framing material used to outline the sharp geometric hexagonal floor borders.
- Stripped Jungle Logs: Provides a warm, smooth, orange-tinted wood grain texturing that fills paths beautifully.
- Clear Glass Panes: Creates unique, wide diagonal window installations that follow the fluid honeycomb shape perfectly.
- Jungle Trapdoors: Used for modern recessed ceiling lighting panels and sleek furniture accents along lines.
- Glowstone Blocks: Hidden behind wooden trapdoors to provide a clean, high-tech interior light grid safely.
Idea 13: The Royal Dark Oak Canopy Overpass
This massive, endgame project builds a grand, sprawling palace bridge centered around a magnificent king-sized canopy walking deck. It features imposing polished blackstone pillars, rich dark oak walls, flowing purple textile banners, and hidden gold vaults. It is the definitive ultimate royal master highway base build.

Scaling Up to a Royal Sky Kingdom Masterpiece
A royal canopy overpass expands the bridge concept to its absolute limits, transforming a simple water crossing into a fortified throne room layout. By utilizing the grand scale of thick dark oak columns paired with shimmering gold and purple accents, you create a path of unparalleled majesty. It offers a breathtaking visual statement.
Step-by-Step How-to Guide
Erecting the Blackstone Pillars
First, place tall vertical columns of polished blackstone bricks inside the river to act as main pillars.
Building the Grand Canopy Frame
Next, construct a massive four-poster canopy frame over the bridge deck using dark oak fences.
Hanging the Royal Purple Banners
Then, hang long purple banners from the top rails of the canopy frame to cascade like curtains.
Laying the Dark Oak Deck
After that, fill the wide walking path using rich dark oak slabs, outlining borders with gold blocks.
Illuminating the Palace Walkway
Finally, hide glowstone blocks behind dark oak trapdoors in the floor to illuminate the royal path safely.
Materials List
- Polished Blackstone Bricks: The heavy, dark, and highly polished stone block used to construct grand water pillars.
- Dark Oak Slabs: Provides the rich, dark, and heavy-duty wood architecture needed to support the path deck.
- Purple Banners: Creating the gorgeous, light-blocking private fabric curtains that define the palace aesthetic.
- Solid Gold Blocks: Placed along the deck borders to create an opulent, high-contrast decorative accent line statement.
- Dark Oak Trapdoors: Used to cleanly conceal the bright floor glowstone blocks while maintaining a wood surface.
Idea 14: The Desert Oasis Acacia Sandstone Span
This vibrant, warm-toned design constructs an expansive open-air bridge layout around a custom-built, massive desert river crossing. It features striking orange acacia wood configurations paired with smooth red sandstone walls and terracotta flower pots. It offers an incredible exotic holiday aesthetic.
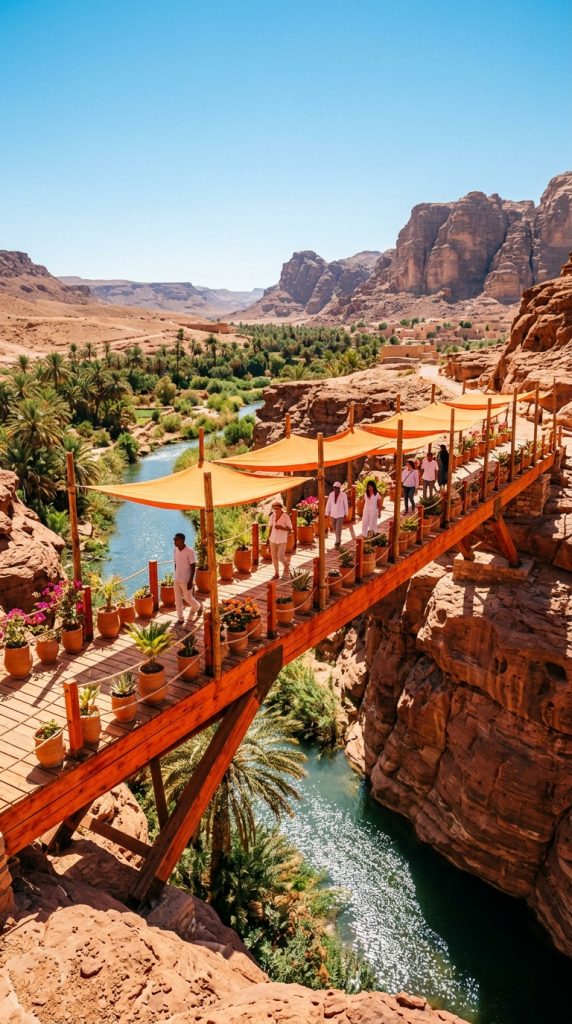
The Warmth of Sun-Drenched Desert Architecture
Acacia wood features a highly unique, rich orange-gray contrast that captures the essence of sun-drenched savannahs and oases perfectly. By building wide, flowing shade platforms decorated with trickling water channels and clay pots, you create a beautiful escape from the hot sun. It turns a boring desert path into art.
Step-by-Step How-to Guide
Building the Red Sandstone Benches
First, construct sturdy approach walls and seating benches along the river banks using red sandstone.
Spanning with Orange Acacia
Next, connect the stone banks horizontally using a wide deck path made of vibrant acacia wood slabs.
Adding the Fabric Sun Shades
Then, use orange and white wool carpets placed over fences to simulate canvas sun awnings over the path.
Integrating the Cooling Channels
After that, dig shallow water channels along the bridge edges to act as refreshing luxury cooling pools.
Decorating with Terracotta Pots
Finally, place terracotta flower pots holding native desert cacti along the acacia handrails neatly.
Materials List
- Acacia Wood Slabs: Provides the signature vibrant orange wood palette that defines the exotic savannah oasis aesthetic.
- Polished Red Sandstone: Used to build clean, luxurious, and warm-toned bank walls that match the desert landscape.
- Orange Wool Carpet: The primary material used to craft lightweight, realistic fabric canvas sun awnings over paths.
- Water Bucket: Crucial for filling the architectural cooling channels and mini-pools that refresh the layout.
- Flower Pots: Used to hold native desert cacti and decorative flora accents neatly along the open guardrails.
Idea 15: The Nether Basalt Lava Delta Cross
This gritty, volcanic-inspired design utilizes the raw dark gray textures of polished basalt and magma blocks to cross a treacherous nether lava ocean. It features exposed iron bars, glowing magma cracks, and eerie orange weeping pulse vines that give it a dangerous underworld survival vibe. It is perfect for brave endgame explorers.

The Intensity of Volcanic Basalt Pathways
Basalt deltas feature an incredibly harsh, ash-filled environment that requires heavy fireproof stone blocks to construct survival pathways safely. This design shapes smooth polished basalt into a heavy, reinforced bridge tube that cuts right through roaring liquid magma waves. It keeps your strider riding paths completely secure and clean.
Step-by-Step How-to Guide
Driving the Blackstone Piles
First, drive solid vertical columns of blackstone blocks deep into the burning liquid lava ocean floor layer.
Laying the Polished Basalt Deck
Next, connect the stone piles horizontally using a heavy walking deck path made of polished basalt blocks.
Embedding the Magma Fire Cracks
Then, replace random deck blocks with glowing magma blocks to create realistic heated structural fire lines.
Mounting the Protective Iron Rails
After that, build tall safety guardrails along both sides of the path using heavy duty dark iron bars.
Hanging the Orange Weeping Vines
Finally, place rows of orange weeping vines hanging down from the bridge sides to capture Nether nature.
Materials List
- Polished Basalt Blocks: The primary raw dark gray stone material used to build the heavy fireproof bridge deck path.
- Blackstone Blocks: Provides heavy, solid volcanic stone piles that anchor the bridge safely into liquid lava oceans.
- Magma Blocks: Embedded into the floor grid to introduce beautiful, glowing orange structural heat fire lines.
- Iron Bars: Great for building tall, heavy-duty safety guardrails that protect riders from liquid fire splashes.
- Weeping Vines: Adds gorgeous, vertical orange foliage details that dangle naturally from the volcanic stone sides.