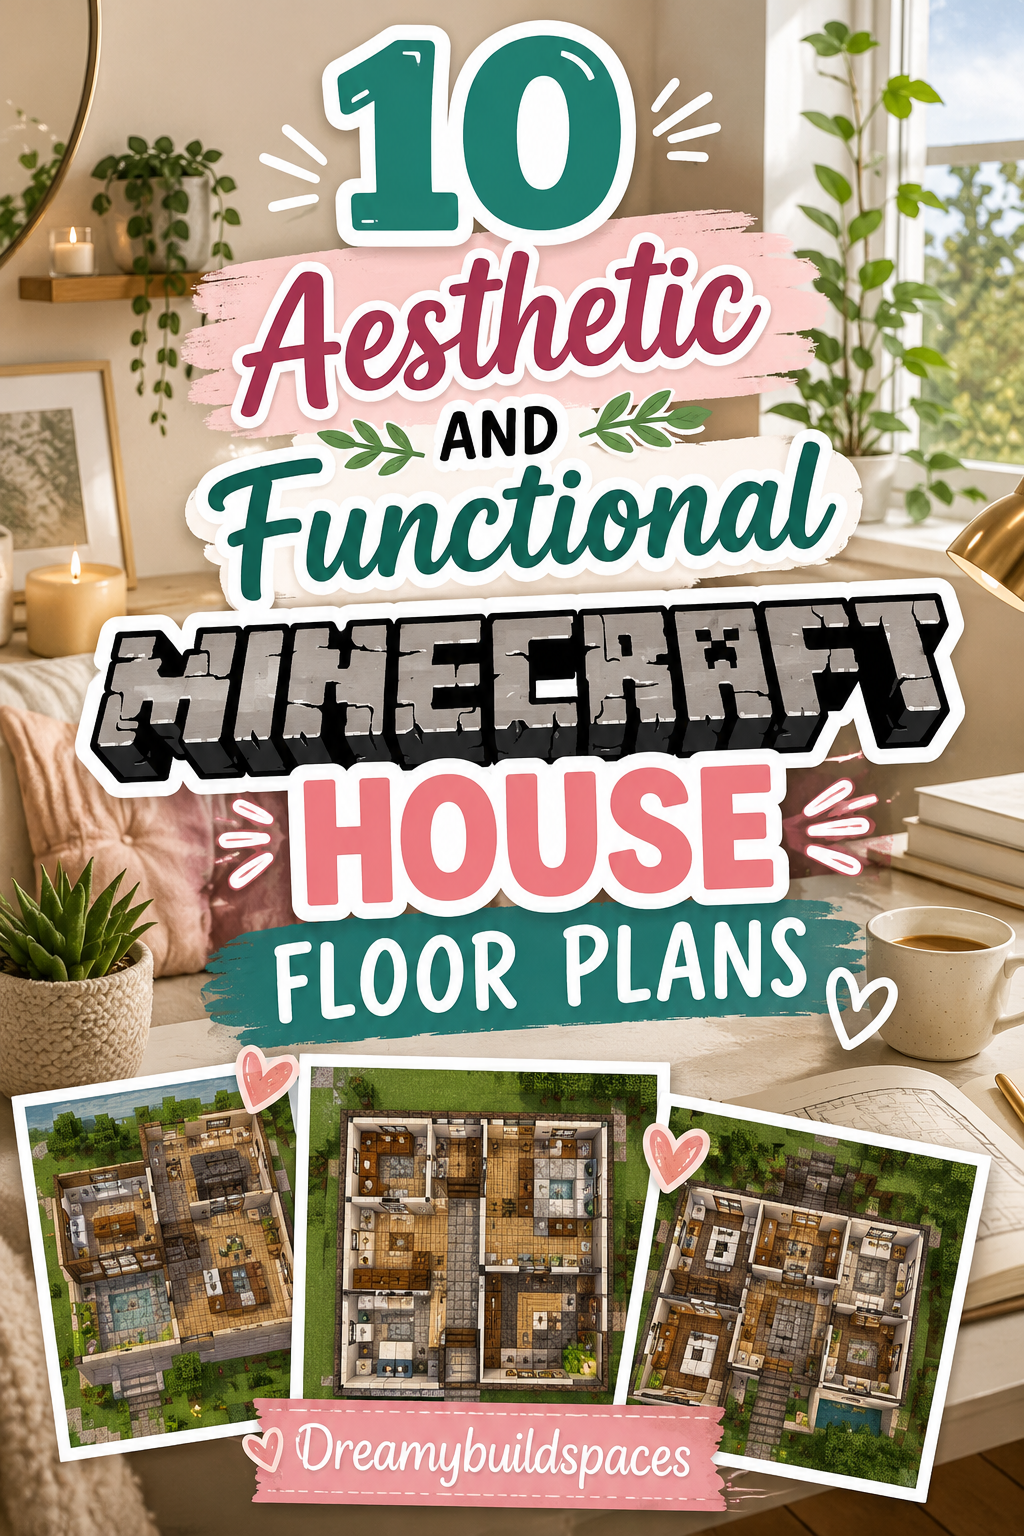
10 Aesthetic And Functional Minecraft House Floor Plans
Designing a Minecraft House Floor survival base requires balancing visual charm with practical utility. Floor plans serve as the architectural foundation, dictating spatial flow, chest storage efficiency, and mob defense layouts. A well-structured floor plan eliminates clutter, streamlines daily crafting routines, and elevates basic block palettes. In this comprehensive guide, you will discover ten distinct aesthetic and functional Minecraft house floor plans. These designs cater to survival starter bases, multi-level farm estates, and compact modern villas.
1. The L-Shaped Courtyard Starter Layout
The L-shaped floor plan is an iconic choice for early-game survival worlds. It features two perpendicular wings wrapped around a secure, central outdoor courtyard. Furthermore, this layout creates natural spatial division between your sleeping quarters and your active crafting workshop. It brings safety, easy expansion options, and rustic cottage charm to any biome.
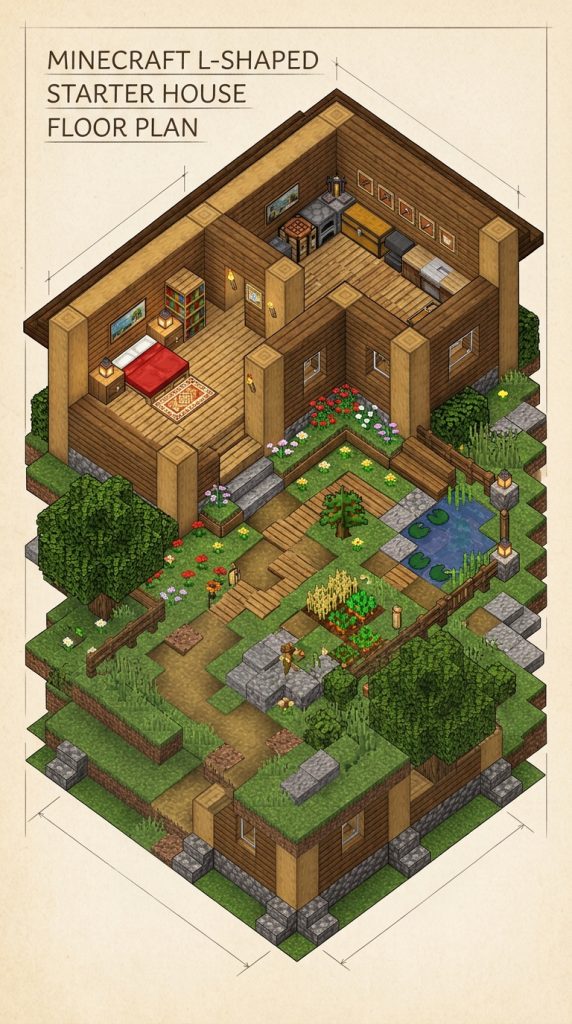
By enclosing two sides of a courtyard, you reduce the number of defensive walls needed. The open central yard provides a safe, mob-free space for animal pens or crop gardens. Furthermore, adding glass windows facing inward keeps your living space bright while maintaining privacy from the outside world.
       [ Storage & Crafting Wing ]
       +-------------------------+
       | [Chest] [Furnace] [Bed] |
       |                         |
       +---------+       +-------+
                 |       |
                 | Court |
                 | yard  |
                 |       |
                 +-------+
                 [ Entrance ]
Functional Zonation
Dividing your base into dedicated operational zones prevents inventory clutter. The longer wing houses organized double chest wall grids and smelting arrays. Meanwhile, the shorter wing holds your bed, enchanting table, and armor displays.
Materials Needed
- Stripped Oak Logs
- Spruce Wood Planks
- Cobblestone
- Glass Panes
- Oak Fences
Step-by-Step Guide
First, mark out a twelve-by-eight block rectangle for the primary storage wing. Attach a six-by-six block square to one end to form the L-shape base frame. Next, lay a solid cobblestone foundation along the entire outer perimeter footprint. Consequently, you establish a sturdy, level structural base for your walls.
Second, erect four-block-tall corner pillars using upright stripped oak logs. Fill the wall sections using warm spruce wood planks, leaving two-block openings for windows. Next, install glass panes in all window slots facing into the interior courtyard area. Consequently, your courtyard receives abundant natural light while remaining secure.
Third, pave the central courtyard ground using path blocks and coarse dirt. Enclose the open courtyard edges using oak fences and a double gate. Additionally, place your bed and crafting table inside the designated short wing room. Finally, add a sloped spruce stair roof with overhanging eaves along all outer walls.
2. The Split-Level Survival Farm Base
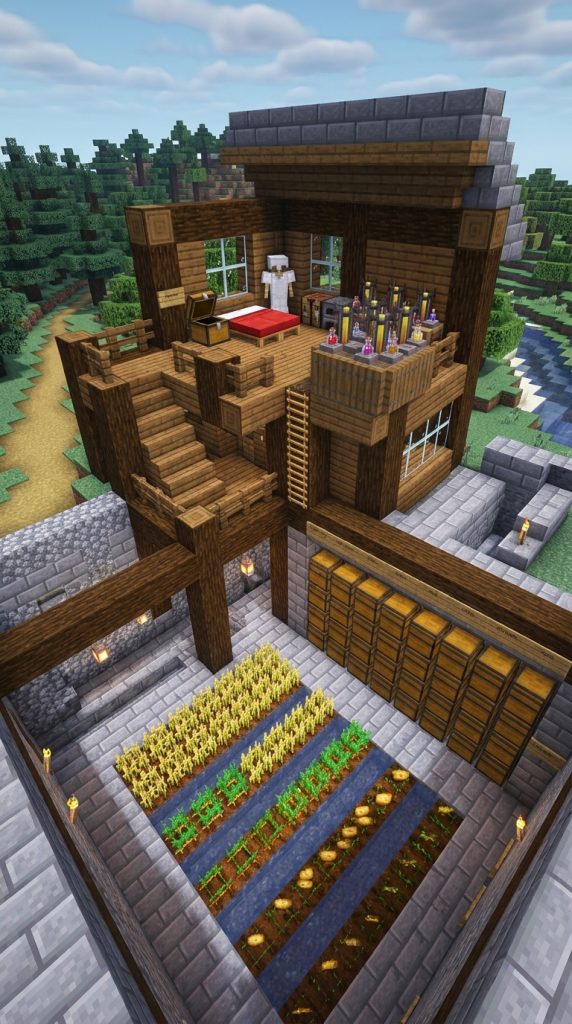
The split-level floor plan utilizes vertical terrain changes to separate utility from living areas. It features a lower sunken level built into a hillside, dedicated entirely to farming and storage. Furthermore, the upper elevated platform holds your bedroom, brewing stands, and safe respawn anchor.
Splitting your base across two distinct elevation levels minimizes footprint while maximizing floor space. The lower level allows water channels for wheat, carrots, or potatoes to remain hidden. Furthermore, accessing your upper living quarters via interior stairs eliminates the need for long external walkways.
       [ Upper Level: Living & Brewing ]
       +-------------------------------+
       | [Bed] [Brewing] [Enchanting]  |
       +---------------+---------------+
                       | [Stairs Down]
                       v
       +---------------+---------------+
       | [Crop Farm]   | [Storage Grid]|
       +-------------------------------+
       [ Lower Level: Utility & Farms  ]
Hydroponic Base Integration
Incorporating water channels directly beneath stone slab floors keeps crops hydrated automatically. Placing trapdoors over water lines allows smooth walking paths without disrupting crop growth.
Materials Needed
- Stone Bricks
- Dark Oak Planks
- Water Buckets
- Oak Trapdoors
- Glass Blocks
Step-by-Step Guide
First, excavate an eight-by-twelve block area into a natural hillside edge. Build a four-block-tall lower retaining wall frame using heavy stone bricks. Next, lay out a central water channel lined with farmland soil for indoor crops. Consequently, you construct a protected, climate-controlled lower farming level.
Second, cover the lower level water channels with dark oak trapdoors for flat walkways. Build a sturdy interior staircase leading three blocks up to the secondary floor level. Next, construct the upper level floor platform using polished dark oak wood planks. Consequently, your upper living area sits elevated, offering panoramic views outside.
Third, enclose the upper level using a combination of stone bricks and large glass windows. Place your bed, brewing stands, and enchanting bookshelf array on the upper wooden floor. Additionally, install double chests along the lower level walls for crop sorting. Finally, cap the structure with a flat, slab-covered roof to prevent mob spawns.
3. The Central Courtyard Atrium Villa

The atrium villa layout is a symmetrical, square design centered around a open-air sky garden. It features a perimeter hallway connecting four distinct corner utility rooms. Furthermore, the central glass-enclosed garden brings natural sunlight and peaceful greenery into every room.
Symmetrical floor plans offer clean aesthetic proportions and effortless navigation. Navigating around the central atrium allows quick access to smelting, storage, sleeping, and armory sections. Furthermore, the internal garden serves as a safe place for bees, flowers, or small tree farms.
       +--------------+---------+--------------+
       |  Crafting    | Corridor|  Bed & Armor |
       |  Workshop    |         |  Quarters    |
       +--------------+--[  ]---+--------------+
       | Corridor     | Central | Corridor     |
       |              | Atrium  |              |
       +--------------+--[  ]---+--------------+
       |  Smelting    | Corridor|  Automated   |
       |  Array       |         |  Storage     |
       +--------------+---------+--------------+
Symmetrical Utility Distribution
Allocating specific tasks to the four corner quadrants prevents bottlenecking during co-op survival play. Each room operates independently while remaining connected by the central loop corridor.
Materials Needed
- Smooth Quartz Blocks
- Birch Wood Planks
- Glass Panes
- Flowering Azalea Leaves
- Sea Lanterns
Step-by-Step Guide
First, mark out a fifteen-by-fifteen block square footprint on flat ground. Carve out a five-by-five block square in the exact center for your atrium. Next, pave the perimeter loop corridor floor using light birch wood planks. Consequently, you establish a clean, symmetrical circulation path for the villa.
Second, build four-block-tall outer walls using crisp smooth quartz blocks. Install large floor-to-ceiling glass windows along the inner atrium walls to frame the garden. Next, place flowering azalea leaves and a small tree inside the central open atrium space. Consequently, sunlight floods into all four surrounding corner rooms effortlessly.
Third, furnish each of the four corner rooms with dedicated survival equipment. Install auto-smelters in one room, and place double chest storage grids in another. Additionally, place your bed and armor stands in the third room, keeping enchanting in fourth. Finally, lay smooth quartz slabs over ceiling frames to lock in a sleek modern aesthetic.
4. The Compact 3×3 Modular Grid Compound

The 3×3 modular grid floor plan is built around nine uniform three-by-three block modules. It offers extreme mathematical efficiency, allowing survival players to scale their base outwards easily. Furthermore, each individual module serves a distinct purpose, such as portal rooms, storage, or crafting stations.
Modular grid designs remove layout guesswork by using standardized geometric dimensions. A three-by-three module fits standard item arrays, such as a full enchanting setup or four double chests. Furthermore, upgrading individual modules requires zero structural changes to the surrounding base framework.
       +-----------+-----------+-----------+
       | Enchanting| Sleeping  | Nether    |
       | Module    | Module    | Portal    |
       +-----------+-----------+-----------+
       | Storage   | Central   | Smelting  |
       | Left      | Hub       | Right     |
       +-----------+-----------+-----------+
       | Food &    | Entrance  | Workshop  |
       | Cooking   | Foyer     | Area      |
       +-----------+-----------+-----------+
Standardized Wall Frameworks
Using structural log pillars at every three-block intersection allows seamless wall replacements. Players can swap solid plank walls for glass panes or archways without compromising roof support.
Materials Needed
- Spruce Logs
- Spruce Wood Planks
- Cobblestone Stairs
- Glass Panes
- Lanterns
Step-by-Step Guide
First, lay out a grid of sixteen spruce log pillars, spaced three blocks apart. Ensure the overall layout forms a large thirteen-by-thirteen block outer square frame. Next, connect the tops of all log pillars using horizontal spruce log crossbeams. Consequently, you create nine distinct three-by-three modular building cells.
Second, select the central module to serve as your main circulation hub. Fill the outer wall modules using spruce planks, leaving window slots where needed. Next, install glass panes in external windows to illuminate interior modules brightly. Consequently, your modular compound gains defined interior rooms while maintaining structural unity.
Third, outfit each three-by-three cell with specific functional survival tools. Place an enchanting table surrounded by fifteen bookshelves in one corner module. Additionally, install a nether portal inside a stone-lined module to isolate portal noise. Finally, place lanterns on every log intersection to keep light levels maxed out.
5. The Underground Bunker Cross Layout

The cross layout is the ultimate underground bunker plan, excavated deep beneath the surface. It features a central ladder hub branching out into four distinct rectangular tunnels. Furthermore, this design provides maximum blast resistance, mob security, and thermal energy aesthetics.
Underground bases eliminate exterior facade building costs entirely, saving valuable wood and stone. The four-way cross structure allows infinite tunnel extension deep into stone layers. Furthermore, isolating noisy machinery like auto-sorters in separate underground wings keeps living areas quiet.
                           [ North Wing: Farms ]
                             +---------------+
                             | [Crop Patch]  |
                             +-------+-------+
                                     |
       [ West Wing: Storage ]        |        [ East Wing: Smelting ]
       +---------------------+-------+-------+---------------------+
       | [Chest Wall Grid]   |  Central Hub  | [Super-Smelter Array|
       +---------------------+-------+-------+---------------------+
                                     |
                                     |
                             +-------+-------+
                             | [Bed] [Portal]|
                             +---------------+
                           [ South Wing: Quarters ]
Excavation Safety Standards
Reinforcing tunnel ceilings with stone brick arches prevents gravel or sand cave-ins. Placing trapdoors around ladder shafts prevents accidental falls down vertical entry tunnels.
Materials Needed
- Deepslate Bricks
- Stripped Dark Oak Logs
- Smooth Basalt
- Redstone Lamps
- Smooth Stone Slabs
Step-by-Step Guide
First, dig a vertical three-by-three entry shaft down twenty blocks into solid stone. Excavate a five-by-five central hub room that stands four blocks tall at the bottom. Next, line the central hub floor with smooth basalt blocks for a industrial finish. Consequently, you establish a secure, subterranean core for your underground bunker.
Second, dig out five-block-wide, ten-block-long tunnels in all four cardinal directions. Reinforce the tunnel walls using deepslate bricks and stripped dark oak log support arches. Next, pave the tunnel floors using smooth stone slabs to prevent mob spawns. Consequently, your underground bunker acquires four spacious, heavy-duty utility wings.
Third, assign functional tasks to each of the four extended underground wings. Convert the north wing into a crop farm, and the west wing into storage. Additionally, install a super-smelter array in the east wing and bedrooms in the south. Finally, place redstone lamps along ceiling arches for clean, switchable interior lighting.
6. The H-Shaped Dual-Wing Manor
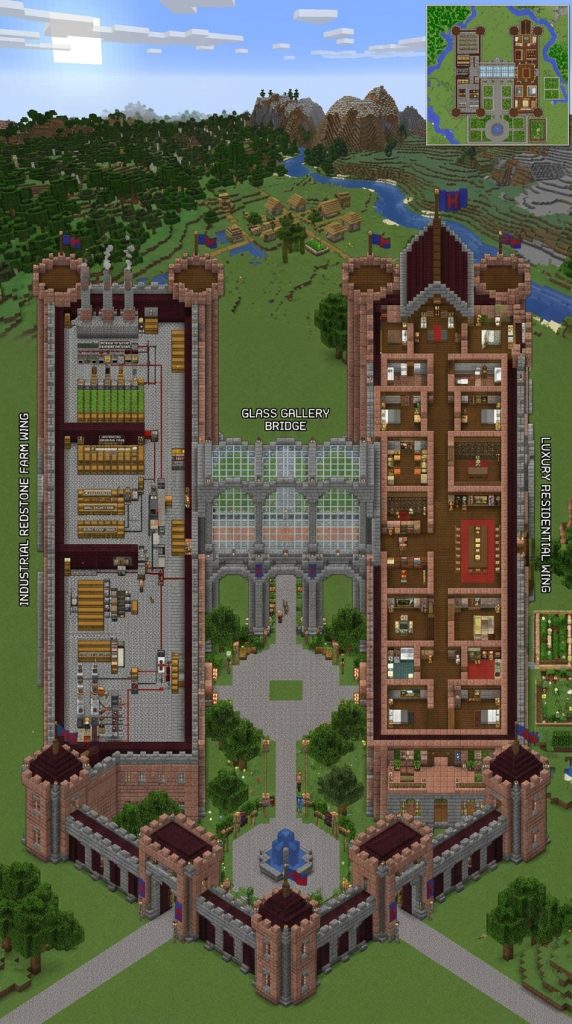
The H-shaped layout is a grand architectural design featuring two parallel multi-story wings connected by a central bridge gallery. It provides massive floor space, making it perfect for endgame survival players with extensive storage needs. Furthermore, the recessed front and back areas create elegant entrance courtyards.
The dual-wing structure allows players to separate living areas from industrial automation entirely. One wing can focus on auto-farms and redstone machinery, while the other holds living quarters and trophies. Furthermore, the central connecting bridge offers sweeping views over both entry courtyards.
       [ Left Wing: Industrial ]         [ Right Wing: Residential ]
       +-----------------------+         +-----------------------+
       | [Auto-Sorter Array]   |         | [Master Bedroom]      |
       |                       +---------+                       |
       | [Iron & Wool Farms]   | Bridge  | [Armor & Trophy Room] |
       |                       +---------+                       |
       | [Potion Brewing]      | Gallery | [Library & Enchanting]|
       +-----------------------+         +-----------------------+
Noise and Lag Isolation
Placing lag-heavy redstone farms in a separate wing keeps performance smooth in residential areas. The central bridge acts as a spatial buffer zone against farm noise.
Materials Needed
- Brick Blocks
- Granite
- Spruce Wood Stairs
- Glass Panes
- Dark Oak Fences
Step-by-Step Guide
First, mark out two parallel eight-by-sixteen block rectangles, spaced six blocks apart. Connect the middle sections of both rectangles using a four-by-six block bridge platform. Next, lay a solid foundation using a mix of granite and polished granite blocks. Consequently, you lay the grand structural footprint for an H-shaped manor.
Second, build three-story-tall outer walls using red bricks and dark oak support posts. Install tall, arched windows made of glass panes along both wing walls. Next, enclose the central bridge gallery with floor-to-ceiling glass for high interior visibility. Consequently, your manor displays impressive architectural depth and symmetry from outside.
Third, construct steep, A-frame roofs over both wings using dark spruce wood stairs. Outfit the left wing with redstone storage, auto-brewers, and smelting systems. Additionally, furnish the right wing with a master bedroom suite, library, and trophy displays. Finally, pave the front entrance courtyard with stone brick paths and flower beds.
7. The Octagonal Tower Base

The octagonal floor plan offers a unique, geometric alternative to standard square bases. It features an eight-sided outer wall structure that maximizes internal floor area while reducing corner block costs. Furthermore, this layout scales vertically into impressive multi-story wizard towers or lighthouse bases.
Octagonal layouts provide superior 360-degree visibility over surrounding terrain, making mob defense simple. Each floor of the tower can be dedicated to a single survival function, connected by a central spiral staircase. Furthermore, adding balconies along external diagonal walls provides excellent archer firing platforms.
                 +-----------+
                /             \
               /  [Storage]    \
              +                 +
              |   [Spiral]      |
              |   [Stairs]      |
              +                 +
               \  [Crafting]   /
                \             /
                 +-----------+
Diagonal Wall Construction
Building clean diagonal walls requires alternating single-block steps in a 1-1-1 pattern. Using corner stairs on diagonal edges smooths out harsh pixelated angles.
Materials Needed
- Deepslate Tiles
- Mangrove Planks
- Mangrove Logs
- Tinted Glass
- Soul Lanterns
Step-by-Step Guide
First, lay out an eight-sided footprint using five-block straight walls connected by three-block diagonals. Verify that the overall diameter measures thirteen blocks from flat side to flat side. Next, pave the interior ground floor using polished deepslate tiles for a dark, sturdy base. Consequently, you establish a perfectly balanced octagonal structural footprint.
Second, erect five-block-tall vertical pillars at all eight corners using mangrove logs. Fill the wall sections using rich red mangrove planks and dark tinted glass panes. Next, construct a central spiral staircase using deepslate tile stairs wrapped around a pillar. Consequently, your octagonal base gains vertical structural integrity and easy floor access.
Third, extend the octagonal structure upward for three complete story levels. Dedicate the ground floor to storage, second floor to enchanting, and top floor to sleeping. Additionally, build an overhanging roof balcony on the top floor using mangrove slabs. Finally, hang soul lanterns along outer diagonal corners for dramatic night lighting.
8. The Open-Concept Modern Villa

The open-concept modern floor plan eliminates traditional interior partition walls almost entirely. It features a sweeping, split-level layout with continuous sightlines between living, dining, and sleeping zones. Furthermore, massive floor-to-ceiling glass facades blend interior spaces seamlessly with outdoor landscapes.
Open-concept designs create a sense of vast space inside compact modern builds. Removing interior walls improves interior lighting distribution, eliminating dark corners where mobs could spawn. Furthermore, using furniture pieces like bookshelves and kitchen counters defines rooms without blocking views.
       +---------------------------------------------------------+
       | [Master Bed Platform]  |  [Open Glass Facade]           |
       |                        |                                |
       |-----+                  +--------------------------------|
       |     | [Step Down]                                       |
       |     v                                                   |
       | [Sunken Living Room]   |  [Kitchen & Brewing Island]    |
       |                        |                                |
       +---------------------------------------------------------+
Visual Zonation Techniques
Using different floor height levels and material textures defines functional zones without solid walls. Sunken living rooms create cozy seating areas while keeping overall views completely open.
Materials Needed
- White Concrete
- Gray Concrete
- Polished Diorite
- Black Stained Glass
- Birch Stairs
Step-by-Step Guide
First, lay down a large twelve-by-eighteen block foundation using smooth white concrete blocks. Recess a six-by-eight block area by one block depth to create a sunken living room space. Next, pave the sunken floor using dark gray concrete, and upper floors with polished diorite. Consequently, you define distinct living zones using floor height variations.
Second, construct a sleek, flat-roofed exterior frame using crisp white concrete pillars. Install massive floor-to-ceiling glass walls along the front using black stained glass panes. Next, build a wide birch stair feature leading up from the sunken living area. Consequently, your modern villa gains panoramic exterior views and bright interior sunlight.
Third, furnish the open interior layout using minimalist, functional survival furniture designs. Place a brewing island and furnace array in the kitchen zone using diorite counters. Additionally, place a bed elevated on a white concrete platform in the back corner. Finally, place hidden light sources under carpet blocks to preserve clean, un-cluttered surfaces.
9. The T-Shaped Riverside Pier Base

The T-shaped floor plan is designed specifically for coastal or riverside survival bases. It features a long access pier extending over water, ending in a wide perpendicular living module. Furthermore, the space beneath the elevated pier deck provides built-in boat docking and underwater farming.
Building over water offers natural protection against land-based hostile mobs like creepers and zombies. The long stem of the T-shape acts as a narrow choke point that is easily defended with a single gate. Furthermore, the wide crossbar module offers panoramic water views and easy fishing access.
                             [ River / Ocean ]
       +---------------------------------------------------------+
       | [Bed & Respawn]    |  [Chest Storage]  | [Brewing Stand]|
       |                    |                   |                |
       +--------------------+-------+   +-------+----------------+
                                    |   |
                                    | P |
                                    | i |  [Boat Dock Below]
                                    | e |
                                    | r |
                                    |   |
                                    +---+
                                  [ Shore ]
Aquatic Structural Pillars
Driving support pillars into riverbeds grounds elevated water builds realistically. Using dark oak or spruce logs simulates water-treated timber that withstands aquatic decay.
Materials Needed
- Stripped Spruce Logs
- Spruce Wood Planks
- Dark Oak Fences
- Prismarine Stairs
- Lanterns
Step-by-Step Guide
First, drive three-block-wide spruce log support pillars deep into a riverbed, extending two blocks above water. Construct a ten-block-long pier walkway heading out from the shoreline over the water. Next, build a wide, six-by-sixteen block perpendicular wooden platform at the end of pier. Consequently, you create a stable T-shaped pier foundation above water level.
Second, pave the main platform deck using horizontal stripped spruce logs and spruce planks. Enclose the crossbar module using spruce wood walls and large glass window openings. Next, install a trapdoor entrance on the deck floor leading down to lower boat docks. Consequently, your riverside base gains direct water access for boat exploration and fishing.
Third, construct a sloped prismarine stair roof over the crossbar living module for color contrast. Outfit the central interior with double chests, furnaces, and a bed. Additionally, line the long entry pier with dark oak fences and hanging iron lanterns. Finally, attach boat leashes to dock posts beneath the main deck for aquatic transport.
10. The Fortified Hexagonal Compound

The fortified hexagonal floor plan provides maximum defensive perimeter security for dangerous survival worlds. It features a six-sided outer wall layout with reinforced corner watchtowers and a central keep. Furthermore, the angled outer walls deflect mob tracking pathing while offering overlapping archery fields of fire.
Hexagonal compounds combine military defense efficiency with impressive fantasy castle aesthetics. The six corner watchtowers eliminate blind spots around the entire base perimeter. Furthermore, the central keep acts as a final, blast-resistant fallback position during nighttime raids or phantom attacks.
                             /-- [Tower 1] --\
                            /                 \
                 [Tower 6] +   +-----------+   + [Tower 2]
                 |         |   | Central   |   |         |
                 |         |   | Keep Base |   |         |
                 [Tower 5] +   +-----------+   + [Tower 3]
                            \                 /
                             \-- [Tower 4] --/
                                 [ Entrance ]
Overlapping Fields of Fire
Positioning corner towers allows archers to shoot mobs attacking adjacent wall sections. Overlapping shooting angles ensures no mob can hide against outer walls safely.
Materials Needed
- Stone Bricks
- Cobblestone Walls
- Spruce Trapdoors
- Iron Bars
- Campfires
Step-by-Step Guide
First, lay out a six-sided outer wall perimeter using six-block straight wall segments. Place three-by-three block square watchtower foundations at all six corner intersections. Next, construct a two-story central keep in the exact middle of the compound footprint. Consequently, you establish a heavily fortified, three-tier defensive layout for your survival base.
Second, raise the six corner watchtowers eight blocks high using sturdy stone bricks. Connect all watchtowers with a four-block-tall outer wall featuring top walkway ramparts. Next, install iron bars and spruce trapdoor arrow slits along watchtower parapets. Consequently, your compound provides complete 360-degree defensive cover against nighttime mob attacks.
Third, furnish the central keep with essential endgame survival utility equipment. Install an enchanting room, bed, armory, and nether portal inside the central keep core. Additionally, place extinguished campfires on watchtower roofs to simulate rustic smoke stacks. Finally, install a heavy iron door and drawbridge gate at the front entrance wall segment.