14 Vibrant And Cozy Rainbow Wooden Bridges in Minecraft
Building beautiful bridges is essential for connecting your Minecraft builds. Rainbow wooden bridges offer a vibrant, cozy, and cheerful aesthetic. They bring life and rich color to any river or lake. However, picking the right wood combinations can feel tricky at times. You need balanced shades that transition smoothly without looking harsh. In this comprehensive guide, you will discover stunning rainbow bridge designs. These ideas work for survival bases, fantasy forests, and modern villages.

Understanding color balance will completely transform your building style in Minecraft. Wooden blocks offer an incredible range of textures and rich tones. You can use mangles, cherries, and warped woods for smooth gradients. Furthermore, blending colored woods with subtle neutral blocks creates balance. Transitioning between warm reds and cool blues adds deep structural interest. You can craft small stream crossings or massive sky-high bridges. Therefore, experimenting with vibrant rainbow palettes expands your creative building skills.
Minecraft features a massive selection of unique colored wooden planks today. Crimson and mangrove wood offer deep, rich shades of red. Acacia wood brings a bright, energetic orange tone to builds. Furthermore, bamboo and birch wood provide cheerful yellow and cream accents. Jungle wood adds a subtle, warm brownish-pink transitional shade. Warped wood introduces striking cyan and vibrant turquoise tones to bridges. Combining these natural options creates endless possibilities for colorful pathways.
Many players struggle with using rainbow colors without making builds look messy. Too many random colors can easily overwhelm a simple bridge design. Consequently, creating smooth color transitions along the pathway is crucial. Pairing bright woods with dark logs or stone supports adds stability. Dark oak and deepslate frame bright rainbow planks exceptionally well. Meanwhile, hanging lanterns and leaves bring the bridge to life naturally. Using the right structural frames makes your rainbow bridges shine effortlessly.
Before you start building, plan your bridge arc and length carefully. First, construct a sturdy frame for the main structural arch. Next, lay out your colored planks in a smooth gradient order. After that, choose matching fences, gates, and hanging light fixtures. Furthermore, consider adding greenery like flowering azalea leaves or vines. Soft lighting along the pathway enhances the cozy, charming aesthetic. As a result, your finished rainbow bridge looks polished and well-planned.
Building rainbow wooden bridges allows for endless creative self-expression in Minecraft. Whether you prefer cozy cottages or fantasy worlds, rainbow bridges fit. You can connect mountain bases or construct romantic blossom valley crossings. Moreover, colorful Minecraft builds perform amazingly well on Pinterest and social media. Sharing your vibrant designs will surely inspire other gaming creators online. Therefore, learning these detailed bridge palettes is great for your journey.
In this guide, we will explore fourteen distinct rainbow bridge ideas. Each idea includes a full word introduction, materials list, and guide. You will learn how to mix wooden textures and gradients effectively. Additionally, these designs suit both creative mode and survival mode players. So, grab your axes, collect your planks, and start building. Let us dive directly into these vibrant, cozy Minecraft bridge designs.
1. Sunset Horizon Curved Arch Bridge

The sunset horizon arch bridge features warm, rich wooden gradient transitions. It uses mangrove, acacia, and bamboo planks for a brilliant glow. Furthermore, this design creates a cozy atmosphere over wide forest rivers. It mimics the natural colors seen during a vivid Minecraft sunset.
To build this bridge, create a gentle, sweeping structural arch. The smooth curve allows boats to pass easily underneath the pathway. Furthermore, framing the colorful deck with dark oak logs adds contrast. Adding hanging lanterns along the sides creates a warm, golden glow.
Cozy Sunset Lighting
Lighting plays a huge role in making wooden bridges feel cozy. Hanging iron lanterns underneath dark oak fences creates soft, warm shadows. Furthermore, placing subtle glowberry vines beneath the arch adds natural brightness. Daylight reflection on the water below enhances the vibrant orange hues.
Materials Needed
- Mangrove Planks
- Acacia Planks
- Bamboo Planks
- Dark Oak Logs
- Iron Lanterns
Step-by-Step Guide
First, construct two sturdy support pillars using dark oak logs. Place the pillars firmly on opposite banks of the river channel. Next, build a curved wooden arch connecting both supportive base pillars. Consequently, this establishes a strong structural foundation for your gradient deck.
Second, lay down your colored wooden planks in a smooth order. Start with deep mangrove planks near the dark oak outer edges. Transition into bright acacia wood, then fill the center with bamboo. Consequently, your bridge pathway displays a beautiful, warm sunset gradient deck.
Third, add safety railings using dark oak fences along both sides. Hang glowing iron lanterns at equal intervals along the outer fence posts. Additionally, place oak leaves around the base pillars for natural blending. Finally, smooth out nearby shoreline paths using cozy packed mud blocks.
2. Cosmic Nebula Hanging Rope Bridge

The cosmic nebula rope bridge blends vibrant purple and cyan woods. Using crimson, cherry, and warped planks creates a magical floating appearance. Furthermore, this suspended design works fantastically across deep mountain ravines. It brings a starry, mystical fantasy vibe to rugged high-altitude biomes.
Suspended rope bridges sway visually and feel adventurous in fantasy worlds. Using spruce fences as supporting cables creates a convincing hanging effect. Furthermore, mixing dark crimson with bright warped wood provides intense color balance. Consequently, your mountain crossing will look striking from any viewing angle.
Mystic Nether Textures
Combining nether woods with overworld timber creates unique structural textures. Crimson stems offer a deep, rich purple-red tone for outer edges. Meanwhile, warped planks provide a vivid, glowing cyan for center sections. Consequently, mixing these unique blocks results in an otherworldly, cosmic aesthetic.
Materials Needed
- Crimson Planks
- Cherry Wood Planks
- Warped Planks
- Spruce Fences
- Chains
Step-by-Step Guide
First, secure heavy anchor posts using stripped dark oak logs high up. Place these strong anchor posts on both sides of the ravine. Next, stretch spruce fences between the posts to mimic thick ropes. Consequently, you create the main suspended frame for your cosmic bridge.
Second, attach iron chains downward from the fence cables to deck level. Lay down crimson planks near the ends of the hanging walkway. Next, place soft pink cherry planks, followed by bright cyan warped wood. Consequently, the center deck glows with a cosmic, magical gradient color.
Third, install spruce fence handrails along the entire suspended walkway deck. Hang iron lanterns from the top support cables using sturdy chains. Additionally, place trapdoors along the outer plank edges for extra depth. Finally, add glowing lichen along nearby cliff faces for ambient light.
3. Pastel Blossom Garden Valley Bridge

The pastel blossom garden bridge uses soft, light wooden shades smoothly. Combining cherry, birch, and bleached wood creates a charming aesthetic design. Furthermore, this gentle bridge fits perfectly inside cherry blossom forest biomes. It offers a calm, sweet, and peaceful crossing over quiet streams.
Soft pastel colors make Minecraft builds feel incredibly cozy and inviting. Pairing light birch wood with pink cherry planks softens the structure. Furthermore, using white quartz stairs for edge trims adds refined elegance. As a result, your garden bridge becomes a scenic highlight today.
Delicate Floral Accents
Decorating bridge railings with flowering greenery creates a lovely garden atmosphere. Placing pink petal carpets and azalea leaves along fences adds life. Furthermore, subtle ambient particle effects from surrounding cherry trees enhance visual charm. Consequently, the structure feels deeply integrated into its natural floral environment.
Materials Needed
- Cherry Wood Planks
- Birch Planks
- Smooth Quartz Stairs
- Birch Fences
- Flowering Azalea Leaves
Step-by-Step Guide
First, lay a clean foundation using smooth quartz stairs along shorelines. Build low support posts using stripped birch logs near the water. Next, construct a low, flat wooden deck spanning across the stream. Consequently, you establish a neat, bright base for your pastel crossing.
Second, arrange your colored wooden planks across the flat bridge deck. Place pink cherry wood planks along the outer sides of deck. Next, fill the inner walking path using clean, light birch planks. Consequently, the walkway features a soft, elegant, and pastel color palette.
Third, construct low handrails using light birch fences along the edges. Place flowering azalea leaves on top of structural fence corner posts. Additionally, scatter pink petals randomly across the wooden plank surface deck. Finally, place hidden sea lanterns underwater to illuminate the bridge base.
4. Deep Ocean Prism Gradient Bridge

The ocean prism bridge uses cool blue, green, and turquoise tones. Combining warped, jungle, and bamboo planks reflects shimmering ocean water colors. Furthermore, this long flat bridge is ideal for connecting coastal islands. It blends naturally into aquatic environments while remaining vibrant and stylish.
Cool color palettes bring a fresh, modern aesthetic to coastal bases. Using warped wood provides a bold, tropical cyan base shade throughout. Furthermore, adding dark prismarine blocks for support posts ensures sturdy durability. Consequently, your coastal bridge stands out beautifully against deep ocean waters.
Aquatic Light Integration
Integrating water-themed light sources makes ocean bridges feel magical at night. Placing sea lanterns beneath warped slab walkways creates a gentle glow. Furthermore, sea pickles placed on underwater support pillars add natural light. Consequently, the bridge illuminates surrounding waters while keeping pathways safe.
Materials Needed
- Warped Planks
- Jungle Planks
- Bamboo Planks
- Dark Prismarine
- Sea Lanterns
Step-by-Step Guide
First, drive sturdy dark prismarine pillars deep into the seabed below. Extend these strong underwater pillars two blocks above the water surface. Next, connect all support pillars using heavy warped wood log beams. Consequently, your ocean bridge gains a strong, water-resistant structural base frame.
Second, lay down the wooden deck planks in a horizontal gradient pattern. Start with deep blue warped planks near the shorelines on each side. Transition into warm jungle wood, then place bamboo planks in middle. Consequently, the pathway reflects shimmering aquatic colors across the open sea.
Third, install warped fence railings along both sides of the deck. Place sea lanterns inside dark prismarine frames along the main pathway. Additionally, attach kelp and seagrass near underwater support pillar bases. Finally, add warped trapdoors along outer edges for a clean finish.
5. Tropical Jungle Canopy Covered Bridge

The tropical canopy bridge features a cozy, covered roof over water. Using mangrove, acacia, jungle, and bamboo creates a rich canopy look. Furthermore, this covered design protects players from rain in tropical jungles. It feels like an adventurous, rustic structure hidden deep inside nature.
Covered bridges offer great architectural depth and shelter in rainy biomes. Building a peaked roof using mixed wooden stairs adds great shape. Furthermore, wrapping support beams in leafy vines creates an overgrown feel. Consequently, your jungle bridge looks like a timeless, natural jungle structure.
Overgrown Jungle Decor
Adding thick foliage around wooden roofs creates an authentic canopy feel. Draping jungle leaves and cocoa beans from roof edges adds detail. Furthermore, moss blocks placed around base pillars blend wood into soil. Consequently, the build feels fully connected to surrounding lush jungle terrain.
Materials Needed
- Mangrove Planks
- Acacia Planks
- Jungle Planks
- Bamboo Planks
- Jungle Leaves
Step-by-Step Guide
First, erect tall support posts using unstripped jungle logs in water. Connect these tall vertical posts using horizontal mangrove log crossbeams. Next, lay down a sturdy wooden deck using mixed jungle planks. Consequently, you create a solid, elevated foundation for your covered bridge.
Second, construct a warm rainbow gradient deck along the central walkway. Transition planks from red mangrove to orange acacia, then yellow bamboo. Furthermore, extend structural jungle log posts upward to support a roof frame. Consequently, your bridge gains strong vertical framing for a sheltered top.
Third, build an A-frame roof using a mix of wooden stairs. Cover the roof with dense jungle leaves and hanging leafy vines. Additionally, hang glowing lanterns from interior roof beams for nighttime safety. Finally, place cocoa beans on support posts for extra jungle detail.
6. Enchanted Fairy Tale Mushroom Bridge
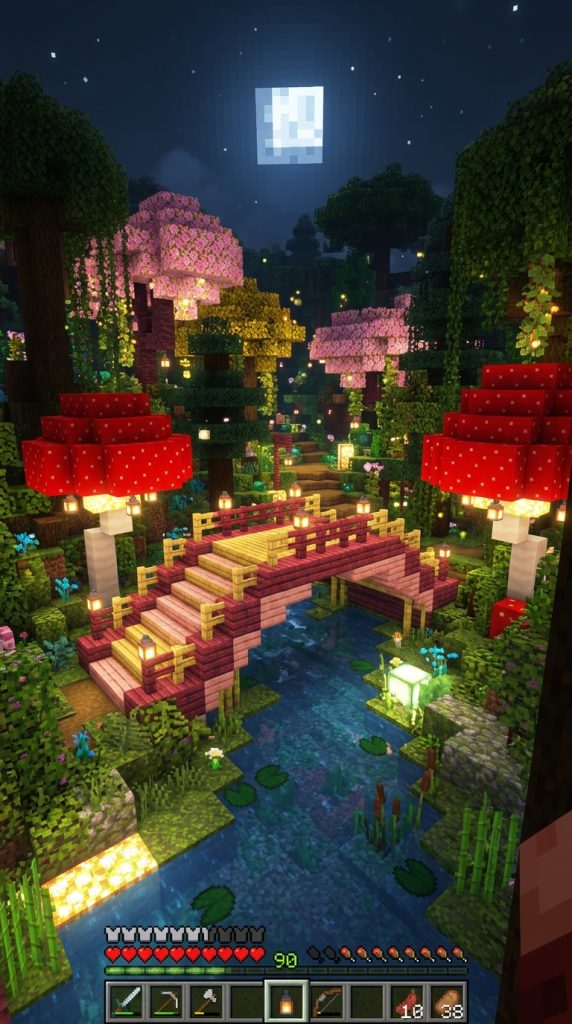
The enchanted fairy tale bridge incorporates playful, bright fantasy colors smoothly. Using crimson, pink cherry, and yellow bamboo planks creates magical charm. Furthermore, building decorative giant wooden mushrooms alongside adds whimsical fantasy flair. This bridge fits wonderfully inside enchanted forests or dark mushroom biomes.
Fantasy bridge designs thrive on exaggerated shapes and vibrant block choices. Curved wooden archways paired with glowing mushroom lights look completely magical. Furthermore, mixing nether crimson with sweet pink cherry wood adds depth. Consequently, your fairy tale bridge becomes an unforgettable, enchanting world feature.
Whimsical Forest Lighting
Illuminating fantasy bridges requires soft, mystical light sources for extra magic. Placing froglights beneath red mushroom caps produces a gentle, warm ambient glow. Furthermore, scattering shroomlights along nearby mossy banks enhances the fairy aesthetic. Consequently, the entire river crossing shines brightly during dark Minecraft nights.
Materials Needed
- Crimson Planks
- Cherry Wood Planks
- Bamboo Planks
- Red Mushroom Block
- Pearlescent Froglight
Step-by-Step Guide
First, construct sweeping, curved support arches using stripped crimson stem logs. Anchor the base of each arch into lush green moss blocks. Next, connect both side arches using thick cherry wood support beams. Consequently, you establish an organic, curved frame for your whimsical bridge.
Second, fill the walkway deck using a bright, energetic rainbow gradient. Place deep crimson planks at ends, blending into soft cherry planks. Fill the peak of the arch using bright yellow bamboo planks. Consequently, your fantasy bridge deck radiates a lively, cheerful color spectrum.
Third, build giant decorative wooden mushrooms along both sides of bridge. Place red mushroom cap blocks on top of white mushroom stems. Additionally, hide glowing froglights inside mushroom caps for soft ambient lighting. Finally, scatter pink petals along pathway edges for a magical finish.
7. Rustic Autumn Harvest Log Bridge

The autumn harvest bridge highlights warm, rustic earthy wood tones beautifully. Combining dark oak, mangrove, acacia, and birch creates a cozy gradient. Furthermore, this sturdy design fits seamlessly into pumpkin patches and forests. It brings a comfortable, traditional fall feel to your survival base.
Rustic bridges focus on heavy wooden textures and grounded structural strength. Using thick stripped logs for outer framing creates a strong look. Furthermore, decorating the bridge deck with hay bales adds harvest charm. As a result, your autumn bridge feels incredibly cozy, warm, and inviting.
Cozy Harvest Decorations
Decorating pathways with seasonal props brings rustic bridges to life naturally. Placing carved pumpkins and hay bales near bridge entrances adds detail. Furthermore, placing campfires beneath chimneys nearby adds soft, rising smoke effects. Consequently, the entire structure conveys a warm, comfortable, and festive mood.
Materials Needed
- Dark Oak Logs
- Mangrove Planks
- Acacia Planks
- Birch Planks
- Hay Bales
Step-by-Step Guide
First, lay down heavy dark oak log support beams across water. Space the logs evenly to create a wide, sturdy structural base. Next, place stripped dark oak logs along outer edges for framing. Consequently, your rustic bridge receives a strong, grounded framework for building.
Second, fill inner pathway using a rich autumn wooden plank gradient. Start with dark mangrove, transition into acacia, then finish with birch. Consequently, the wooden walkway deck reflects rich, warm fall foliage colors. Furthermore, ensure all plank transitions blend smoothly across the wide pathway.
Third, construct low fence railings using sturdy dark oak fences today. Place carved pumpkins and hay bales around both bridge entrance points. Additionally, hang cozy iron lanterns from fence posts to light pathways. Finally, mix coarse dirt into surrounding grass banks for rustic realism.
8. Sleek Modern Rainbow Ribbon Bridge

The modern ribbon bridge features ultra-clean lines and bright wooden contrast. Combining crisp white concrete frames with vibrant wooden planks looks modern. Furthermore, this flat, geometric design suits modern cities and luxury bases. It transforms a simple stream crossing into a sleek architectural statement.
Modern architectural styles rely on smooth surfaces and sharp geometric angles. Framing colorful wooden planks with smooth white concrete creates striking contrast. Furthermore, using glass pane railings preserves clean lines while ensuring safety. Consequently, your modern bridge looks stylish, professional, and exceptionally well-designed.
Minimalist Glass Railings
Glass railings provide safety without blocking views of colorful wooden decks. Using clear or light gray glass panes creates a sleek border. Furthermore, embedding sea lanterns directly into concrete frames offers clean lighting. Consequently, the modern ribbon bridge maintains its sleek, uncluttered visual appeal.
Materials Needed
- White Concrete
- Crimson Planks
- Acacia Planks
- Bamboo Planks
- Warped Planks
Step-by-Step Guide
First, build a long, flat geometric frame using bright white concrete. Ensure the outer edges are completely straight for a modern look. Next, leave a wide inner channel open for placing wooden planks. Consequently, you create a sharp, clean border frame for your bridge.
Second, lay down vibrant wooden planks in tight, alternating diagonal stripes. Use crimson, acacia, bamboo, and warped planks for full rainbow variety. Consequently, the colorful wooden deck pops dramatically against crisp white concrete. Furthermore, keep all plank surfaces flush with outer concrete edges.
Third, install clear glass pane railings along top edges of concrete. Embed sea lanterns smoothly into concrete floor corners for hidden lighting. Additionally, place polished quartz stairs at both bridge entrances for smoothness. Finally, pave surrounding approach walkways using smooth gray light concrete.
9. Royal Imperial Palette Arch Bridge
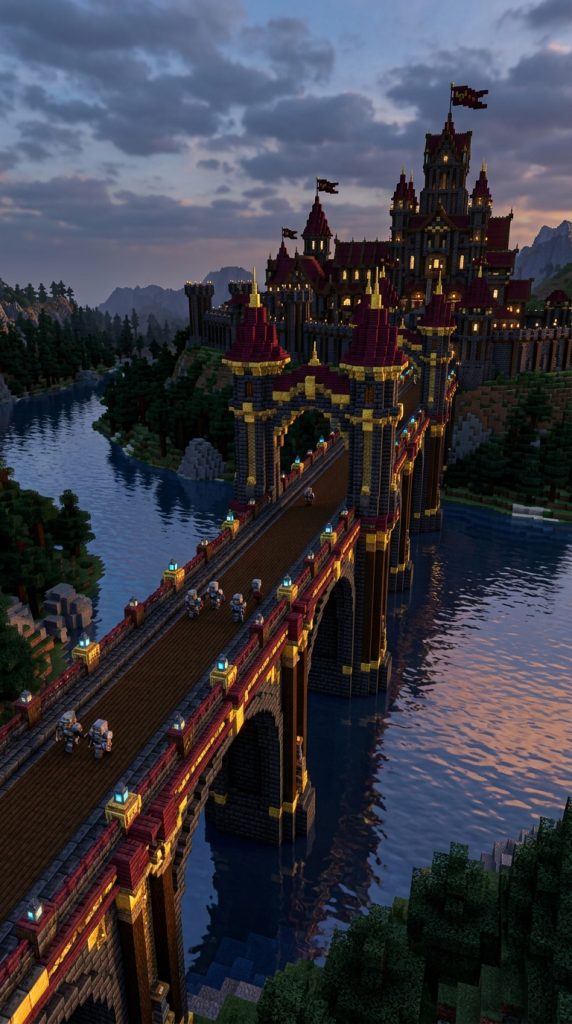
The royal imperial bridge combines rich wooden colors with opulent accents. Combining dark crimson, acacia, gold, and dark oak creates elegance. Furthermore, this grand arch bridge fits majestic castles and palace grounds. It conveys power, wealth, and sophisticated craftsmanship over grand rivers.
Imperial architecture uses bold arches, grand pillars, and decorative gold trim. Using dark oak logs for pillars creates an imposing structural foundation. Furthermore, adding gold blocks or polished cut copper adds luxurious detail. Consequently, your imperial arch bridge becomes a magnificent landmark on servers.
Grand Architectural Detailing
Adding ornate details makes imperial bridges look regal and visually impressive. Placing polished deepslate stairs along arch undersides adds heavy contrast. Furthermore, hanging gold-framed lanterns along grand handrails elevates the overall aesthetic. Consequently, the build radiates a commanding, high-end presence across wide waterways.
Materials Needed
- Crimson Planks
- Acacia Planks
- Dark Oak Logs
- Block of Gold
- Deepslate Bricks
Step-by-Step Guide
First, build massive stone support pillars using heavy dark deepslate bricks. Connect these pillars with a tall, sweeping arch of dark oak logs. Next, reinforce the arch underside using polished deepslate brick stairs today. Consequently, your imperial bridge receives an exceptionally strong, majestic foundation frame.
Second, line the main walkway using rich crimson and warm acacia planks. Place block of gold accents along inner edges of wooden deck. Consequently, the walking path features a regal, vibrant, and luxurious color scheme. Furthermore, ensure the arch gradient transitions smoothly at highest point.
Third, construct tall, detailed handrails using dark oak fences and gates. Top structural corner posts with polished gold blocks for brilliant shimmer. Additionally, hang ornate soul lanterns from lower arch supports over water. Finally, place grand banners along entrance pillars for a noble finish.
10. Floating Sky-Haven Suspension Bridge

The sky-haven bridge is built high above clouds between floating islands. Using light cherry, birch, and bamboo planks keeps structures feeling weightless. Furthermore, using white wool cables creates a cloud-like hanging aesthetic appearance. This design is perfect for floating island bases or skyblock worlds.
Skyblock bridges must feel airy, safe, and visually lightweight in nature. Pairing soft pink cherry wood with light birch planks creates warmth. Furthermore, using white fences and iron chains ensures strong structural realism. Consequently, your sky-haven bridge looks light, safe, and amazingly scenic.
Cloud-Level Ambient Glow
Lighting sky bridges properly prevents phantom spawns while enhancing high-altitude views. Embedding end rods along white cable supports creates a starry glow. Furthermore, placing sea lanterns underneath translucent white glass floor tiles adds safety. Consequently, the floating bridge shines brightly against dark night sky backdrops.
Materials Needed
- Cherry Wood Planks
- Birch Planks
- Bamboo Planks
- White Wool
- End Rods
Step-by-Step Guide
First, construct sturdy anchor towers on opposite floating cloud island edges. Build anchor towers using stripped birch logs and white quartz blocks. Next, extend white wool lines high between towers to simulate suspension ropes. Consequently, you create the main hanging support system for sky bridge.
Second, suspend the main wooden deck using strong, vertical iron chains. Lay down light bamboo, birch, and cherry wood planks along walkway. Consequently, the suspended deck forms a bright, peaceful, and weightless rainbow gradient. Furthermore, keep the center deck slightly lower for natural sag.
Third, install white stained glass pane safety walls along outer deck edges. Attach glowing end rods to top wool support cables for sparkle. Additionally, place subtle white carpet over light sources along central pathway. Finally, build cloud-like quartz platforms at both island landing points.
11. Cozy Village Covered Plank Footbridge

The village footbridge is a small, charming, and practical wooden bridge. Using spruce, mangrove, acacia, and birch planks creates a sweet gradient. Furthermore, adding a low wooden shingle roof provides protection from rain. This design fits perfectly into rustic survival villages and small farms.
Small footbridges enhance village navigation while adding immense visual charm naturally. Using spruce logs for low posts keeps the build cozy and humble. Furthermore, adding spruce trapdoors along roof edges provides extra architectural detail. Consequently, your village footbridge feels authentic, functional, and deeply charming.
Warm Village Atmosphere
Creating a welcoming village bridge involves adding simple, cozy functional details. Hanging glowing iron lanterns from wooden roof rafters provides warm light. Furthermore, placing barrel storage and flower pots near entrances adds life. Consequently, the footbridge blends seamlessly into daily survival village activities.
Materials Needed
- Spruce Logs
- Mangrove Planks
- Acacia Planks
- Birch Planks
- Spruce Trapdoors
Step-by-Step Guide
First, drive sturdy spruce log posts into shallow stream bed soil. Connect support posts using horizontal spruce log beams across small water gap. Next, lay down a narrow wooden deck using mixed spruce planks. Consequently, you establish a quick, reliable structural frame for footbridge.
Second, arrange your colored planks in a simple three-block wide gradient. Place dark mangrove along one side, acacia in middle, birch opposite. Consequently, the short footbridge deck displays a subtle, colorful wooden gradient. Furthermore, keep the pathway low to match surrounding village gravel roads.
Third, construct a low wooden roof using spruce stairs and trapdoors. Support the roof using simple spruce fence posts on all four corners. Additionally, hang a cozy iron lantern directly from central roof rafter. Finally, plant bright yellow dandelions along grassy stream banks nearby.
12. Wildflower Meadow Rainbow Pier Bridge

The wildflower meadow bridge extends over wide, calm marshland waters smoothly. Combining cherry, acacia, bamboo, and warped planks offers full rainbow vibrancy. Furthermore, incorporating built-in wooden flower boxes along railings adds colorful greenery. This design fits amazingly well inside flower forest and meadow biomes.
Meadow bridges should feel vibrant, cheerful, and filled with natural life. Building wide wooden deck platforms allows space for integrated floral planters. Furthermore, using polished oak fences creates clean, safe handrails for players. Consequently, your meadow pier bridge feels integrated into surrounding flower fields.
Integrated Floral Planters
Building planter boxes directly into bridge handrails brings colorful plant life. Placing oak trapdoors around dirt blocks creates simple, attractive flower pots. Furthermore, planting allium, tulips, and cornflowers provides natural matching rainbow colors. Consequently, the bridge railings burst with fresh, vibrant botanical life.
Materials Needed
- Cherry Wood Planks
- Acacia Planks
- Bamboo Planks
- Warped Planks
- Oak Trapdoors
Step-by-Step Guide
First, set sturdy support pillars using stripped oak logs across marsh. Space pillars closely to support a wide, flat wooden pier deck. Next, connect all pillars using long, horizontal oak log crossbeams. Consequently, your meadow bridge gets a solid, level foundation over wetlands.
Second, lay down wooden planks in long, vibrant color bands across deck. Transition smoothly from pink cherry wood to orange acacia, bamboo, and warped planks. Consequently, walking across the wide pier feels like strolling over a rainbow. Furthermore, keep all planks flat for easy, smooth running access.
Third, construct oak fence handrails along both sides of wide pier. Build wooden planter boxes using oak trapdoors filled with rich soil blocks. Additionally, plant bright rainbow wildflowers inside planters along the entire pathway. Finally, hang cozy lanterns from corner fence posts for nighttime illumination.
13. High-Mountain Bamboo Zig-Zag Bridge

The mountain zig-zag bridge features sharp, dramatic turns over rocky chasms. Using bamboo, jungle, acacia, and mangrove planks provides high visual energy. Furthermore, the geometric zig-zag shape adds thrilling complexity to mountain paths. This build is ideal for steep cliffs, alpine villages, and waterfalls.
Zig-zag bridges break up straight paths, making mountain navigation visually dynamic. Building angled turns requires strong corner support posts made of granite. Furthermore, using bamboo planks for main walkways adds a light, flexible aesthetic. Consequently, your alpine mountain bridge feels exciting, rugged, and well-integrated.
Alpine Safety Features
Navigating mountain bridges requires heavy safety framing to feel grounded visually. Building tall stone brick pillars beneath sharp turns adds realistic support. Furthermore, placing spruce fence railings with iron chain nets prevents falling. Consequently, the dramatic zig-zag bridge looks sturdy despite harsh cliff environments.
Materials Needed
- Bamboo Planks
- Jungle Planks
- Acacia Planks
- Mangrove Planks
- Stone Bricks
Step-by-Step Guide
First, construct tall support towers using sturdy stone bricks up cliff faces. Build stone towers at every point where the bridge turns sharply. Next, connect support towers using heavy spruce log beams across chasms. Consequently, you create a safe, anchored framework for sharp zig-zagging paths.
Second, lay down bamboo planks on first straight section of deck. Switch to jungle planks after first turn, then acacia, then mangrove. Consequently, every distinct segment of zig-zag bridge features its own color. Furthermore, the sharp turns highlight transitions between different wooden tones.
Third, install heavy spruce fence railings along all outer cliffside edges. Attach iron chains along lower fence rails for extra visual security. Additionally, place campfires on stone towers, extinguished for smoky wood detail. Finally, light up all turns using bright hanging wall lanterns.
14. Nether Warp Fantasy Light-Bridge

The nether warp light-bridge blends exotic nether woods with glowing blocks. Combining warped planks, crimson planks, and pearlescent froglights creates magic. Furthermore, this glowing structure spans dangerous lava oceans or deep nether valleys. It provides a colorful, safe, and heat-resistant path through dark biomes.
Nether bridges must feel durable, fireproof, and visually striking in dark worlds. Using dark basalt blocks for arch frames offers heavy, dark contrast. Furthermore, embedding glowing froglights directly into warped wood decks provides maximum light. Consequently, your nether bridge becomes an indispensable, gorgeous survival highway.
Nether Heat Resistance
Using non-flammable blocks like basalt and nether wood ensures safety from fire. Polished basalt pillars resist ghast fireballs while offering sleek texture. Furthermore, warped and crimson planks will never catch fire from nearby lava. Consequently, your fantasy light-bridge remains permanently safe in hostile nether biomes.
Materials Needed
- Warped Planks
- Crimson Planks
- Polished Basalt
- Pearlescent Froglight
- Twisted Vines
Step-by-Step Guide
First, erect massive support pillars using fireproof polished basalt blocks in lava. Span a thick, heavy arch of basalt between both shorelines. Next, trim arch undersides using dark polished blackstone brick stairs. Consequently, your nether bridge receives a completely fireproof, ghast-resistant structural frame.
Second, construct the walking deck using alternating warped and crimson wooden planks. Place glowing pearlescent froglights along center line of wooden deck. Consequently, the pathway radiates an intense, magical cyan and red glow. Furthermore, light levels remain maxed out, preventing hostile mob spawns completely.
Third, build protective side walls using polished basalt fences and wall blocks. Drape glowing twisted vines along lower edges of bridge basalt arch. Additionally, place warped trapdoors along outer edges for clean detail finish. Finally, build safe, enclosed stone entryways at both ends of bridge.